© ROOT-NATION.com - Use of content is permitted with a backlink.
The Google ecosystem of devices is wide and if you’re an avid user, then you should know how to link your Android device to your Chromebook. Yes, ChromeOS which is the operating system for Chromebooks is a product of Google some called it “Android for laptops”. For this reason, Google baked in a ton of connectivity features into both Android and ChromeOS, making them able to connect.
Linking your Android device to your Chromebook is very easy, and doing so will give you access to a ton of features. In this article, we’ll have a look at how to link both devices, and all the features that you get once both devices are linked. This is very important for power users and those who work on their Chromebooks, as it helps make accessing files on either device less of a hassle.
Once your Android device and your Chromebook are connected, you get to enjoy a ton of features that Google offers within its ecosystem. This link will help transform your Chromebook from just a basic device to a portal for all your devices. Now let’s see the steps to take to be able to link your Android device to your Chromebook.
Read also: How to set up and reset your Chromebook
Steps to link your Android device to your Chromebook

Being a part of the Android ecosystem, ChromeOS devices come with a ton of integration features. If you’re an Android user, and you own a Chromebook you can sync both devices together. This will give you access to your phone’s notifications, files, text messages, network, and so much more on your Chromebook.
By linking your Android device to your Chromebook, you’ll also be able to unlock your Chromebook using your smartphone. For you to be able to get this linking done, all you’ll need is an Android device and a Chromebook running on a recent software version. You’ll also need to run both devices on the same Google account for the linking process to be possible.
Read also: How to install ChromeOS Flex
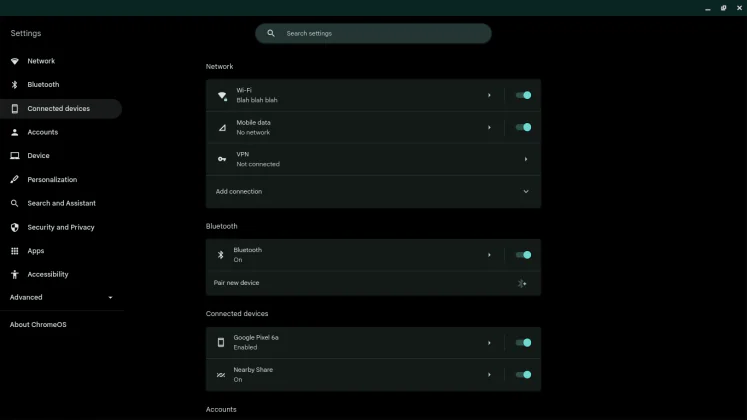
Once you meet these requirements, you can then link both devices, and there are two ways to do this. The first way to start this linking process is via the Chromebook setup, and the second way is via the settings page. The steps below will guide you on how to link your Android device to your Chromebook via the settings page:
- Access your Chromebook settings page via the menu or bottom shelf
- Next, select the “Connected Devices” option on the settings page
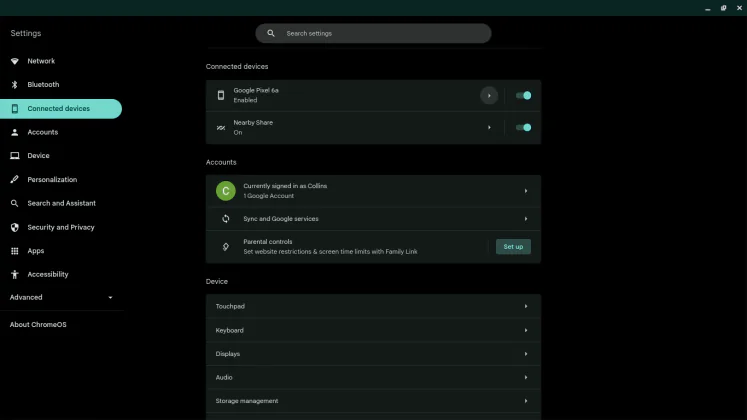
- Now hit the “Set up” button on the Android phone option on the settings page
- Follow the steps that the system lists out on both your Chromebook and Android device
- Once you’re done and both devices are synced, head back to the Connected device settings page
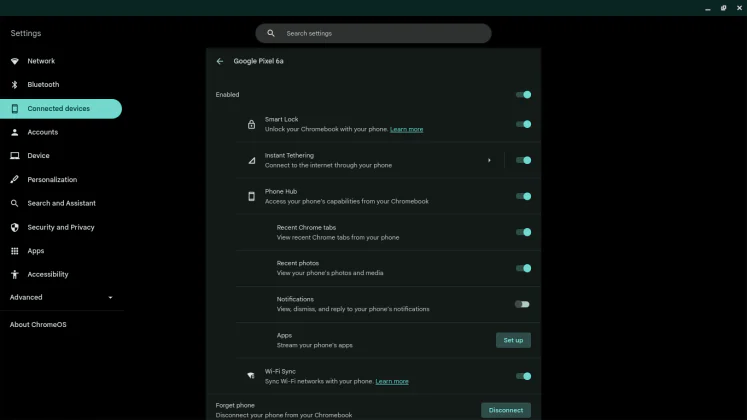
- Here, the first option will now hold the name of your Android device, click the arrow next to it and toggle on all controls you’ll need
If you want to link your Android phone to your new Chromebook during setup, simply use the Connect your Android phone option. Select the “Accept & continue” button from the setup page, follow the steps, and then hit Done. By taking either of the steps mentioned in this article, you’ll have successfully set up your Android device to your Chromebook.
Once the setup process is complete, you can access your Android device on your Chromebook from the phone icon on the bottom app shelf. From here you can view your device’s recently visited web pages, apps, photos, and battery percentage, and you can also locate your device. Now you can make use of your Android device directly from your Chromebook.
Read also:
- POCO Pad Review: First Tablet from the Manufacturer
- GamePro MK130R and GamePro MK180B Keyboards Review


