© ROOT-NATION.com - Use of content is permitted with a backlink.
Today, we’ll explain how resetting network settings in Windows 11 can help resolve issues with the Internet and Wi-Fi connections.
In today’s world, it’s hard to imagine life without the Internet, social media, various apps, and computer games. This is understandable, as the Internet provides quick access to answers for any questions, opportunities to learn new things, read the news, use online encyclopedias, video tutorials, research, and much more.
Thanks to the Internet, people can stay connected with family, friends, and colleagues, no matter the distance. Social media, messaging apps, video calls, and email have become essential parts of daily life.

Music, movies, books, games, streaming services—all of these are accessible thanks to the Internet. It helps us relax, unwind, and diversify our free time. The Internet has also opened up opportunities for remote work, freelancing, and online business. Many professions have now fully or partially transitioned to the online space. So, when we experience issues with Internet access, it can feel as if the world has come to a halt. Some even panic, trying to fix the problem, but not everyone knows how to do so.
There are various ways to resolve Internet and Wi-Fi router connection issues. Today, we’ll focus on a software solution—resetting network settings in Windows 11. This can sometimes help fix the problem, so it’s worth giving it a try. Let’s go through the steps one by one.
Read also: Power saving modes in Windows 11: Which one to choose?
When to reset the network settings
Resetting network settings can be a helpful solution in many situations. If you’re experiencing issues with Internet connectivity or unstable network performance, restoring the network configuration to its default settings may resolve these problems. This method is especially useful for fixing frequent Wi-Fi connection drops.

Additionally, if your system was configured with VPNs or proxy servers that are causing network issues, resetting them can help resolve the problem. If you’re switching to a new network and want to start fresh, restoring the network settings to their factory defaults can be a good option.
However, it’s important to understand that resetting the network should be considered a last resort. It’s something to try if standard troubleshooting methods haven’t resolved the issue of no Internet connection on your PC. Resetting the network will remove all installed network adapters and their settings. After restarting the computer, all adapters will be reinstalled, and the settings will revert to their default values.
Read also: How to Increase Microphone Volume in Windows 11
What happens after a network reset
First and foremost, it’s important to note that when resetting network settings in Windows 11, the system removes and reinstalls all network adapters—Wi-Fi, Ethernet, and VPN. This means that all saved Wi-Fi networks will be deleted, along with your custom DNS settings, proxy server configurations, and IP address settings.

If you have many Wi-Fi networks saved on your computer and don’t want to reconfigure access to them after the reset, it’s a good idea to export these networks to a file in advance.
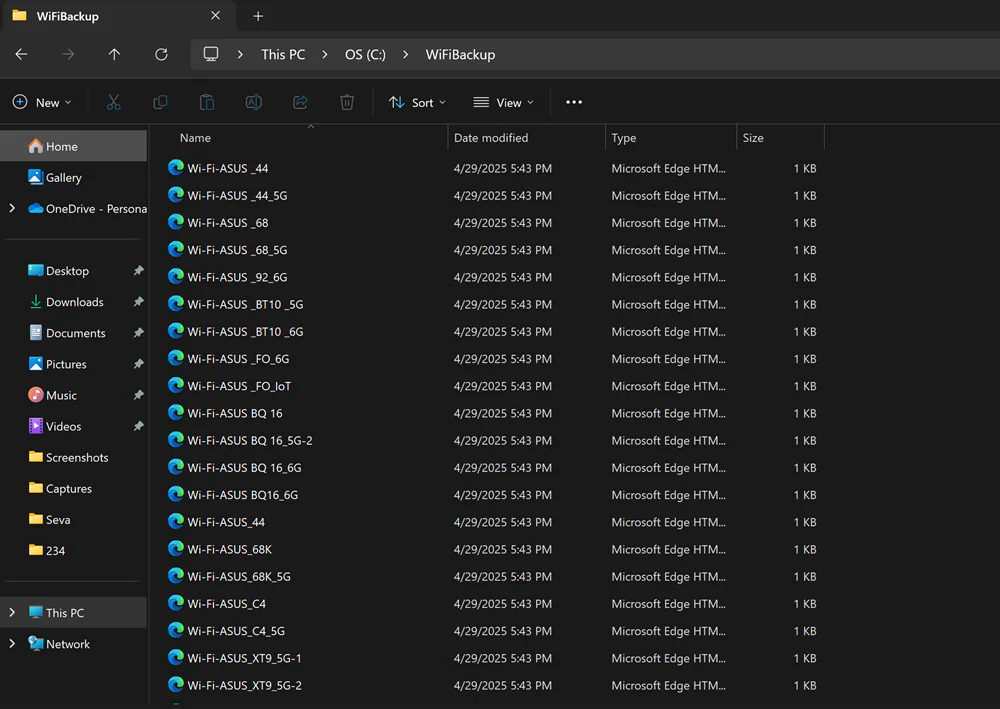
If you’ve saved numerous Wi-Fi networks on your PC, you can export them, including their passwords, to separate files. This will allow you to quickly reconnect to these networks after resetting your network settings. To do this, create a folder where you will store the Wi-Fi networks. For example, open the root folder of drive C and create a folder named “WiFiBackup.” This folder will contain all your saved Wi-Fi passwords, which you’ll need to restore the necessary network connections.
Read also: Everything You Need to Know About NVIDIA DLSS 4.0 and Reflex 2: What They Offer and Why They Matter
How to reset your network settings
Now, let’s move on to the instructions for resetting all network settings. There are two methods to do this. The first one is simpler, as it can be done through the Windows 11 Settings option. The second method involves using the Command Prompt, which will appeal to more experienced users. It’s worth noting that both methods are equally effective, so the choice is yours.
Reset network settings through Windows 11 Settings
We need to enter Windows 11 Settings. Everything is simple here.
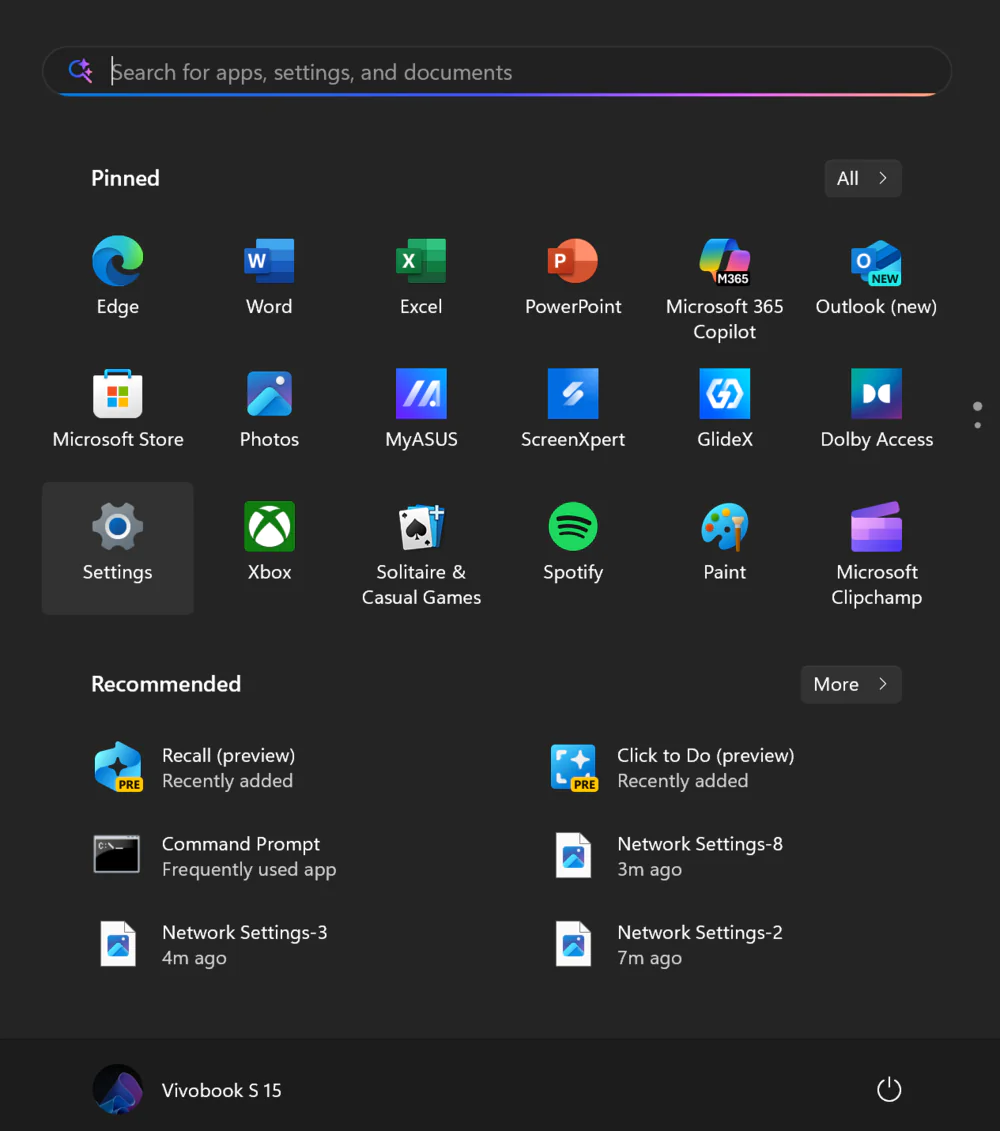
- Click on the Start menu and select Settings.
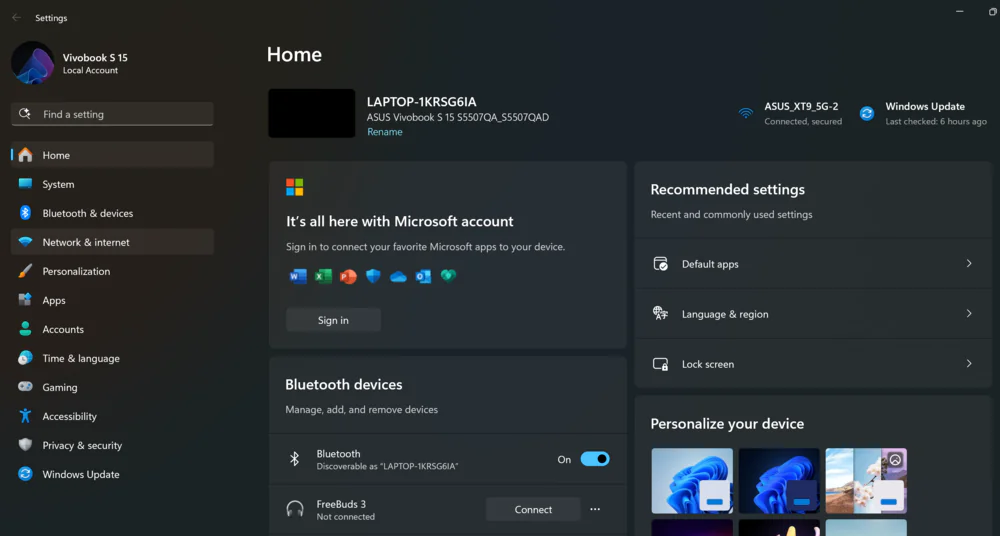
2. After opening the settings, select the Network and Internet section on the right,
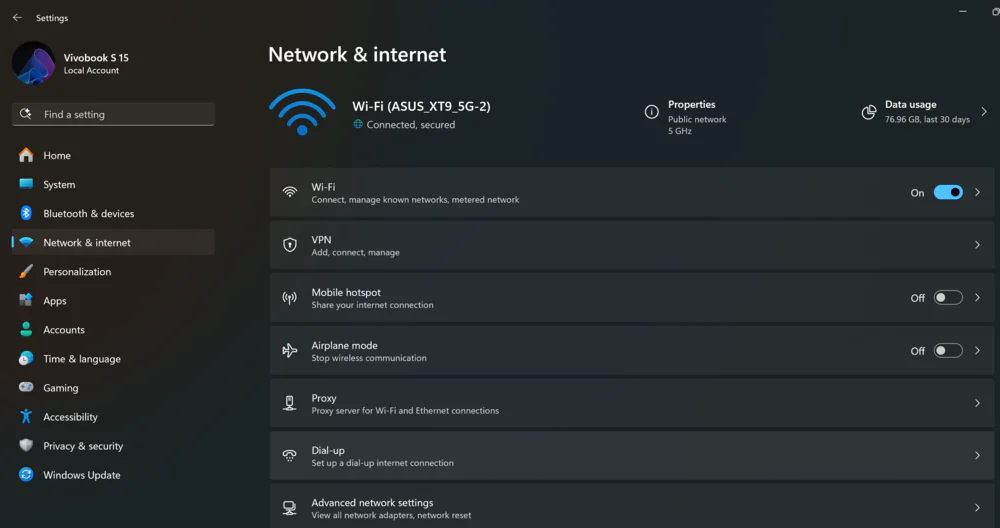
where you need to go to the Advanced network settings subsection.
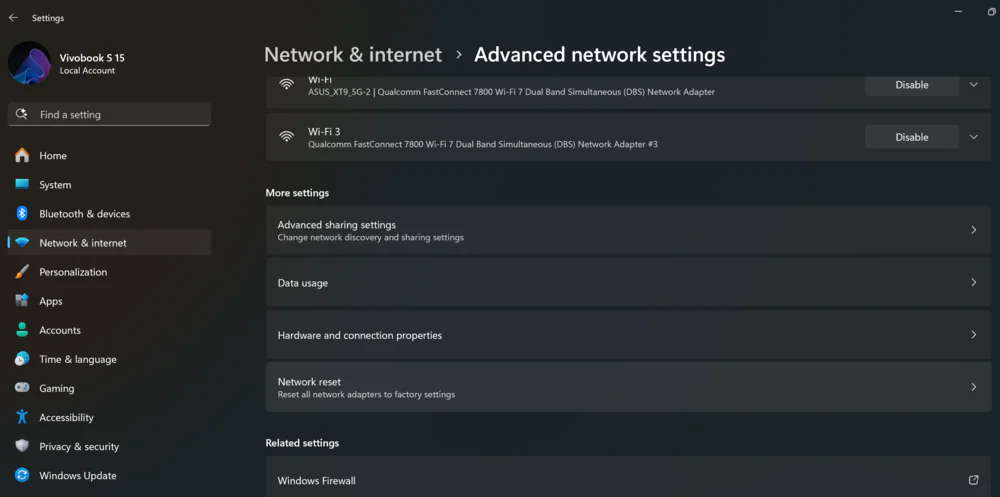
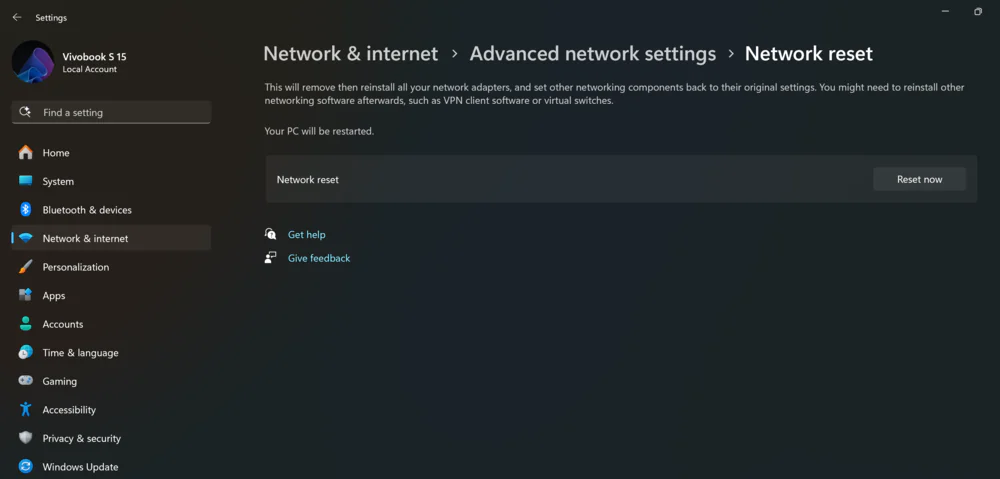
3. Scroll almost to the end and click on Reset network settings.
4. Now you just need to click on the Reset Now option on the right to get a prompt asking if you really want to erase your network settings.
5. Click Yes to continue.
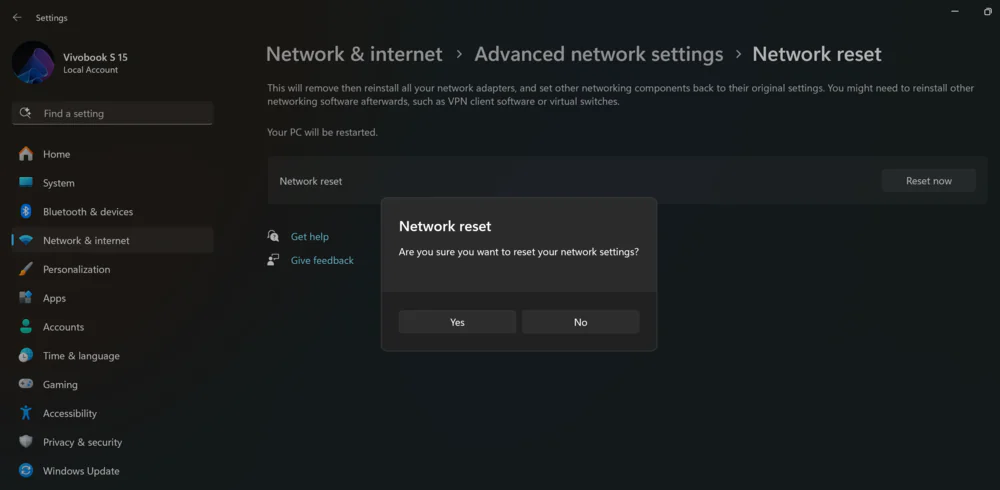
Windows 11 will start erasing your network settings almost immediately. You just need to be patient until the process is completed.
Reset the network settings using the Command Prompt
As I mentioned earlier, this method will be of more interest to experienced users or enthusiasts who want to learn something new.
- Open the Command Prompt. To do this, right-click on the Start menu and select Run from the list. Insert the cmd command and press Enter.
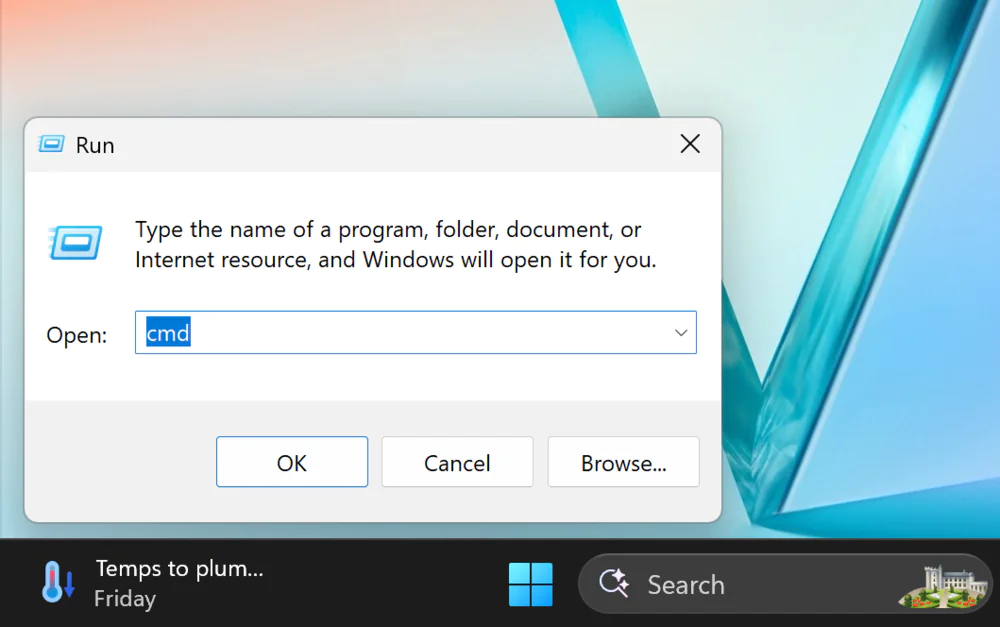
2. Now enter the following commands in sequence, pressing Enter at the end of each line:
netsh winsock reset
netsh int ip reset all
netsh winhttp reset proxy
ipconfig / flushdns
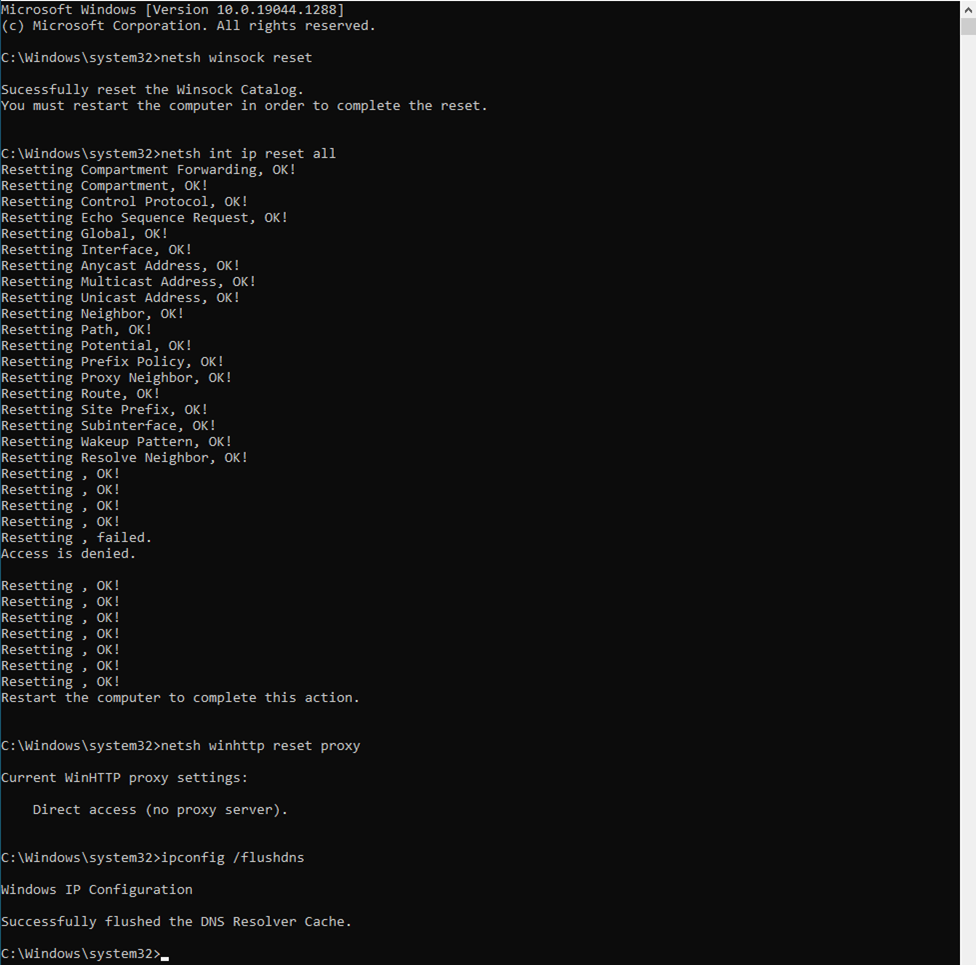
3. Close the Command Prompt and restart your computer. The system will reset all network settings in Windows 11 to their default values. In other words, a full network settings reset will occur.
Read also: Use It or Lose It: How AI is Changing Human Thinking
What to do after resetting your network
Of course, after all these actions, you’ll need to manually configure a few network settings to reconnect to the Internet. First, you’ll need to connect to Wi-Fi networks, select your network from the list, and enter its password. You may also need to set up a VPN if you had one previously.
If you assigned a static IP address or customized your DNS settings, you might need to re-enter these details into your system, as the network reset removed them. This is important for proper network connection setup.
Read also:Tectonic Shifts in AI: Is Microsoft Betting on DeepSeek?
Import saved Wi-Fi networks to your laptop
Remember, we created a folder called WiFiBackup where all your Wi-Fi passwords were saved? You now have the option to restore them and import the saved Wi-Fi networks back onto your laptop.
To do this, you again need to follow a few simple steps.
- Open the Command Prompt. To do this, click Start again and select Run. Type the cmd command and press Enter.

2. Enter the command netsh wlan export profile folder=”C:\WiFiBackup” key=clear and press Enter.
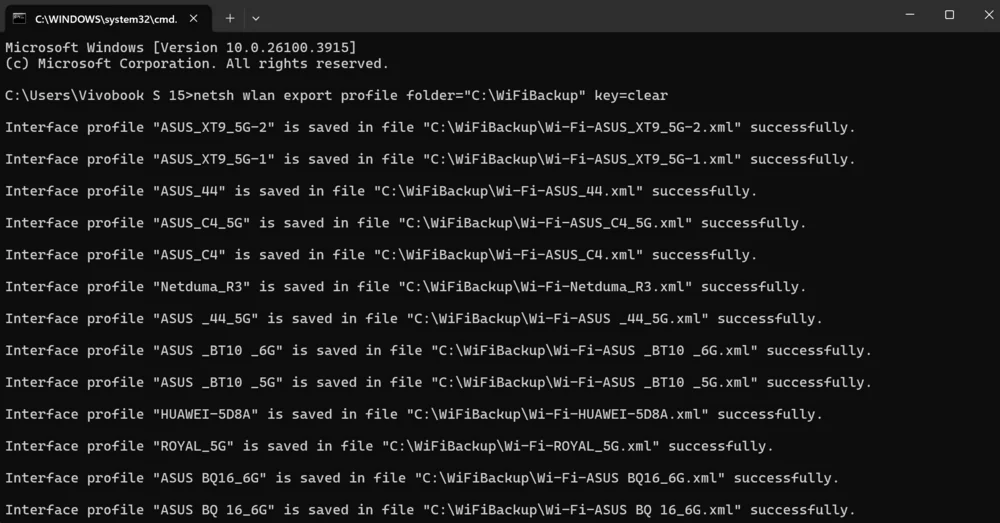
3. In the WiFiBackup folder, you will find an XML file for each of your saved Wi-Fi networks. Open the file using a program like Microsoft Edge to view the network’s password.
4. You can also import the saved networks. To do this, you need to run the Terminal as an administrator.
5. Enter the command for %f in (“C:\WiFiBackup\*.xml”) do netsh wlan add profile filename=”%f” and all settings will be transferred.
Read also: End-to-End Encryption: What It Is and How It Works
What to do if network problems persist after a reset
If the issue persists after resetting the network settings, the cause may not be related to system settings. For instance, a faulty network adapter could be responsible for connection problems. In such cases, device diagnostics may be required, followed by repair or replacement if necessary.
It’s also important to consider potential issues from the internet service provider’s side. If the problem is caused by a network outage or malfunction on their end, it cannot be fixed on your own. You’ll need to contact the provider’s support team for more information. Additionally, connection issues may be caused by malware or specific firewall settings. Running an antivirus scan can help identify and address any threats that could be affecting network stability.
To determine whether the issue is with your PC or the network itself, try using another device connected to the same network. If it also experiences similar difficulties, this suggests that the problem lies with the network, not your computer. In this case, the best course of action would be to consult a network specialist who can help identify and resolve the issue. It’s advisable to do this before reconnecting your Windows 11 PC to the network to avoid the problem recurring.
Either way, now you know how to reset all network settings in Windows 11. We’re always here to help!
Read also:

