© ROOT-NATION.com - Use of content is permitted with a backlink.
In this article-instructions, we will talk about the SuperFetch, or SysMain, process in Windows 10/11, and how to disable it if necessary.
What is SuperFetch or SysMain?
SysMain (formerly known as SuperFetch) is a technology that Microsoft has integrated into every iteration of the Windows operating system since Windows Vista (Windows XP had a more primitive form of SuperFetch called PreFetcher). According to Microsoft, SuperFetch ‘maintains and improves system performance over time.’ This same feature is available in Windows 10 and even the new Windows 11.
The main goal of SysMain is to help Windows computers better and more efficiently manage and use any amount of RAM. SysMain is part of the memory manager built into every version of Windows, and this technology is designed to make the data that users access most on their computer easily accessible because the computer can read it from RAM instead of the hard drive (accessing data stored in RAM takes much less time than accessing data stored on a hard drive).

SysMain has two main goals: the technology reduces the time it takes to start up your computer, allowing it to read the files needed at boot time much faster, and it also ensures that the applications you use most often load and launch much faster than others. Sysmain is somewhat of an intelligent process as the technology is able to record and analyze computer usage patterns for better performance.
This feature is enabled by default in every version of Windows and runs constantly in the background to analyze RAM usage patterns. Over time, it recognizes the most frequently used applications and preloads them into RAM, which speeds up the loading of applications.
While this feature can certainly speed up application loading, it can sometimes cause high levels of CPU usage and RAM usage problems. Many Windows 11 users have reported high CPU usage when using their computers. After a deeper check, it turned out that the background SysMain process was the culprit in high CPU and RAM usage.
Read also: Why spacecraft use processors from the 20th century
Three best ways to turn off SuperFetch (SysMain) in Windows 11
Therefore, it is better to disable this feature if you are using Windows 11 and are facing issues due to SuperFetch or SysMain. Below, we will share a step by step guide to disable SuperFetch (SysMain) in Windows 10/11.
Option 1. Disable SuperFetch via Windows Services
This method will use the Windows Services to disable SuperFetch on Windows 10/11. Here are some simple steps you should follow.
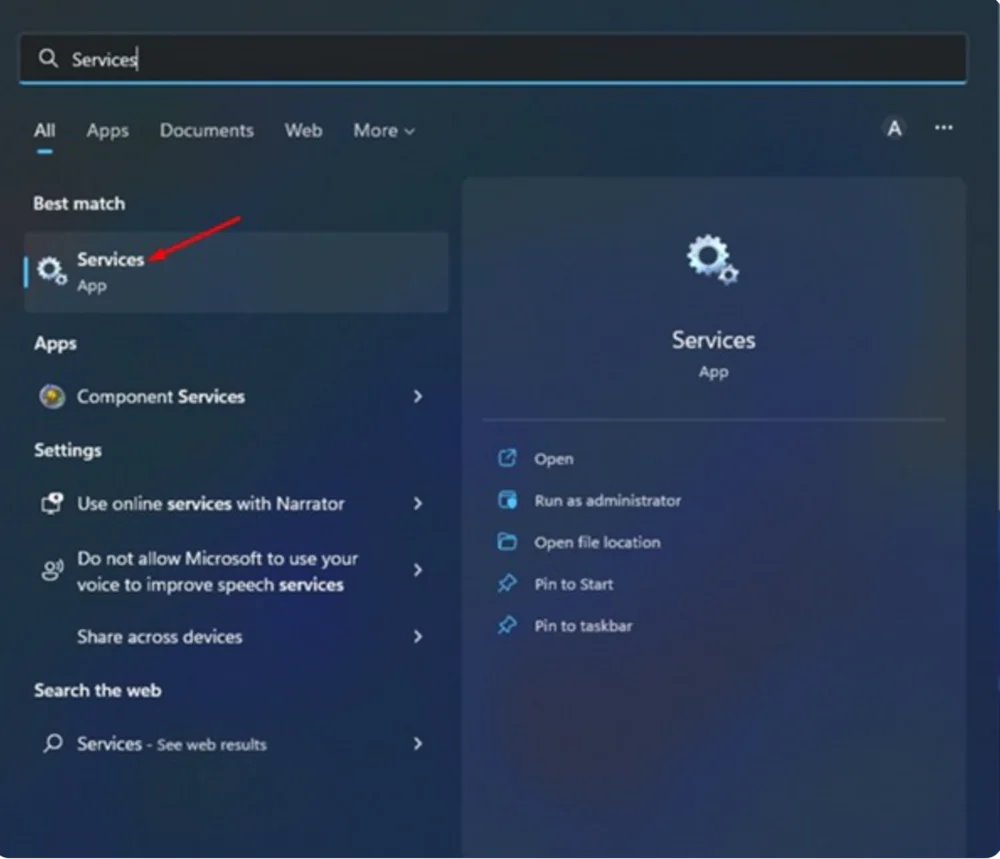
- Click Search in Windows 11 and type Services. Then open the Services application from the list.
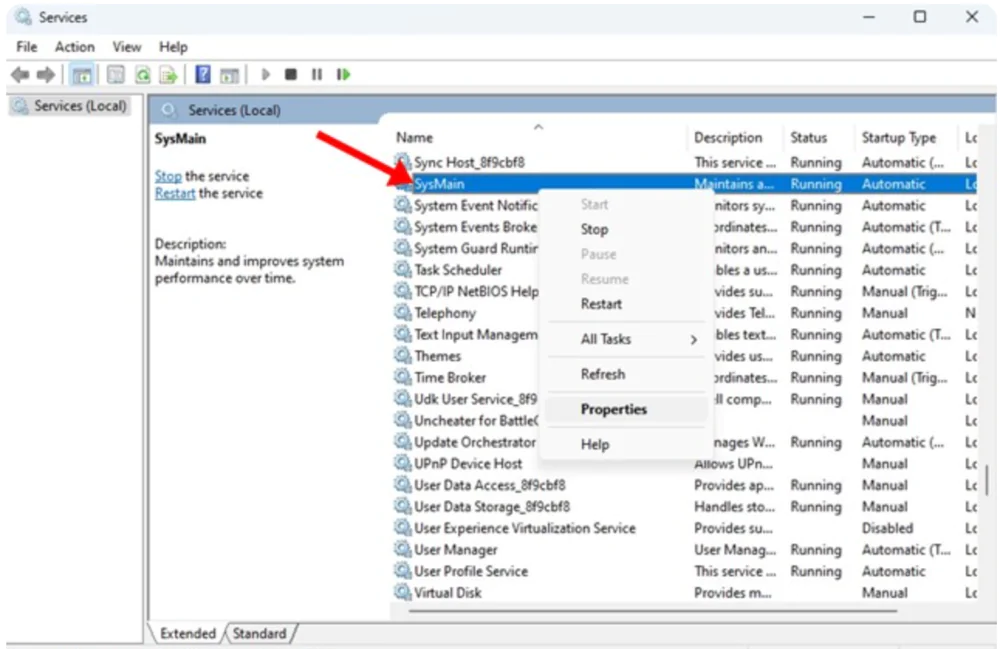
- In the Services application, find and right-click SysMain. In the menu that opens with the right mouse button, select Properties.
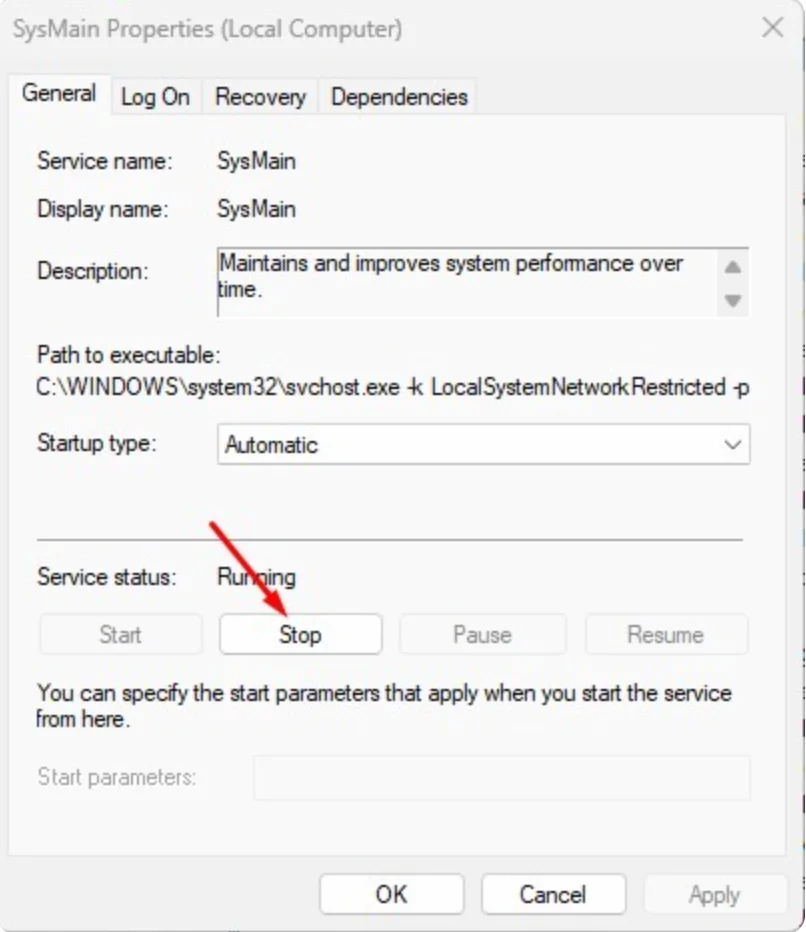
- Then, in the SysMain properties, click the Stop button under Service Status.
- Open the drop-down menu next to Startup Type and select Disabled.
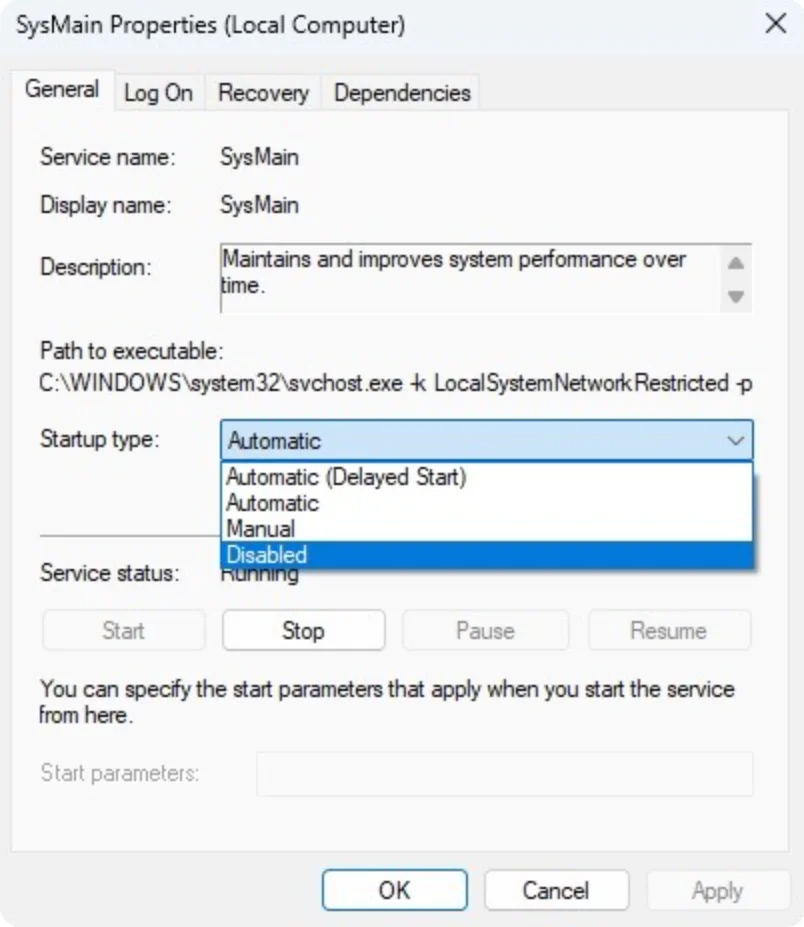
- Click Apply and then OK.
That’s it! This will disable SupeFetch or SysMain on Windows 10/11. Be sure to restart your computer for the changes to take effect.
Read also:
- How To Use Portrait Mode in FaceTime on iPhone and iPad
- Boosteroid cloud gaming service: how to use it to the max
Option 2: Disable SuperFetch in Windows 11 via Registry
You can use Registry Editor to disable SuperFetch or SysMain on Windows 10/11 computer. You need to follow a few simple steps, which we will discuss below.
- First, open the Windows 11 search engine and type Registry. Then open Registry Editor from the list. You can also use a set of keys where you should press the combination Win + R. The Run option line will appear, where you should write regedit and press Enter.
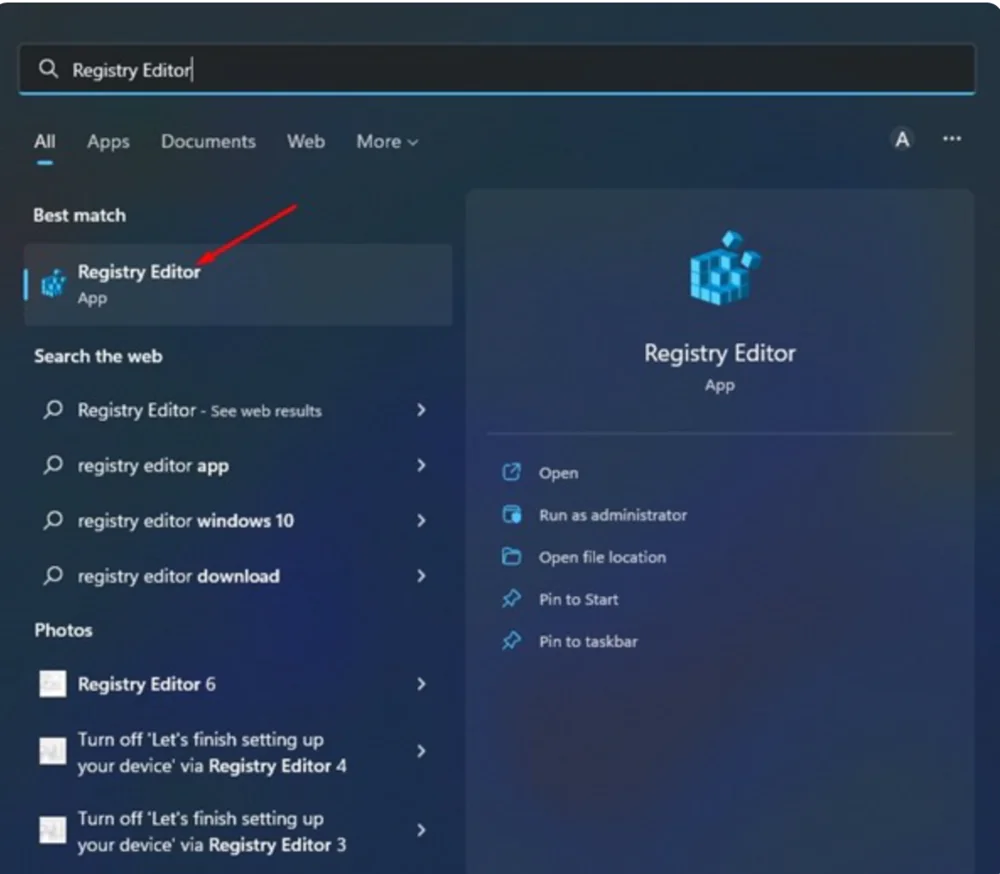
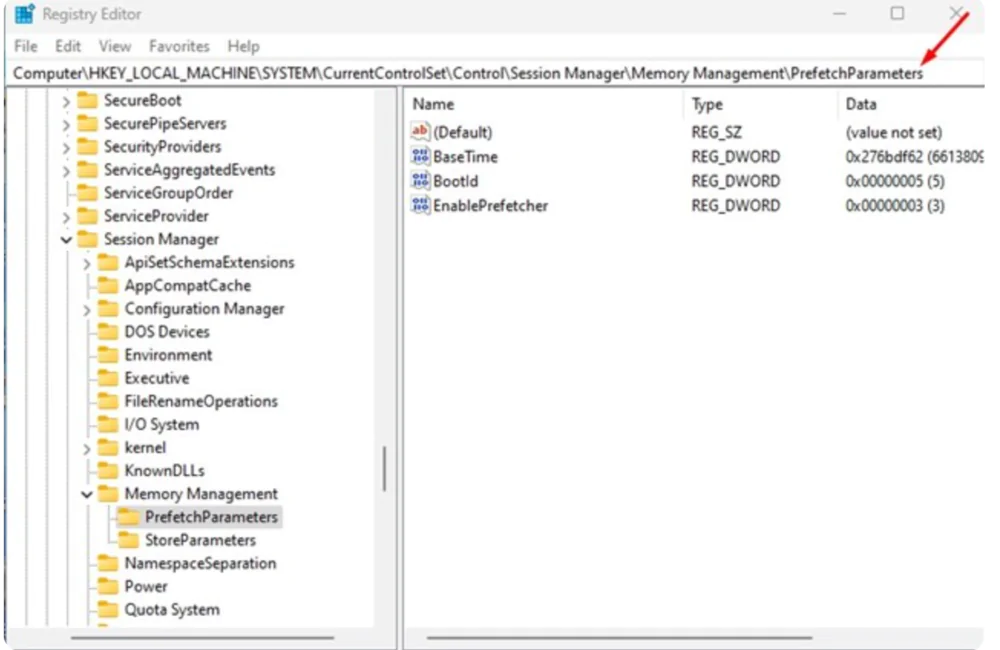
- In the Registry Editor, navigate to the following path: Computer\HKEY_LOCAL_MACHINE\SYSTEM\CurrentControlSet\Control\ Session Manager\Memory Management\PrefetchParameters
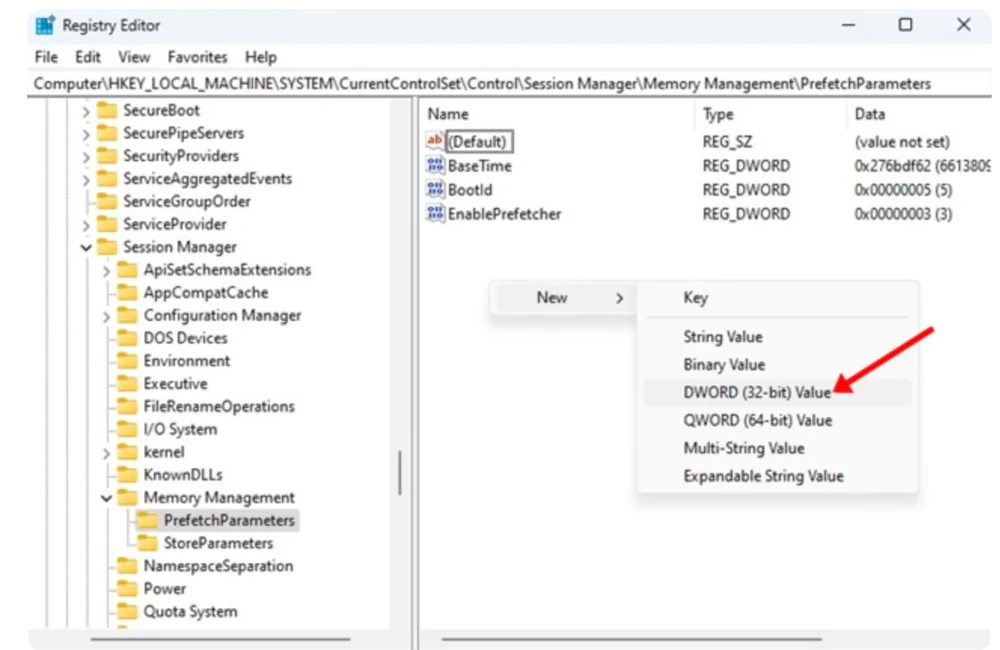
- Then right-click in the right panel and select New and DWORD (32-bit) value.
- Name the 32-bit DWORD key you just created EnableSuperfetch.
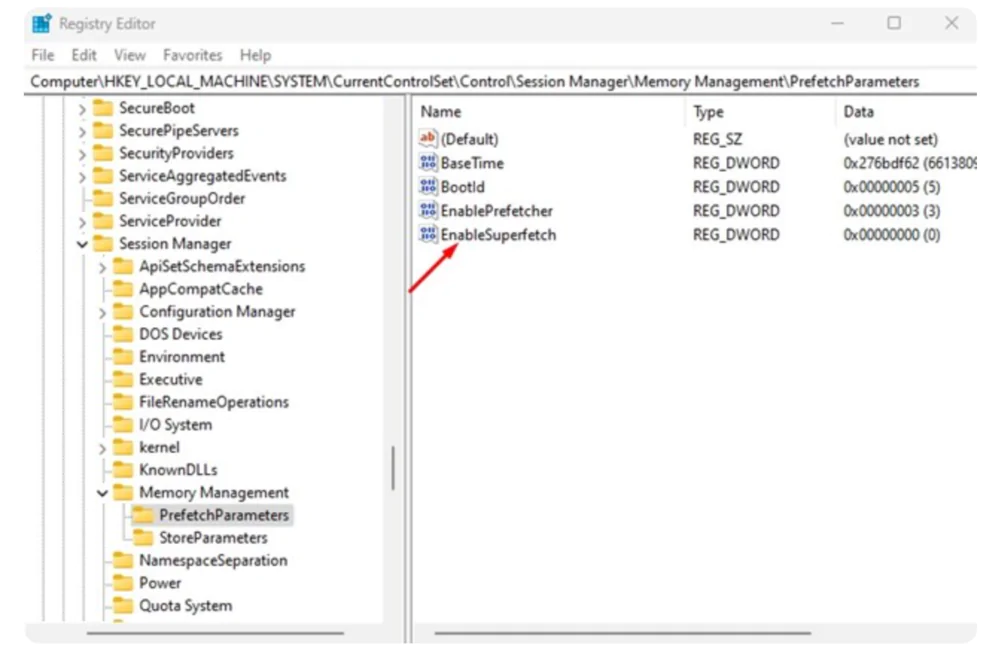
5. When finished, double-click EnableSuperfetch and enter 0 in the Value data field.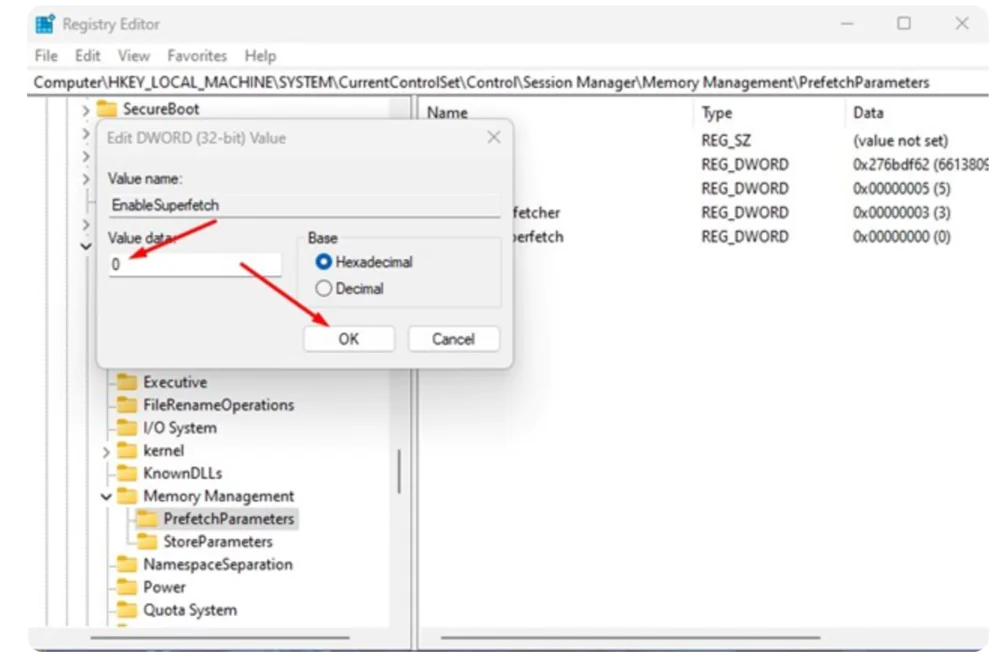
6. When finished, click OK and exit the Registry Editor.
Now the SuperFetch process will be disabled, but you must first restart your Windows 10/11 computer to apply the changes.
Read also:
- Weapons of Ukrainian Victory: Iris-T SLM for Ukraine from Germany
- HUAWEI FreeBuds Pro 2 TWS Earphones Review: Love At First Touch
Option 3: Disable SysMain in Windows 11 via Command Prompt
You can also use the Windows 11 Command Prompt to disable SysMain. You need to follow a few simple steps which we provide below.
- Click Search in Windows 11 and type Command Prompt. But the easiest way is to right-click on the Start button and select Command Prompt or Terminal, but the one that gives you the Run as administrator right.
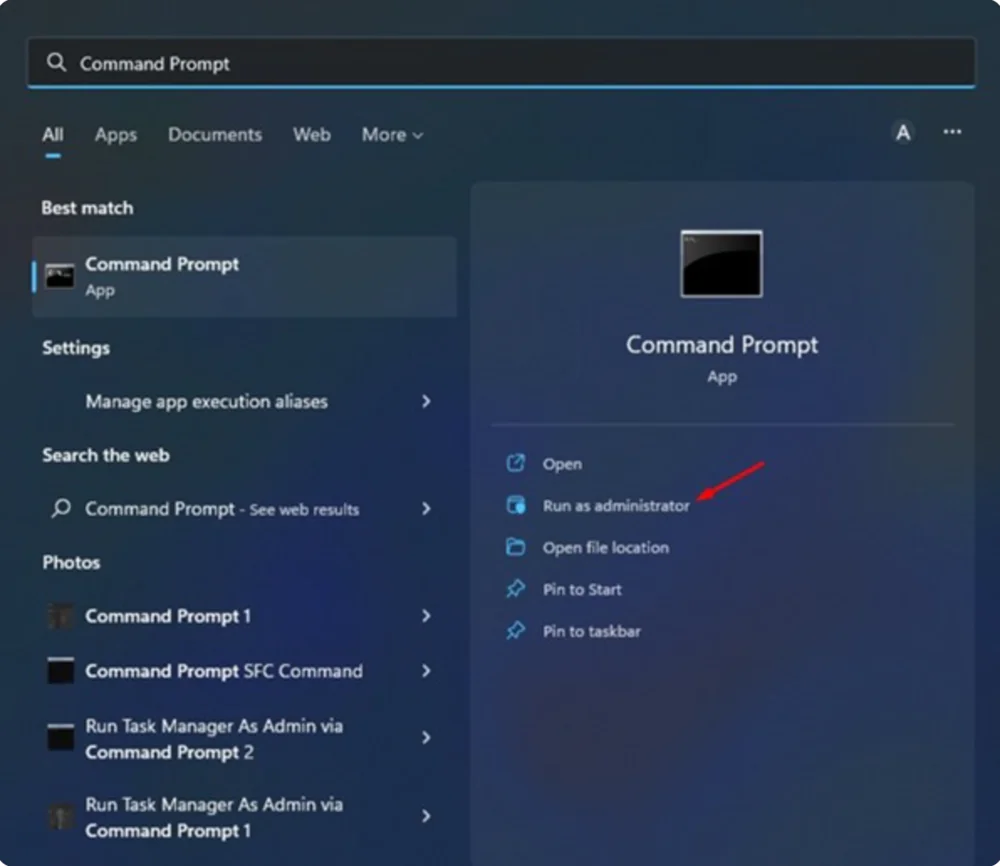
- At the command prompt, paste the following command and press Enter:
sc stop „SysMain” & sc config „SysMain” start=disabled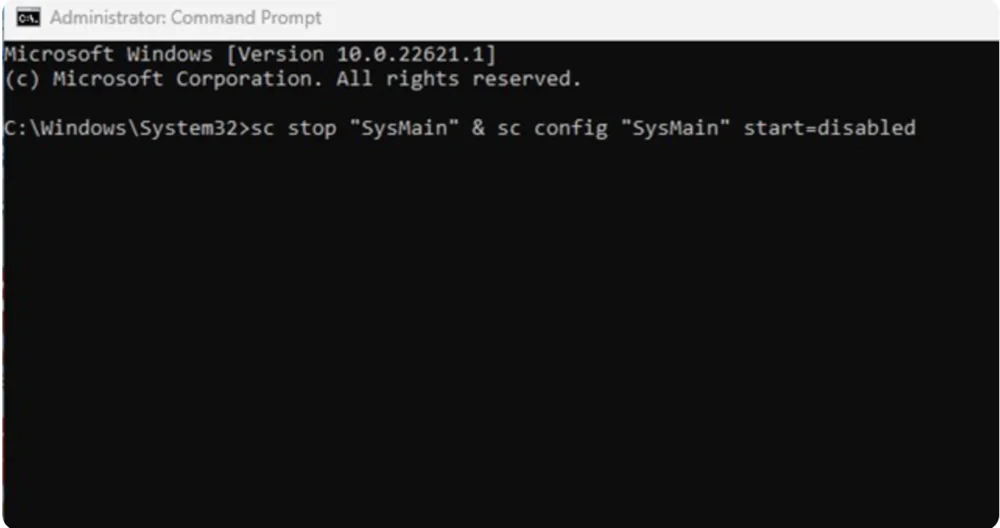
This is enough to stop the SuperFetch or SysMain process on your Windows 10/11 computer now.
Should SuperFetch be disabled in Windows 11?
Important! If you are still experiencing issues with high CPU usage on your Windows 11 PC, there may be some other issues that you may need to address. If you have a high-end computer, you’d better enable this feature as it improves application loading times. However, if you run into problems, you can use any of these three methods to completely disable this feature.
Now you know all the ways to disable SuperFetch in Windows 11. And if your computer was running slowly, this will help improve performance. If you need more help on disabling SuperFetch or SysMain on Windows 10/11, please let us know in the comments.
Read also:
- ‘Neptunes’ knocked out ‘Moskva’ cruiser: All about these anti-ship cruise missiles
- Comparison of F-15 Eagle and F-16 Fighting Falcon fighters: pros and cons
You can also help Ukraine fight with Russian occupants via Savelife or via an official page of the National Bank of Ukraine.

