© ROOT-NATION.com - Use of content is permitted with a backlink.
Don’t want Windows 11 to track your data and share it with third parties? Then you need to read this article.
In today’s technological world, your data is a valuable resource. Many companies use it to get an accurate picture of how you use their products and services, but only if you give them your consent. Like previous versions of Microsoft’s operating system, Windows 11 also has significant shortcomings in protecting the privacy of its users. In addition, this new system transfers a lot of user data to Microsoft servers. However, you can put a stop to this.
In addition, the latest operating system from Microsoft collects and analyses telemetry data and statistical information. Many of the associated settings are already active by default, and only a few can be deactivated when you first set up your user account during the installation of the operating system.
You will need to make a few manual settings to moderate Windows 11 and thus prevent your data from being collected. You might already be familiar with this procedure from Windows 10, but in the new Windows 11, the layout of some menus has changed and you need to adjust it for more privacy.
How to do this? We’ll walk you through the settings step by step to help you increase the level of user data protection in Windows 11 to an acceptable level. Unfortunately, you can’t force Microsoft to stop collecting your data altogether.
Read also: Windows 11 22H2 Moment 3 update: what to expect?
How do I view data tracking in Windows 11?
Before you delete anything, it’s a good idea to understand the type of data that Windows 11 collects. You can’t access most of it yourself, but diagnostic data is an exception.
It’s worth knowing that this is essentially data that Microsoft uses to make Windows 11 work better. That’s what the developers say. It’s like they have a mission. They want to see your problems with the OS and solve them quickly.
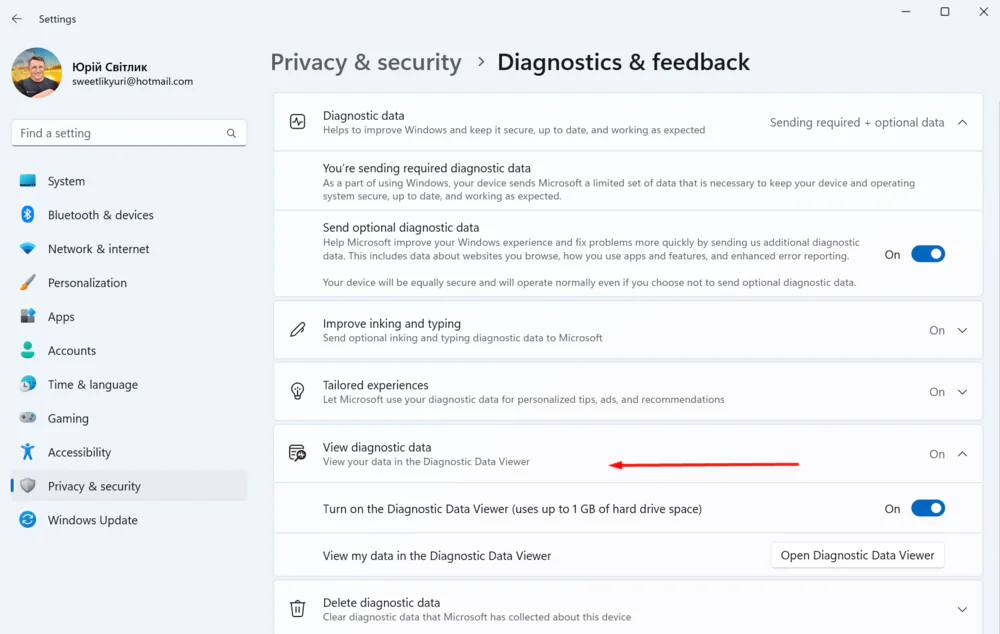
To see some of the data tracking in Windows 11, you need to:
- Go to Settings and open Privacy and Security.
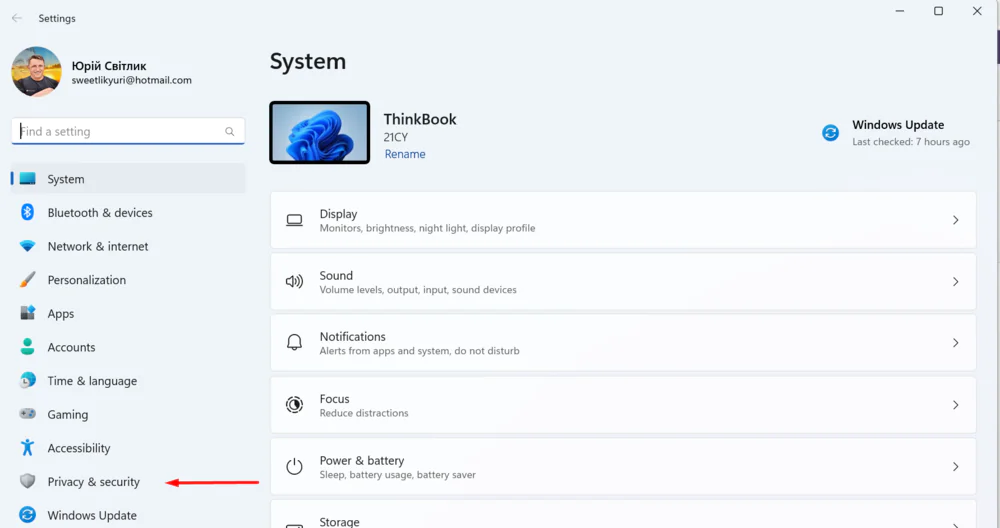
- In the Windows Permissions subsection, open Diagnostics and Feedback.
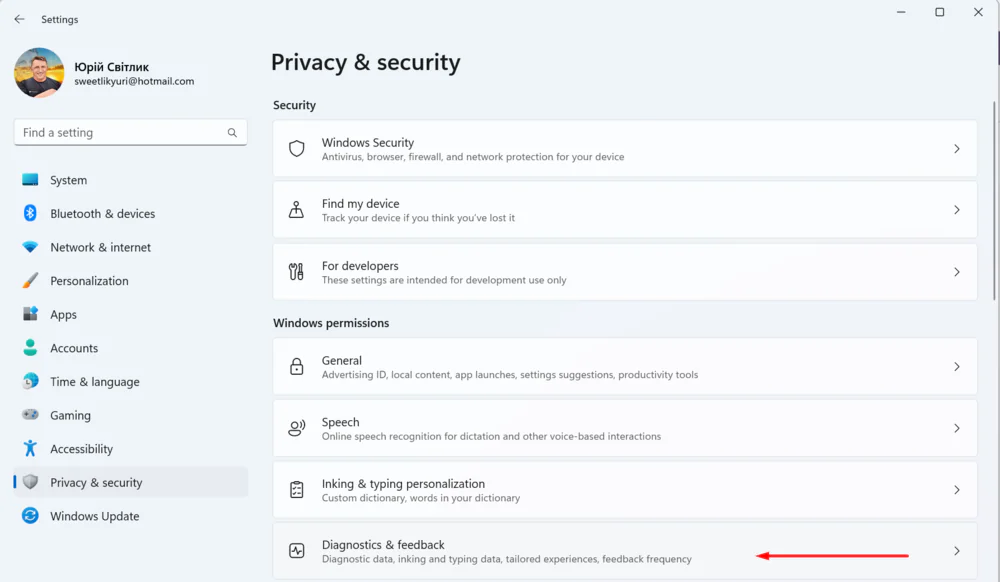
- In the Diagnostic Data Viewer section, select the checkbox next to Enable Diagnostic Data Viewer.
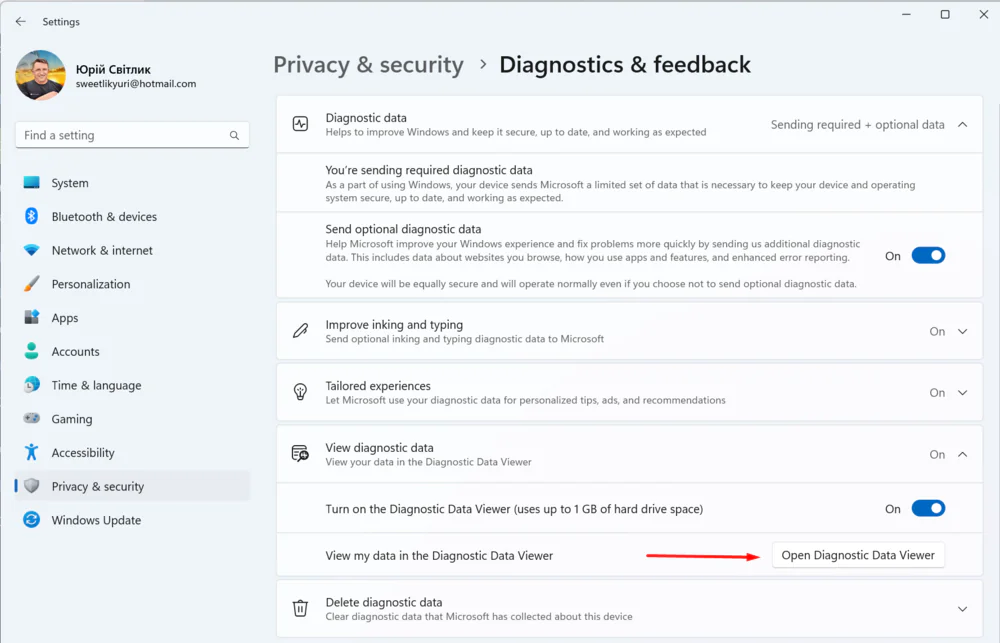
- Below, click Open Diagnostic Data Viewer.
- The operating system opens the Microsoft Store and offers to download the Diagnostic Data Viewer for the first time.
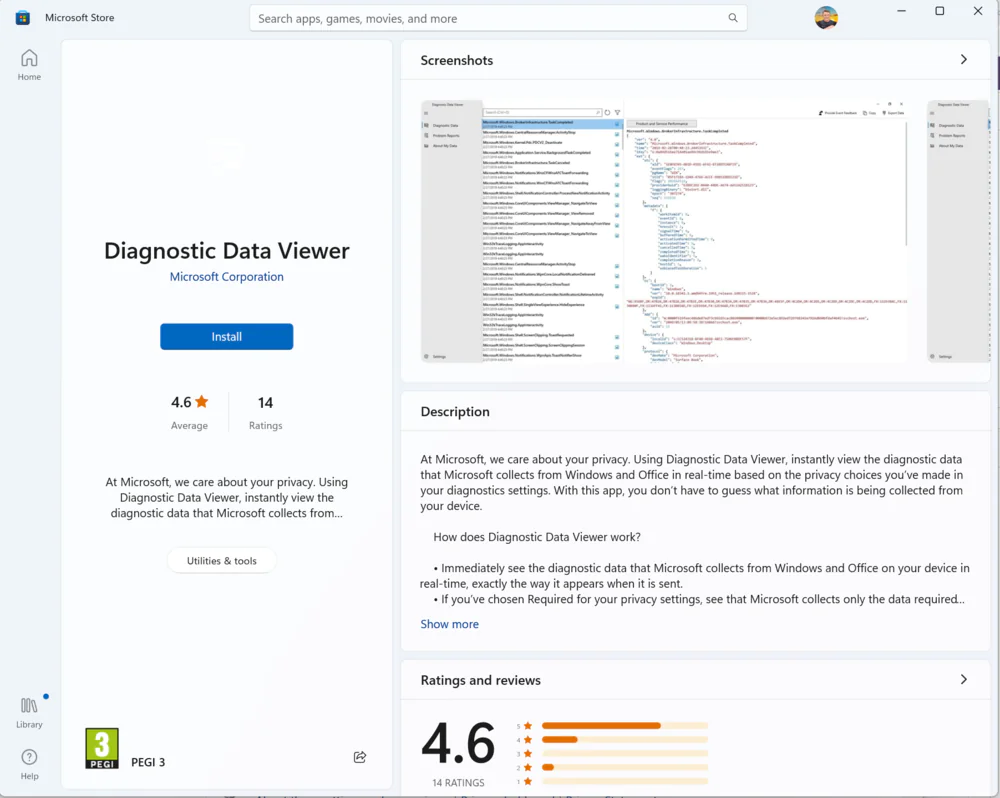 This is where you will find all the information you need about the diagnostic data. Once downloaded, simply open the app.
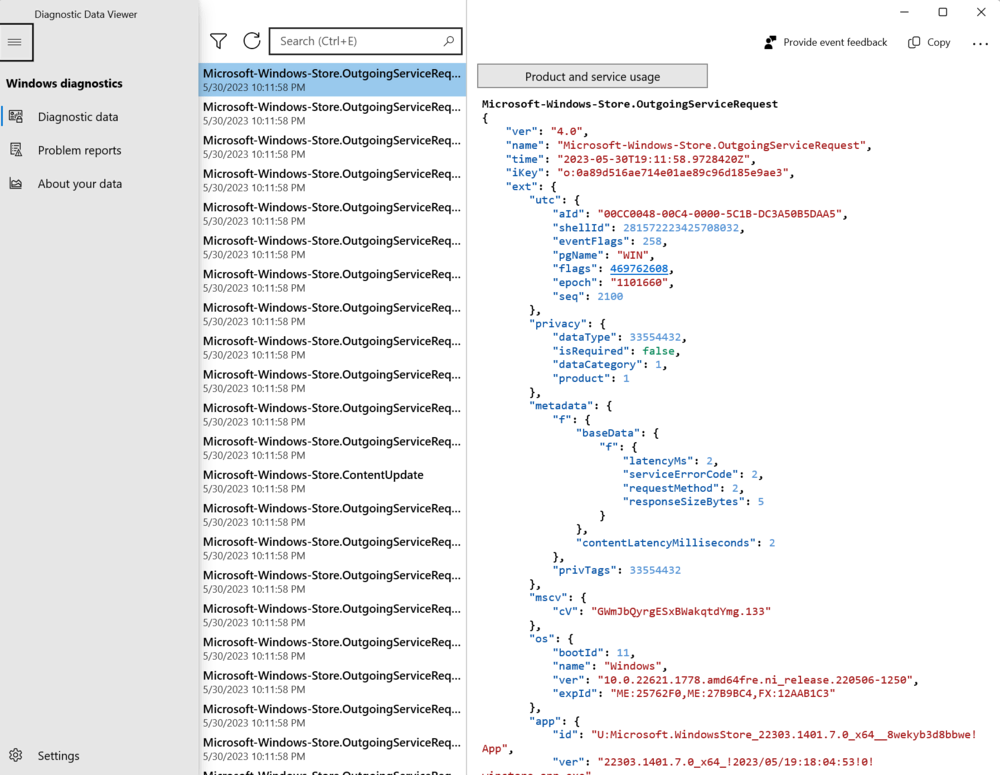
In the app, you’ll find a list of all the data that Microsoft collects to help improve Windows 11. By default, the Diagnostic Data tab is selected, but you can switch to Problem Reports to see what issues have been found.
It should be noted that the Diagnostic Data Viewer doesn’t provide a complete picture, but it will certainly be very useful for those who want to know what exactly Microsoft is getting.
How to disable diagnostic data collection in Windows 11
As we have already found out, not all diagnostic data can be seen and disabled, but it is possible to disable additional data. These are, first of all, the history of web browsing, application usage, and more detailed reports on OS errors. You can do this in a few simple steps.
- Open Settings again and go to the Privacy and Security subsection. Here, you should go to the familiar Diagnostics and Feedback section.
- Make sure the checkbox next to Send optional diagnostic data is turned off. Note that this does not allow you to participate in the Windows Evaluation Programme.
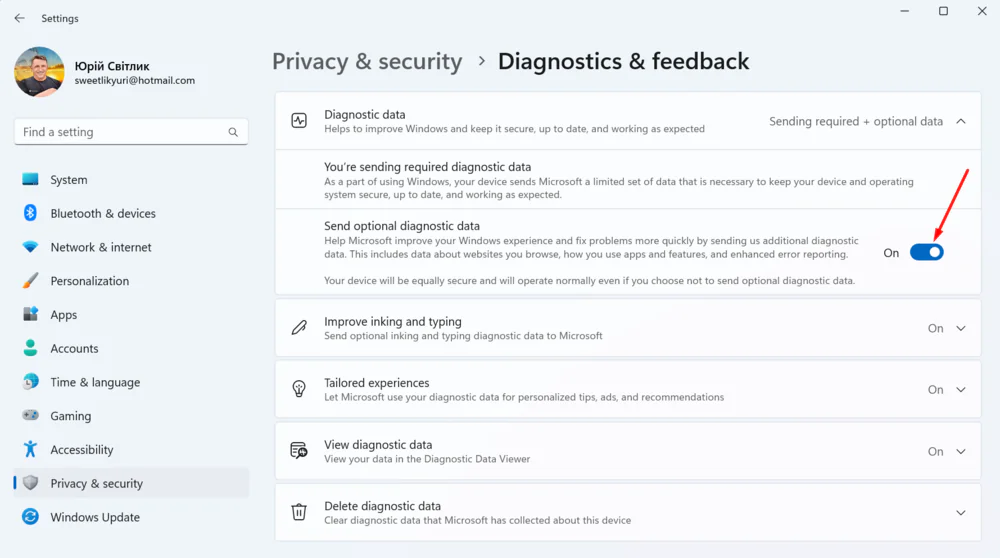
- Click Enhance pen and keyboard input, and then make sure the switch here is also turned off.
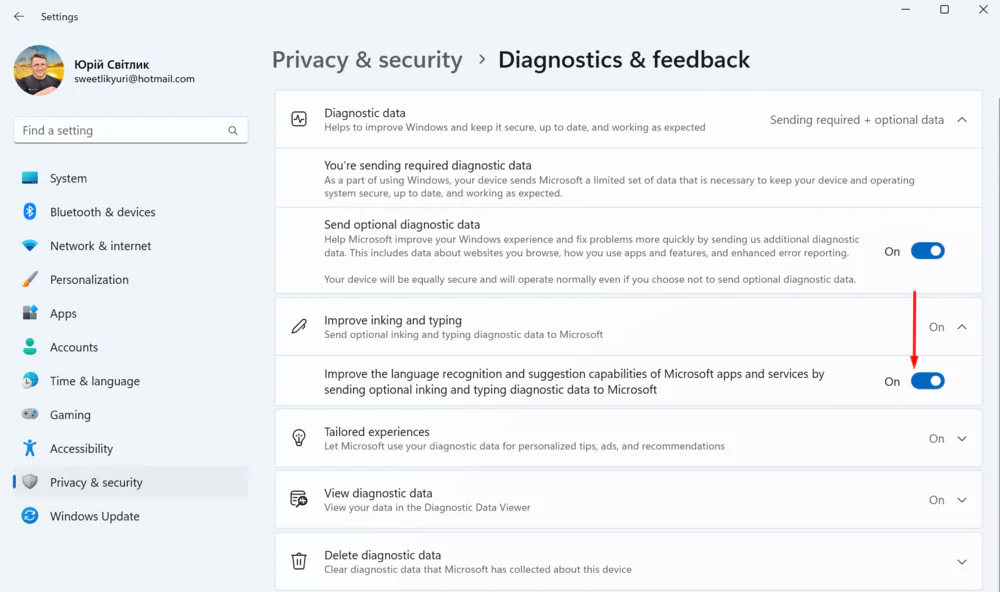
- Then go to the Personalised features section, where you should also turn off the switch.
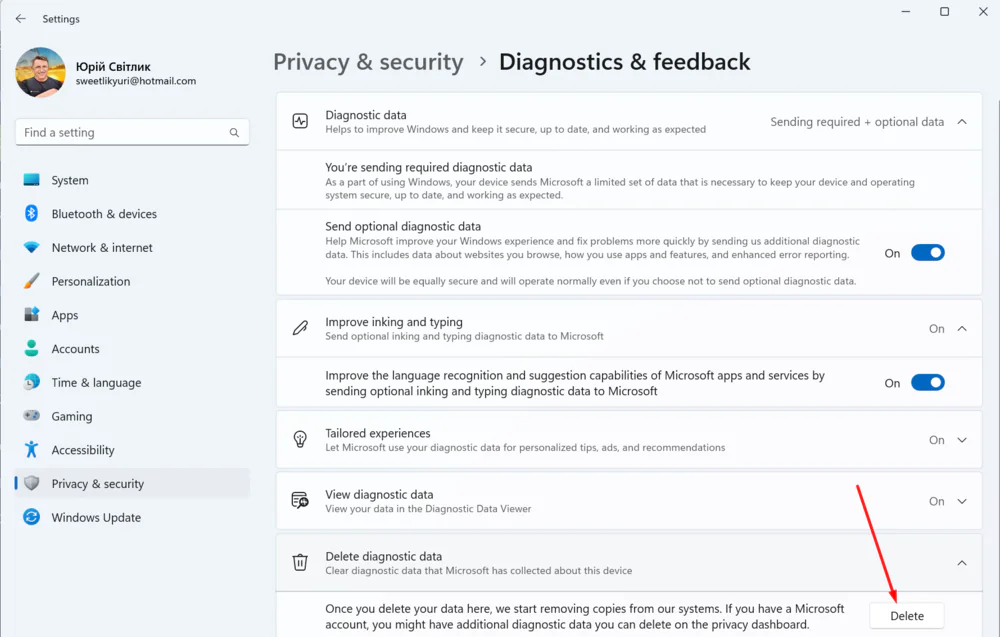
- You have the option to delete all unnecessary diagnostic data. To do this, open the Delete diagnostic data section and click on Delete.
Now at least some of the diagnostic data that Windows 11 collected about you will be deleted.
How to disable ad tracking on Windows 11
In the modern world, advertising plays a very important role. All tech companies are trying to make money from personalised advertising. It’s big money, big profits, so it’s no surprise that Windows 11 also tries to use your data to show you personalised ads and other information. Of course, users don’t like it. There are a lot of complaints and complaints, but you don’t have to agree to it. You just need to know how to disable ad tracking on Windows 11. To do this, you should:
- Go to Settings – Privacy and Security, and then go to the General section.
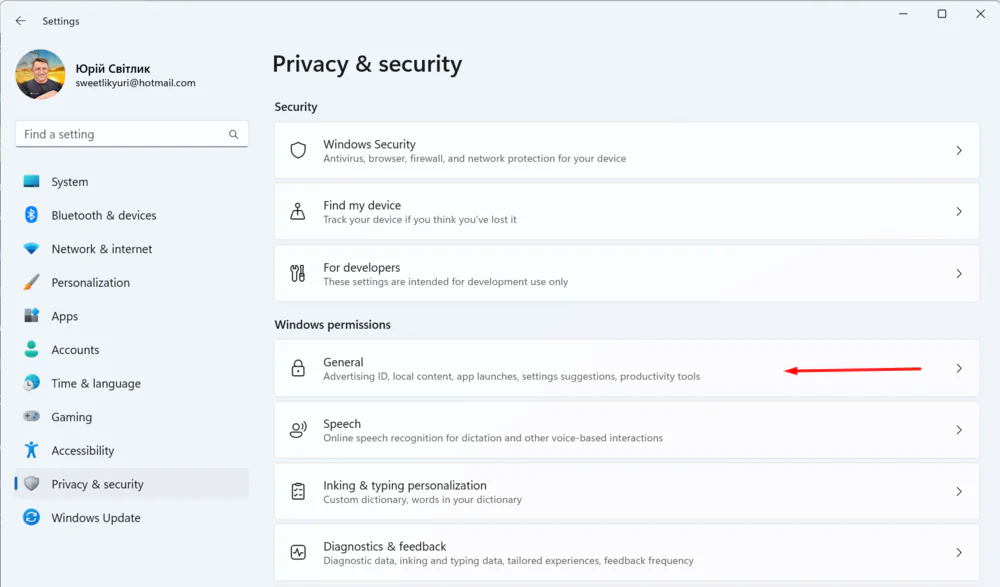
- Here, turn off the Allow apps to show me personalised ads using my advertising ID switch.
- You should do the same for Allow websites to access my language list to show content based on my location.
- Don’t forget to turn off the checkbox next to Allow Windows to track app launches to improve Start menu and search results.
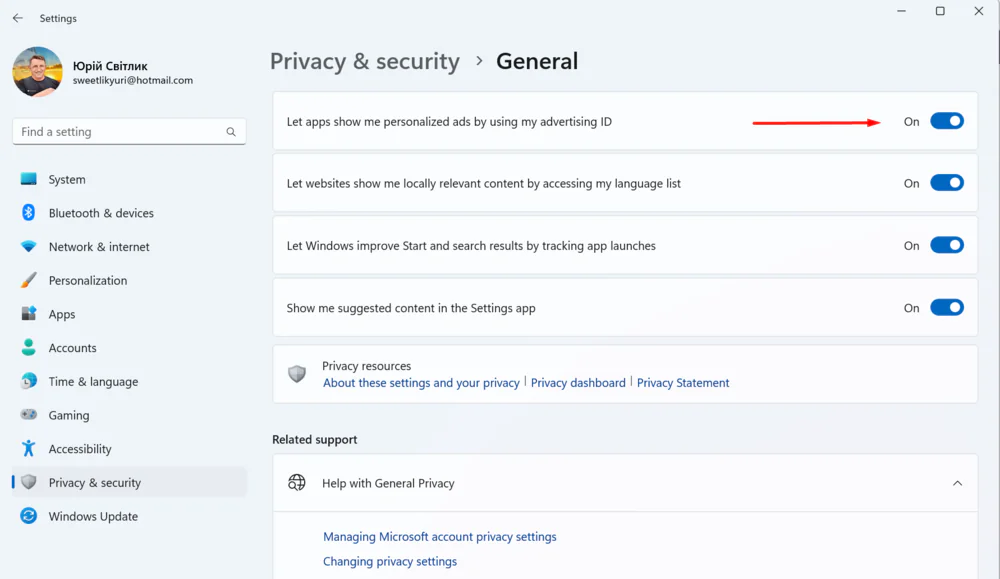
Please note that disabling these settings will not remove the adverts. You will still see the same number of ads, but they will be generic and not based on your behaviour. This will allow you to at least maintain your personal preferences.
You should disable activity history in Windows 11
Windows 11’s Activity History feature contains information about how you use apps and services, as well as information about the websites you’ve visited. This makes it easy and quick to keep track of what you’ve been doing recently. This is also a kind of data collection of your data and preferences, but you can turn it off. To do this:
- Open Settings – Privacy and security.
- In the Windows Permissions section, select Activity Log.
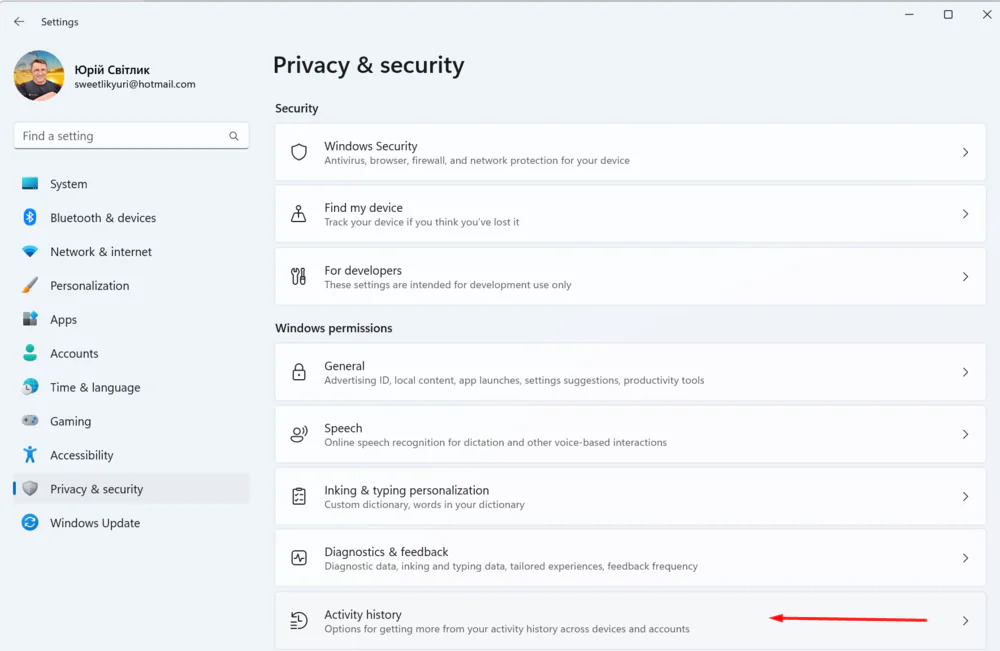
- Open the Activity log and turn off the Save activity log on this device checkbox.
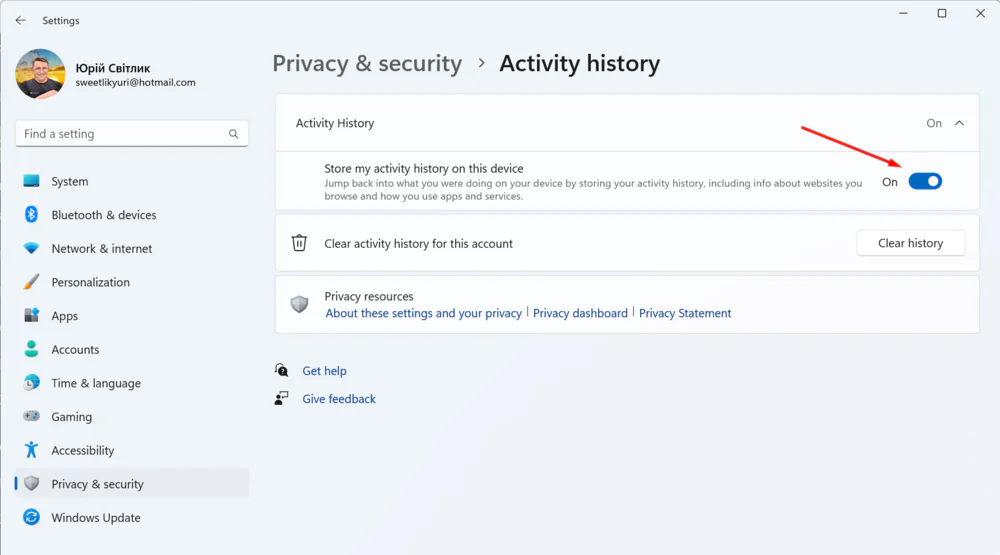
Windows 11 will no longer store data about what apps and services you use and what websites you visit.
Read also: What is CorePC – All about the new project from Microsoft
How to turn off Find My Device in Windows 11
The Find My Device feature is great for locating a lost computer, but it relies on collecting location data on a regular basis. Many users don’t like this, so if you want to disable this feature, you should:
- Go to Settings – Privacy and Security.
- In the Security section, open Search for Device.
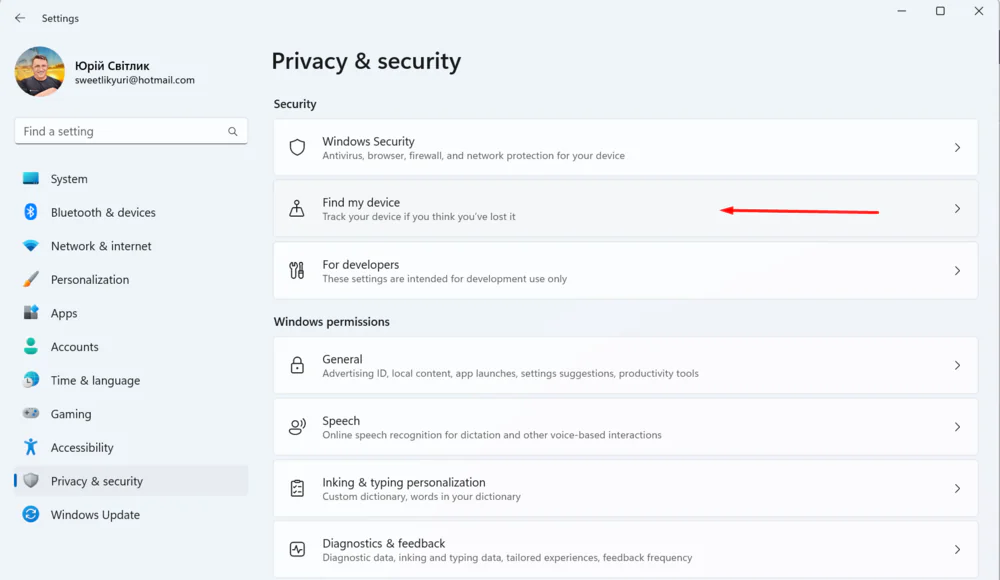
- You need to turn off the Device Search switch.
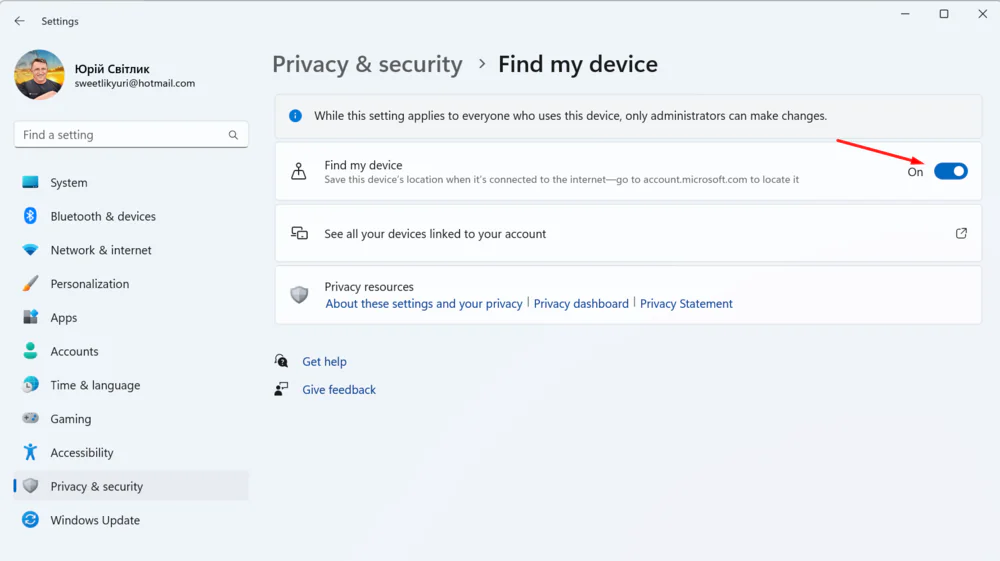
If you usually turn off location services, you don’t need to do this step. Microsoft can’t track your device’s location if you don’t give it access.
Important. Keep in mind that if you lose your device, you won’t be able to find it or remotely lock the data on it. Therefore, you should think twice before disabling this very useful feature.
Read also: 7 coolest ways to use ChatGPT
Clear Microsoft account activity tracking
Data associated with your Microsoft account may have been collected on multiple devices. Even if you are no longer using these devices, they continue to collect data. You should therefore clear your Microsoft account activity tracking immediately. Here’s how to do it:
- Go to account.microsoft.com and sign in with your email address and password.
- Click Privacy at the top of the window. You may need to double-check your details.
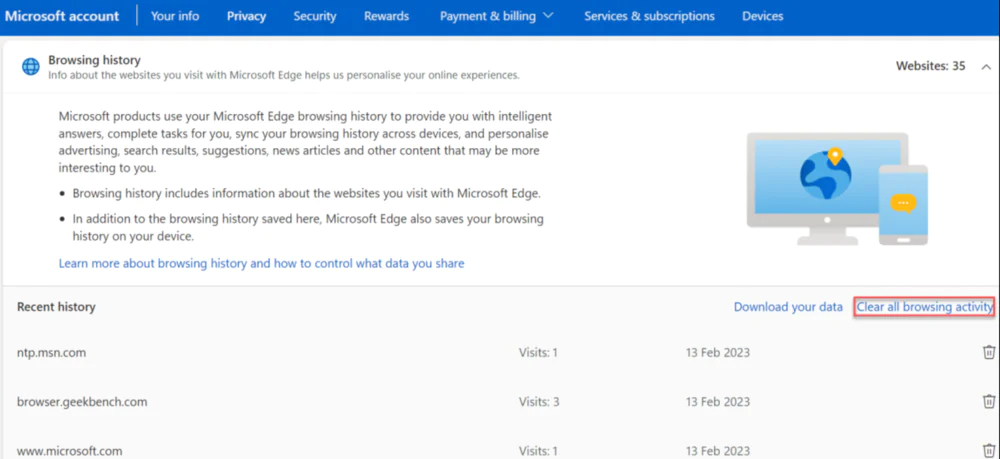
- In the Manage your activity data section, click each section and select Clear all…
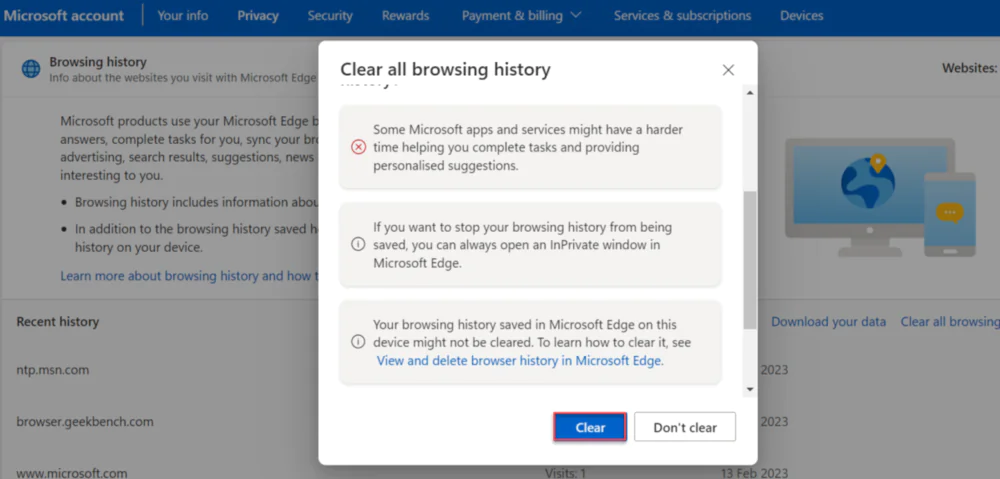
- Click Clear to confirm.
- Repeat for any other section where data was collected.
Your device’s operating system will no longer track your Microsoft account activity.
Turn off Microsoft Edge data collection
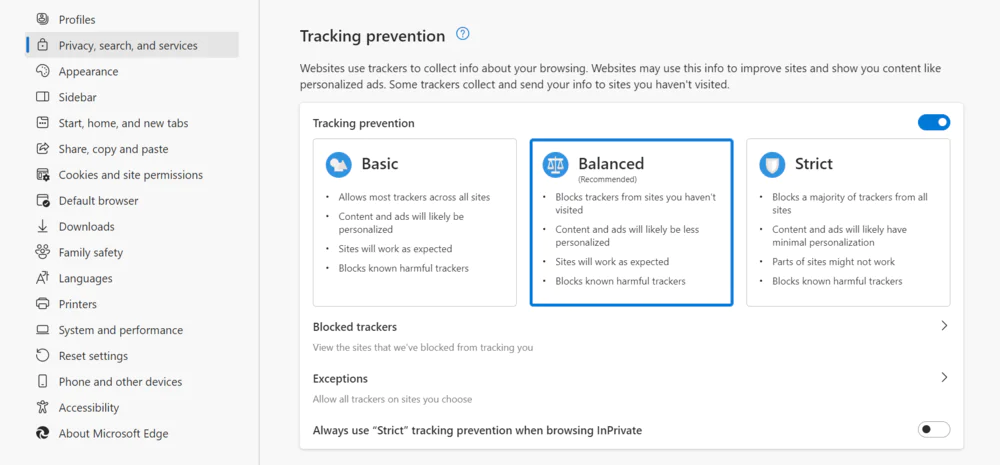
The Edge browser comes pre-installed with the option to prevent websites from using trackers, and there are three settings to choose from. Here’s how to set it up:
- Open the Microsoft Edge browser, click the three dots in the top right corner, scroll down, and select Options.
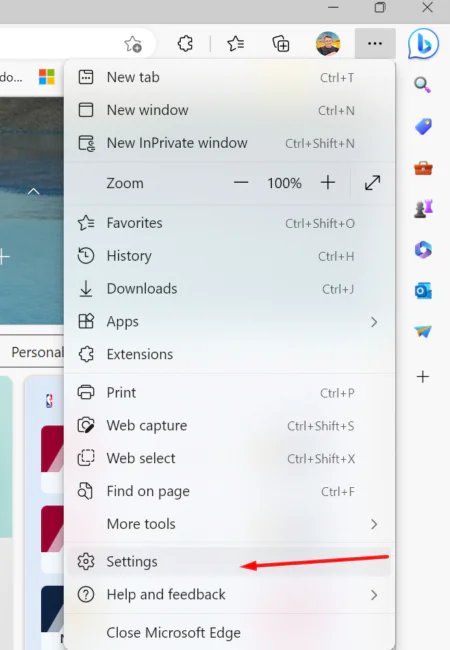
- Go to the Privacy, Search and Services section in the left pane.
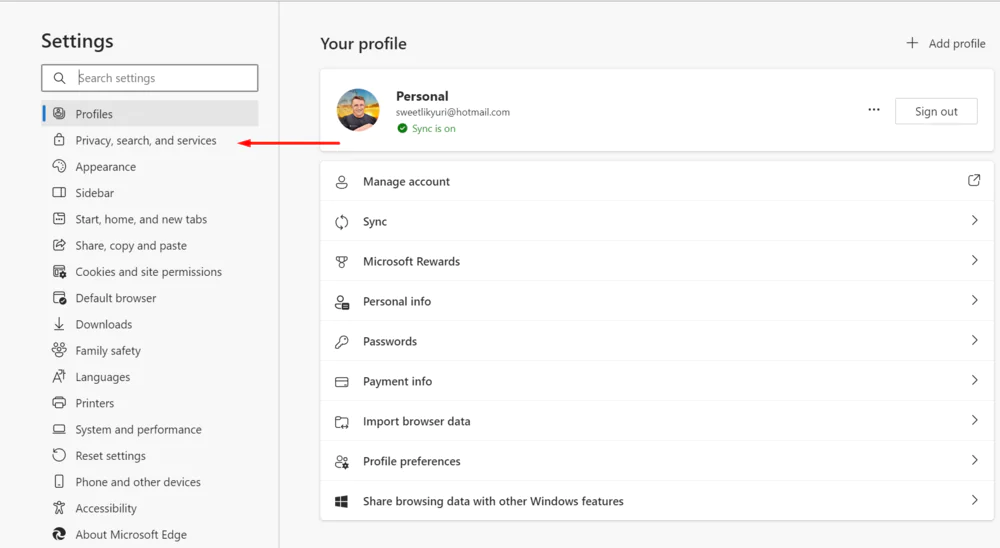
- Make sure the checkbox next to Prevent Tracking is on.
- Select one of the three options: Basic, Balanced, and Strict.
Balanced is the best choice for most people, as it will stop tracking from unknown sites, but won’t affect core features.
Of course, there are more radical ways to stop Windows 11 from collecting your data. Let’s take a look at them as well.
Using a local profile
You’ll get more data protection options if you sign in with a local user account instead of a Microsoft account. You can do this when you first set up your device or at any time. Keep in mind that you may lose some of the data you downloaded while using your Microsoft account. If you do decide to switch to using a local user account, you will need to:
- Go to Settings in the Accounts section
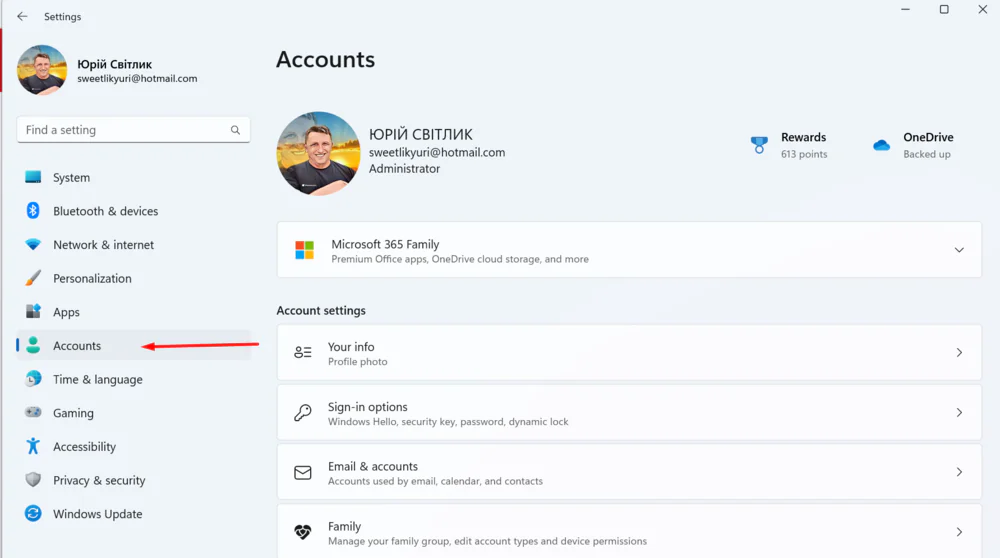 and open Your information.
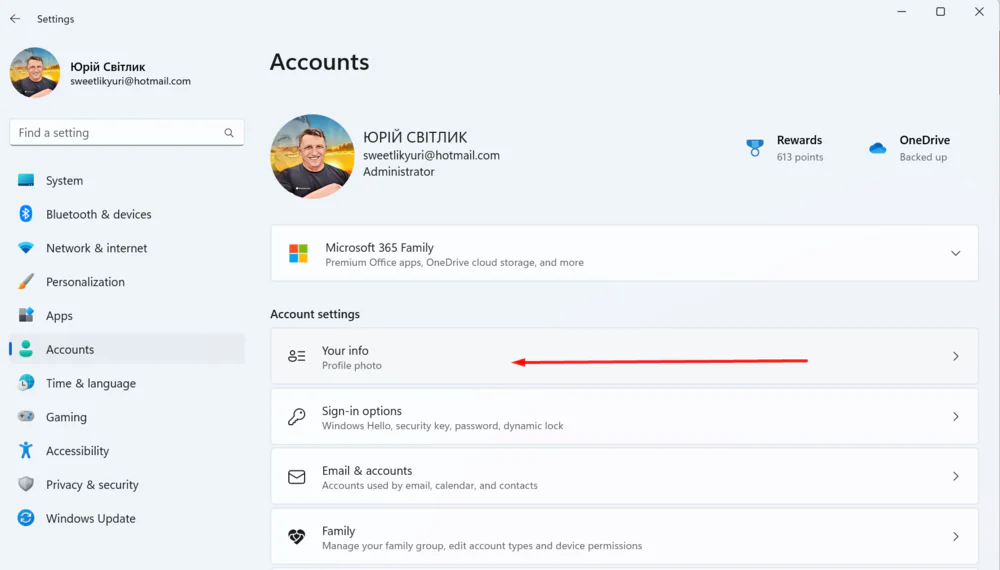
- There, use the Sign in with your local account option.
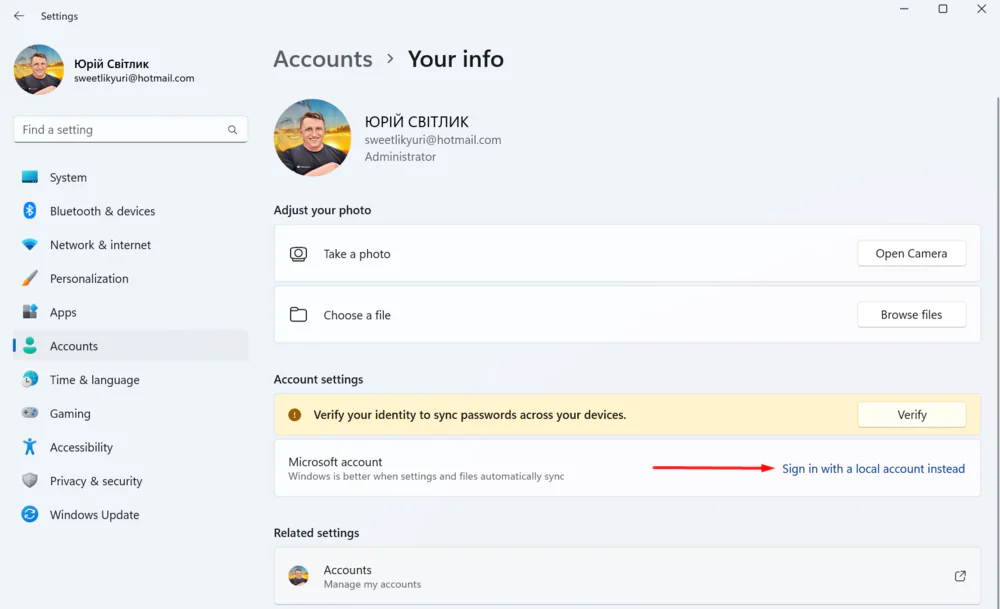
- Windows will then prompt you to Enter your Microsoft account PIN or password.
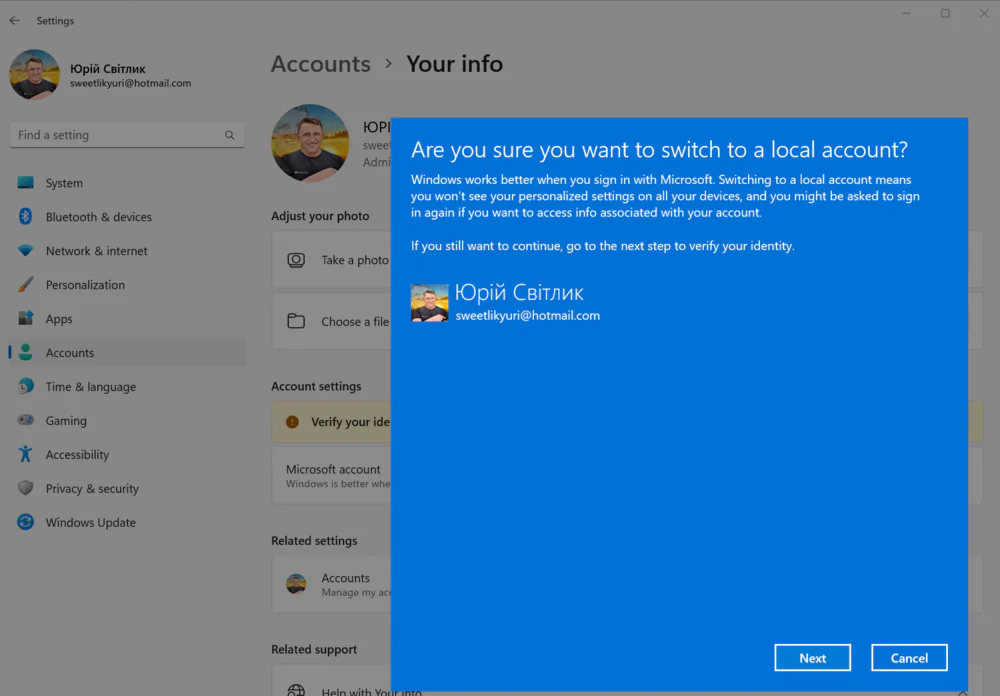
- You will also need to choose a new password for your local account.
You will now be able to sign in to Windows 11 using your local user account.
Deactivation of telemetry
If you want to completely prevent telemetry data from being sent to Microsoft, simply disable the corresponding DiagTrack service. To do this, you need to:
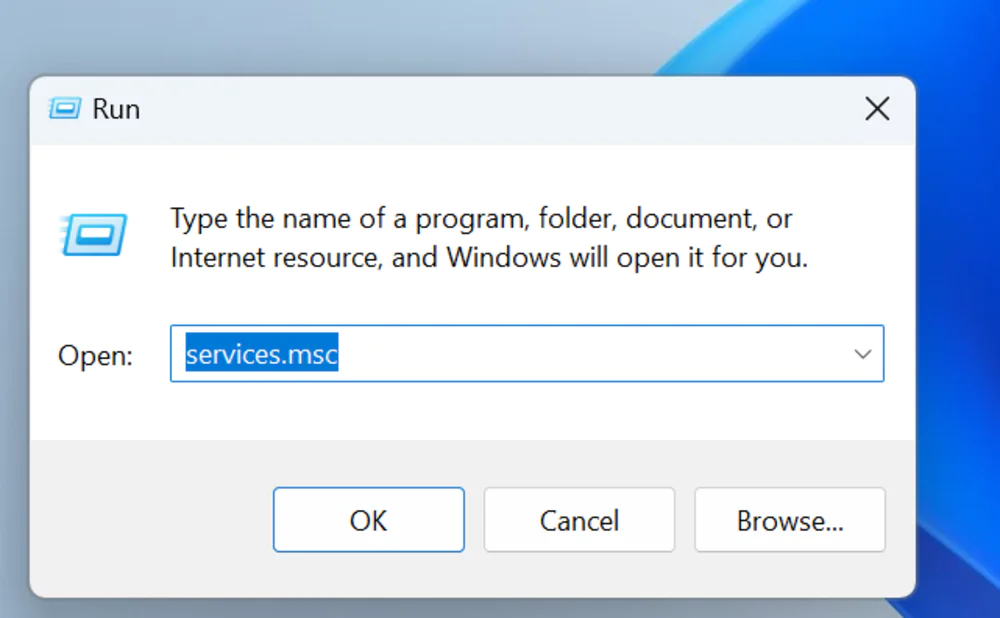
- Use the keyboard shortcut Windows+R to open the Startup window. You can also open it by right-clicking on the Start button and selecting the option.
- Enter the command there services.msc
- The Services window opens, where you need to find the Connected User Experiences and Telemetry service.
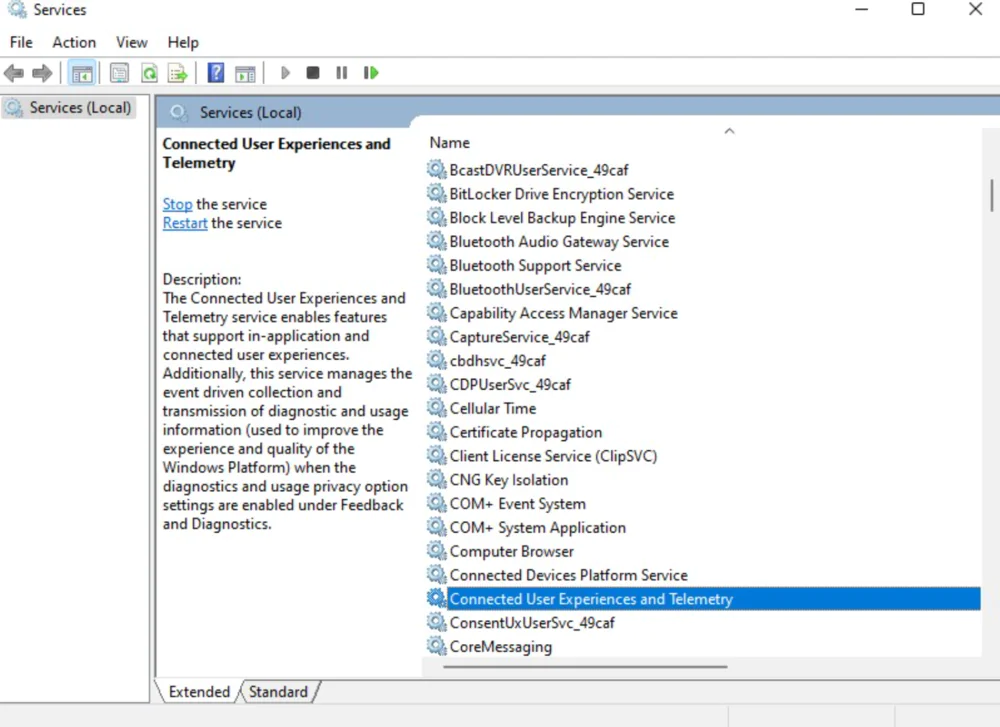
- Double-click on it and set the Startup Type to Off.
You should also keep in mind that Windows 11 is a cloud-connected system, meaning it relies on online services to function properly. For example, the Start menu needs to know about your activity to show you recommendations. Windows Search needs to connect to Microsoft services to display web search results and other content. The Widgets feature connects to the MSN network to play your personalised feeds and weather information. And Windows Update requires an Internet connection to download and install updates.
Now you know how to stop, or rather reduce, your data being tracked in Windows 11.
Read also:
- Bluesky phenomenon: what is the service and how long will it last?
- What are 6G networks and why are they needed?
- ROG FUSION II 500 gaming headset review


