© ROOT-NATION.com - Use of content is permitted with a backlink.
Some time ago I bought a Raspberry Pi 4 single-board mini-computer, not really understanding how and for what it can be used at home. It didn’t cost much, so I decided I could afford to experiment, and right now I have a network-wide AdGuard Home ad blocker, the Apple Time Machine backup storage system, Homebridge for adding uncertified devices to the Apple HomeKit ecosystem, Transmission torrent app, PLEX media server on my RPi4 and the RetroPie retro game console. I plan to experiment with the self-hosted password manager Bitwarden, an open source analogue of the famous 1Password. Not bad for a tiny box, isn’t it?

In this series of two articles, I will try to tell you in as much detail as possible how I installed and configured all this.
The first article will be more useful for Mac users, as it touches on points specific to the Apple ecosystem, although the section concerning AdGuard will be of interest to users of any desktop or mobile operating system.
In the second article, we will consider universal services that can be useful to everyone without exception. And we will move forward like normal people, from simple to more complex stuff.
Preparing Raspberry Pi
It should be noted that early revisions of the Raspberry Pi were rather weak, so every software developer perceived this computer as a single-task machine. Because of this, any service that can be run on RPi by default can be downloaded as a ready-made operating system image. I downloaded it, put it on an SD card, put it in the RPi and turned on the computer with the pre-installed service. But our task is to launch several services simultaneously, since the current revision allows it. Therefore, we will install them as apps.
Let’s assume that you have already connected a Raspberry Pi with a “clean” Raspbian system to the local network. If you’re a beginner and don’t know where to start at all, then start with the official tutorial (the link has a great step-by-step wizard with tons of interactive illustrations), and then move on to the next step.
Step 1
First of all, you need to enable SSH access to your Raspberry Pi. To do this, you need to follow a few simple steps:
- Open the Raspberry Pi Configuration window in the Preferences menu of the operating system
- Click on the Interfaces tab
- Select Enable next to the SSH line
- Click on the OK button for the changes to take effect
If you have Raspbian Lite installed without a graphical interface, in Terminal on the Raspberry Pi itself, type the following commands:
sudo systemctl enable ssh
sudo systemctl start ssh
Access is granted.
I have a macOS computer, so I can get down to the next steps right away, just like Linux owners. Windows 10 users also got a built-in OpenSSH client as part of their operating system some time ago, but some manipulation may be required to activate it.
Open a Windows command prompt or PowerShell (whatever you like) and enter this command:
Get-WindowsCapability -Online | ? Name -like 'OpenSSH*'
If the SSH client is installed, it will look something like this:
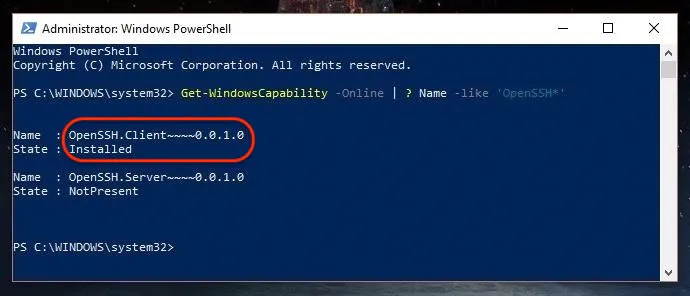
If OpenSSH.Client in the State field tells us that it is NotPresent, then the fastest way to activate it would be to enter the following command:
Add-WindowsCapability -Online -Name OpenSSH.Client*
This completes the first stage of preparation, for Windows users, too. Given the nature of the Raspberry Pi and the fact that OS Raspbian is actually just another version of Linux, we’ll have to work quite a bit with the command line. For some, this may seem unusual, but believe me, it’s not so difficult.
Step 2
Now you need to make sure that your Raspberry Pi always gets the same internal IP address on the local network. The easiest way to do this is in the router settings.
I use the ASUS ZenWiFi Mini three-piece MESH system with a standard web interface of any router from this company. To bind MAC and IP addresses, you need to select a device in the list of connected ones and in the pop-up window simply specify the desired IP. In my case, I chose 192.168.50.10 just for easier memorization.
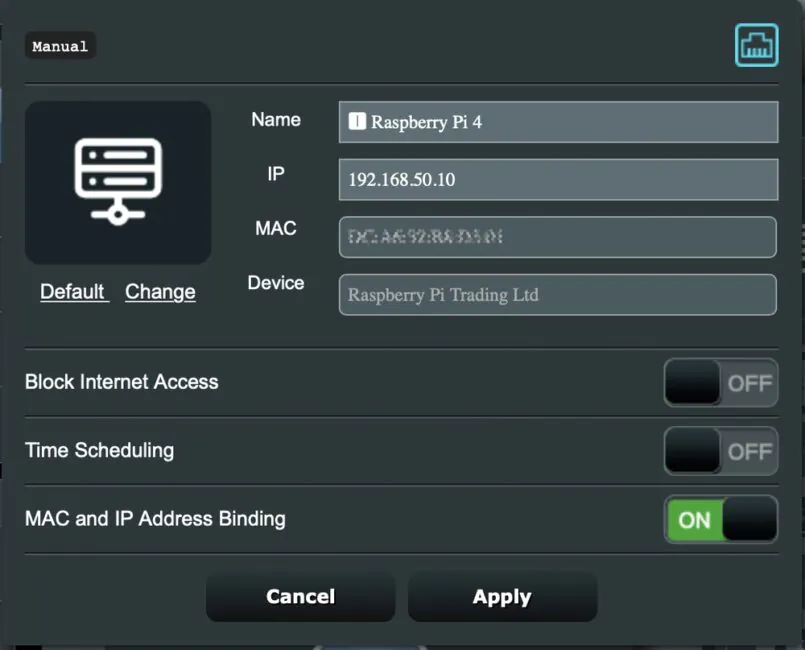
With routers from other manufacturers, the menu item may be called differently, but its essence will be the same – issuing static local IP to connected devices.
Step 3
Launch the Terminal (command line, PowerShell, etc.) on your computer from the standard macOS, Linux or Windows package.
Enter the command
ssh pi@<ip address of your server>
(where instead of <ip address of your server> we enter the IP from the previous step) and get something like this:
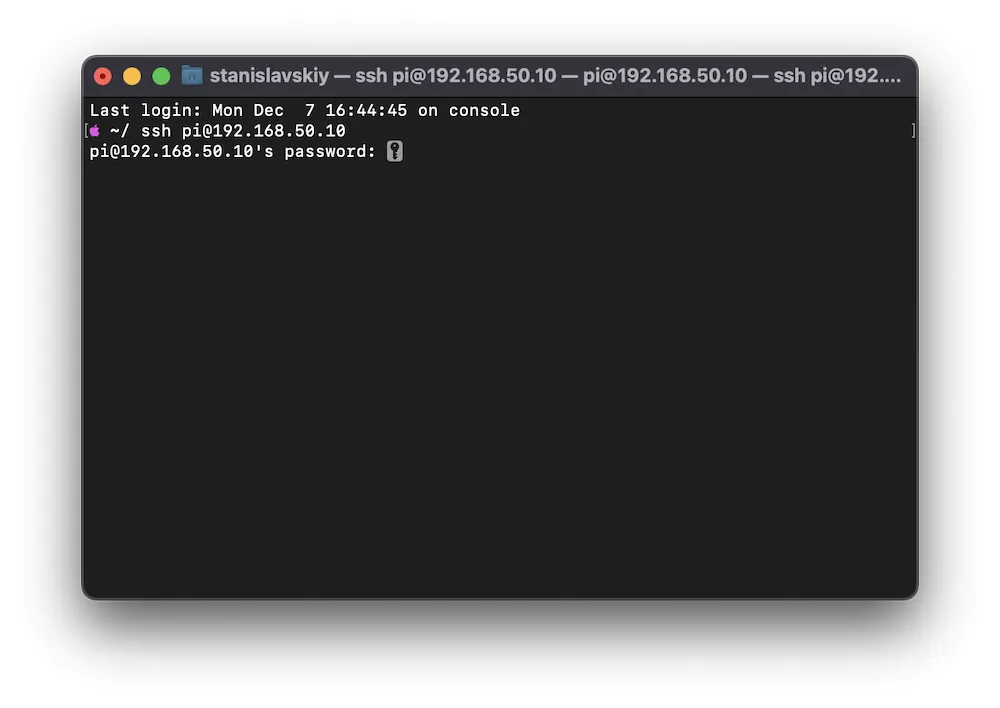
Here you need to enter the password for your Raspberry Pi, which you specified during the initial setup.
Important! The password will not be displayed on the screen during the input process. And asterisks will not be displayed either. You need to enter the password “blindly” and press Enter.
If you entered the password correctly, the result will look something like this:
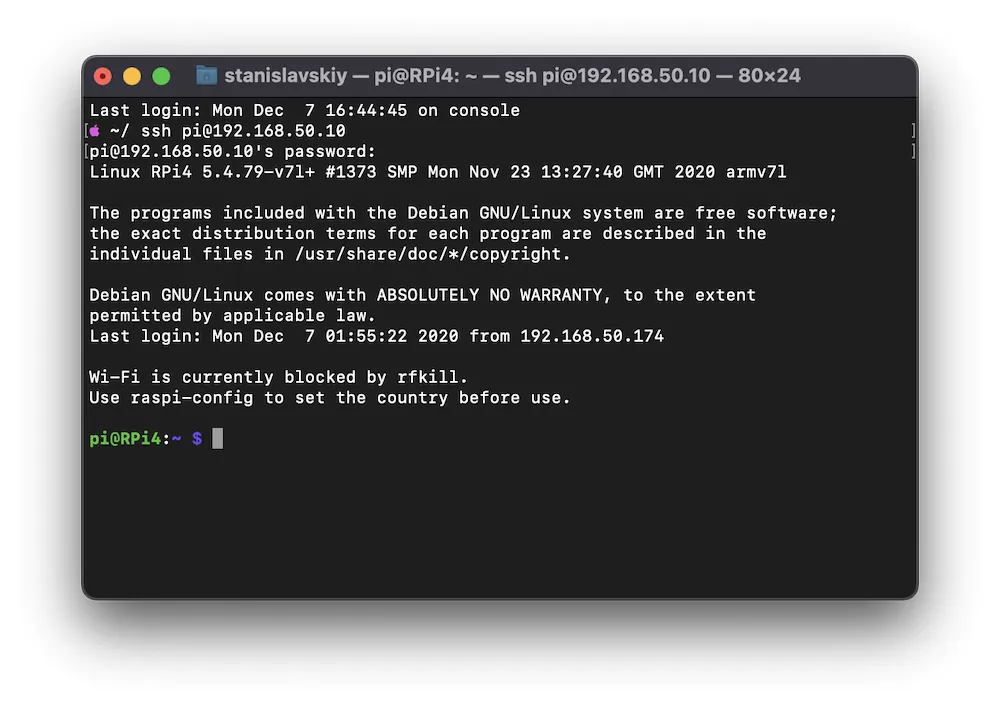 Congratulations, you’re inside your Raspberry Pi. Welcome! You can start configuring individual services. And we’ll start with the simplest.

Installing and setting up AdGuard Home on Raspberry Pi
AdGuard Home, according to the developer’s assurances, is “a powerful web-based anti-ad and tracking tool. With the growing role of the Internet of Things, it becomes more and more important to manage your entire network. Once configured, AdGuard Home will cover ALL of your home devices and you don’t need any client-side software for that. “
In simple terms, this is an ad filter that does not work like a separate app or browser plugins on each of your devices, but a universal solution that covers your entire home local network with filters.
Let’s go back to the Terminal window (I’ll call Windows PowerShell and other shells for entering commands the Terminal from now on), Type in the following commands that will download and unpack the AdGuard Home archive:
cd $HOME
wget https://static.adguard.com/adguardhome/release/AdGuardHome_linux_armv6.tar.gz
tar xvf AdGuardHome_linux_armv6.tar.gz
Now install and run the service:
cd AdGuardHome
sudo ./AdGuardHome -s install
The result will look something like this:
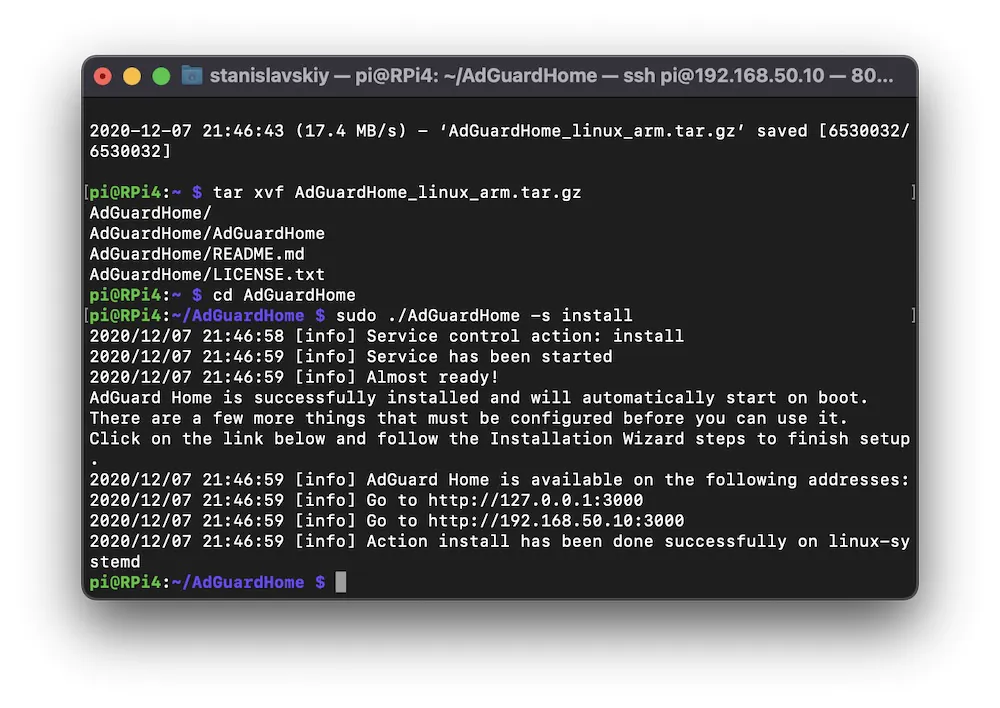
AdGuard Home is already installed! It was easy, wasn’t it?
Now you need to visit the web interface of the newly installed service. Launch a browser (Safari, Chrome, Firefox or whatever you have – it doesn’t matter) and type https://<ip address of your server>:3000 in the address bar. For me it was https://192.168.50.10:3000.
You will see a step-by-step initial setup wizard. If you prefer the interface in another language, you can switch to the one you need.
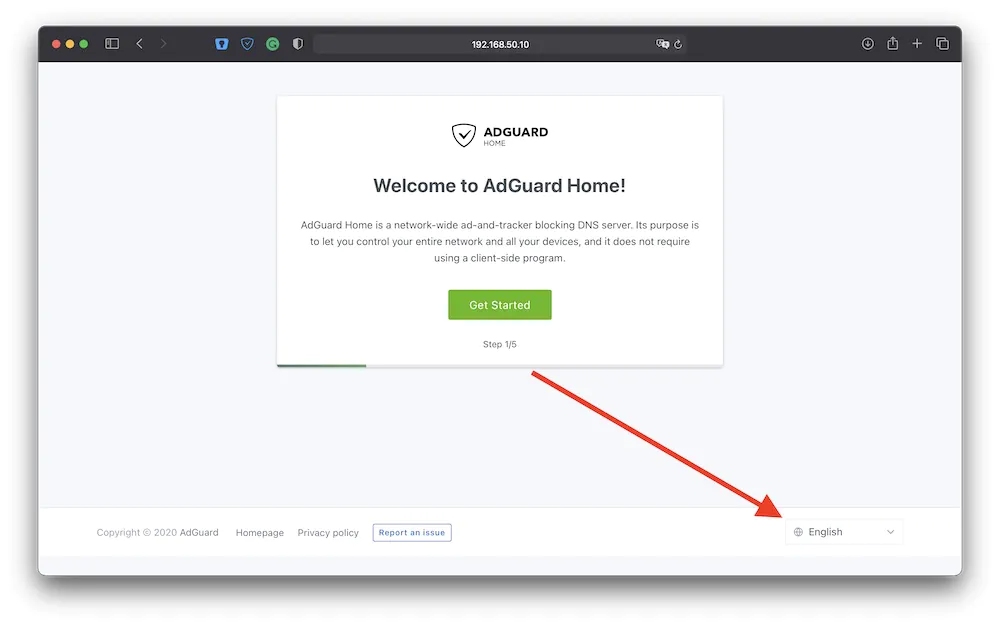 Next, you will be asked to create an AdGuard Home user and create a password for it. Then we’ll see that the Raspberry Pi’s IP address (the same 192.168.50.10 in my case) needs to be registered as DNS in the corresponding section of the router settings. Do it:
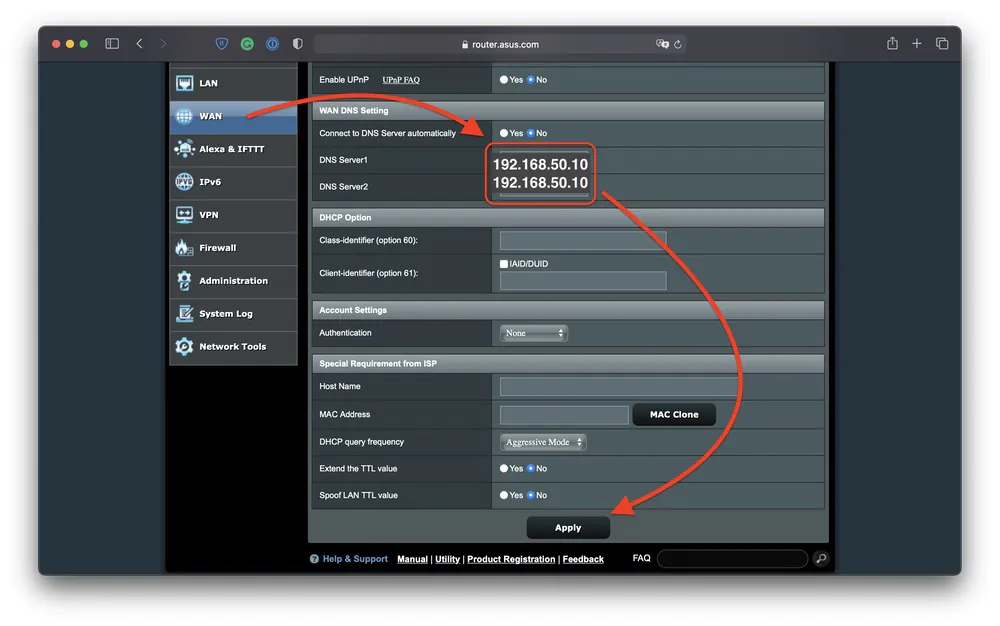
In routers from other manufacturers, the desired settings will be located approximately along the same path.
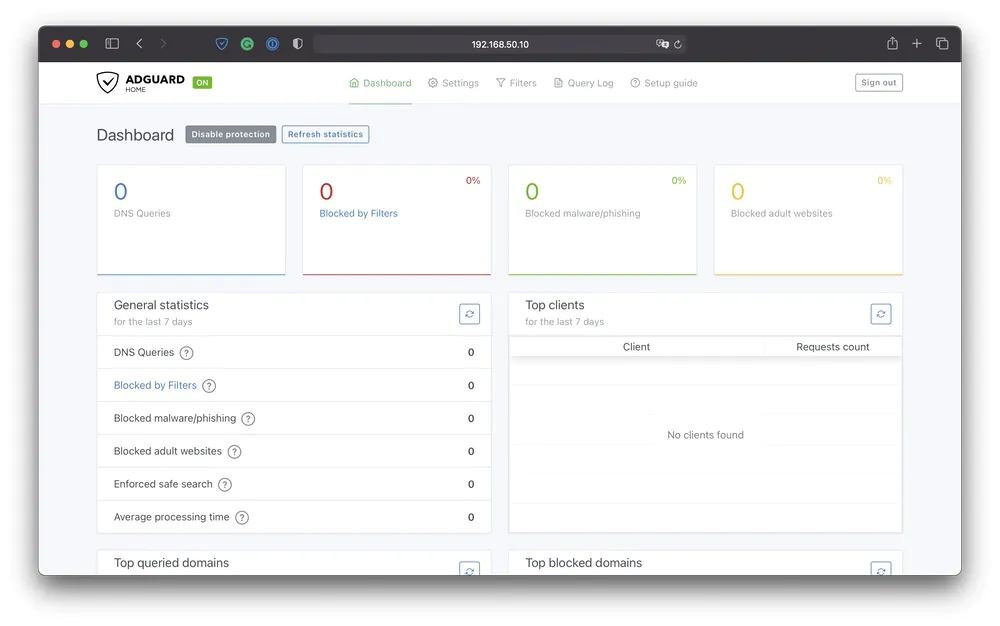
Next, let’s move on to the settings of AdGuard Home itself, which is still pristine.
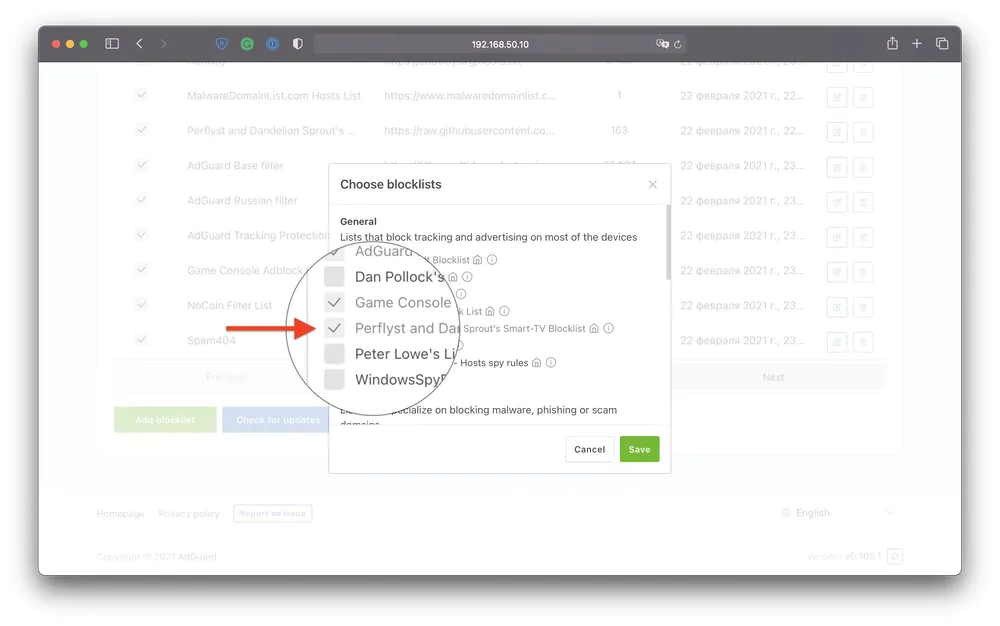
If you have a Samsung, LG or similar Smart TV, go to the Filters – Add Blacklist menu and find Choose blocklists. Activate the corresponding blocklist.
Updating AdGuard Home is done manually, but it is launched with just one button and takes several seconds.
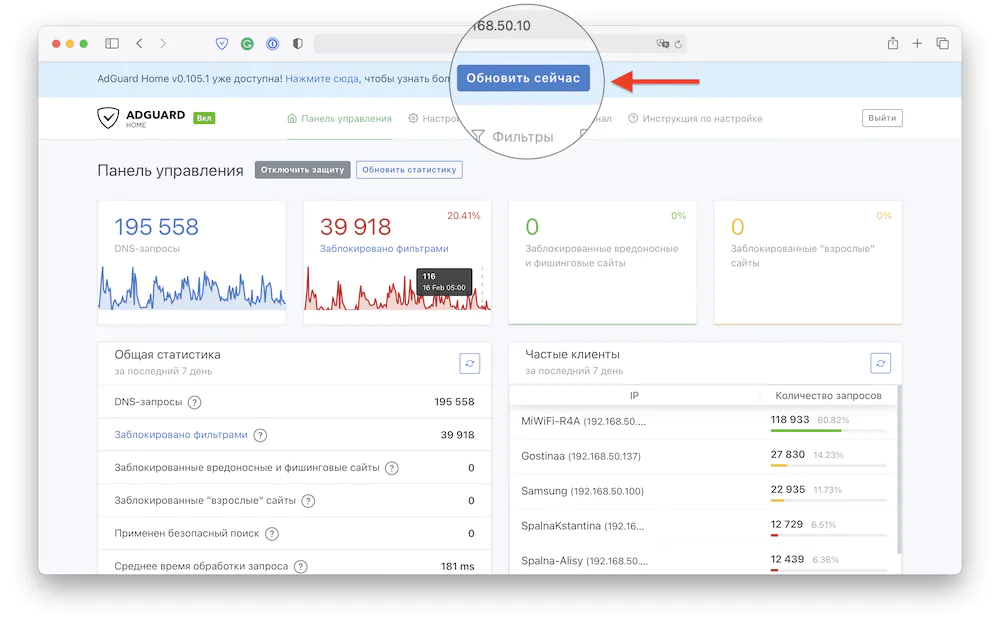
And that’s everything. From now on, all your home devices are virtually immune to advertising. An unpleasant exception here is the YouTube client application on Apple TV devices, but these are the limitations of the tvOS architecture, so AdGuard is powerless in this case.
Installing and setting up Time Machine on Raspberry Pi
According to Wikipedia, Time Machine is a backup system developed by Apple and built into Mac OS X Leopard and later versions of macOS, as well as a program of the same name that allows you to view the contents of backups and restore both individual files and the entire operating system.
Simply put, it is an hourly backup system built into macOS that requires a compatible file server. It is into such a server that the Raspberry Pi can be turned by connecting an external USB HDD to it.
For Time Machine to work correctly, only Raspberry Pi 4 or newer can be used, with USB 3.0 ports (in previous models, the ports are slower) and a corresponding 1-3 GB HDD (with external power supply if it is a 3.5-inch drive).
Important! There are two network protocols that macOS can use to store Time Machine data on a local network. Obsolete Netatalk or more modern Samba. You can use any of them for Time Machine tasks. The Internet is full of instructions for organizing the process precisely through Netatalk, and all these instructions are quite elaborate, but my task is to give the simplest, guaranteed working version. And your task is to choose the one that is convenient for you. So we’ll cover both in this article.
Preparing the HDD
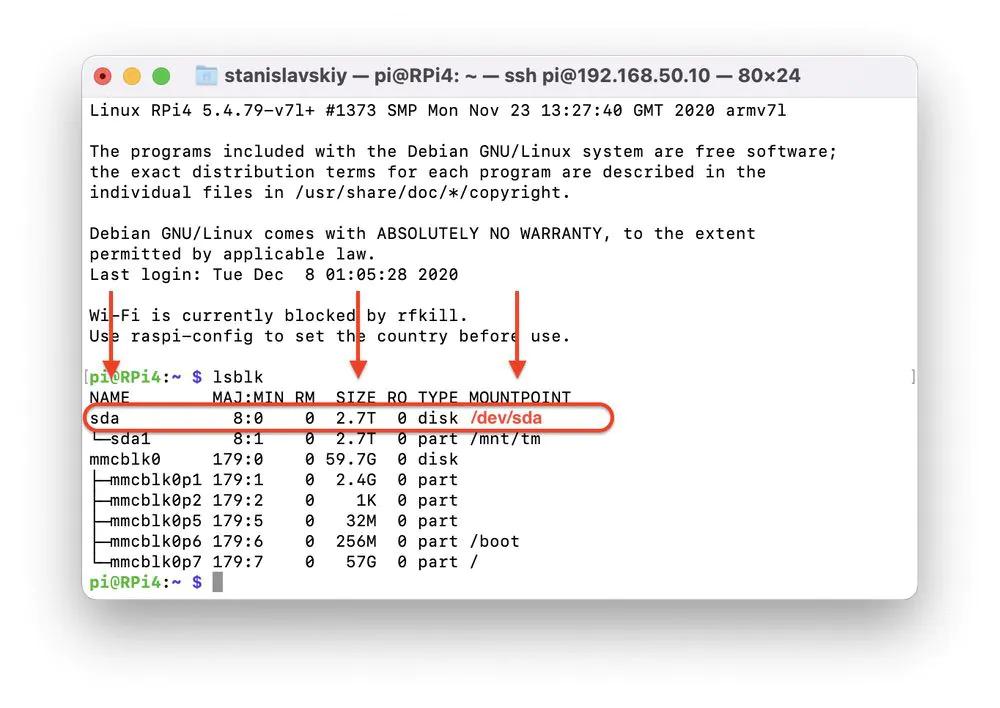
Connect the HDD to the USB 3.0 port of our Raspberry Pi, go to it in the Terminal via SSH and run the command lsblk, which will display a list of connected drives in the console. Pay attention to the size of the disk in order to make sure which one you will work with, to its name and mount point, in my case it’s just sda, in your case it might as well be /dev/sda. That’s what we need.
Enter the command sudo fdisk /dev/sda (or with any other mount point that is relevant in your case), then press m on the keyboard to see the full list of commands. You can even copy it into a separate text file (or use the hint below).
GPT
M   enter protective/hybrid MBR

Generic
d   delete a partition
F   list free unpartitioned space
l   list known partition types
n   add a new partition
p   print the partition table
t   change a partition type
v   verify the partition table
i   print information about a partition

Misc
m   print this menu
x   extra functionality (experts only)

Script
I   load disk layout from sfdisk script file
O   dump disk layout to sfdisk script file

Save & Exit
w   write table to disk and exit
q   quit without saving changes

Create a new label
g   create a new empty GPT partition table
G   create a new empty SGI (IRIX) partition table
o   create a new empty DOS partition table
s   create a new empty Sun partition table
We need to delete a partition as many times as needed to completely clear the disk from partitions, and then create a new one using add a new partition. Don’t forget to write table to disk and exit. All good?
Now we create a file system on the disk. Regular ext4 is quite enough, despite the the popular opinion that the disk must be formatted in one of Apple’s file systems. In reality, this only complicates the preparation process, without any benefit at all.
Enter the command sudo mkfs.ext4 /dev/sda1. All good.
Now we need to find out the UUID of our new partition.
Enter ls -lha /dev/disk/by-uuid to find something like this:
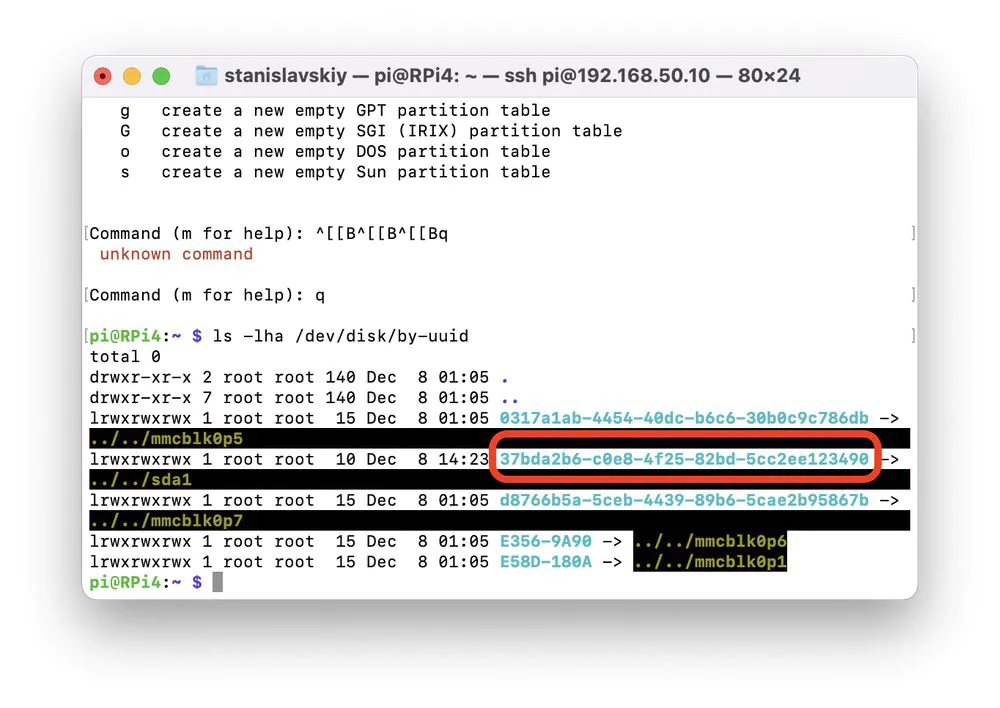
Copy UUID from our sda1 to a separate text file if you are not using the clipboard manager with extended manager.
Now we need to create a folder in which we will mount our disk and give it the appropriate access rights.
sudo mkdir /mnt/tm && sudo chmod -R 777 /mnt/tm && sudo chown pi:pi /mnt/tm
We mount the disk. To do this, edit the configuration file with the command
sudo nano /etc/fstab
nano in this case is the name of the editor preinstalled in the system that I prefer to use.
Make changes to the file that opens by adding a line like
UUID=b32c00d8-0aa8-4ec4-b01f-18cbade45e7c /mnt/tm ext4 nofail,defaults 0 2
but with your UUID from the previous step. It should look like this:
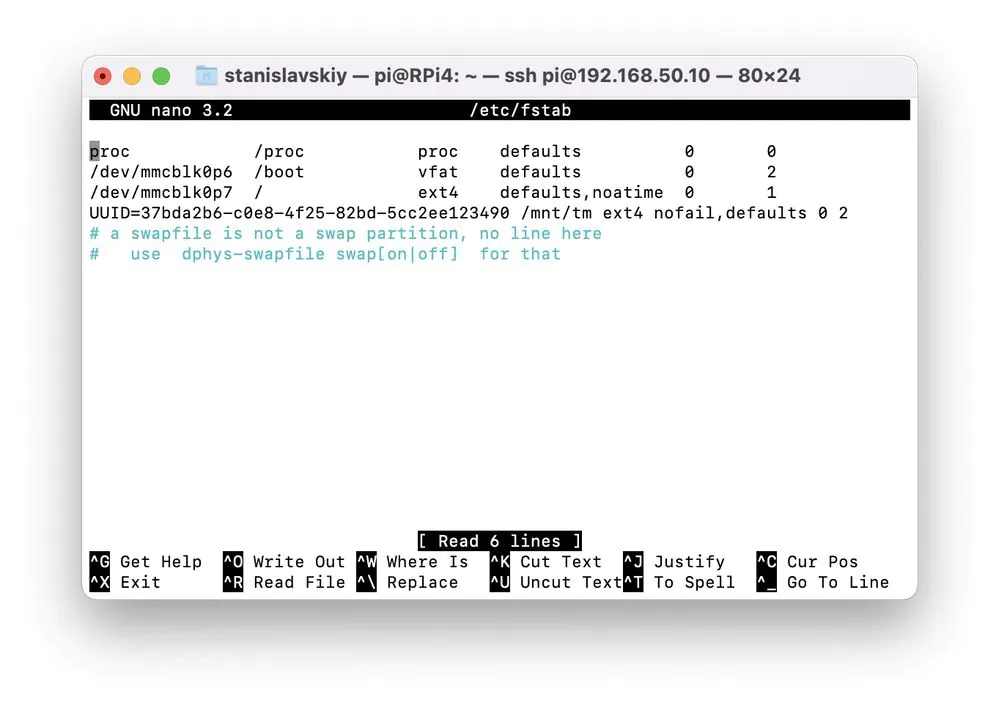
Save the changes by pressing Ctrl+O and Enter, and then exit the editor by pressing Ctrl+X.
Reboot Rarspberry Pi with sudo reboot and after use the SSH again.
Enter the df -h command and make sure the disk is mounted to the system at /mnt/tm.
Great, the disc is ready to go.
Installing and setting up NETATALK (variant 1)
Install:
sudo apt-get install netatalk -y
Configuring everything in the same nano editor:
sudo nano /etc/netatalk/afp.conf
And we make the contents of the configuration file exactly like this:
; ; Netatalk 3.x configuration file ; [Global] ; Global server settings mimic model = TimeCapsule6,106 [Time Machine] path = /mnt/tm time machine = yes valid users = pi ; [Homes] ; basedir regex = /xxxx ; [My AFP Volume] ; path = /path/to/volume ; [My Time Machine Volume] ; path = /path/to/backup ; time machine = yes`
Don’t forget to save the result by pressing Ctrl+O → Enter → Ctrl+X
Now edit the file nsswitch.conf, addingmdns4 mdns at the end of the hosts: line.
sudo nano /etc/nsswitch.conf
The result should look like that:
# /etc/nsswitch.conf
#
# Example configuration of GNU Name Service Switch functionality.
# If you have the `glibc-doc-reference' and `info' packages installed, try:
# `info libc "Name Service Switch"' for information about this file.

passwd:         files
group:          files
shadow:         files
gshadow:        files

hosts:          files mdns4_minimal [NOTFOUND=return] dns mdns4 mdns
networks:       files

protocols:      db files
services:       db files
ethers:         db files
rpc:            db files

netgroup:       nis
Now save the changes by pressing Ctrl+O → Enter → Ctrl+X
Then it remains only to start the services:
sudo service avahi-daemon start
sudo service netatalk start
And check their performance with the commands:
sudo service netatalk status
and
sudo service avahi-daemon status
The result should look like that:
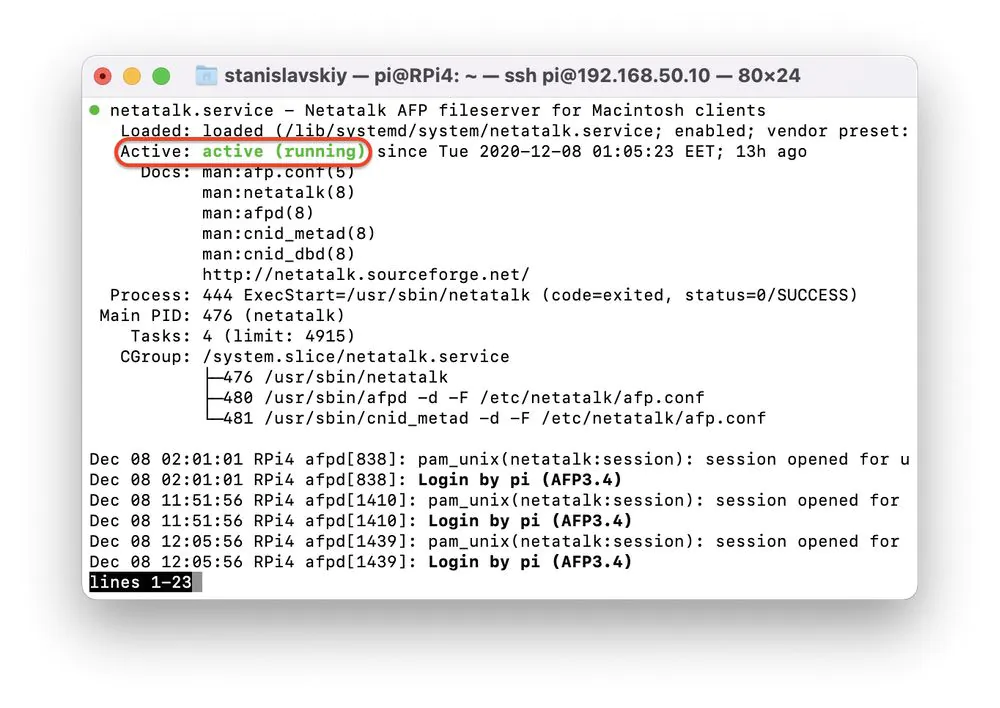
It remains only to go to the macOS Settings, select the Time Machine and find our Raspberry Pi in the available disks.
We use pi as a login, and the password is the one used for SSH access.
Done, the usual option via Netatalk is configured. Now, every time your Mac is on the same local Wi-Fi network as the Raspberry Pi, the backups will automatically be stored in your disk.
Now let’s look at an alternative in the form of the Samba protocol, which is considered more reliable.
Installing and setting up SAMBA (variant 2)
Installing Samba:
sudo apt-get install samba
Set a user password (for the pi user) and edit the configuration. Password first:
sudo smbpasswd -a pi (you can use the same as for SSH).
And then Samba conf in the nano editor:
sudo nano /etc/samba/smb.conf
The contents of [global] should look like that:
[global]
security = user
encrypt passwords = true
map to guest = bad user
guest account = nobody
Add a new block to the very end of the configuration file:
[TimeCapsule]
comment = Time Capsule
path = /mnt/tm
browseable = yes
writeable = yes
create mask = 0600
directory mask = 0700
spotlight = no
vfs objects = catia fruit streams_xattr
fruit:aapl = yes
fruit:time machine = yes
And saving the result: Ctrl+O, Enter, Ctrl+X.
Restart the service:
sudo systemctl restart smb.service
Done. It remains, as in the case of Netatalk, to find the disk in the list of available ones in the Time Machine settings.
Installing and setting up Homebridge on Raspberry Pi
We have successfully reached the most massive part of the article.
Homebridge is a NodeJS-based server that uses the Homekit API to integrate non-certified devices and natively support Apple HomeKit.
The thing about Homebridge is that its plugins support a wide variety of protocols and devices, making them visible and manageable from Apple HomeKit. Accordingly, each plug-in is configured in its own way, often quite differently from its counterpart for another device.
Let’s start. As usual, log into your Raspberry Pi via SSH and follow a few steps.
Installing Node.js
You can copy and paste the entire code block into the Terminal. In the vast majority of cases, this will be enough. But if it so happened that at some stage the installation failed, then enter the remaining commands from the block one by one.
# setup repo
curl -sL https://deb.nodesource.com/setup_14.x | sudo bash -

# install Node.js
sudo apt install -y nodejs gcc g++ make python net-tools

# test node is working
node -v

# upgrade npm (version 6.13.4 has issues with git dependencies)
sudo npm install -g npm
Installing Homebridge and Homebridge Config UI X
First, let’s set up the base with the following command …
sudo npm install -g --unsafe-perm homebridge homebridge-config-ui-x
… and run it as a system service.
sudo hb-service install --user homebridge
Installing Homebridge via the web interface
In your browser go to http://<ip address of your server>:8581 where instead of <ip address of your server> we use the same IP from the beginning of the article, for me it’s
The default user and password values are the same: admin
I recommend that you immediately go to the Users menu item and change the default values there to safer ones.

Done? Great, now to configure plugins.
Different equipment at home dictates which plugins to install. It is quite possible that in your case the set of plugins will be slightly different, but using my configuration as an example, you can get an idea of what issues you can encounter in the process of configuring them.
My bundle of plugins at the time of this writing:
- Homebridge UI (included in the basic package and does not have its own settings)
- Hue (for Philips Hue control)
- Apple TV Remote (to control Apple TV)
- Mqttthing (to control the Gyver lamp with Whilser firmware)
- Samsung Tizen (to control Smart TV Samsung on Tizen OS)
- Weather Plus (for smart home automation depending on weather conditions)
- Yeelight WiFi (to control Xiaomi Yeelight)
Let’s take it one step at a time.
Setting up Hue
To install any plugin, just go to the corresponding tab of the web interface, type in the name of the desired piece of hardware into the search bar and select the plugin in the list of available ones. I recommend that you pay attention to the “🛡Verified” tag, the version and date of the plugin update (if the author has not updated it for a couple of years, chances are good that it will not work) and be sure to open the link to the plugin home page, which usually describes the installation process in detail.

Press the Install button of the required plugin and wait a minute or two until the plugin is installed.
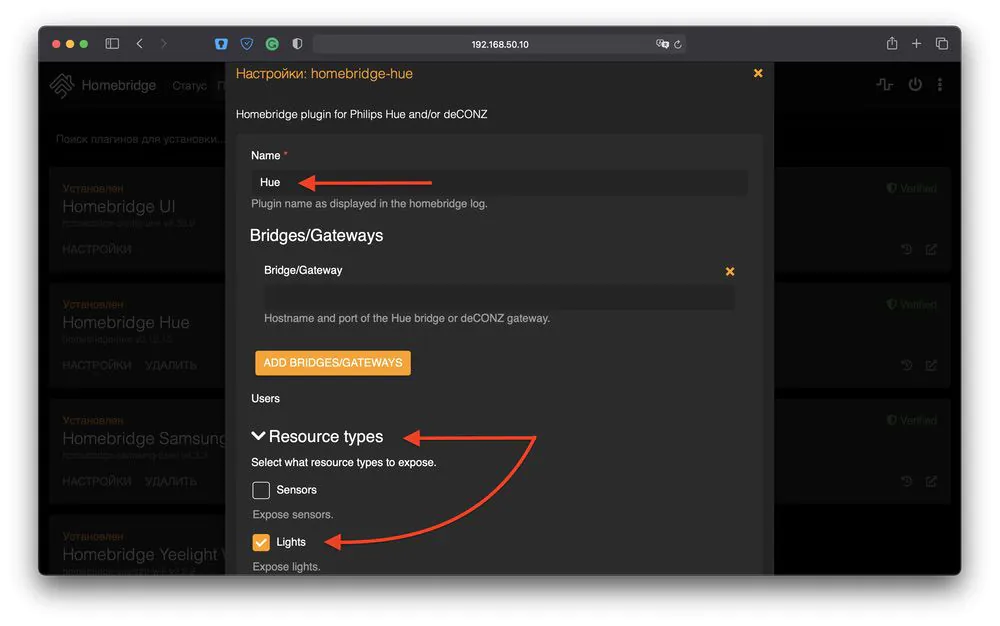
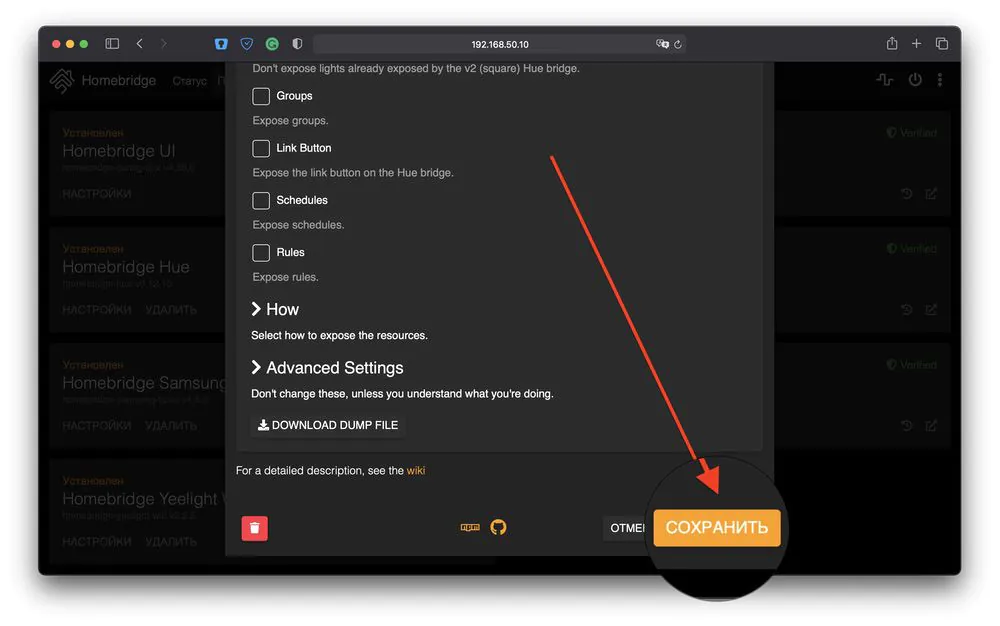
The Homebridge Hue plugin is fairly easy to configure. You just need to set a default name that will be displayed in the Homebridge logs and choose which type of compatible devices will be processed by the plugin. In my case, it’s only Philips Hue lighting, the first, round, version of it.
Fill in the data and be sure to save the result. Now just press the central button on the Philips Hue hub and wait 15 seconds for the plug-in to recognize the hub. Done!
All that remains is to pick up your iPhone, point its camera at the QR code located on the Status tab of the Homebridge web interface, and add it as a bridge to your HomeKit.
If HomeKit itself was already pre-configured (Apple TV or iPad was selected as the main hub, rooms were added, etc.), then the step-by-step wizard will offer to distribute all the Hue lighting fixtures found in the corresponding rooms and give each fixture a new name. In my living room, for example, there are lamps called Ceiling 1, Ceiling 2 and Ceiling 3, but by means of HomeKit itself on the iPhone (Combine with other devices) I combined them into the Overhead light group. At the same time, in the same living room I have a Floor Lamp and Bedside Lamp, which are separate devices, but Siri perfectly understands a variety of commands without any additional training:
- “Turn on the light in the living room (all the lamps in the living room are on)”
- “Turn on the floor lamp”
- “The brightness of the night light twenty percent”
- “Turn on the Bedside Lamp”
- “Turn off the overhead light”
- “Blue color for a floor lamp”
- “Turn off the lights in the living room (turns off all the lights in the living room)”
- “Turn off all the lights (turns off the lights throughout the apartment)”
Etc. If you have a well-configured Apple family, the appropriate and absolutely logical commands are automatically available to all members with an Apple ID in your family.
Setting up Apple TV Remote
I use this plugin for one single purpose: to create an additional switch for the Apple TV digital media player. Apple HomeKit has the ability to program, for example, playback of an album or playlist according to a predetermined condition, such as “When I come home.” And everything would be fine, but if the set-top box is sleeping at this time, then such a scenario is not able to wake it up. But an additional virtual switch can:
Step 1. Install a service to catch Apple TV credentials
sudo npm install -g node-appletv-x
Step 2. Look for Apple TV devices on the local network
sudo appletv pair
Step 3. Create a pairing with the desired device. In the console output, it will look something like this:
% appletv pair
✔ Connecting to Living Room
✔ Initiating Pairing
? Enter the 4-digit pin that's currently being displayed on Living Room
When you see ? Enter the 4-digit pin that's currently being displayed on... a standard four-digit code for pairing with the remote will appear on the screen of your Apple TV box, (in our example, 1234), which must be entered right there in the console.
% appletv pair
✔ Connecting to Living Room
✔ Initiating Pairing
? Enter the 4-digit pin that's currently being displayed on Living Room 1234
✔ Completing Pairing Credentials: 77346115-ED48-46A8-A288-<snip>
Instead of <snip> there will be several lines of letters and numbers, they need to be copied into a separate text file in their entirety, starting from the first number in the lineCredentials:. A bit later we’ll need those credentials.
Step 4. On the Configuration tab of the Homebridge web interface, add this block to the config section "platforms": [
{
   "platform": "AppleTvPlatform",
   "name": "Apple TV Platform",
   "devices": [
      {
         "name": "Living Room",
         "credentials": "77346115-ED48-46A8-A288-<snip>",
         "isOnOffSwitchEnabled": true,
         "onOffSwitchName": "Apple TV"
      }
   ]
},
…and in "credentials": just insert the full contents of the text file from the previous step.
Choose any name for the prefix, “Living room” is here only for example.
Шаг 5. Install the plagin itself.
On the Plugins tab of the Homebridge web interface, enter Apple TV Remote into the search bar and press Install. After installing the plugin, you will be prompted to restart Homebridge, this is done by clicking on the appropriate button.

Done, there is a new switch on iPhone in HomeKit that can now be added to all scenarios where you want Apple TV to turn on automatically.
Voice commands like “Siri turn on Apple TV” or “Siri turn off Apple TV” are also supported. Moreover, if you have several players in different rooms, Siri will also automatically understand the requirement to turn off Apple TV in a particular room, or all at once.
In fact, this plugin is rapidly developing, it already knows how to recognize the Bundle ID for apps running on the console and interfere with their work, to pause a movie on Netflix, for example. But this you will have to set up yourself.
Setting up Mqttthing plugin
I use this plugin with the aforementioned Gyver lamp (a homemade lamp with an Arduino board and a 16×16 addressable LED array). The lamp itself must have firmware from Whilser. And may the Force be with us.

Step 1. Installing an MQTT broker
We execute a number of commands. They do not work in batches, so we enter them into the console one by one.
sudo wget http://repo.mosquitto.org/debian/mosquitto-repo.gpg.key
sudo apt-key add mosquitto-repo.gpg.key
cd /etc/apt/sources.list.d/
sudo wget
sudo apt update
sudo apt install mosquitto mosquitto-clients
sudo /etc/init.d/mosquitto stop
sudo nano /etc/mosquitto/mosquitto.conf
The last command launches the same old nano editor, in which we replace the contents of the opened file with the following:
# Place your local configuration in /etc/mosquitto/conf.d/
#
# A full description of the configuration file is at
# /usr/share/doc/mosquitto/examples/mosquitto.conf.example

# pid_file /var/run/mosquitto.pid

allow_anonymous true
listener 1883

persistence true
persistence_location /var/lib/mosquitto/

log_dest topic

log_type error
log_type warning
log_type notice
log_type information

connection_messages true
log_timestamp true

include_dir /etc/mosquitto/conf.d
As usual, Ctrl+O, Enter, Ctrl+X, and then restart the broker using the command
sudo /etc/init.d/mosquitto start
MQTT broker is installed.
Step 2. Installing Mqttthing plugin
As usual we go to the Plugins tab in the Homebridge web interface, look for Mqttthing and press Install.
Step 3. Configuring Mqttthing plugin
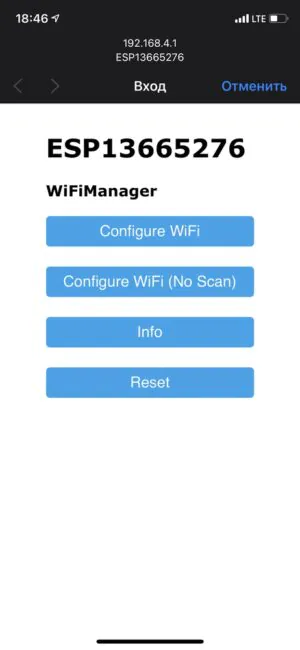
Each Gyver lamp has its own ESP chip ID. For example, ESP-3bd20b. If you made and stitched the lamp yourself, then you are well aware of this, if not, then put the lamp in pairing mode and when you connect to your WiFi network, the required ID will be displayed in the corresponding dialog box on the iPhone. Write it down.
- Disconnect the lamp power;
- Disconnect the router;
- Turn on the lamp power;
- On iPhone go to Settings → WiFi
- Select an unsecured network with an SSID like “ESP12345678” and in the dialog box that opens, tap Configure WiFi
- At the very bottom of the configuration window there will be the desired Chip ID
If the lamp has already been configured before, you can simply turn it off, turn on the router and turn on the lamp again – the old settings will be picked up. If this is the first time you connect the lamp, turn on the router and select your network in the list of settings, and then enter all the necessary data, such as the home WiFI password and the IP address of the Raspberry Pi.
Open the Configuration tab of the Homebridge web interface and to the section "accessories": [ add a huge piece of code, replacing the ID with ESP-3bd20b with your own:
{
    "accessory": "mqttthing",
    "type": "lightbulb",
    "name": "Bedside lamp",
    "url": "http://127.0.0.1:1883",
    "mqttPubOptions": {
        "retain": false
    },
    "topics": {
        "getOn": "homeassistant/light/ESP-3bd20b/status",
        "setOn": "homeassistant/light/ESP-3bd20b/switch",
        "getBrightness": "homeassistant/light/ESP-3bd20b/brightness/status",
        "setBrightness": "homeassistant/light/ESP-3bd20b/brightness/set",
        "getRGB": "homeassistant/light/ESP-3bd20b/rgb/status",
        "setRGB": "homeassistant/light/ESP-3bd20b/rgb/set"
    },
    "onValue": "ON",
    "offValue": "OFF"
},
{
    "accessory": "mqttthing",
    "type": "television",
    "name": "Bedside lamp effects",
    "url": "http://127.0.0.1:1883",
    "topics": {
        "setActive": "homeassistant/light/ESP-3bd20b/switch",
        "getActive": "homeassistant/light/ESP-3bd20b/status",
        "setActiveInput": "homeassistant/light/ESP-3bd20b/effect/set",
        "getActiveInput": "homeassistant/light/ESP-3bd20b/effect/status"
    },
    "inputs": [
        {
            "name": "Confetti",
            "value": "Конфетти"
        },
        {
            "name": "Fire",
            "value": "Огонь"
        },
        {
            "name": "Rainbow vertical",
            "value": "Радуга верт."
        },
        {
            "name": "Rainbow horizontal",
            "value": "Радуга гориз."
        },
        {
            "name": "Change color",
            "value": "Смена цвета"
        },
        {
            "name": "Madness 3D",
            "value": "Безумие 3D"
        },
        {
            "name": "Clouds 3D",
            "value": "Облака 3D"
        },
        {
            "name": "Lava 3D",
            "value": "Лава 3D"
        },
        {
            "name": "Plasma 3D",
            "value": "Плазма 3D"
        },
        {
            "name": "Rainbow 3D",
            "value": "Радуга 3D"
        },
        {
            "name": "Peacock 3D",
            "value": "Павлин 3D"
        },
        {
            "name": "Zebra 3D",
            "value": "Зебра 3D"
        },
            {
            "name": "Forest 3D",
            "value": "Лес 3D"
            },
        {
            "name": "Ocean 3D",
            "value": "Океан 3D"
        },
        {
            "name": "Snowfall",
            "value": "Снегопад"
        },
        {
            "name": "Matrix",
            "value": "Матрица"
        },
        {
            "name": "Fireflies",
            "value": "Светлячки"
        },
            {
            "name": "Aquarium",
            "value": "Аквариум"
        },
        {
            "name": "Starfall",
            "value": "Звездопад"
        },
        {
            "name": "Paintball",
            "value": "Пейнтбол"
        },
        {
            "name": "Spiral",
            "value": "Спираль"
        },
        {
            "name": "Warm light",
            "value": "Теплый свет"
        },
        {
            "name": "Pendulum",
            "value": "Маятник"
        },
        {
            "name": "Shimmering",
            "value": "Мерцание"
        },
        {
            "name": "Police siren",
            "value": "Полицейская сирена"
        },
        {
            "name": "Drift",
            "value": "Дрейф"
        },
        {
            "name": "Pack",
            "value": "Стая"
        }
    ],
    "onValue": "ON",
    "offValue": "OFF"
}
Done. Apple HomeKit has two new devices, the bedside lamp and the bedside lamp effects. They are interconnected and their purpose is quite easy to grasp. If you wish, you can rename them in the config.
Unfortunately, the author of the firmware wrote the parameters in Russian, which looks a bit weird, but we modified it so that you could speak with Siri in English as usual.
Setting up Samsung Tizen
Step 1. Checking your TV for compatibility
In the control panel of the router, assign a static local IP to the TV, as you did for the Raspberry Pi at the very beginning. For example, in my case it is 192.168.50.100.
In a browser on your computer, go to http://TV_IP:8001/api/v2/, which for me is http://192.168.50.100:8001/api/v2/
If you see a page with a bunch of service information like this …
{"device":{"FrameTVSupport":"false","GamePadSupport":"true","ImeSyncedSupport":"true","OS":"Tizen","TokenAuthSupport":"true","VoiceSupport":"false","countryCode":"UA","description":"Samsung DTV RCR","developerIP":"0.0.0.0","developerMode":"0","duid": ......
…it means that there is a chance of success. But you need to understand that not all Samsung TV models are compatible with the plug-in. For example, those requiring identification via PIN will not work.
Copy the value of the "wifiMac": field from the service page and prepare the TV remote control.
Step 2. Installing the plugin
Nothing new, we search for the Samsung Tizenplugin, find what we need (by @tavicu) and install it.
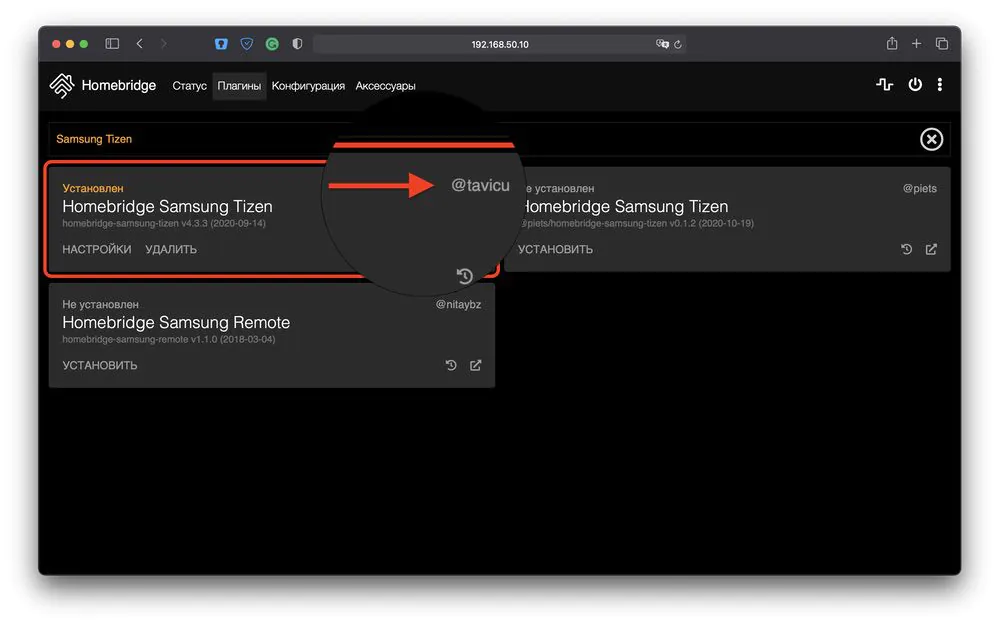
Afterwards go to the settings and register the following values there:
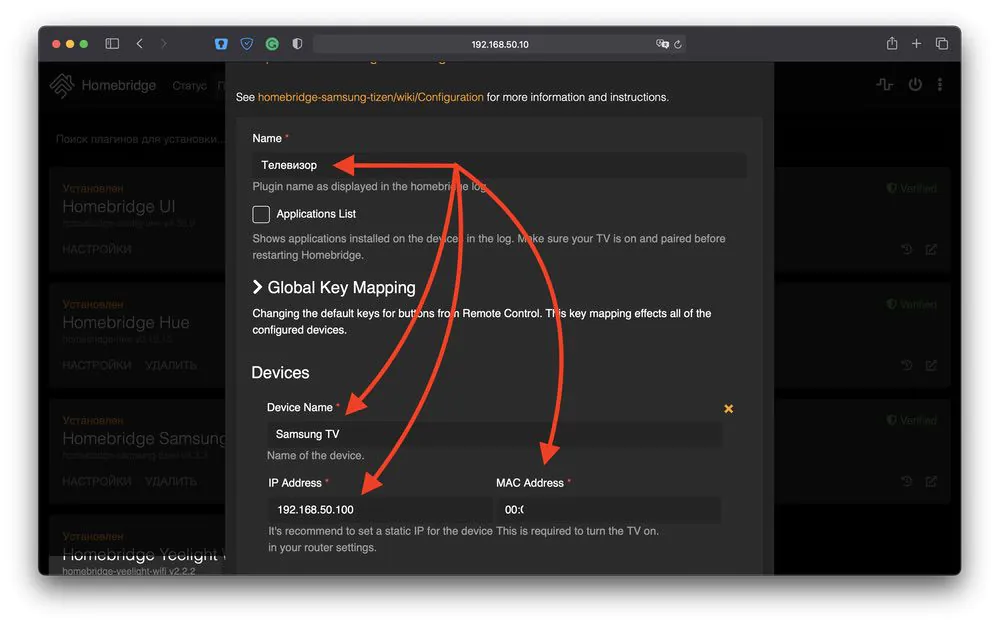
The name “TV” is quite enough, as Siri perfectly understands the request to turn on the TV in the living room, in which you probably don’t have more than 1 TVs. She also perfectly understands the command “turn on the TV in the bedroom” without activating the TV in the living room.
Step 3. Pairing with a TV
Everything is simple here: take the TV remote control in your hands and wait for a pop-up menu to appear on the screen with a warning about a device trying to take control of the TV. The TV, of course, must be turned on. When a request appears in the upper right corner of the screen, select Allow with the TV remote control. All good.
Step 4. Add a TV to Apple HomeKit
Yes, unlike in previous cases, the TV will not magically appear in the list of devices. Therefore, take the iPhone in our hands and do the following:
- Launch the Home app and on the home page, click + in the upper right corner;
- Select Add accessory;
- At the bottom of the screen, click No code or no way to scan;
- On the next screen, select your TV;
- When prompted to enter the HomeKit setup code, click Use Camera;
- Point the camera at the QR code on the Homebridge Status tab.
Step 5. Plugin settings
After digging deeply into the documentation for the plug-in, you can make Siri launch specific apps from the list of installed ones on the TV, pause them, and so on. Let’s change the functionality of a single button in the virtual Apple Remote built into the iOS Control Center shutter.
This is the ℹ︎ (information) button, which by default displays information about the current picture mode at the top of the TV screen. There is no way to see the list of apps installed on the TV with the help of the Apple Remote. Let’s change that.
 Go to the plugin settings, section Key Mapping, look for the INFORMATION field and change its value to
 KEY_HOME. Restart Homebridge and voila – the ℹ︎ button of the virtual remote brings up the main app menu! The virtual remote makes sense now.
Weather Plus plugin settings
Step 1. OpenWeather account creation
We go to the site https://home.openweathermap.org and register an account, it’s free.
Step 2. Generating API Keys
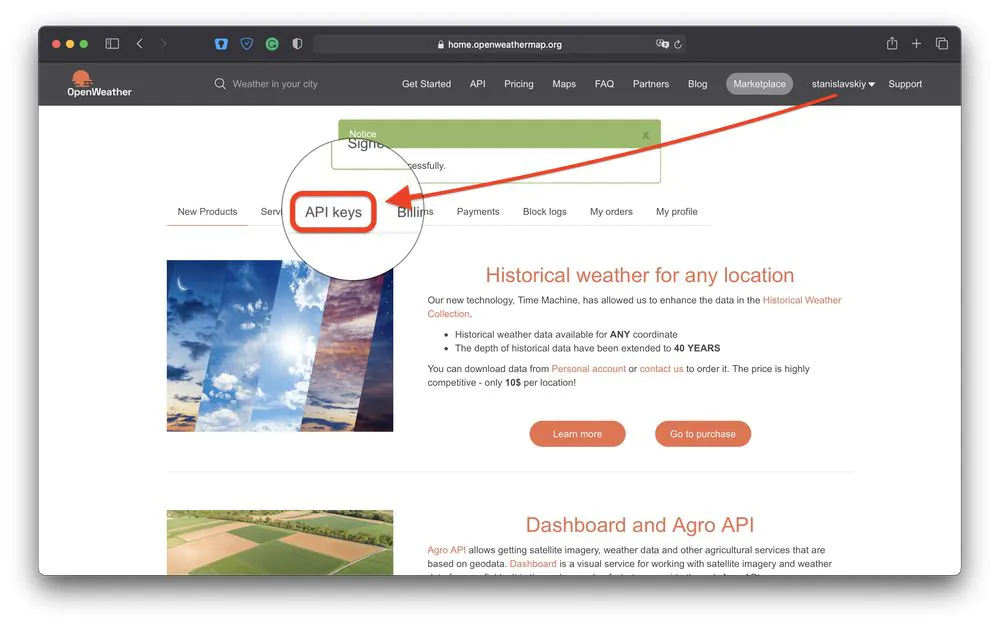
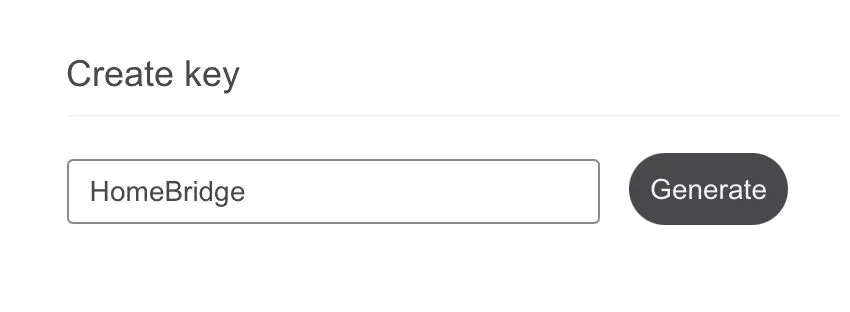
Go to the appropriate tab in your OpenWeather personal account and, having specified a name for the key, and click the Generate button.
Step 3. Installing and configuring the Weather Plus plugin
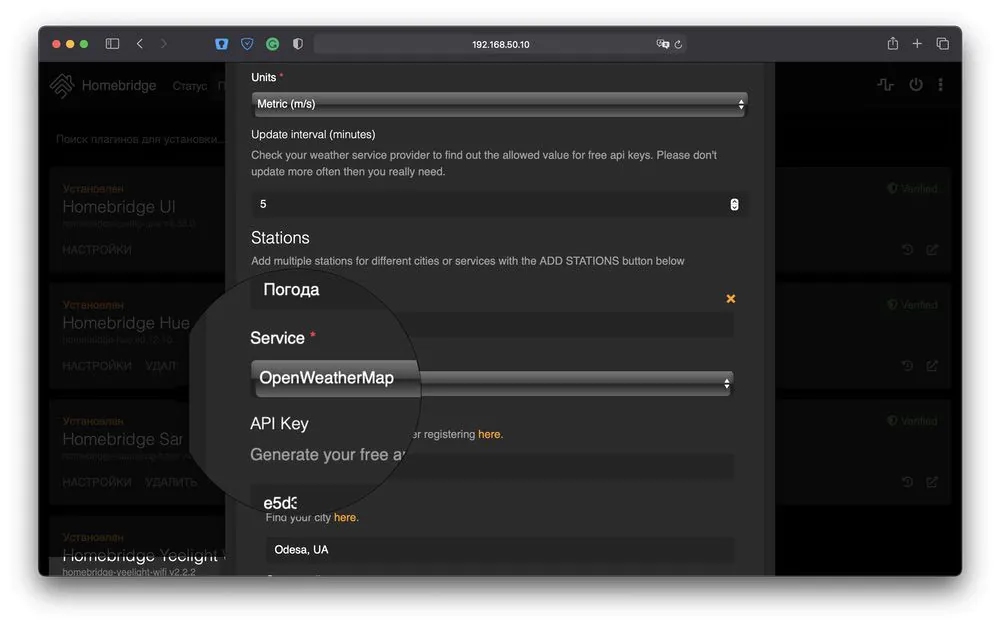
We use the usual method to search and install the required plugin, and then go to its settings. The result should look something like this:
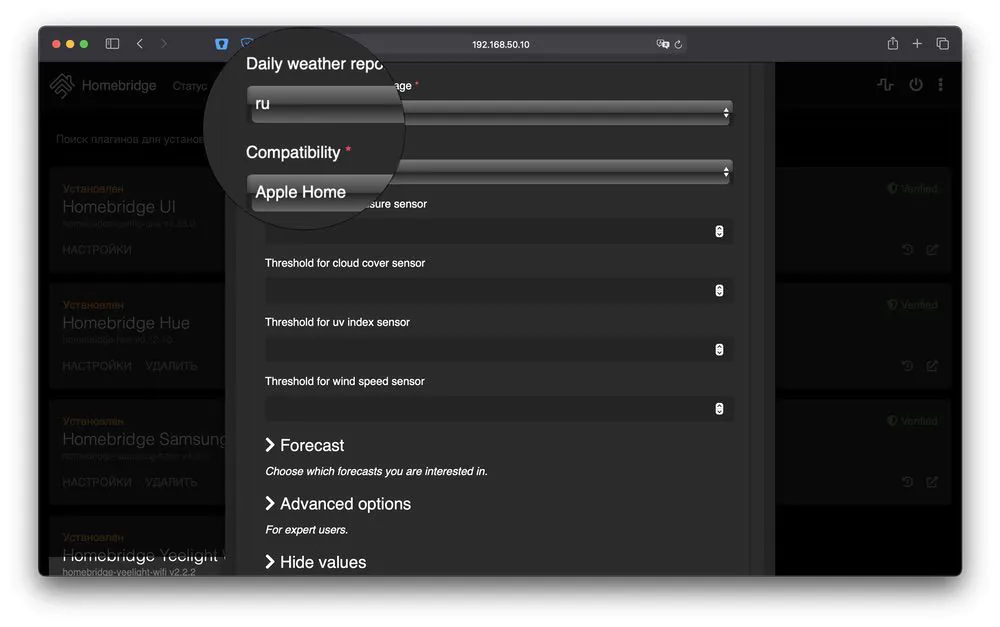
In the forecast, I am personally only interested in the values for the next hour, so I disable the rest:
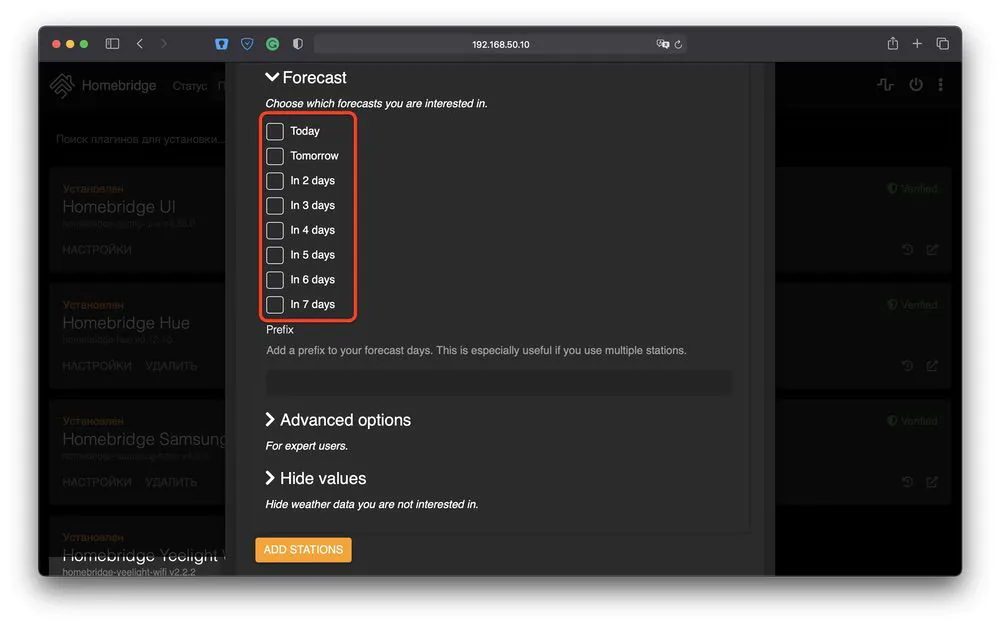
And so that unnecessary virtual weather sensors do not annoy you, disable them in the corresponding Hide Values section. It is better to disable:
- Air Pressure
- Cloud Cover
- Dew Point
- Temperature Apparent
- Wind Direction
- UV Index
- Wind Speed
- Wind Speed Max
And click Save at the very bottom of the settings window.
As a result, the Apple HomeKit will display the temperature and humidity values for the next hour, as well as two “Snow” and “Rain” virtual sensors, which can be used in various scenarios. For example, I have programmed HomeKit automation, in which, when rain or snow appear in the forecast for the next hour, Gyver’s lamp demonstrates the corresponding effect of a puddle or falling snowflakes for a minute. In this case, the effect will turn on only in the interval from 8:00 to 23:00 and only if someone is at home. At other times, advices to take an umbrella or put on waterproof clothing are redundant.
Yeelight WiFi plugin setup
Yeelight command shows plugins for installation, including one verified. But I prefer another one, in which the transitions between states are as smooth as possible. In addition, it supports adaptive lighting from Apple, but the standard Xiaomi application has not learned this in a year since the appearance of this feature in HomeKit.
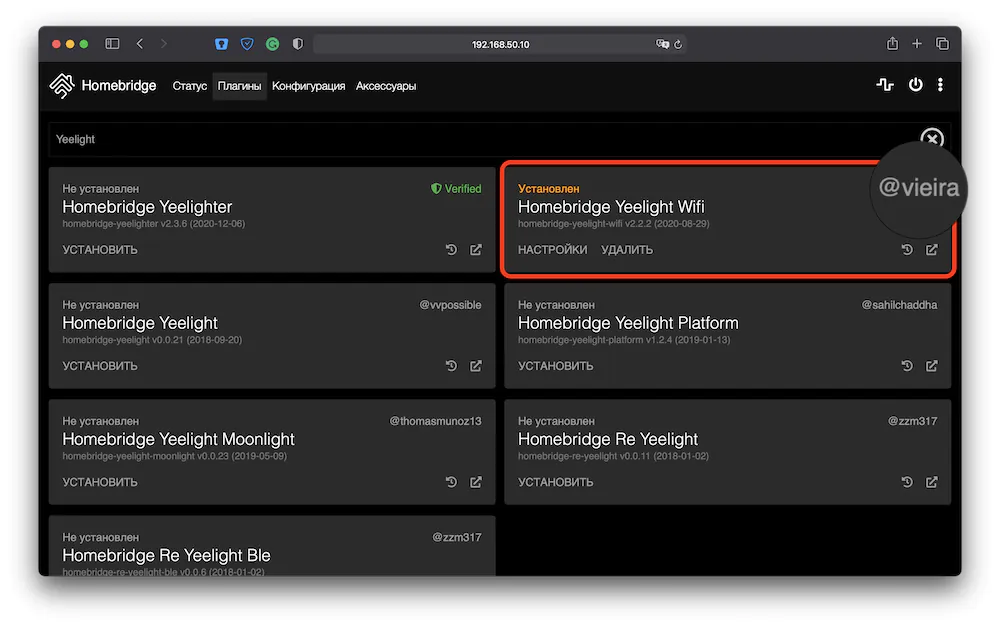
Important! Leave only one Xiaomi light bulb on to avoid confusion at first. We will work with it.
After installing the plugin, restart Homebridge and find something like this in the log: [Yeelight] Received advertisement from ab1234. This conditional ab1234 is your light bulb. Perhaps the value will be color-ab1234.
Go to the plugin settings and paste the following piece of code there:
{
    "platform": "yeelight",
    "name": "Yeelight",
    "transitions": {
        "power": 400,
        "brightness": 400,
        "color": 1500,
        "temperature": 1500
    },
    "multicast": {
        "interface": "0.0.0.0"
    },
    "defaultValue": {
        "color-ab1234": {
            "name": "Floor-lamp",
            "blacklist": [
                "set_hsv"
            ]
        }
    }
}
Where, instead of color-ab1234, there should be a value from your log, and instead of "name": "Floor-lamp" any name that indicates the lamp placement: Night light, Wall lamp, Ceiling, etc.
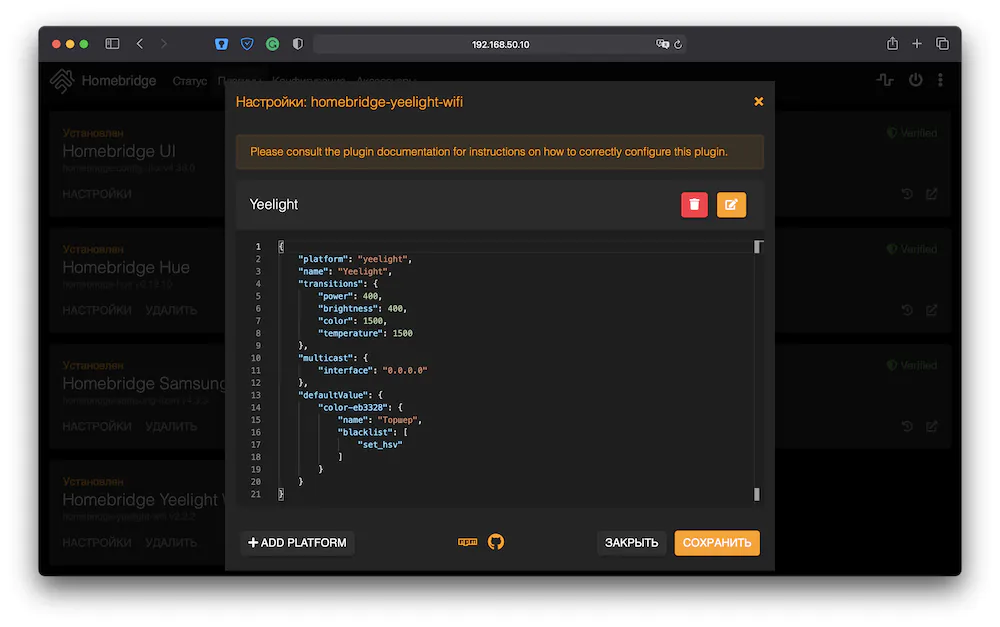
Save the inserted code by clicking on the Save button and restart Homebridge. Done, the light bulb has appeared in HomeKit under the name of your choice. The rest of the Yeelight bulbs are added one by one by pressing the +ADD PLATFORM button in the same place in the plugin settings in exactly the same way.
Updating Homebridge and Node.JS on Raspberry Pi
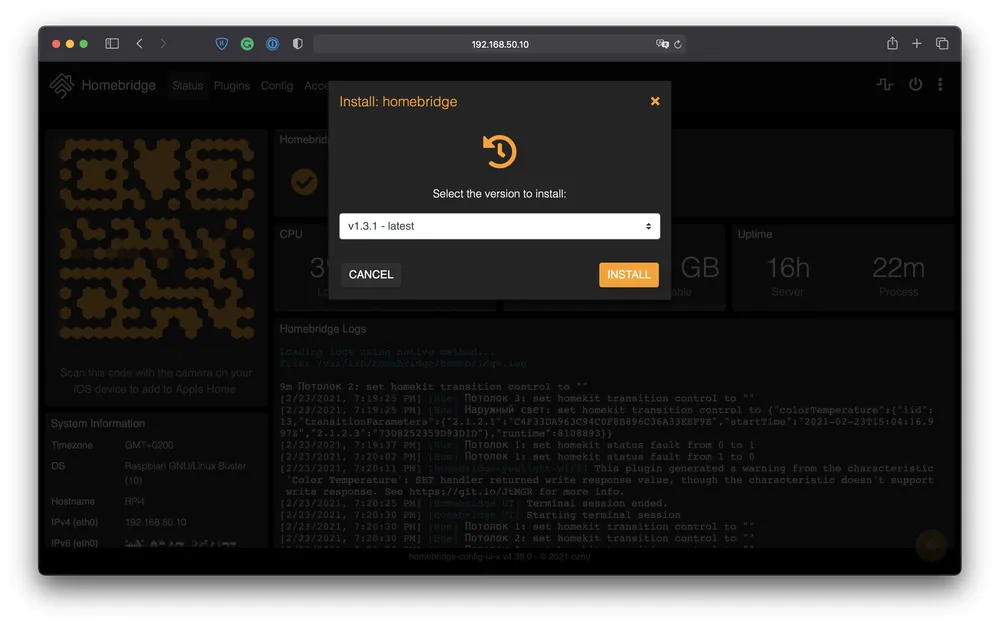
Updating (and rolling back the version) of Homebridge itself is quite simple: you need to click on the number of the current version in the web interface and select the desired version from the drop-down list.
But updating Node.JS and NPM, which sooner or later will be required when installing an update to some plugin, is not easy. More precisely, the commands are not exactly the same as described in the standard tutorial.
Node.JS is updated with the command:
sudo hb-service update-node
And NPM with two commands one after another:
sudo npm cache clean -f
sudo npm install -g npm
Unfortunately, neither Homebridge itself, nor its plugins, nor the “rails” on which it rides, can update automatically. But going into the control panel every day and checking if there is anything new is a hassle to say the least. So to automate the process, there’s a special widget for iOS 14, which monitors the status of all Homebridge nodes and sends PUSH notifications where there’s anything new.
Installing Homebridge Status widget
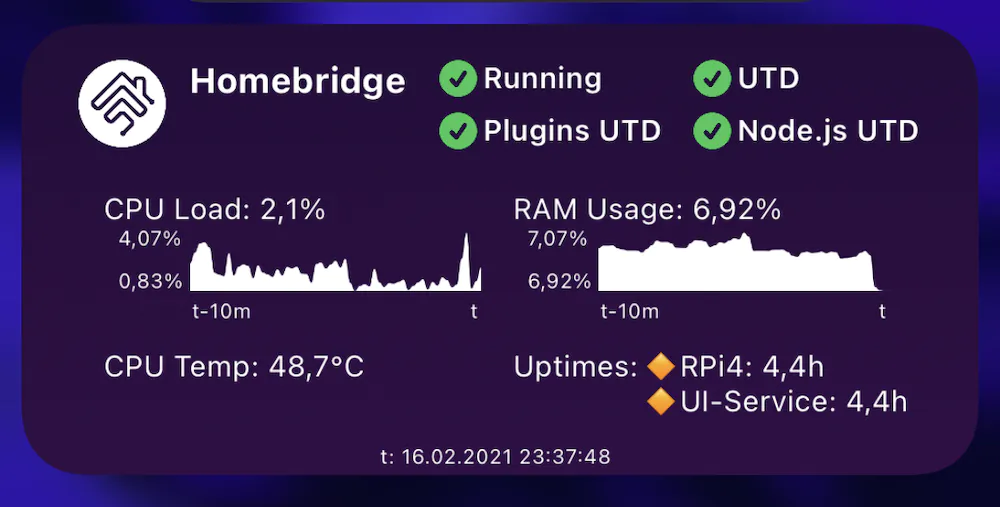
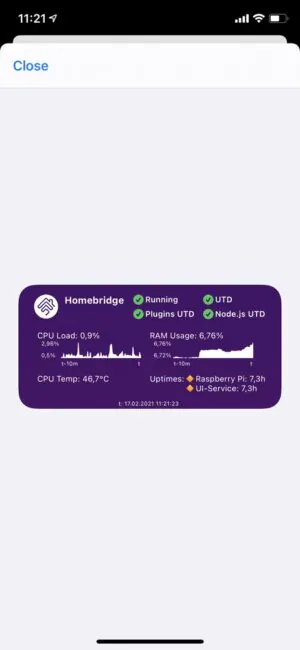
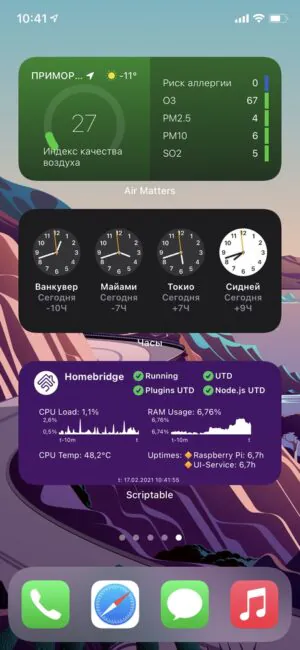
As you can see, the widget shows a lot of necessary and not so much information about your Homebridge, but the most valuable thing in it is information about the state of Homebridge itself, its plugins and Node.JS.
To get the widget itself, we first need its parent application. Install it on iPhone from the App Store.
And now the rather lengthy but fascinating process of installing the widget begins. We will install it using another script called ScriptDude inside the Scriptable application. ScriptDude is good because it tracks changes in the code of a lot of scripts located in the gallery on scriptables.net. Perhaps you will find something else useful for yourself there, but now we have one task.
Step 1. Install Scriptable.app from App Store.
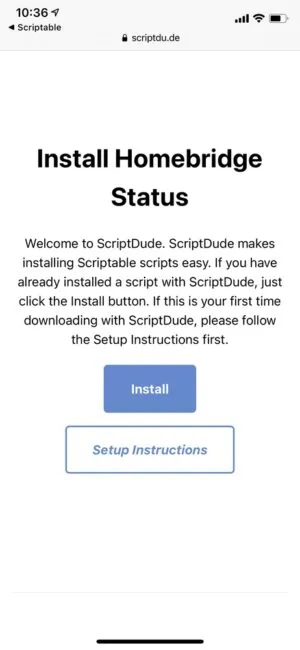
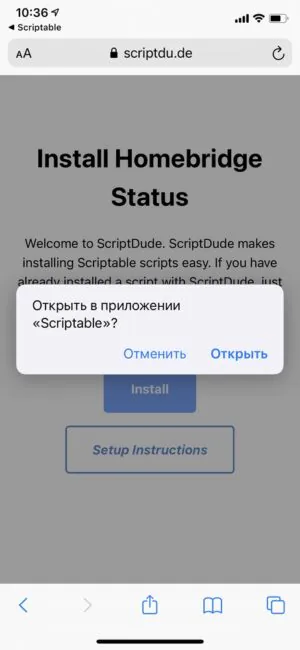
Step 2. Open scriptdu.de in a browser on your iPhone and click the Install ScriptDude button.

Step 3. On the page that opens, click on the Copy Installer button and, having received a notification about the script code in our clipboard, click the Open Scriptable button.
Step 4. Paste the contents of the clipboard in the empty field with the title Untitled Script, and press the Play ▶️ button.

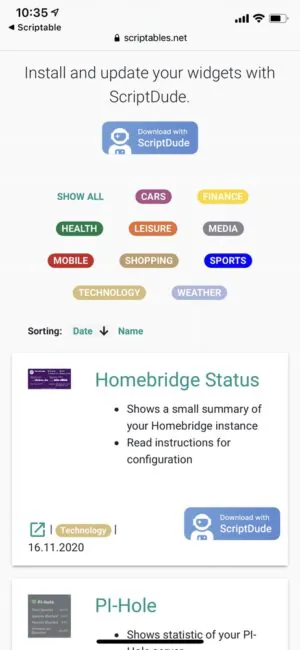
Step 5. On the screen that opens, click the Browse scriptables.net link and on the next page, click on the (technology) tag. Hooray, the Homebridge Status script is first in the list! Feel free to click on the Download with ScriptDude button.
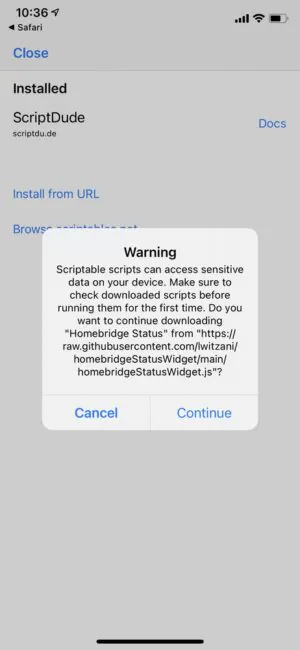
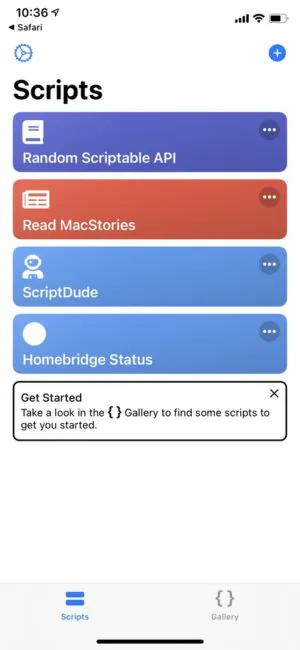
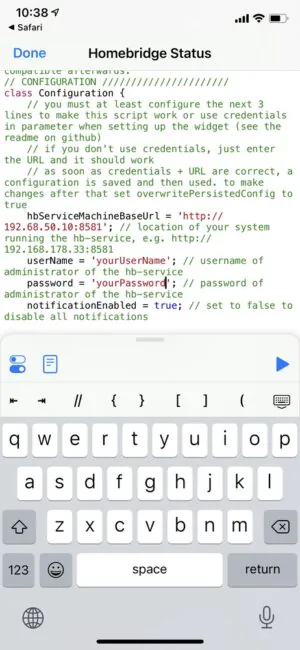
Step 6. Click Install and, having agreed with two warnings, you’ll see the desired script in the Installed list. The main screen of Scriptables now looks like in the fourth screenshot below, and we click on the ellipsis in the Homebridge Status and proceed to editing the parameters.
Step 7. First of all, change the overwritePersistedConfig value from false to true
overwritePersistedConfig = true
to save script parameters to iCloud.
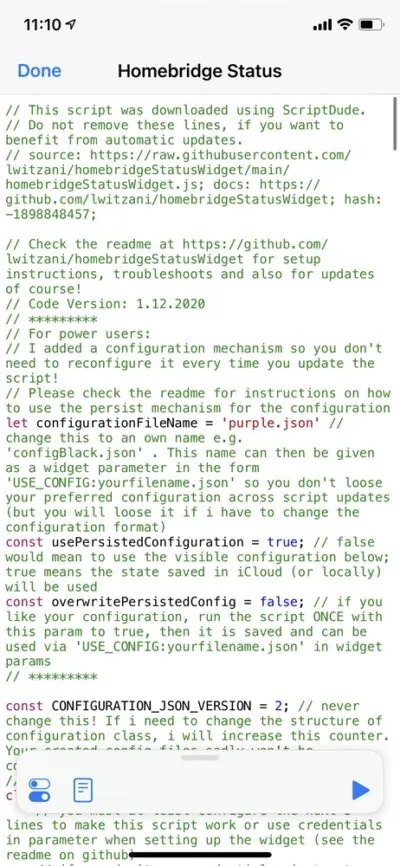
Step 8. Going down a little below, we edit three fields: the IP address and port of Homebridge (remember, this is the already mentioned http://<ip address of your server>:8581 where instead of <ip address of your server> we use the same IP from the very beginning of the article, in my case ) and agree with the warning about searching for devices on the local network. Hooray, the script works!
All that remains is to add the widget to the iOS 14 screen just like any other. After adding, you need to go to the settings of the widget (long tap on it) and specify a number of parameters: select the script, indicate what to do when interacting with it, and enter the value in the Parameter field
USE_CONFIG:purple.json
After that, do not forget to return to the script code and return the value
overwritePersistedConfig = false
That’s all. The widget works, and when there are updates to Node.JS, Homebridge or its plugins, you will receive PUSH notifications.
Verdict
The capabilities of Apple HomeKit have increased dramatically for me. I came up with a bunch of scripts and automations that make life easier for me and my loved ones.
For example, when it’s dark outside and the family member returning home, he will be greeted with the lights on outside, in the hallway, living room and bathroom – now there is no need to run touch the switches with dirty hands.
When the last member of the family leaves the house, HomeKit will turn off TVs, lights, and anything else that can be turned off. And if there is at least one person at home, with the onset of dusk, the outdoor lighting and some lamps inside will turn on.
Again, Siri can control all connected devices using completely logical commands, word for word the same with which you would ask someone f when you need to turn something on or off in a particular room. Only no one needs to run into this room.
Apple’s morning and evening music mixes work, and I tied lighting effects of Gyver’s lamp to them. The rest of the lighting can work with color music, but I’m not happy with the effect.
Scenarios depend only on your imagination and will not strain your wallet too much, since products labeled “Works with Apple HomeKit” are no longer the only available choice.
In the next article of the cycle we will have some fun: we will teach our Raspberry Pi to download torrents, and turn it into a powerful media center and a retro gaming console.
Stay tuned!


