© ROOT-NATION.com - Use of content is permitted with a backlink.
Are you annoyed by frequent notifications from the system? Today we will tell you how to properly disable them in Windows, and whether everything should be disabled.
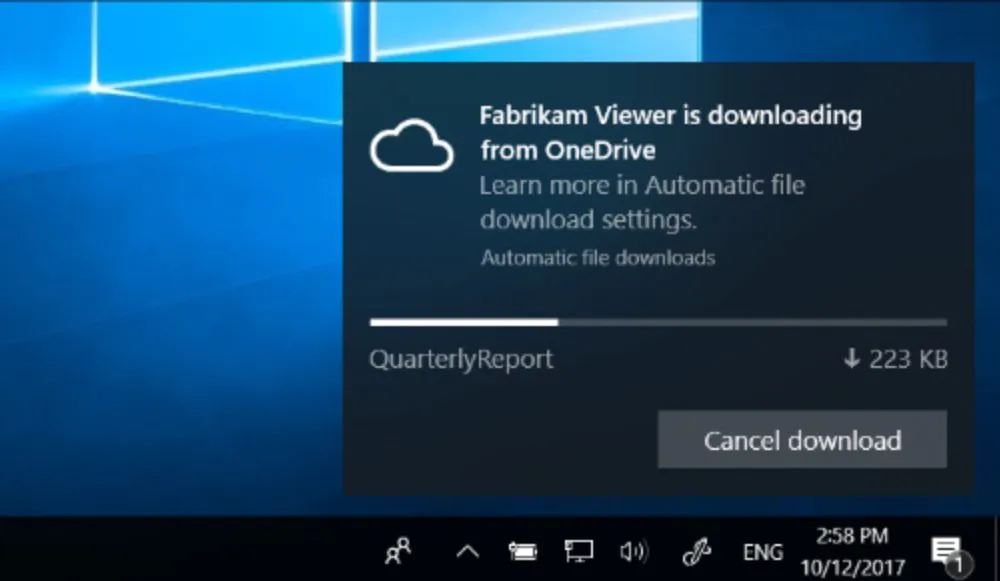
Windows devices send many system and program notifications (sometimes incorrectly called pop-ups) that notify you of real-time events. Notifications can seem especially annoying when you’re working, playing, or watching a favorite TV show or TV series. Whether it’s incoming calls, Outlook calendar reminders, or tips to upgrade Windows, they can all look urgent. However, this is not always the case, very often any necessary actions of the user can easily wait a little longer.
Read also: All the announcements of Microsoft Build 2022
New notification system – a brilliant idea buried by default settings
Although Microsoft’s action center has evolved over the years, real notifications only appeared in Windows 8, but it was not well received by users. The controversial updated design brought Live Tiles and Toast Notifications, an event notification and update system.
The new approach was to provide developers and users with an additional channel of communication, informing about significant changes or updates, especially when we are not currently in the application. However, the first embodiment of this idea was mediocre, mainly due to poor implementation of user interface elements (especially the full-screen Start menu) and the general underdevelopment of the 8 itself.
The debut of Windows 10 in 2016 brought us a number of new features and changes that can be divided into more useful and less useful. The most important changes focused on some system improvements, such as better memory management, while others focused on functionality and performance. It was in this version that we saw an improved notification center, which additionally received a focus mode.
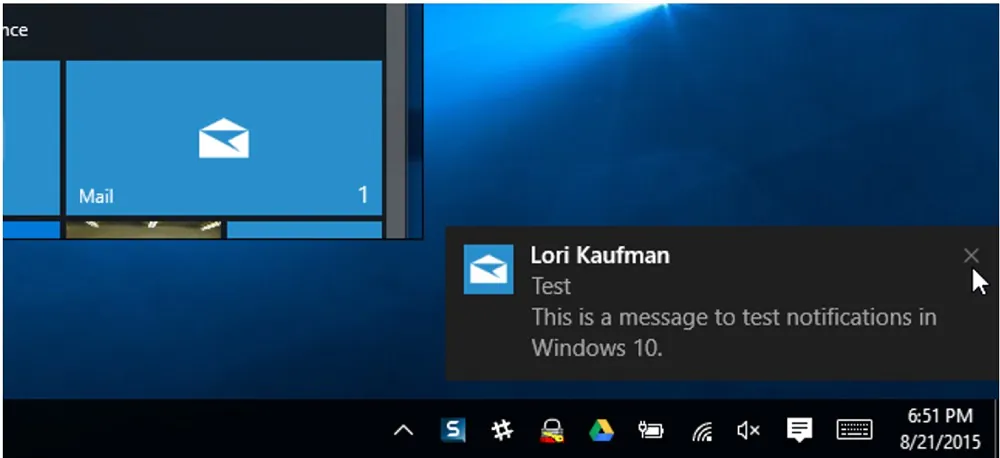
However, the huge potential of this solution is nullified by the default settings, which attack the user with a large number of pop-up messages. An email has arrived – okay, that’s important. Now I press the key combination Win + Shift + S, select the area of the screenshot and immediately receive information that the clipping is copied to the clipboard. Does anyone need this information?
And so we are overwhelmed with unnecessary notifications that only distract. New applications have a full set of permissions to display messages and create confusion. Let’s add more notifications from websites and get a complete picture of the apocalypse. So the question arises – how can I restrict or disable notifications?
To prevent these notifications from being intrusive, we recommend that you turn them off, temporarily hide them, or turn on only the important ones. We will show you how to do it.
Should the notifications be turned off?
Of course, we can turn off almost all notifications almost instantly, but I recommend refraining from these actions for some categories of messages. I mean security status messages, antivirus protection and system updates.
Our response to a potential threat from malware and viruses should be as quick as possible, and simply recognizing the problems that arise can save us a lot of trouble. You definitely should not disable real-time protection or security notification of your device.

The same goes for system updates, which should not be forgotten either. Not everyone remembers the extremely common in the days of Windows XP and 2000 virus Sasser, which used in its work the process of the local security subsystem – lsass.exe. For a period of time, if the computer was not protected by any firewall or antivirus software, it was enough to connect the equipment to the Internet for a while to catch this worm. It turned out that the virus infected millions of computers precisely because their owners disabled Windows Update or notifications related to this service.
In the fight against dangerous threats, key ones are downloaded as part of the patch update. Zero-day attacks, which appear in circulation before the release of the patch by the manufacturer, require us to be vigilant and respond quickly to the problem.
Read also: All about the General Atomics MQ-9 Reaper
How to permanently disable notifications
When you really need to focus on work or play, you need to know how to turn off all notifications on your computer. To do this, follow these steps:
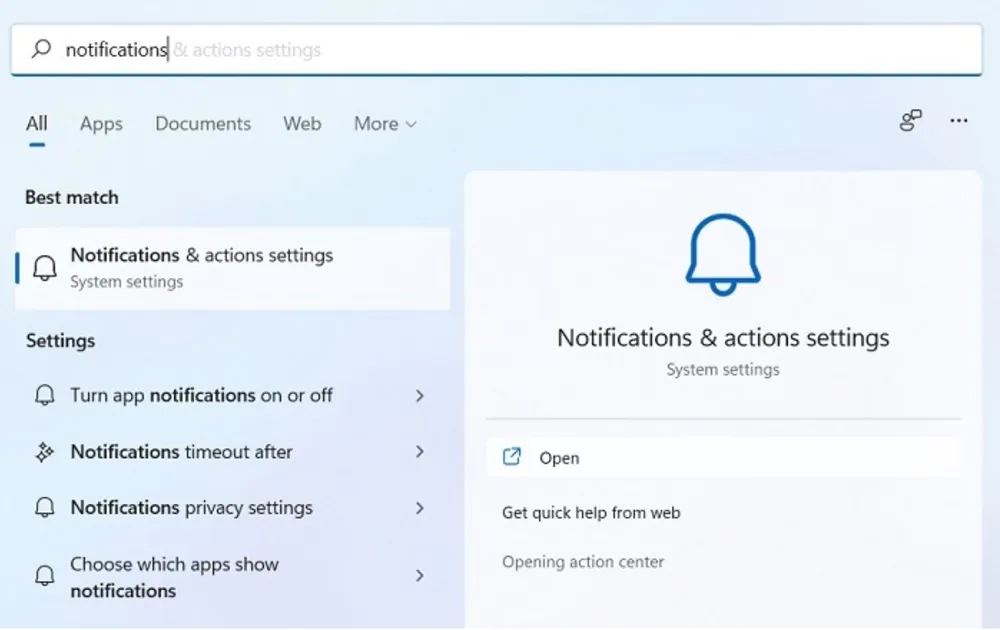
- Open the Notifications and actions settings menu item in the search box. In Windows 11, you can also access it using the Settings – System – Notifications path. In Windows 10, the corresponding option System – Notifications and actions.
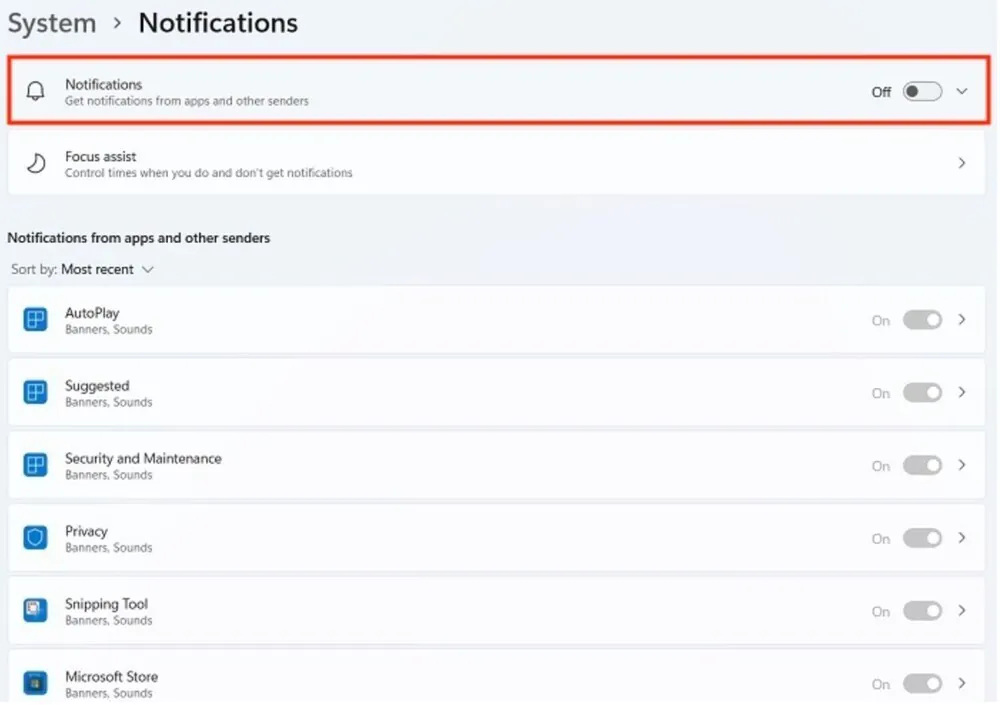
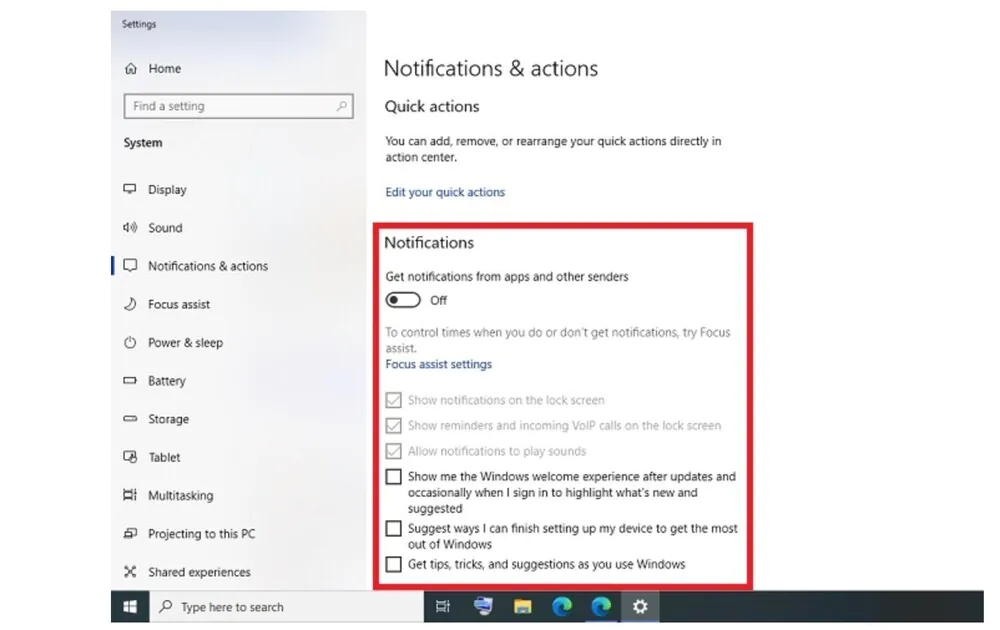
- When the notification settings window appears, turn off the Notifications button (it’s enabled by default). This will turn off all notifications from programs and other senders, so you don’t have to deal with them one by one. Keep in mind that in this case, the switches next to each program will be inactive.
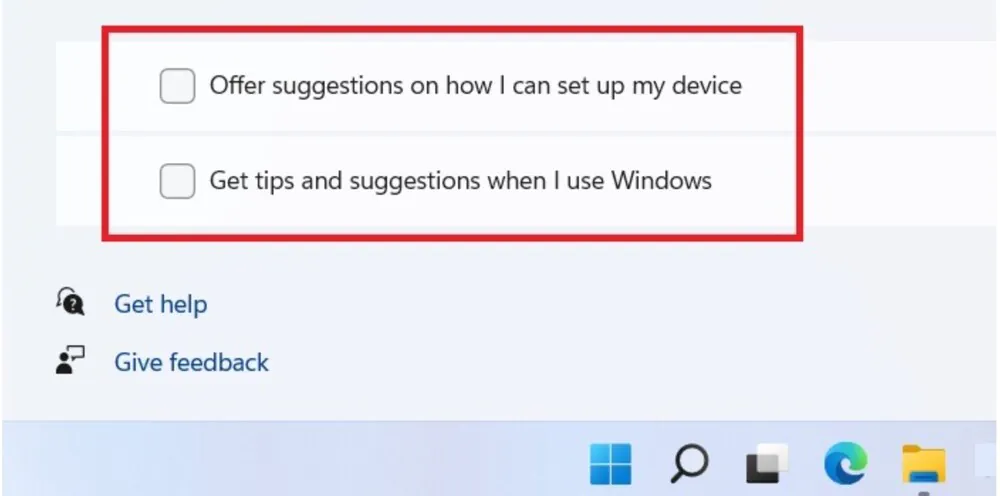
- To turn off Windows 11 notifications completely, clear the check boxes next to Offer suggestions on how I can set up my device and Get tips and suggestions when I use Windows.
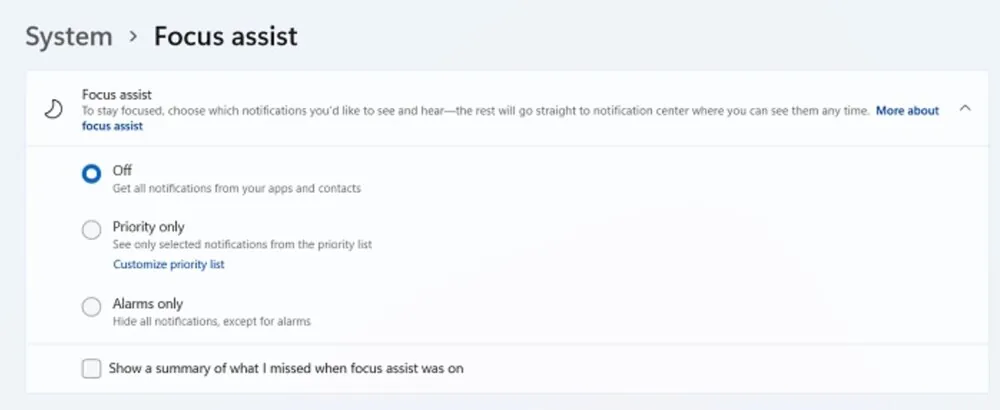
To make sure that the Focus Assist setting does not prevent you from permanently and completely disabling system notifications, leave it in the Off position.
Windows 10 has a similar mechanism for disabling all notifications, except for one: the location of the menu and the wording of the relevant parameters (including Focus Assist) is slightly different from Windows 11.
Read also: Silent killers of modern warfare: most dangerous military UAVs
How to reject notifications
Instead of disabling all notifications and Windows pop-ups, it can be much easier to delete notifications on your desktop. There are two ways to do this: through the Action Center and through the notification timeout.
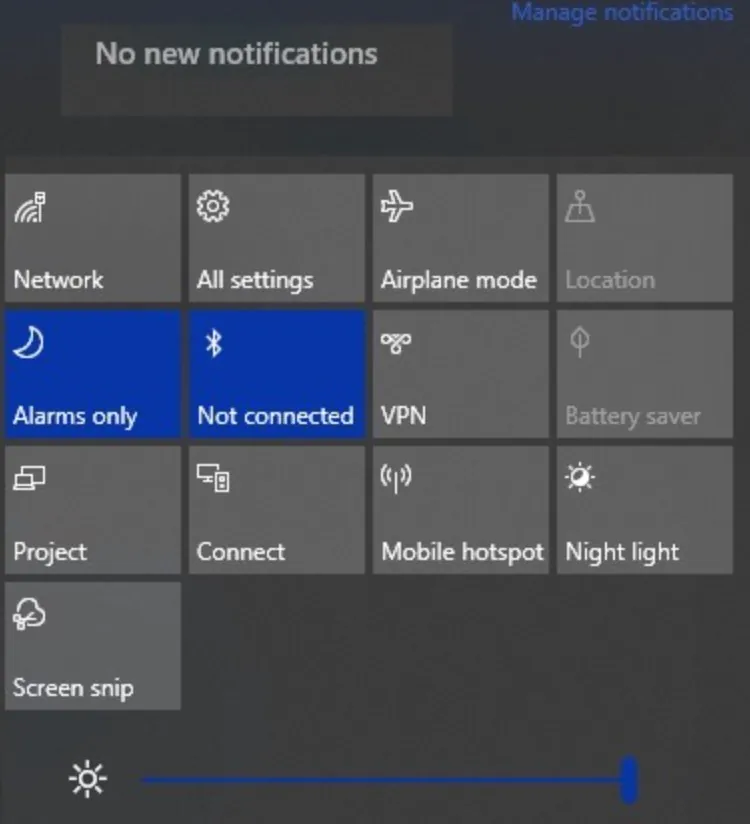
Use Win + A to open the Action Center. If it has any notifications, you will see a white outline around them. Just press the Del key to delete the notification.
You can also reject notifications by setting a timer. In Windows 11, find the option called Close notifications after a specified time in the system settings.
The timer option is also available by the Settings – Accessibility – Visual effects path.
In the Close notifications after a specified time drop-down menu, select the time for which the notification will remain on the screen. Automatic notification rejection can take up to five seconds.
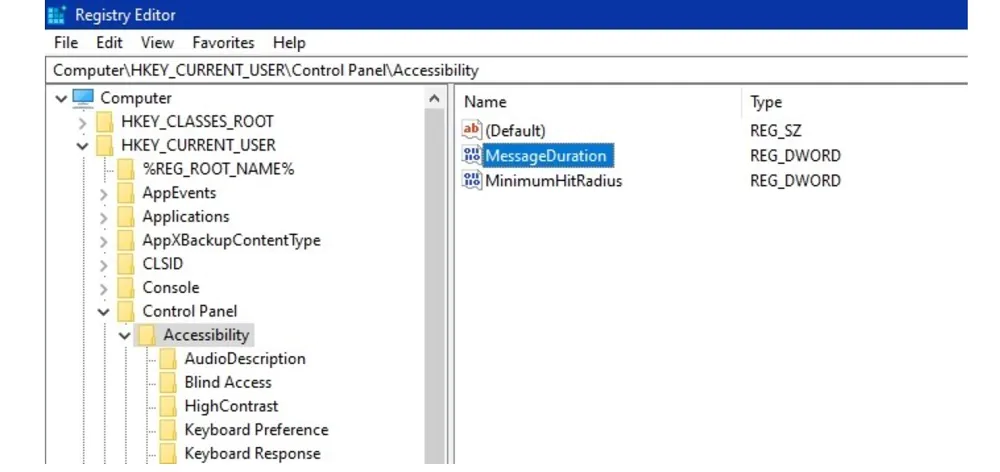
Although Windows 10 does not have a notification timeout button, you can manually set a timer in Registry Editor.
- Open Registry Editor using the keyboard shortcut Win+R and type regedit in the line.
- Go to: Computer\HKEY_CURRENT_USER\Control Panel\Accessibility
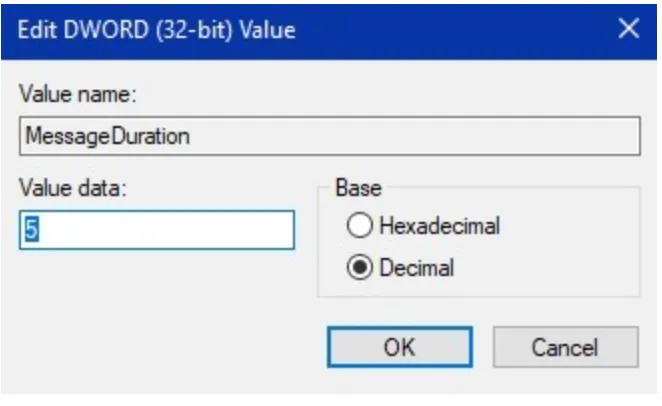
- Double-click the DWORD “Message Duration” component on the right panel. This will open the new edit window.
Change the database of DWORD values (32-bit) from the default hexadecimal to the decimal. You can now set this value for 5 seconds.
 Read also:
- All about the 155mm M777 howitzer and M982 Excalibur guided projectile
- Weapons of Ukrainian Victory: the French Caesar self-propelled howitzer
- Weapons of Ukrainian Victory: Modern PzH 2000 self-propelled howitzers
How to turn off notifications from specific programs
If you want to turn off notifications only for certain programs and leave them for others, you can do so in Windows settings. To turn off notifications from certain programs in Windows:
- Go to Choose which apps show notifications in the search box. In Windows 11 you can also go to the menu by System – Notifications, and in Windows 10 System – Notifications and Actions.
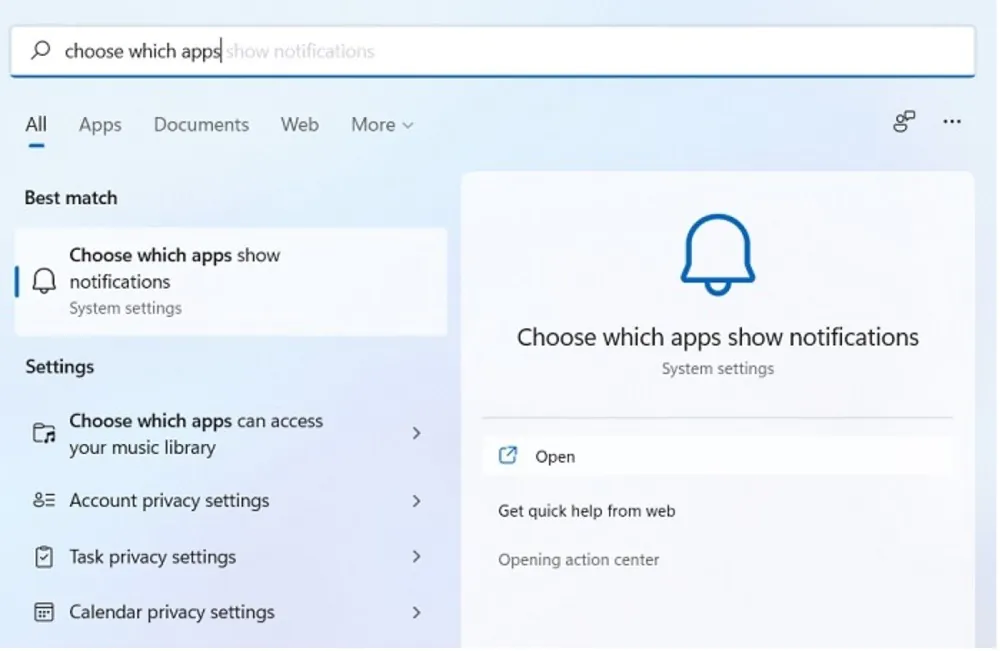
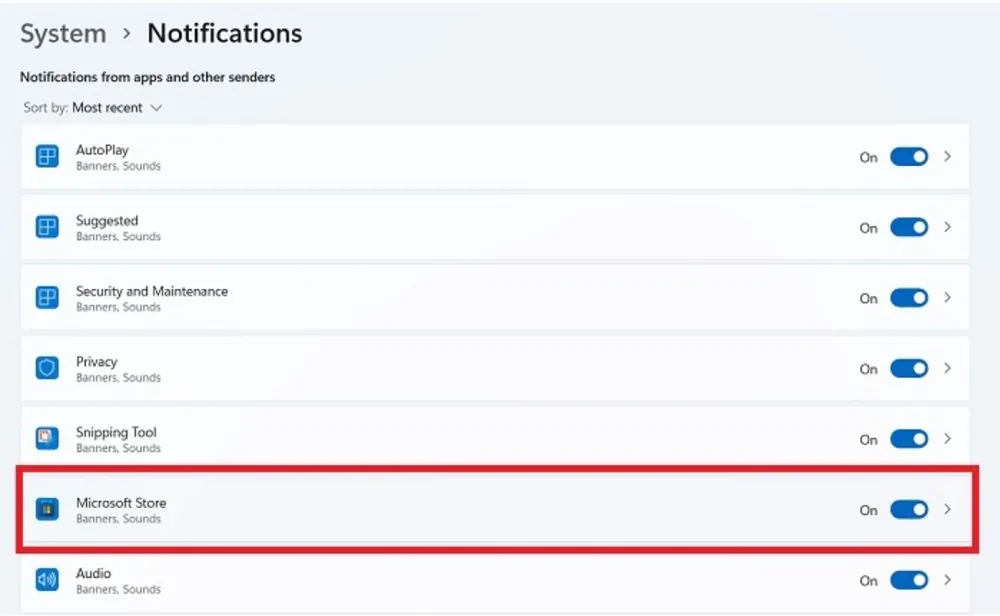
- Select any application for which you want to turn off notifications and turn it off. In the example below, we select the Microsoft Store.
Click the arrow button next to the switch to get more detailed settings. But it is better not to disable this application, because there are many other programs that you may need.
 Read also: ‘Neptunes’ knocked out ‘Moskva’ cruiser: All about these anti-ship cruise missiles
How to temporarily hide notifications with Focus Assist
To get the most out of computer notifications without being flooded with them, we recommend that you turn on Windows Focus Assistant, an advanced feature for experienced users available from the Windows taskbar. This feature can minimize distractions with annoying notifications by temporarily hiding notifications with an ‘automatic rule’.
- Open Focus Assist Automatic Rules in the search box. In Windows 11, you can go to these settings in the System section. In Windows 10, find the option in the Settings section.
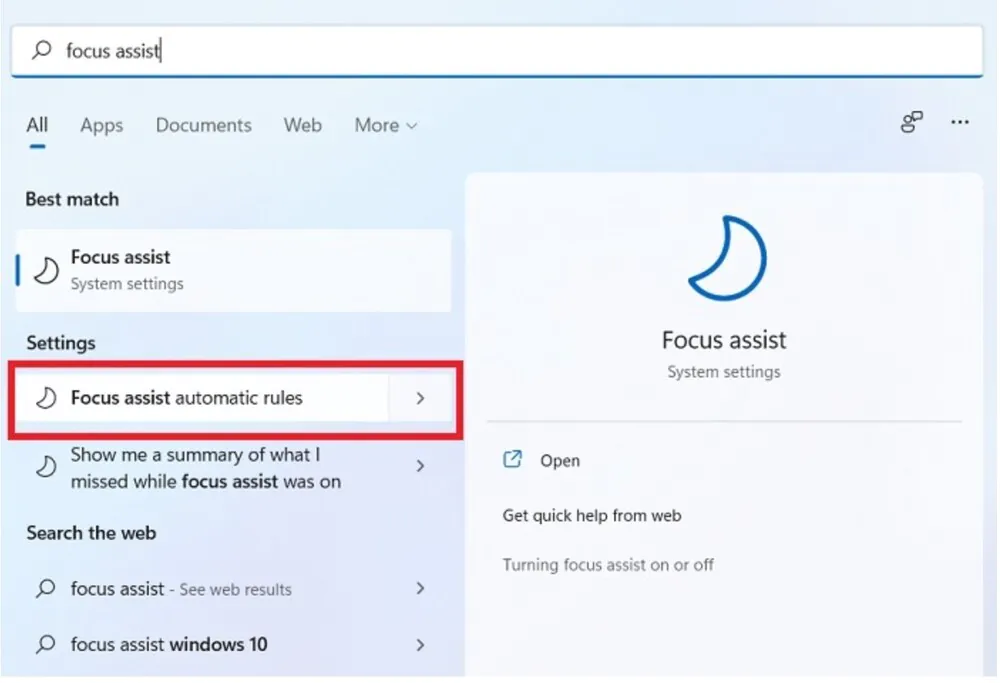
- In the Automatic Rules section under Focus Assistant, turn off the switch for settings you don’t need. For more detailed settings, click the arrow button next to each automatic rule.
Similarly, you can restrict all notifications to include Alarms only, for example, during the game. This option is also useful when using the program in full screen mode (for example, when watching Netflix / YouTube in a web browser).
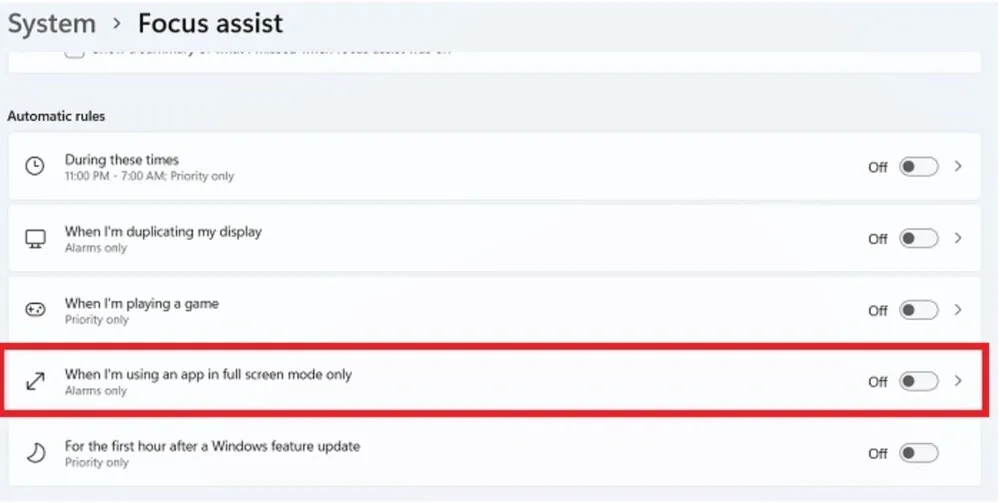
If you want to set rules for the types of notifications you receive, scroll to the Focus Assist section and select the Priority Only or Alarms Only switcher, respectively. (By default, the switch is set to Off).
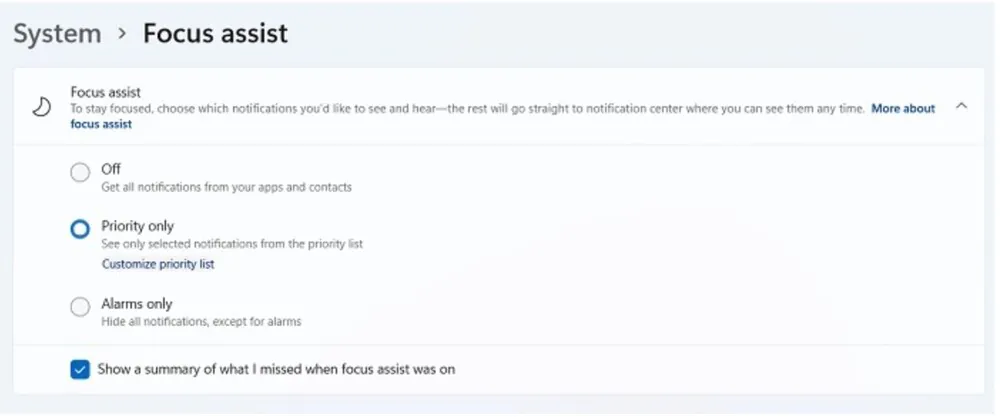
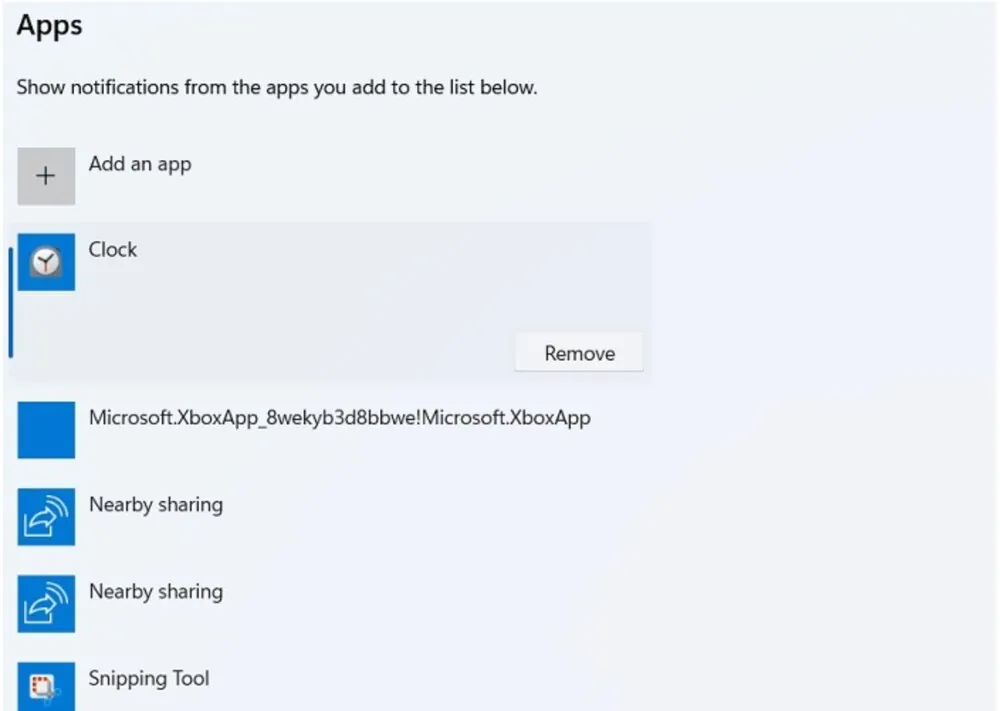
Priority allows you to receive notifications only from important contacts and applications, while muting others. Click the Priority List below this option to set whether or not to include VoIP notifications, reminders (regardless of the application you’re using), and pinned contacts on the taskbar.
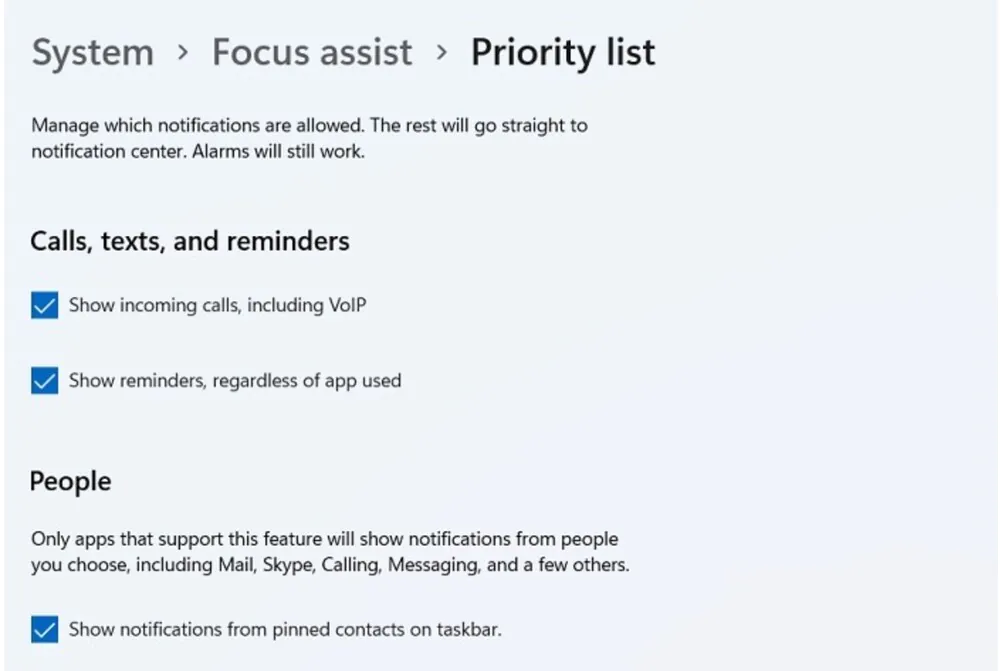
Finally, go to the list of programs in the Priority List section. Here you can add or remove programs depending on whether you want notifications from these programs to have priority.
Read also: Weapons of Ukrainian victory: The military praise the Piorun MPADS
How to disable notifications on Windows lock screen
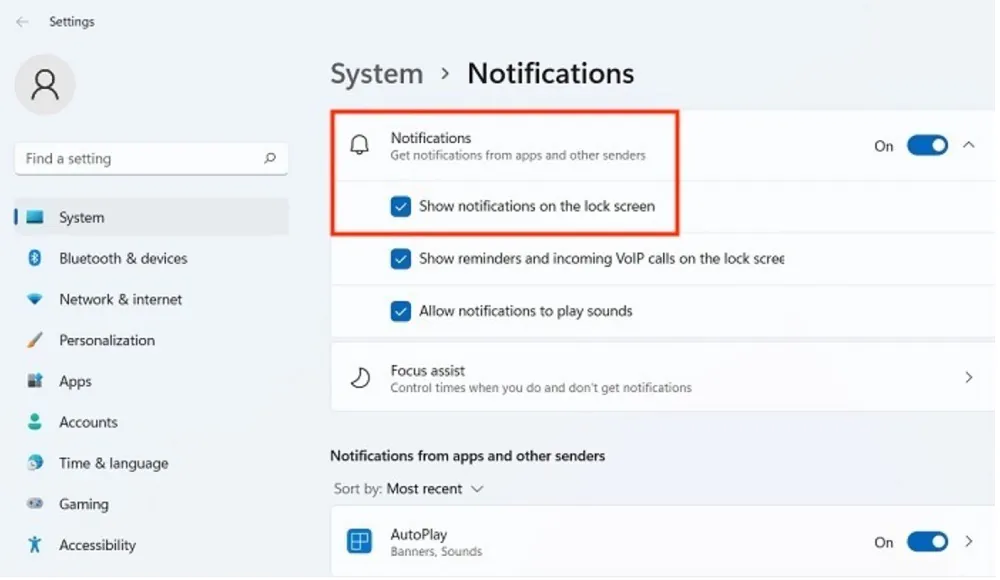
In Windows 11, notifications on the lock screen can be easily turned off by going to System – Notifications. Clear the Show notifications on the lock screen checkbox in the Notifications section. If necessary, turn off reminders and incoming VoIP calls on the lock screen. In Windows 10, these settings are displayed in the System – Notifications and Actions section.
How to turn off Windows notification sounds
You can turn off Windows notification sounds in System – Notifications in Windows 11 and System – Notifications and Actions in Windows 10. However, this only affects application sounds, not the messages themselves. In order to turn off notification sounds for general system alerts:
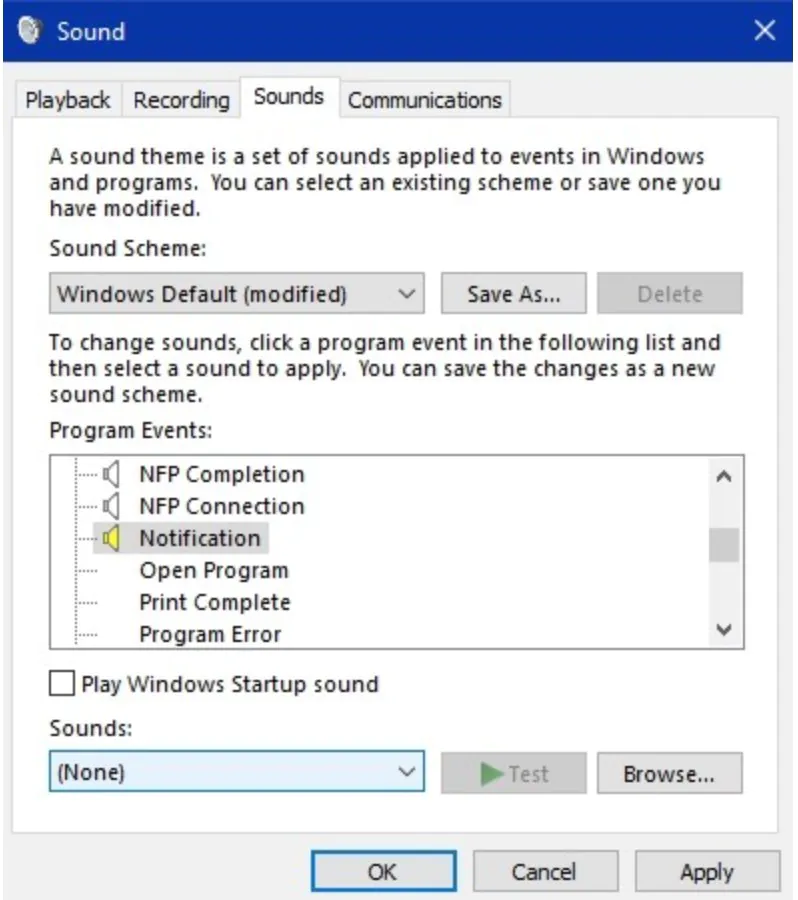
- Open the Control Panel and click the Sound menu in the Hardware and Sound section. This will open a new pop-up window.
- Go to the Sounds tab and scroll down under the active Windows sound scheme and select Notification in the Program Events section.
- Now go to the Sounds drop-down list below and set it to None. Click Apply to save the changes.
Now you decide which notifications you want to receive in Windows 10/11, either to disable them completely or partially, as well as what sounds you will hear.
You can also help Ukraine fight with Russian occupants via Savelife or via an official page of the National Bank of Ukraine.
Read also: Weapons of Ukrainian victory: ATGM Stugna-P – Russian tanks are in trouble

