The Future of Sound Design: AI Sound Effect Generator Explained

AI sound effect generators have transformed sound design, eliminating the need for hours of recording and editing. With advanced algorithms, AI tools now create detailed soundscapes instantly. As AI technology continues to evolve, it offers exciting possibilities for both professionals and beginners.

This article covers Filmora’s AI sound effect generator, including example prompts and tips for resolving common issues. We’ll also compare AI-generated sound effects with traditional methods, highlighting how AI streamlines sound design.

ai sound effect generator 

Let’s dive in!

Part 1. Overview of Filmora’s AI Sound Effect Generator

If you are in the video editing industry, it’s impossible to not know about Wondershare Filmora. It’s a complete toolkit for all your video and audio editing needs.

Filmora has even added an AI sound effect generator in the latest updates. You don’t need to use separate audio design tools or sift through endless sound libraries. Video editors and content creators can make custom sound effects directly with text. It’s a quick and non-technical method.

Let’s look closely at some key features that make this tool indispensable for modern creators.

  • Text-to-Sound Transformation

Filmora’s AI generator can accept textual prompts and immediately convert them into specific sound effects. You can explain anything from a busy cityscape to a magical incantation. The AI in Filmora will read the input and generate an appropriate impact.

  • Different Sound Options

With every prompt, you will get multiple sound options to choose from. Check out all of those and select the one you like.

  • Integrated Editing Workflow

The AI Sound Effect Generator is embedded within Filmora. It adds sound directly to your editing timeline. You can drag, drop, and fine-tune effects directly on the platform.

  • Customizable Sound Settings

You can control the volume, pitch, and duration of the effect. The audio can vary in its intensity and tone to fit your preference. For example, you can easily create variations and sample regeneration for the perfect sound.

  • High Quality, Multi-Format Output

The AI Sound Effect Generator supports multiple formats like MP3, WAV, FLAC, and M4A. It ensures that the project meets top-quality video, mobile playback, or online streaming requirements.

filmora ai sound effect generator 

Do you think this new feature in Filmora will improve your workflow? Of course, it will. Let’s show you how!

Part 2. How AI Enhances Creative Workflow of Sound Design

AI opens up new levels of creativity while saving time spent in production. The long hours of recording, editing, and looking through the libraries for that perfect sound are a thing of the past. High-quality audio can be ready in seconds with an AI Sound Effect Generator. It takes a simple type of text description.

But AI doesn’t merely speed up the process but encourages it. Users are allowed to explore sounds that may be impractical or impossible to produce through other means. For example, surreal sci-fi effects and intricate fantasy sounds.

Furthermore, AI-fueled instruments alter and change the sounds. You can adjust the tone or rhythm that a particular concept may need in a movie. It will draw the audience fully into an immersive experience.

Steps to Use FIlmora AI Sound Effect Generator

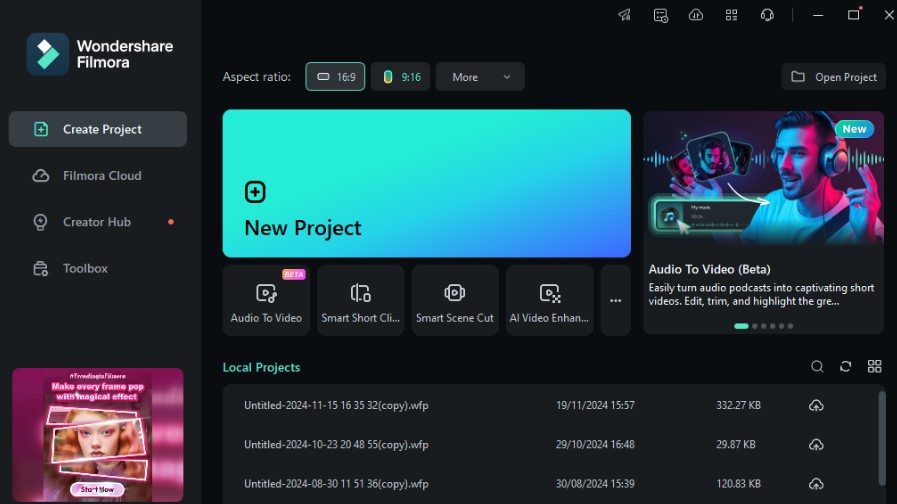
Step 1: Launch the latest version of Wondershare Filmora. Create a “New Project.

create a new project

Step 2: In the top toolbar, go to the “Audio” section. Select AI Sound Effect option.

go to the ai sound effect generator

Step 3: Enter the specific keywords about your desired sound effect. You can also get a description from Filmora about the keywords.

Step 4: Change the settings about the sound effect and click “Generate” to start.

Step 5: When Filmora gives you an output, preview the sound effect. You can use it right away or Download it for future use.

Step 6: The sound effects will be available for 30 days. Download the effects if you want to keep them for forever. You can access them in the”Downloads” section.

access sound effects in the downloads section

Now let’s show you how AI differs from traditional sound design.

Part 3. AI Sound Effects vs. Traditional Sound Effects—A Comparative Breakdown

Both AI-generated sound effects and traditional methods have their pros & cons. Let’s compare both these methods.

Feature AI Sound Effects Traditional Sound Effects
Time Efficiency Creates sound effects instantly. It dramatically reduces the time needed to set up and produce. Requires long recording sessions, editing, and library searches.
Flexibility Highly flexible. You can easily alter tones and styles through minimal changes in prompts. Flexible but requires hands-on alteration for particular effects.
Effect Range Vast range. You can create highly realistic to entirely imaginary sounds. They are limited to recorded sounds. Fantasy or unique sounds require much effort to create.
Cost Less costly. There is no need for pricey equipment and extensive libraries of sounds. Expensive costs associated with recording equipment, professional libraries, and qualified engineers.
Quality The sound quality is good. But, it may sound produced or “clean.” It’s closest to real, rich, and natural in its variety and texture.

Now, let’s move on and show you some examples of AI-generated sound effects.

Part 4. Examples of Sound Effects That Work: Successful AI-Generated Sounds

Whether relaxing nature sounds or an active buzzing of machinery sounds, the choice is yours, all through AI. Here are some examples of successful AI sound effects. There are also example prompts that you can use immediately.

1. Nature Sounds

Artificial intelligence can generate very natural sounds. You can make sound effects like birds chirping, leaves rustling, or water flowing. These sounds are perfect for relaxation videos, nature documentaries, or outdoor scenes.

Example Prompt

Generate a sound of gentle rain with occasional thunderclaps in the distance.

make the sound of rain with lightning

2. Mechanical Noises

AI designs several mechanical sounds for technological or machinery projects. It might include revving up engines, grinding gears, or robotic beeps. They are often used for thrills in films, games, or technological advertisement videos.

Example Prompt

Make a sound effect of the engine gearing up with metallic grinding, followed by the steady hum of machinery in motion.

3. Human Sounds

AI can even create sounds associated with human activity, such as laughter, applause, or background chatter. These effects can be added to scenes to make them even more alive and energetic.

Example Prompt

A sound effect of background human chatter with occasional laughter and applause.

4. Fantasy and Sci-Fi Effects

With AI, creators can make imaginary sounds that fit either fantasy or science fiction. These effects may include wizard spells, extraterrestrial noises, or futuristic modes of transportation. They are ideal sounds for adding animations or video game effects.

Example Prompt

Make the sound of a bustling, futuristic city with flying cars whizzing overhead, accompanied by soft electronic beeps.

make the sound of the high-tech world

5. City Sounds

AI can generate sounds of urban life. You can make sound effects of city traffic, sirens, and crowd noise. Such effects are suitable for films and commercials placed in the city.

Example Prompt

Generate the effect of a busy street with honking cars, rumbling buses, and the faint murmur of people talking on the sidewalks.

Now, you need some tips for using AI sound effect generators effectively.

Part 5. Troubleshooting & Tips for Best Results

Working with AI-generated sound effects is exciting, but a few challenges may arise. Fortunately, simple adjustments can significantly improve audio quality. Here’s how to optimize your AI sound generator:

  • Clarify Your Text Prompts: Be specific with your descriptions. Instead of generic terms like “noise,” use detailed phrases such as “light rain tapping on a window” for more accurate results.
  • Try Variations in Phrasing: If the first result isn’t perfect, rephrase or use synonyms. Small changes in wording can yield better outcomes.
  • Tune the Sound’s Parameters: Adjust volume, pitch, or duration to customize the sound and ensure it fits seamlessly into your project.
  • Layer Multiple Effects for Depth: Combine different sounds, such as natural ambiance with mechanical or sci-fi elements, to create a richer, more complex audio experience.
  • Review, Refine, and Repeat: After adding the sound to your project, evaluate it alongside the visuals. If it feels off, don’t hesitate to regenerate or tweak the effect until it works.

By following these tips, you can troubleshoot and improve your AI-generated sound effects effectively.

Final Words

The AI Sound Effect Generator is more than just a tool. It greatly reduces the time needed for audio and video editing, freeing artists, filmmakers, and game designers from the painstaking audio-editing process.

Filmora provides an excellent AI sound effect generator. Simply enter a prompt, and the tool will instantly create an excellent sound effect.

As time passes, AI technology will become even more advanced. These sound generators will become even more beneficial and indispensable allies for everyone.

FAQs

Q1: What is an AI Sound Effect Generator, and how does it work?

It’s an AI tool. You just type a description, and the AI generates an audio effect for it. From “gentle rainfall” to “spaceship taking off,” you can get sound effects on anything.

All this eliminates long hours of audio recording from scratch or exhaustive searches at libraries.

Q2: How does the sound generated by AI differ from sound design?

Traditional sound design uses real-world recordings, careful editing, or even pre-curated sound libraries. It can create incredibly realistic sounds. However, it takes a long time and requires specific equipment.

On the other hand, AI sound effect generators use algorithms to make sounds in real time based on text inputs. It’s fast, flexible, and brings an entire spectrum of effects. You can generate realistic to imaginative sound effects.

Q3: Are AI sound effect generators free or charge?

Most AI sound generators charge fees, especially the editing suites. Most will have a free version or trial or a lite version so that you can test it. However, for good quality & customization, you pay to upgrade. Paid versions have better sound quality, many sound choices, and more features.

Q4: What types of projects are best suited for AI-generated sound effects?

AI sound effects are perfect for projects that require speed, uniqueness, or an expansive audio range. They are ideal for digital content such as YouTube videos, animations, social media clips, and video games.

They are also perfect for unique sounds, such as fantasy or sci-fi themes. You can easily create sounds that cannot be recorded or found elsewhere.

BLUETTI AC70 Portable Power Station Review: Compact Yet Powerful

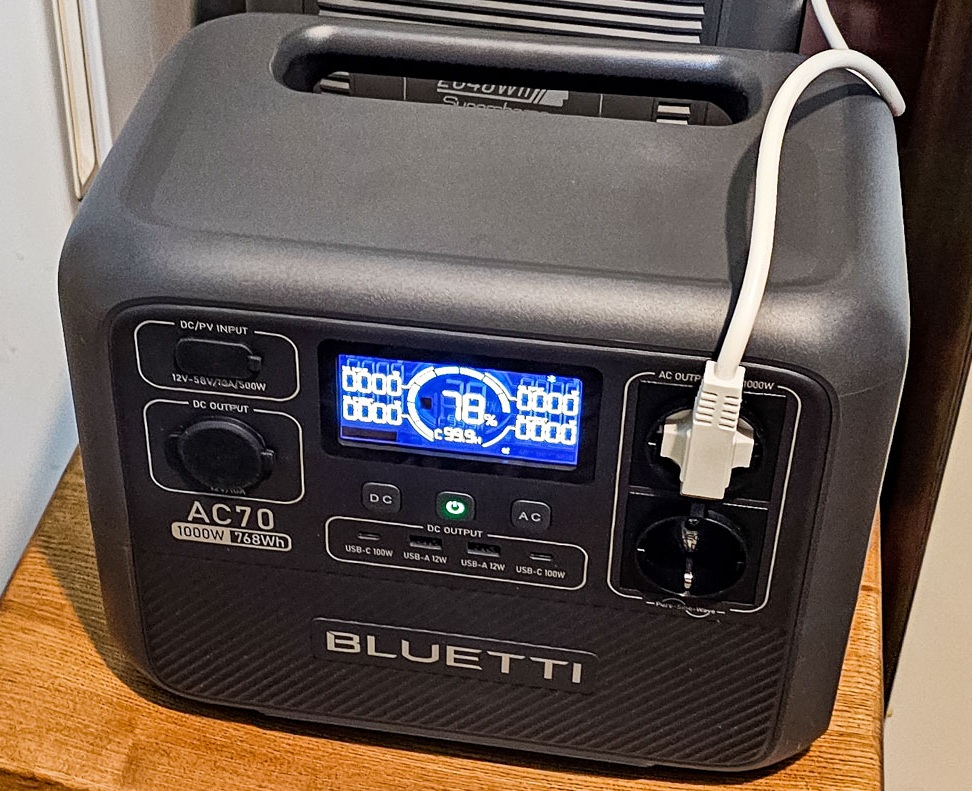
Recently, we’ve been extensively covering the topic of power stations on our site. Unfortunately, portable power stations remain a necessity in Ukraine due to the destruction of energy infrastructure by Russian missile and drone strikes. As a result, nearly every Ukrainian household now has a source of backup power for potential grid outages. For those who don’t yet own such equipment, a purchase is likely in their plans. We aim to provide information on portable power stations across various price points, and today, we’ll take a closer look at what the relatively affordable and compact BLUETTI AC70 can offer. This popular model features a 768 Wh battery and promises dependable performance.

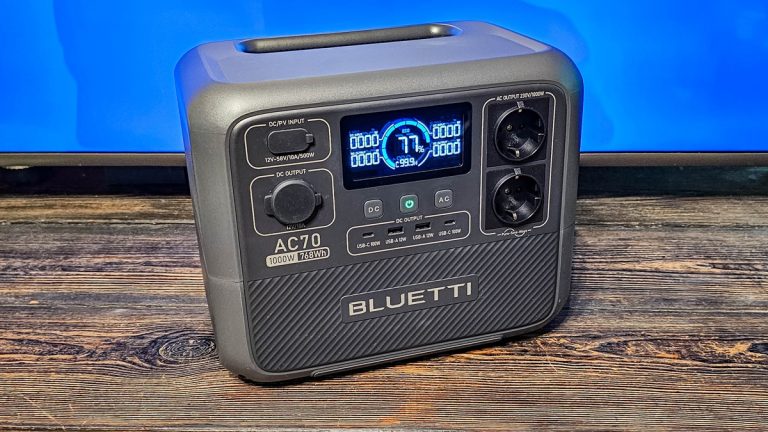
BLUETTI AC70

Main characteristics of BLUETTI AC70

Before diving into the testing of the power station, let’s first review its key specifications to get a general idea of its potential capabilities.

BLUETTI AC70 Key Features

  • Battery information:
    Battery capacity: 768 Wh (32 V, 24 Ah)
    Battery type: LiFePO4 (Lithium Iron Phosphate)
    Service life: 3000+ charge cycles to 80% of original capacity
    Control system: MPPT Controller, BMS
  • AC output:
    Inverter type: pure sine wave
    AC outlets: 2 x 230V/4.3A
    Rated power: 1000 W
    Peak power output: 1500 W
    Increased power mode: 2000 W
  • DC system:
    USB-C ports: 2×100 W
    USB-A ports: 2×5V/2.4A – 12W total
    Car socket: 1 x 12V/10A
  • Input current and charging:
    Alternating current: 950 W max.
    Solar panels: 500W max, 12V-58VDC, 10A
    Charging from the car: 12/24 V from the cigarette lighter socket
    Maximum input power: 850 W from the mains and solar panels
  • Charging time:
    850W AC current: 1.3-1.6 hours
    Solar panels (500 W): 2.8-3.3 hours
  • General data:
    UPS: yes, up to 20 ms
    Pass-through Charging: yes
    Weight: 10.2 kg
    Dimensions (WxHxD): 31.4×20.95×25.58 cm
    Operating and storage temperature: from -20 to 40℃
    BLUETTI AC70 page on the manufacturer’s website

It’s worth noting that despite its compact size, this portable power station comes equipped with features typically found in larger, next-generation models. These include direct AC mains connection without the need for a separate charging adapter and pass-through fast charging, allowing connected devices to draw power directly from the grid while the station itself charges. Additionally, it features an Uninterruptible Power Supply (UPS) function, ensuring that devices powered through the 230V outlets remain unaffected during power outages. We’ll test the real-world performance of these features later on.

BLUETTI AC70

Read also: BLUETTI AC200L Portable Power Station Review: Reliable Backup Power for the Entire Home

Positioning and price

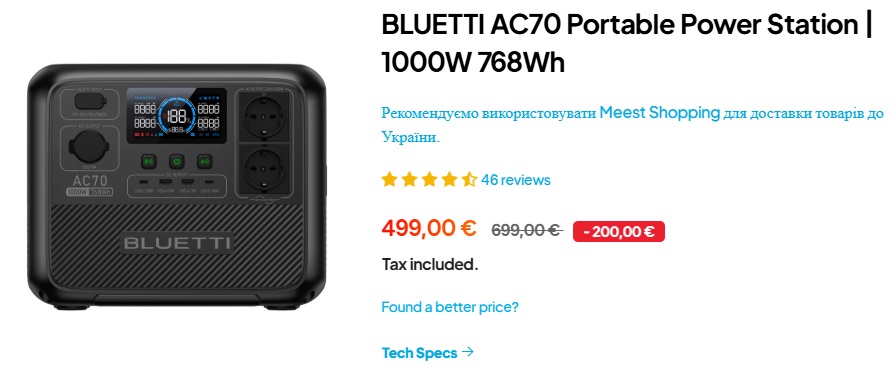
As mentioned earlier, the AC70 (1000W, 768Wh) is a mid-range compact model within BLUETTI’s lineup of portable power stations. Its current price on the official European website is €499.

BLUETTI AC70 (1000W 768Wh) EU Price

In fact, BLUETTI offers only a few smaller power stations in its lineup. These include the new AC50B (700W, 448Wh), which is gradually replacing older models like the EB55 (700W, 537Wh) and EB3A (600W, 268Wh), as well as the ultra-compact AC2A (300W, 204.8Wh).

Unpacking and package contents

The BLUETTI AC70 comes securely packaged in double-layered perforated cardboard boxes. The outer box serves as a shipping container, while the inner box features a plastic handle for easier carrying. The power station itself is securely held in place by foam inserts and wrapped in a polyethylene bag for added protection. All included accessories are neatly packed in a separate small box.

BLUETTI AC70

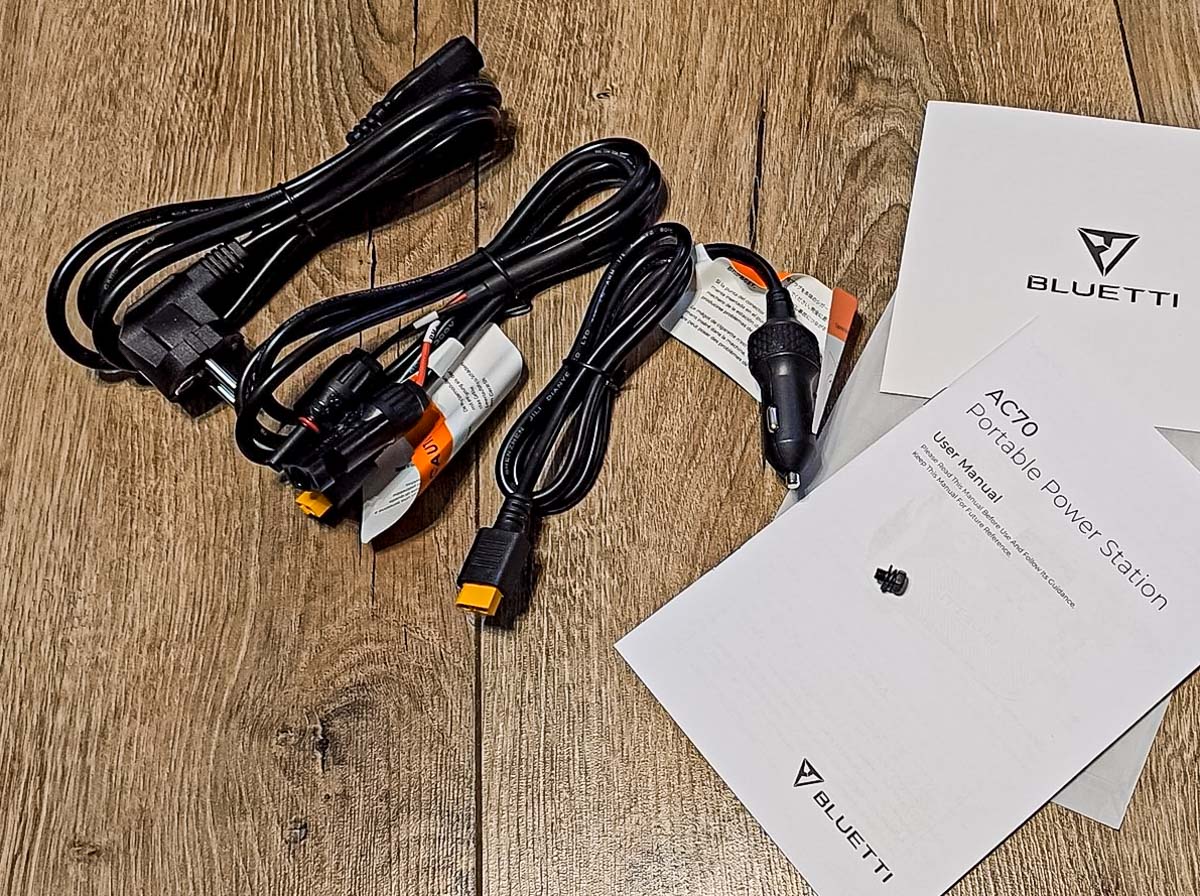
The package includes three charging cables: one for AC mains, one for solar panels, and one for a car outlet. Additionally, the box contains a user manual, a warranty certificate, and a grounding wire screw.

BLUETTI AC70 Accessories

Read also: BLUETTI AC200L vs OUKITEL P2001 Plus: comparison of portable power stations

Design, materials, build, layout of elements

The design of the BLUETTI AC70 follows the typical aesthetic of the brand’s modern lineup. It features a compact rectangular shape with rounded edges and corners, offering a clean and well-thought-out appearance. The device’s casing is made of durable, impact-resistant dark gray plastic, and the build quality is excellent, as expected. However, the manufacturer notes that the station lacks water resistance, so it should not be used or stored in high-humidity environments.

BLUETTI AC70 Design

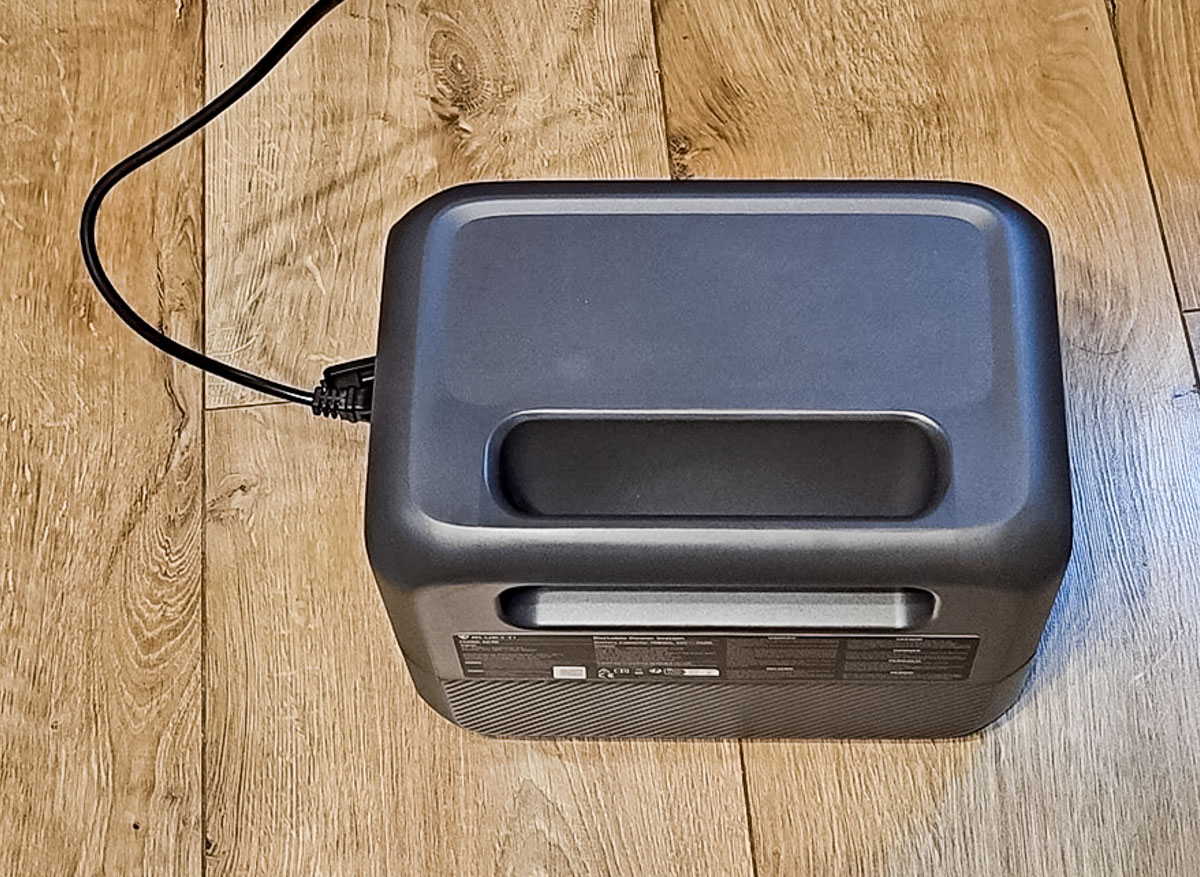
The top of the station, near the rear, features a cutout that forms an integrated handle for easy carrying.

BLUETTI AC70

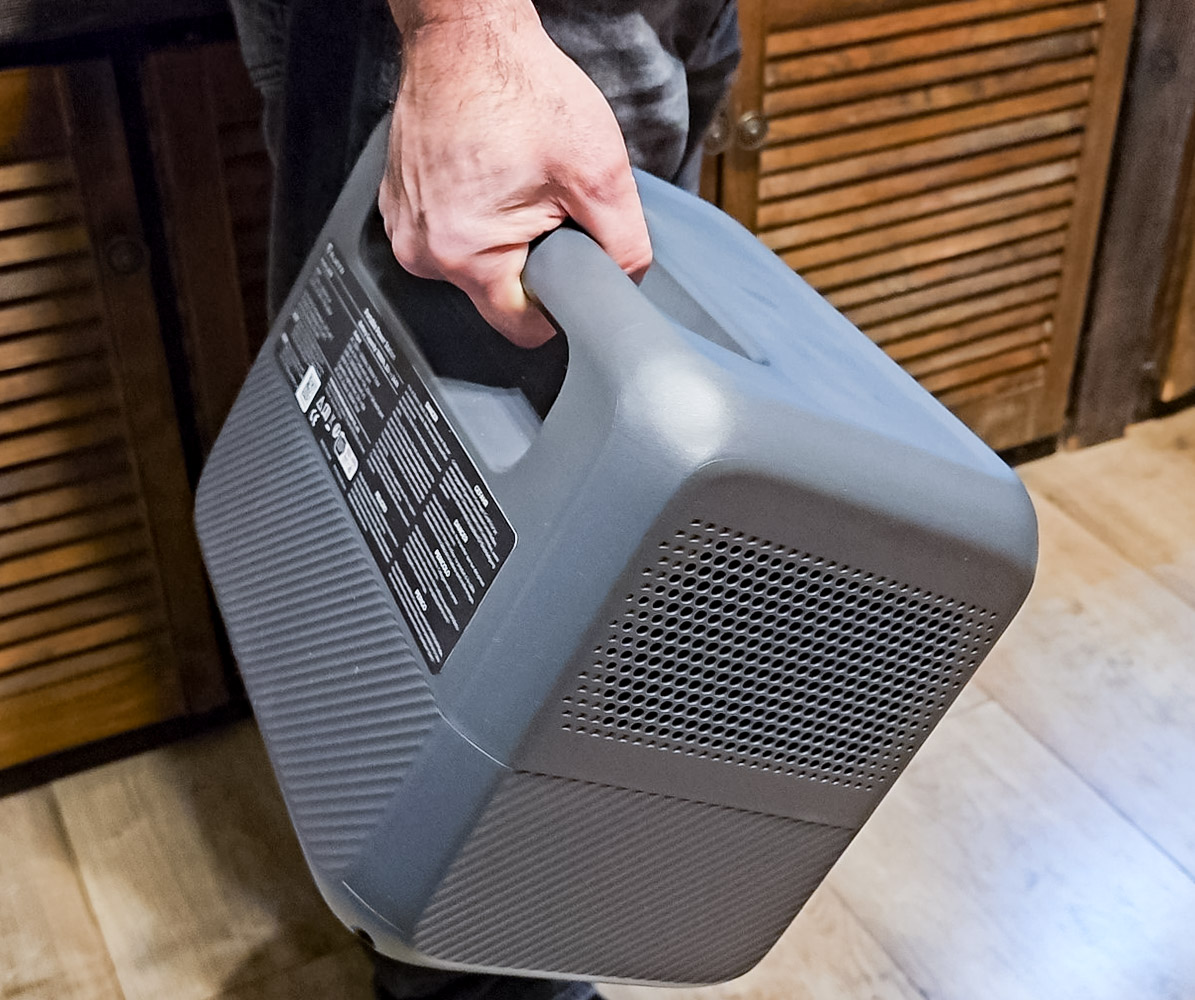
Given its relatively lightweight and compact size, the station can indeed be considered a fully portable device.

BLUETTI AC70

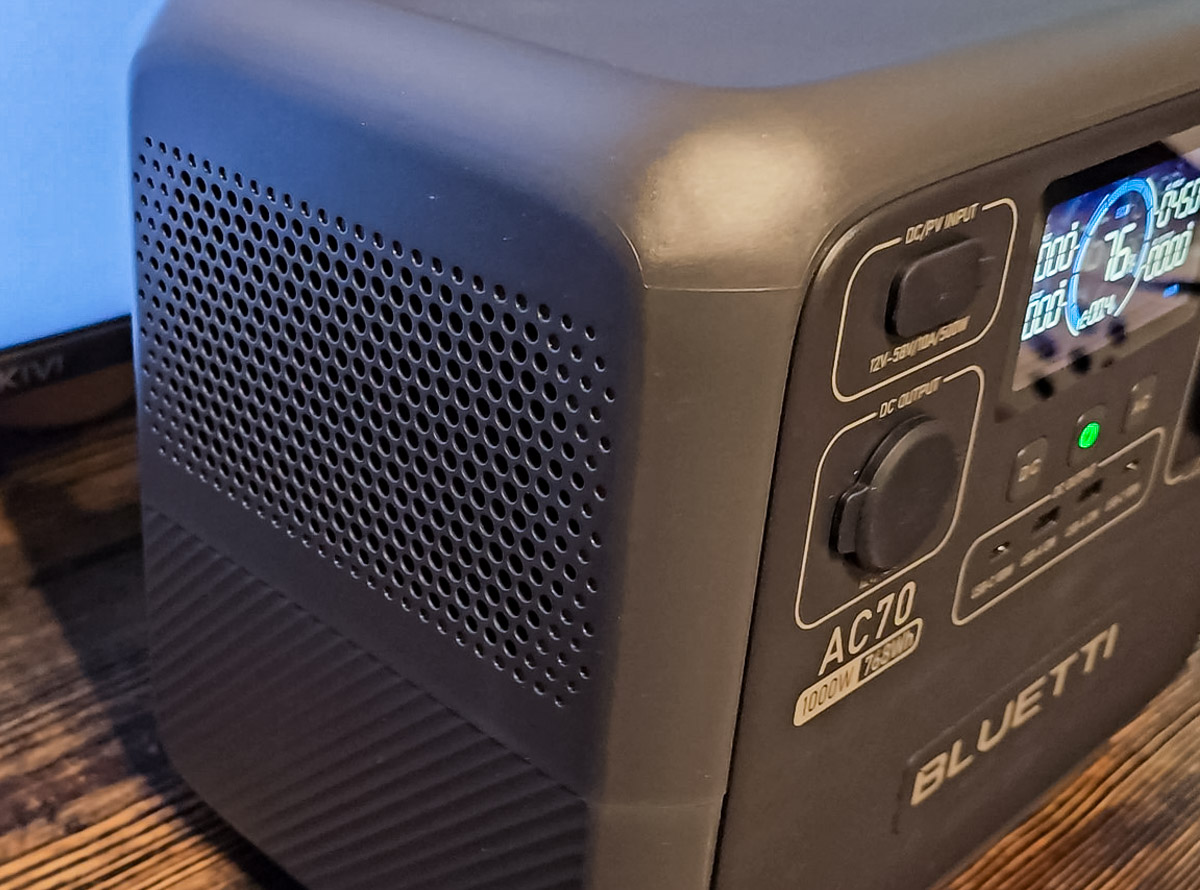
The left panel features only ventilation openings.

BLUETTI AC70

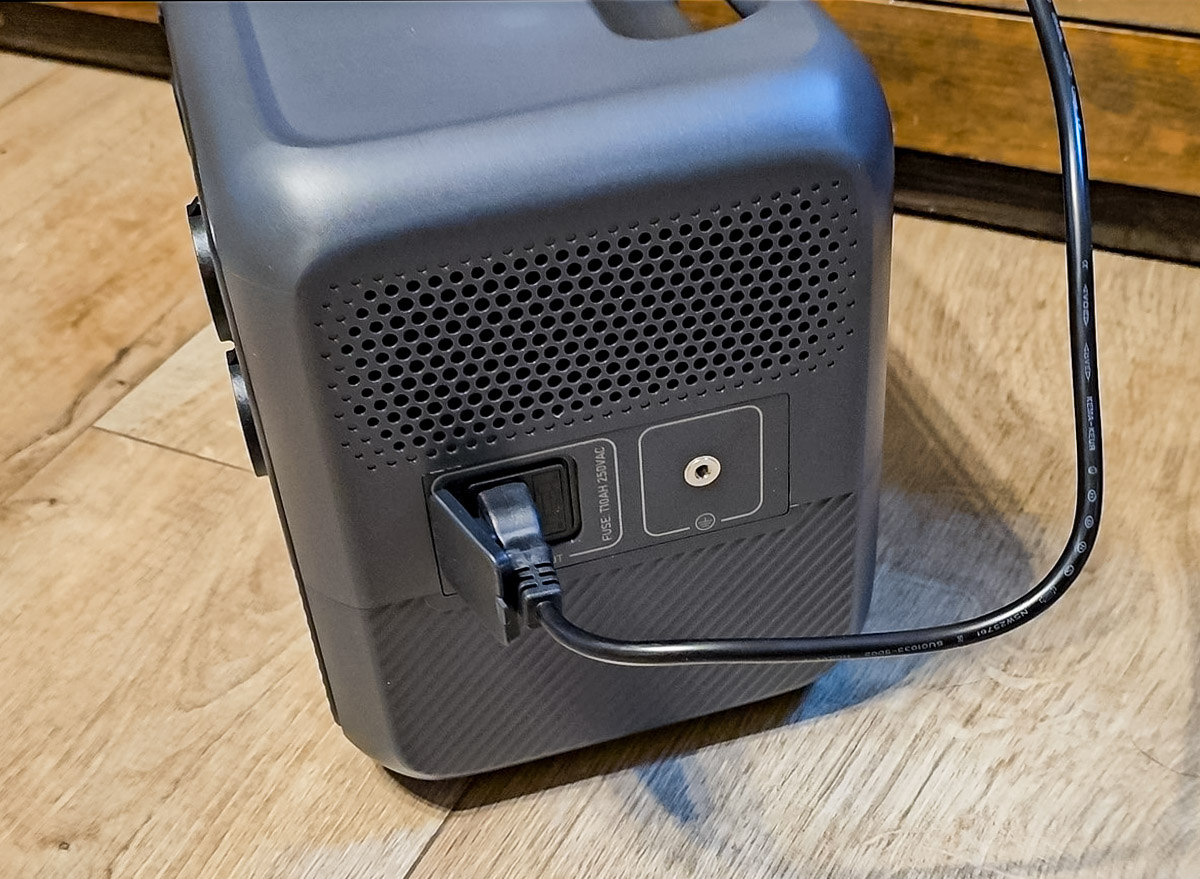
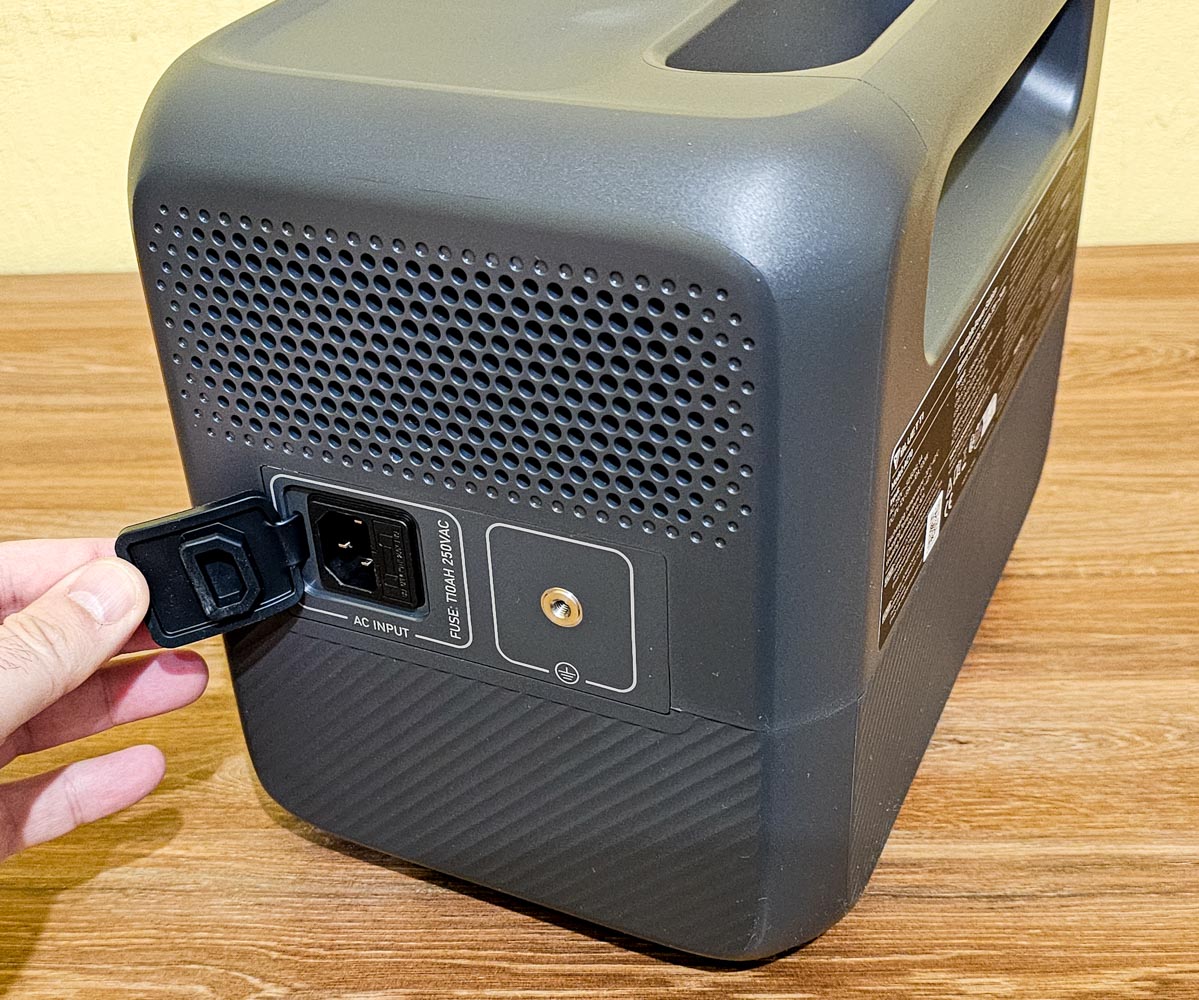
On the right side, there is an AC charging port covered by a rubber plug. Unlike larger models that use proprietary AC cables, the AC70 connects to the power grid using a standard C14 power cable, making it easy to replace a damaged or lost cable if needed. Additionally, this side features a threaded connection for the grounding wire.

BLUETTI AC70

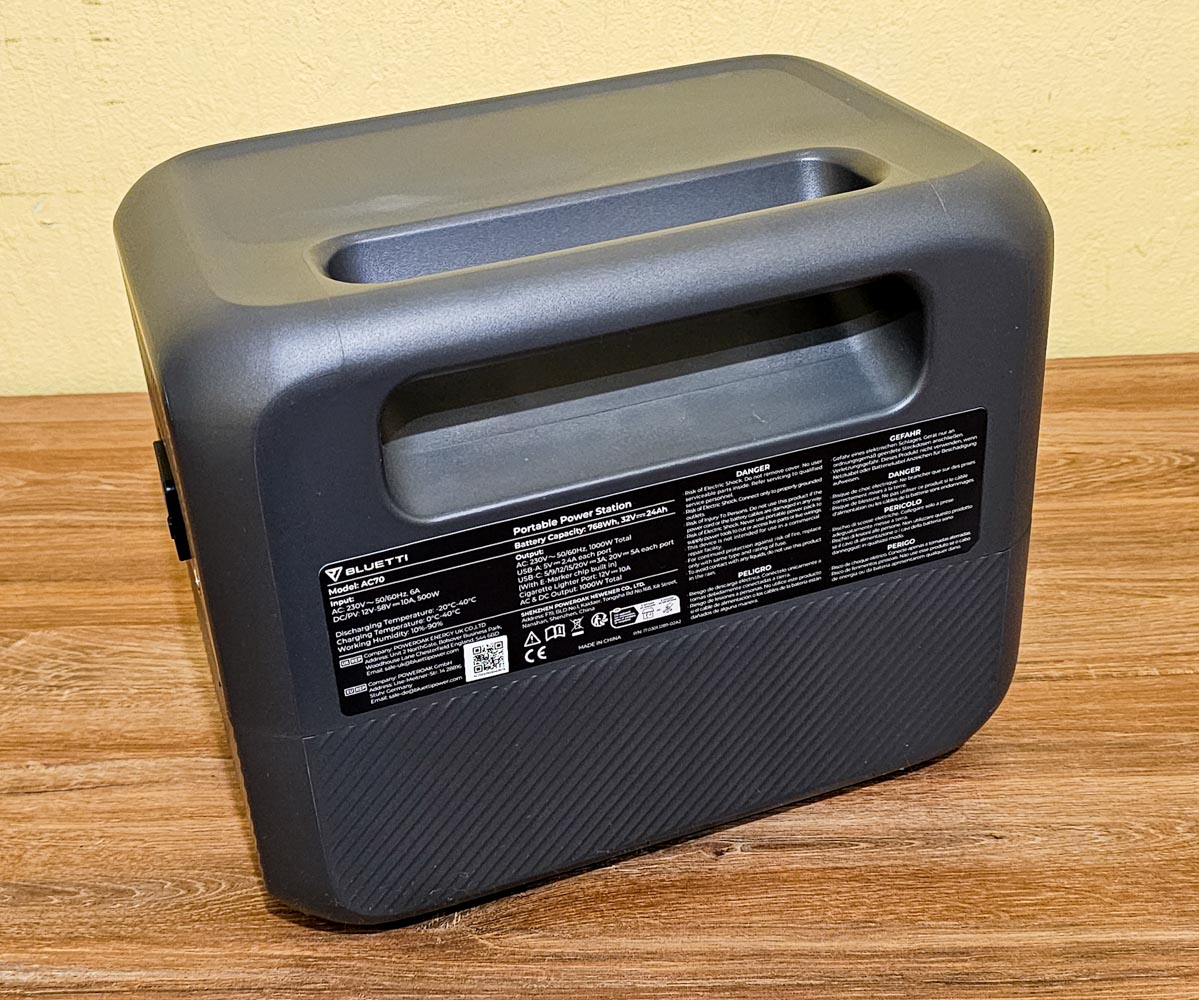
The rear panel features a sticker with all the relevant information and key specifications of the device.

BLUETTI AC70

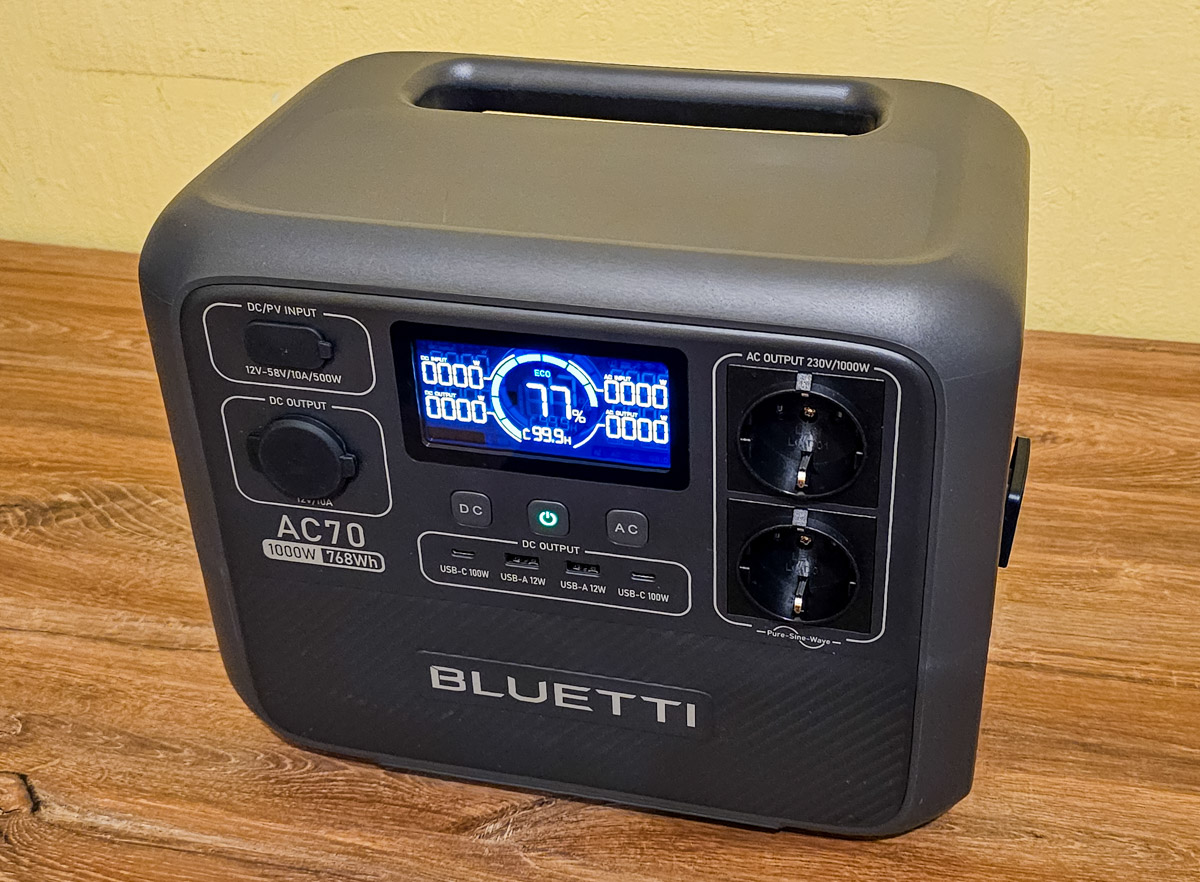
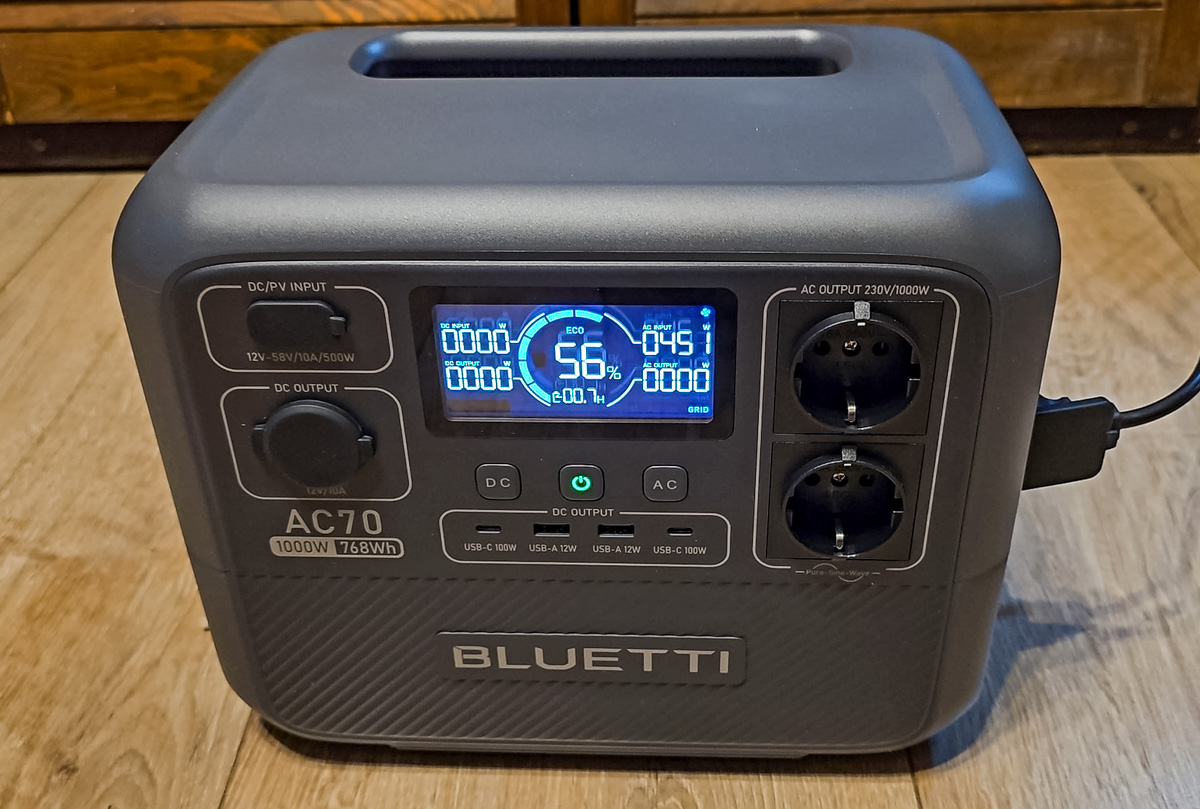
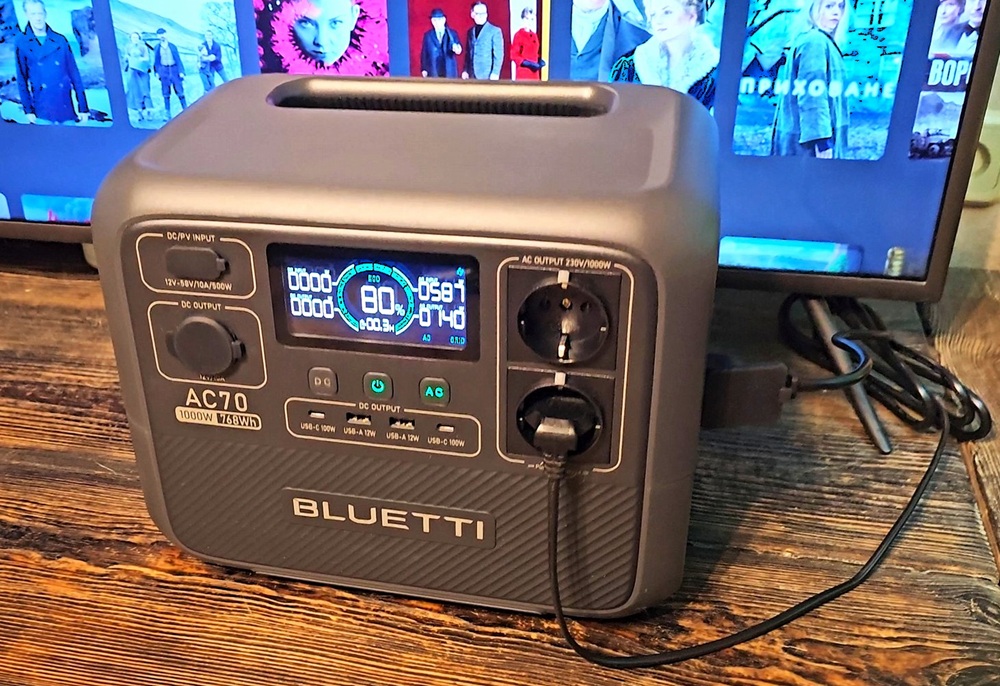
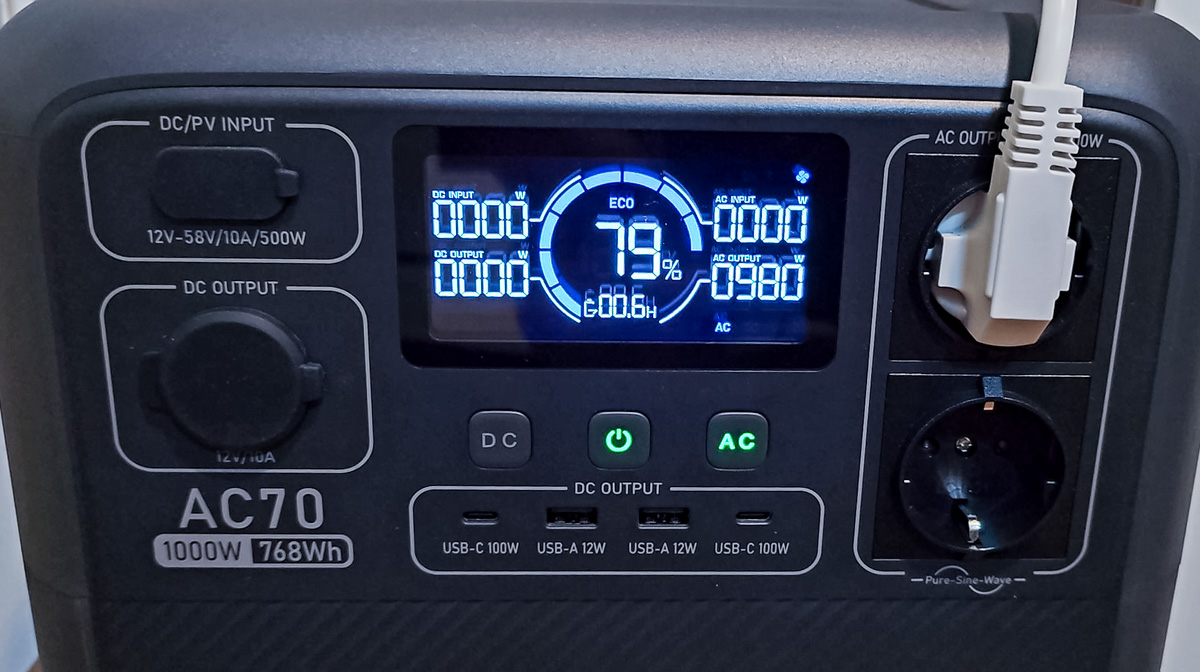
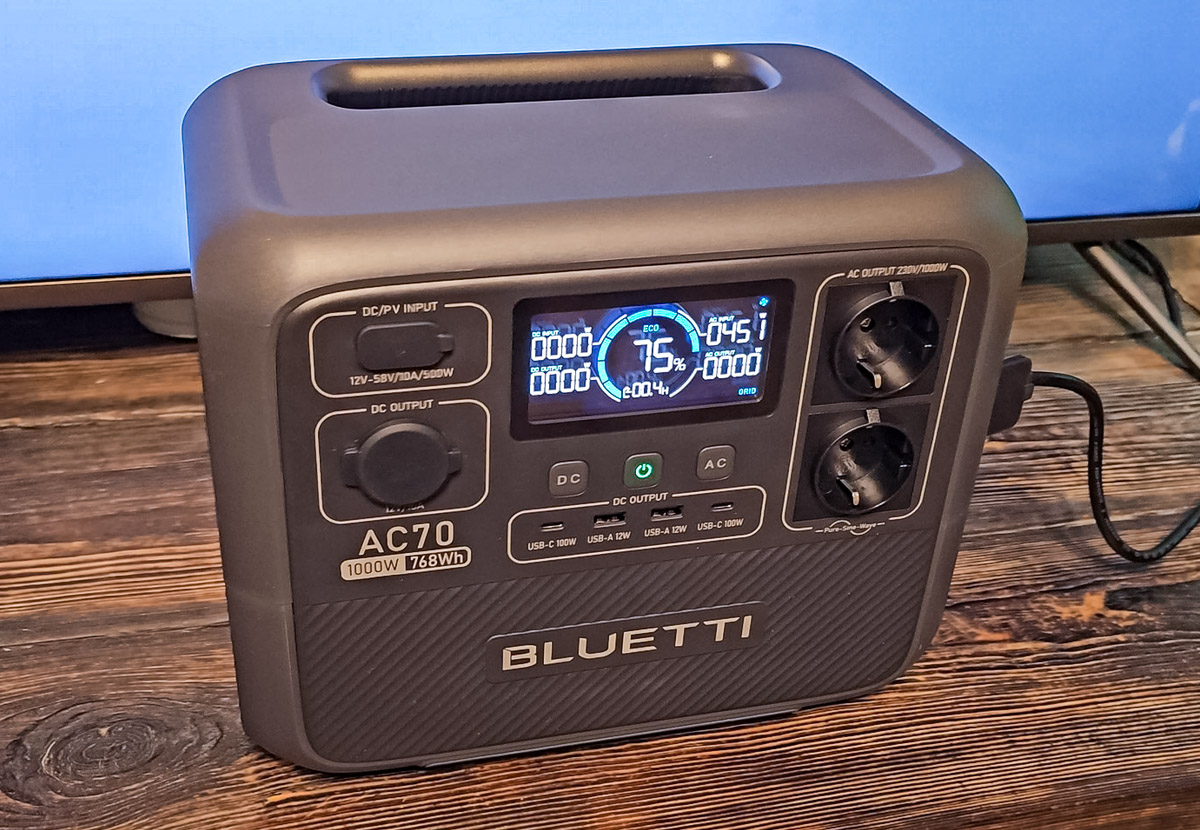
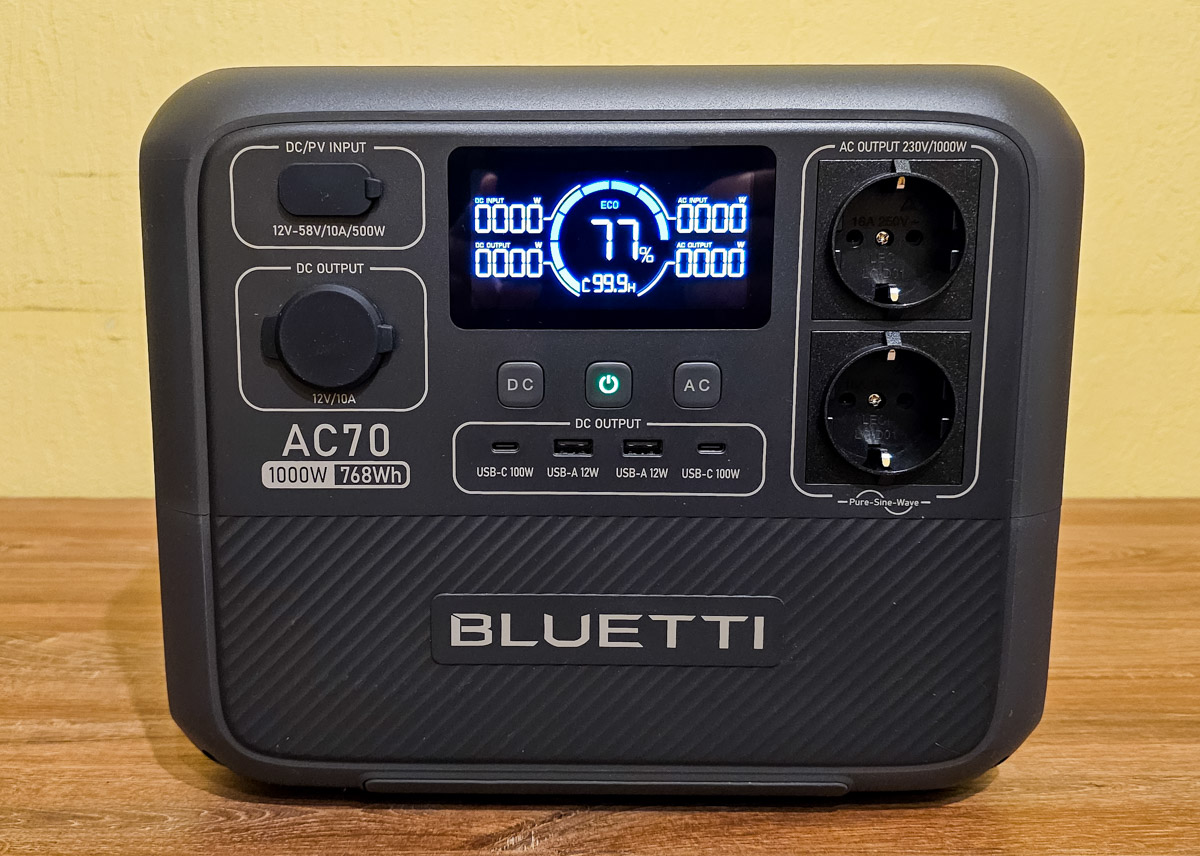
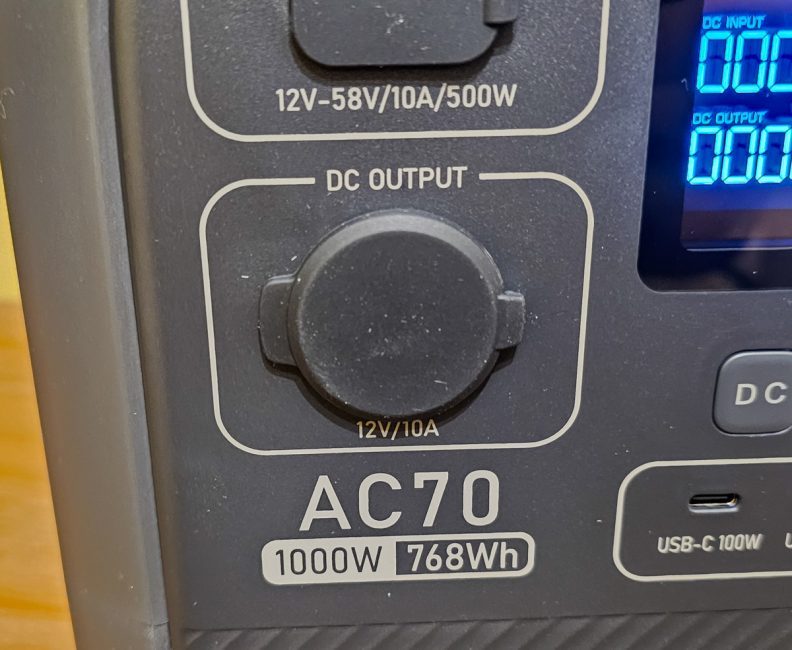
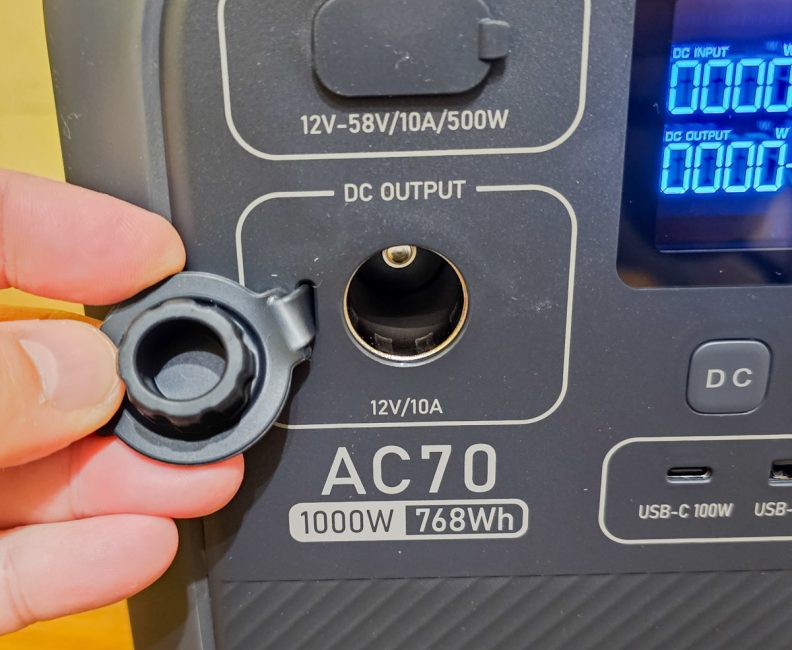
The front panel houses all the main ports: two 230V AC outlets with pure sine wave support, two USB-A ports, two USB-C ports, a 12V DC input for charging from solar panels, a car outlet, or an external battery, as well as a 12V car cigarette lighter socket.

BLUETTI AC70

It’s worth noting that, unlike more expensive models, not all of the ports on the BLUETTI AC70 are equipped with rubber covers—the 230V outlets and USB ports are fully exposed.

Read also: OUKITEL P2001 Plus Portable Power Station Review

Control and display

At the top center of the front panel is an informational LED display. Below it are the power button and two buttons for turning the DC and AC interfaces on and off.

BLUETTI AC70

The display is clear and bright, with no complaints. However, it only shows basic information about the device’s status: input and output power for all interfaces, battery charge level, estimated charging time or runtime, and indicators for the current operating modes. There is no built-in settings menu on the station, which is a typical feature of the newer BLUETTI models. All settings can be adjusted through the mobile app, which we will review next.

Read also: EcoFlow River 2 Max power station review: Affordable, fast, cool

Mobile application

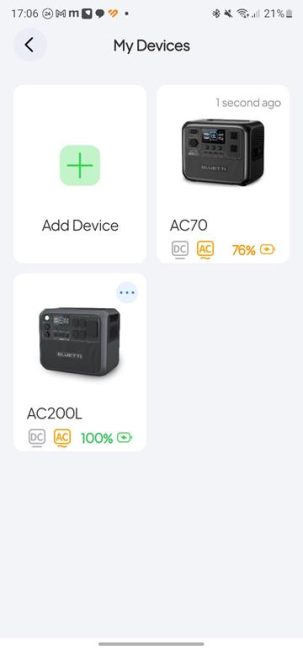
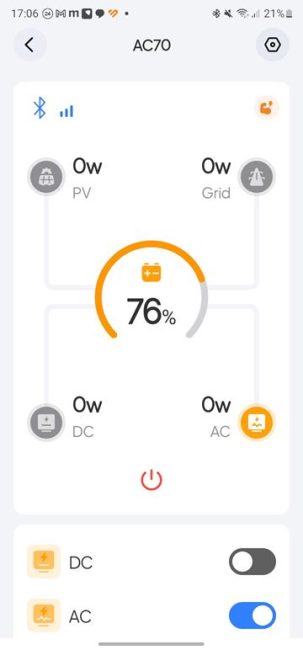
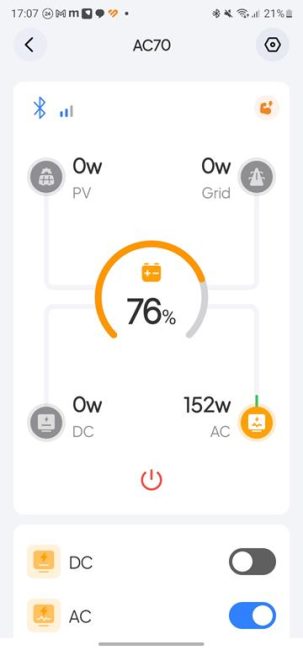
The BLUETTI AC70 is controlled via a smartphone using a mobile app. The user guide for the app can be downloaded from the official website.

Android:

BLUETTI
BLUETTI
Developer: BLUETTI OFFICIAL
Price: Free

iOS:

This charging station connects to the smartphone only via Bluetooth. Therefore, remote control of the station through the internet is not available for this model. Such a feature is supported only by more expensive devices.

You can explore the main features of the BLUETTI app in more detail through the screenshot gallery below:

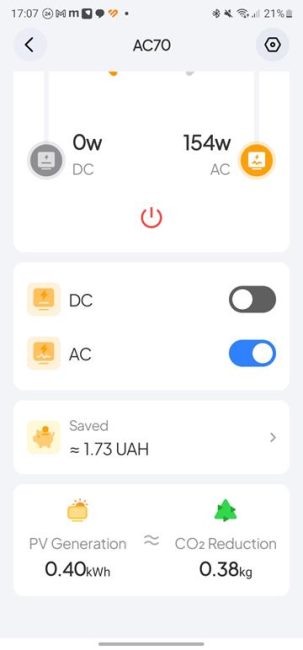
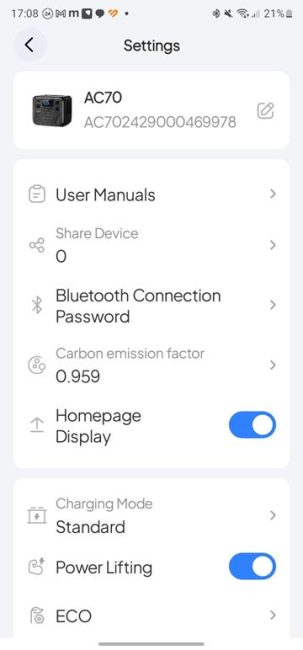
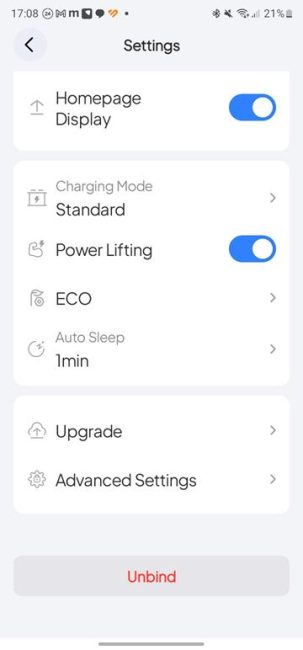
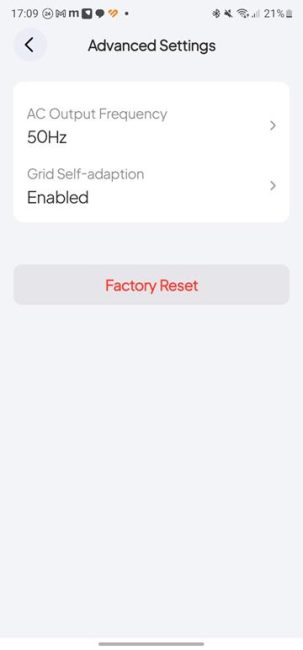
In addition to duplicating the buttons on the station’s body, the mobile app offers a variety of extra settings – enabling high power mode, selecting UPS mode and charging priority, controlling charging speed, and configuring grid parameters. Additionally, you can activate a mode where the station automatically adapts to the state of the grid if its parameters are unstable. The app also provides a user manual and detailed statistics on energy consumption and cost savings when using the power station with solar panels.

Tests and experience with BLUETTI AC70

To begin with, we will check the key feature of the portable power station, namely pass-through charging and UPS functionality. Why is this important? From experience, I can confidently say that a station with a separate adapter that charges only via DC is very inconvenient because when the power is off, your devices lose power. Then you have to manually switch all devices from the stationary socket to the charging station. When the electricity comes back on, you need to reverse the process. However, with the BLUETTI AC70, you can simply keep the station permanently plugged into the mains, and all critical devices can be powered from the charging station’s outlets.

BLUETTI AC70 - Pass-through charging

If the power goes out, thanks to the UPS (Uninterruptible Power Supply) function, the station automatically activates emergency power supply to the connected devices from the built-in battery through the AC inverter. Once the electricity supply is restored, the station charges itself in parallel while continuing to provide power to the devices.

In this video, I demonstrate how the UPS and pass-through charging function works:

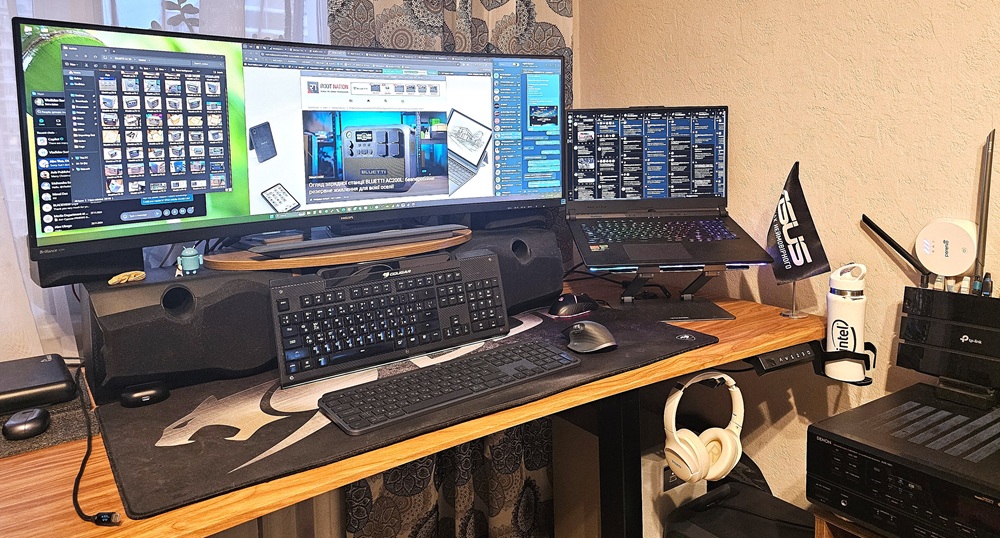
The first test of the BLUETTI AC70 was conducted in a regular living space, where the station was able to power my entire workstation without any issues (a powerful laptop, large 43″ monitor, motorized desk, and all peripherals), a audio receiver + 5 speakers, subwoofer, Wi-Fi router, security system hub, 55″ TV, and an aquarium filtration pump.

All this equipment consumes approximately 300W in total. Accordingly, the station can provide up to 2 hours of autonomous operation for this set of devices from its own battery. Of course, if the stationary power supply is lost, this time can be extended by simply turning off unnecessary electrical devices. For example, if the TV, receiver, and subwoofer are excluded from the power circuit, the consumption drops to 130-150W, allowing me to work for over 4 hours with the large monitor.

Next, we move to the kitchen, where the station faces a more serious test with powerful household appliances. The dual-chamber refrigerator consumes around 140W, and the station easily handles the task of maintaining its continuous operation for 4 hours on the built-in battery.

However, when I attempt to connect additional loads, such as a microwave or coffee machine, which consume around 1000W at the moment, the protection mechanism activates, turning off the inverter.

BLUETTI AC70

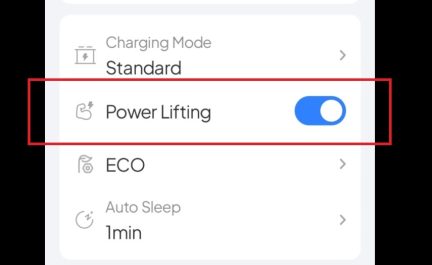
The situation can be partially resolved by activating the Power Lifting mode in the mobile app.

After enabling the Power Lifting mode, the station is able to handle even powerful household appliances, although not simultaneously with the refrigerator. In any case, these are quite impressive results for a fairly compact power station. The full testing process of the BLUETTI AC70 in the kitchen is demonstrated in several videos below.

Video 1 – Testing without activated overdrive mode:

Video 2 – Testing with the Power Lifting mode activated:

Read also: ALLPOWERS S1500 Portable Power Station (AP-SS-008): Review and user experience

Charging

The fast charging feature via AC power is a truly useful function that significantly reduces the recharge time for the built-in battery. I can confirm that the approximate time for a full charge via AC aligns with the manufacturer’s claims — around 1.5 hours.

BLUETTI AC70

Certainly, you can reduce this charging time further by additionally charging the AC70 via DC power from solar panels, a car charger, or an external battery.

BLUETTI AC70

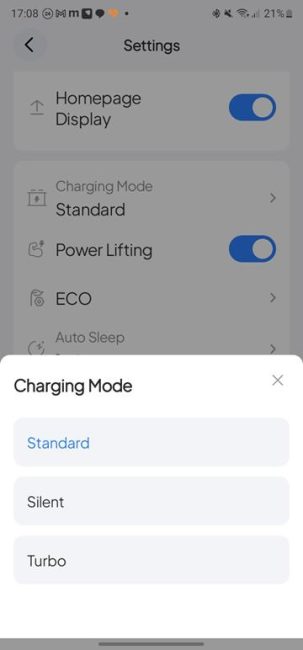
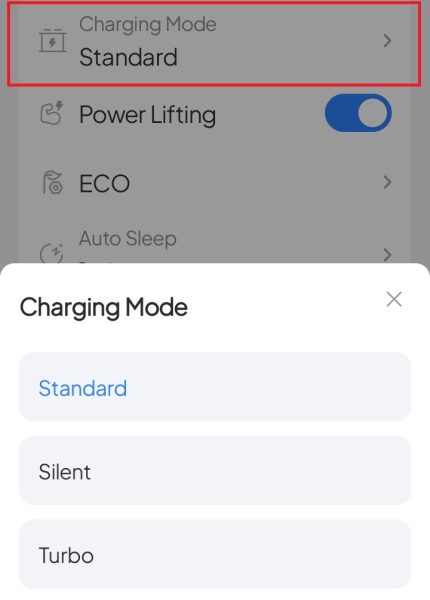
It’s also worth noting that the overall power and charging speed are directly related to the noise level produced by the station’s active cooling system. By default, the station is set to a standard (medium) charging speed, which limits the charging current and prevents it from reaching maximum values. In this mode, the station is relatively quiet, with the fan kicking in occasionally, though the noise level is noticeable, but not overwhelming. Through the mobile app, you can adjust this setting to suit your needs—choosing between Turbo or Silent charging. Consequently, the power and noise level will change, so keep that in mind.

Conclusions

The BLUETTI AC70 is a compact portable power station with a broad range of capabilities. Despite its small size, the model offers relatively high electrical power, sufficient for typical household or outdoor use. The built-in battery capacity is average, which imposes some limitations on using the station during extended power outages. However, this is offset by the ability to charge the station simultaneously with both AC and DC power, providing a quicker recovery time.

BLUETTI AC70

What I liked

  • The overall quality of the device
  • Compact size, light weight
  • Pass-through Charging and UPS mode
  • Standard AC charging cable
  • Power Lifting mode 2000W
  • High-quality mobile application

Drawbacks

  • Lack of rubber plugs on AC sockets and USB ports
  • Connection to a smartphone only via bluetooth

Where to buy

Approved

HyperX Alloy Rise 75 Wireless Keyboard Review

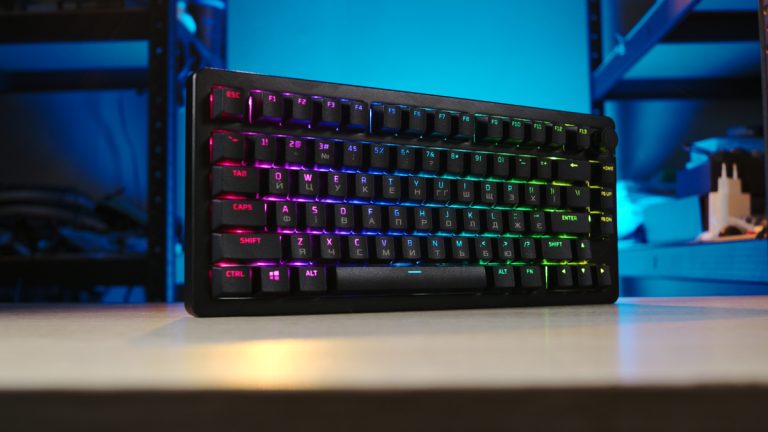
A long time ago, it feels like in a past life, I used to review HyperX tech. Back then, HyperX gaming gear was premium, cool, high-quality, and exciting. Time has passed, a lot has happened, but now, once again, HyperX gear is back for review. This time, it’s the HyperX Alloy Rise 75 Wireless keyboard. So, let’s see just how cool, high-quality, and interesting this particular new release really is.

HyperX Alloy Rise 75 Wireless

Technical characteristics

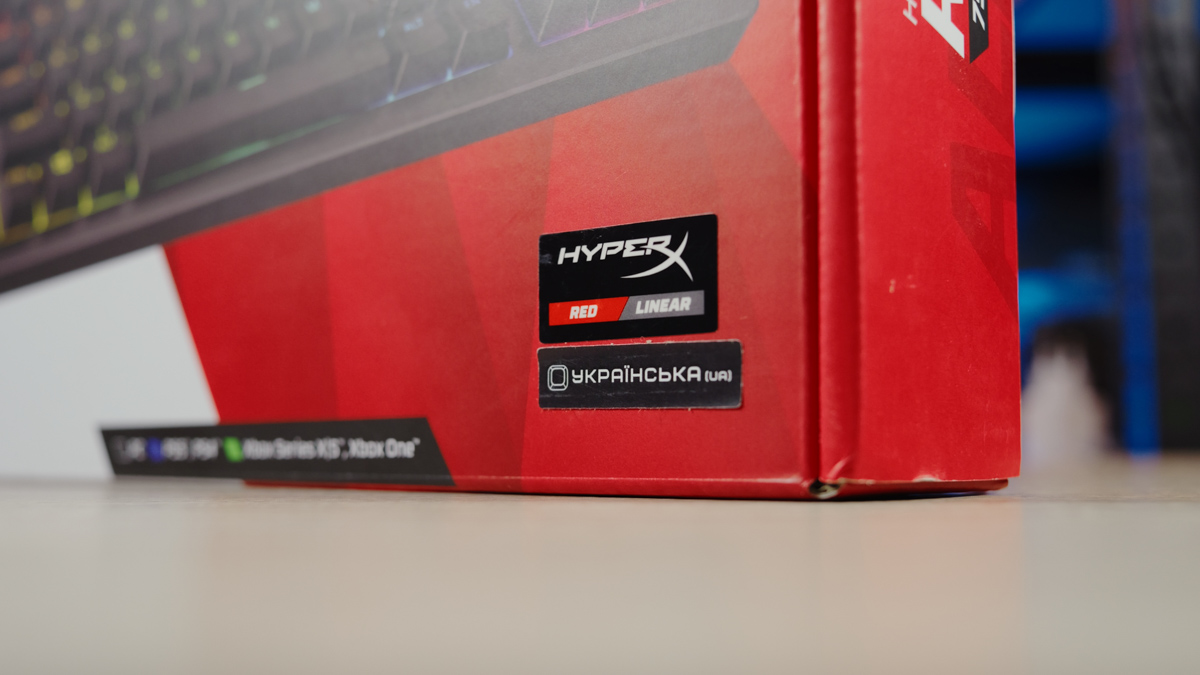
  • Switches: HyperX Red Linear
  • Polling frequency: 1000 Hz
  • Game mode: present
  • Anti-hosting: 100%
  • N-key rollover: yes
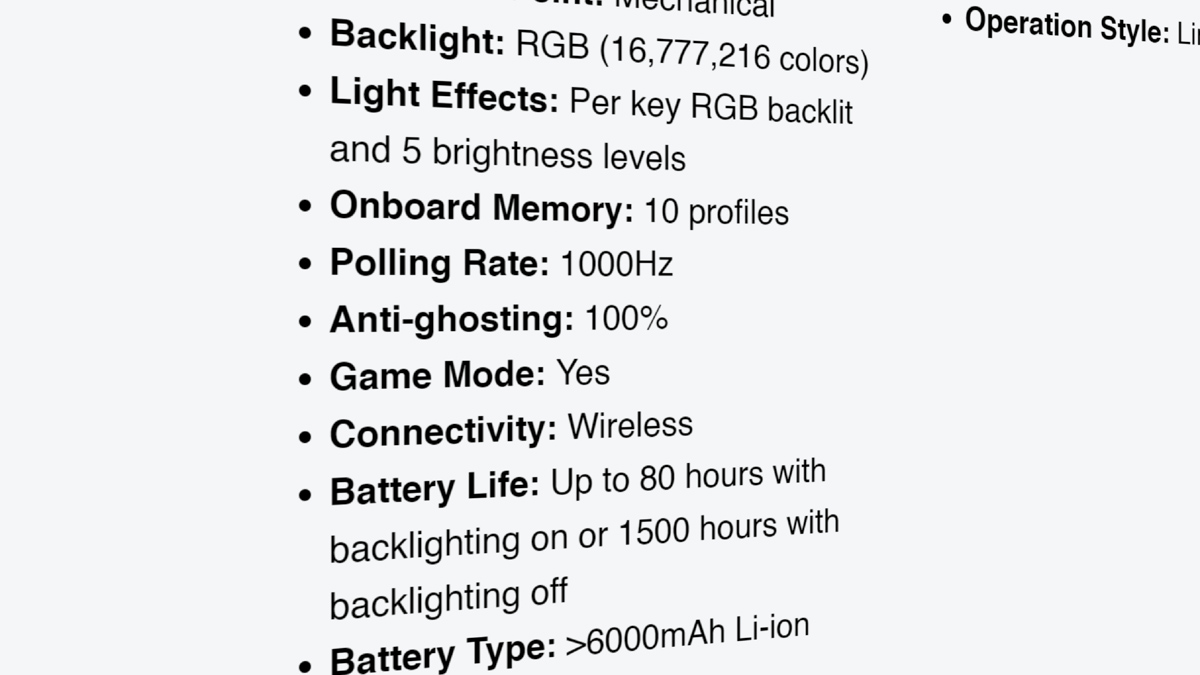
  • Battery capacity: 6000 mAh
  • Battery endurance: up to 80 hours with 50% backlight, up to 1500 hours without backlight
  • Backlight: RGB, 5 brightness levels + auto-adjustment
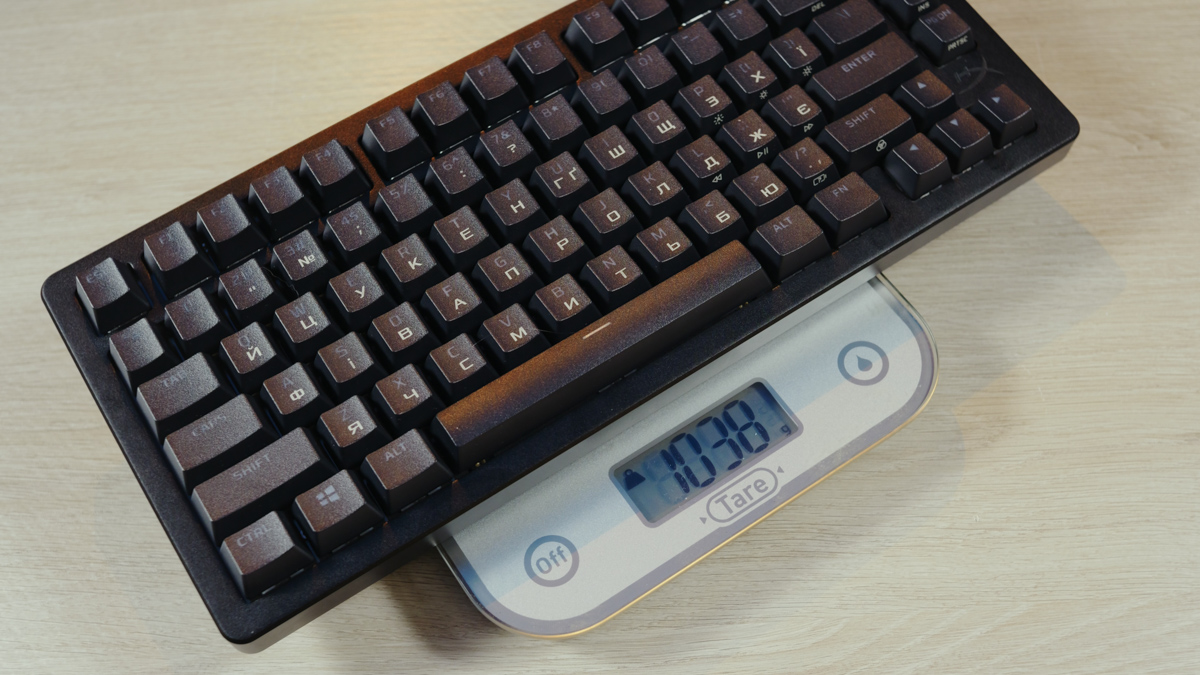
  • Weight: 1038 g
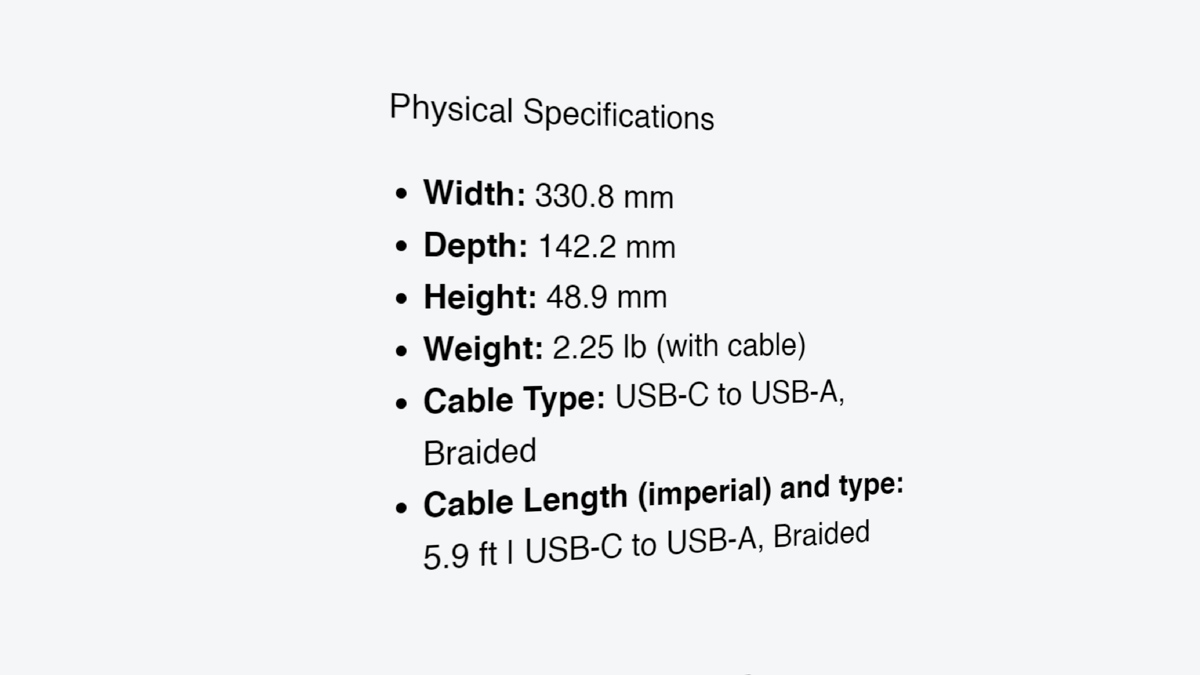
  • Dimensions: 330.8×142.2×48.9 mm

Video review of HyperX Alloy Rise 75 Wireless

Package contents and price

One thing is certain — it’s a premium product. The price is around $290 or €270. And yes, this is a 75% model, not a full-size one, which is already clear from the name.

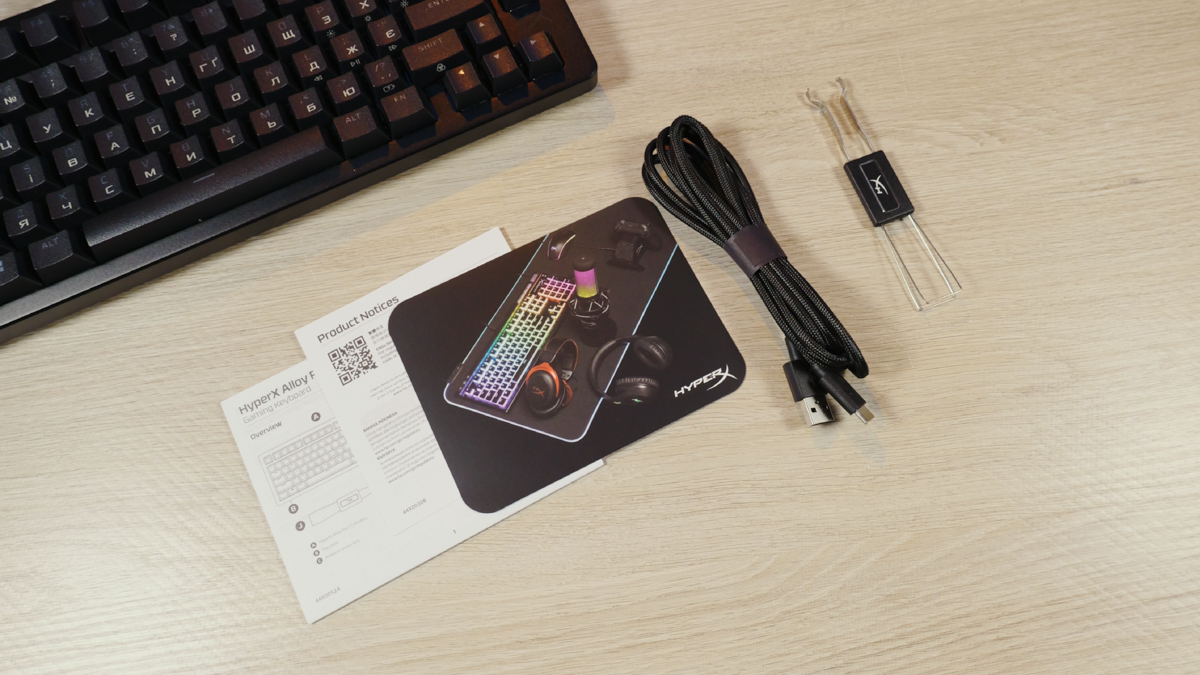
As for the packaging, it’s not overly extravagant. It includes the warranty, instructions, a Type-A to Type-C cable, and a keycap and switch puller. However, the unboxing experience is quite nice, with everything packed neatly and pleasantly.

HyperX Alloy Rise 75 Wireless

Design and ergonomics

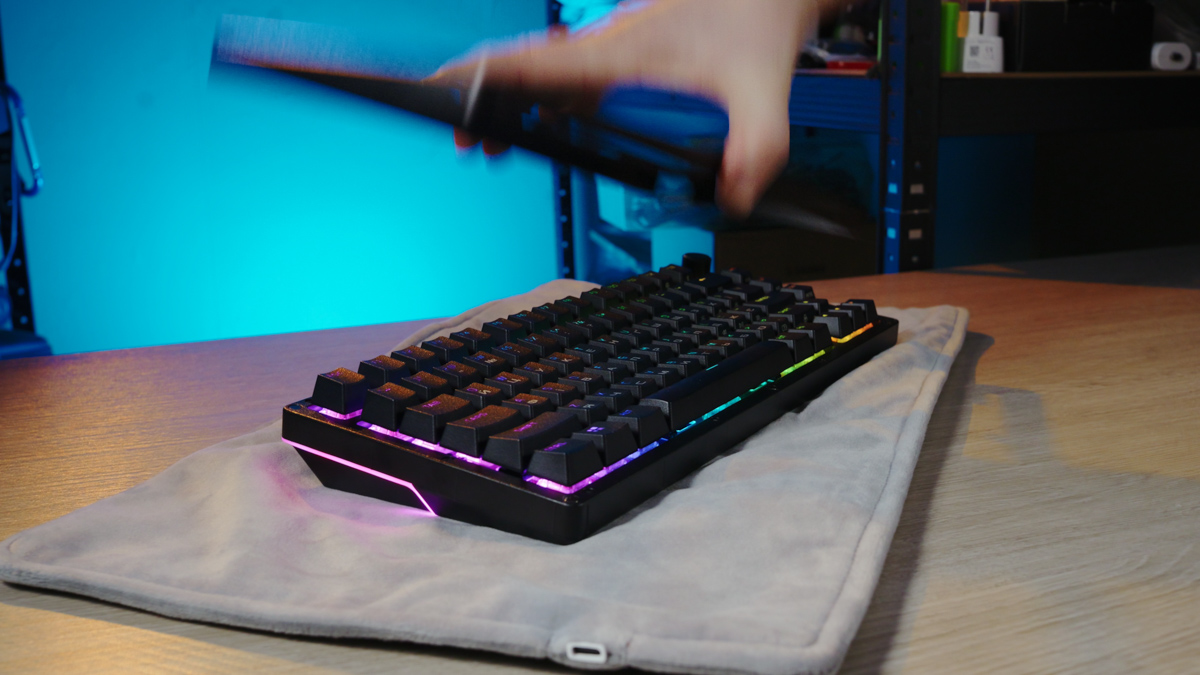
The first thing that stands out when holding the HyperX Alloy Rise 75 Wireless is that it requires a specific grip. The top metal “cover” that protects the switches is held in place by strong magnets, but it comes off relatively easily. Personally, when I carry the keyboard, my natural grip tends to fall exactly where the tabs for removing the cover are located.

HyperX Alloy Rise 75 Wireless

So, when I try to lift the keyboard, it’s the cover that ends up in my hands instead of the keyboard itself. This points to its weight, which, together with the cable, exceeds… one kilogram. To give you some perspective, I’ve rarely come across full-size keyboards that weigh more than a kilogram. Yet, this is a 75% keyboard, and it weighs over a kilogram.

HyperX Alloy Rise 75 Wireless

This means that the body is fully metal, with minimal plastic. Overall, even when turned off, the HyperX Alloy Rise 75 Wireless looks exceptionally solid. It’s only available in black, coated with matte paint, and has more of an industrial tool aesthetic than a typical gaming keyboard look.

HyperX Alloy Rise 75 Wireless

The front of the entire keyboard is black. On the right, the HyperX logo stands out in silver, which is also attached with magnets. Why magnets? Because on the HyperX website, you can purchase replacement logos.

HyperX Alloy Rise 75 Wireless

The set costs $25 for four plates, but one thing is clear — judging by the photos and the feel of the standard one, they are made with quality and attention to tactile details. By the way, you can also replace the magnetic top cover — for $40, you can buy a white or blue version.

Read also: Epomaker x AULA F65 keyboard review: Solid Keyboard That Looks The Part

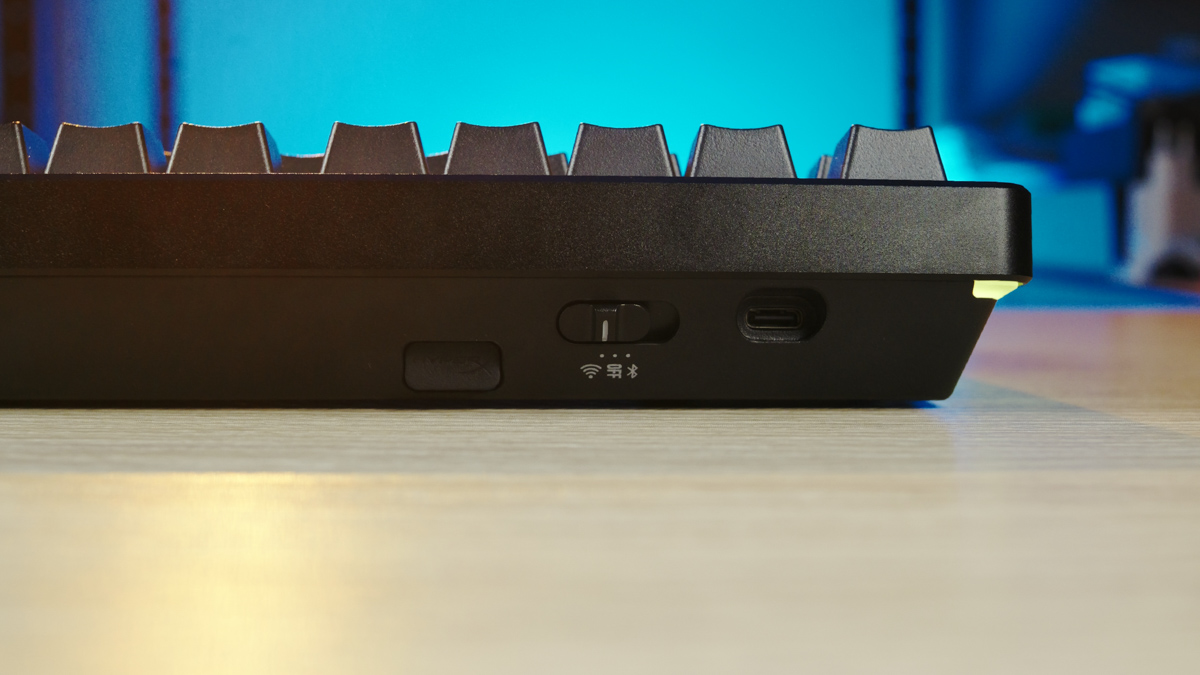
On the left side of the edge, there’s nothing. The interesting features are on the back. Specifically, there’s a deep cutout for the Type-C charging and sync cable, along with a switch that toggles between three positions.

HyperX Alloy Rise 75 Wireless

And there’s also the 2.4 GHz adapter, which is also magnetic.

HyperX Alloy Rise 75 Wireless

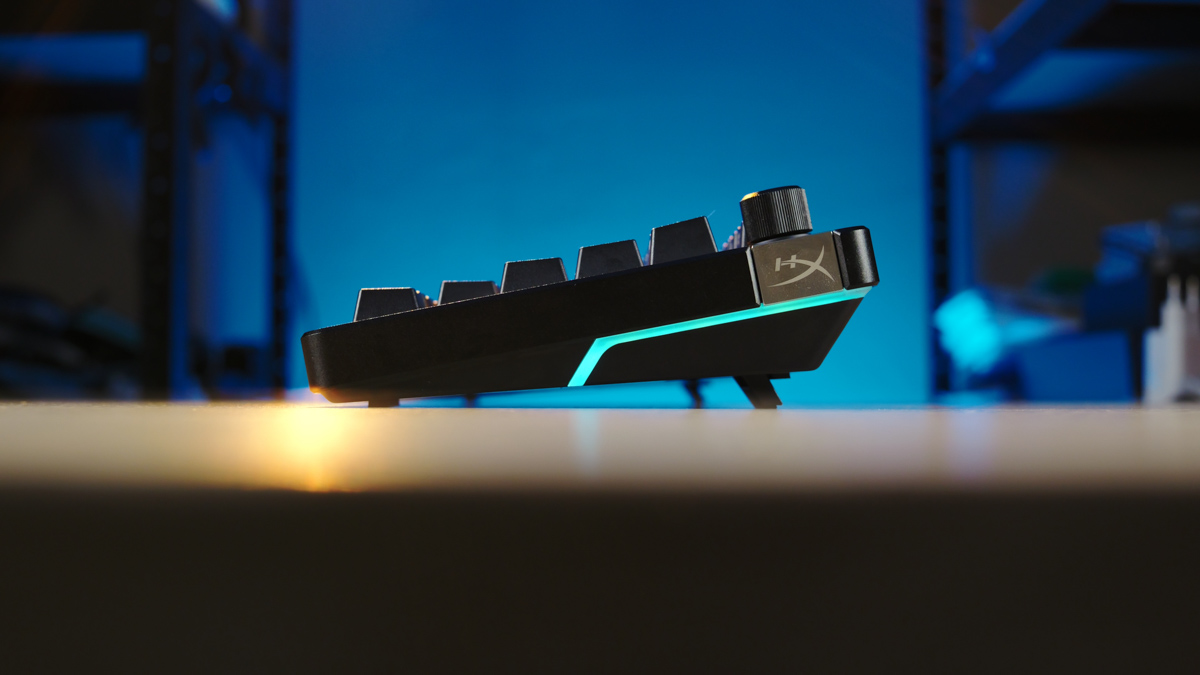
On the bottom, there are only retractable feet. This is nearly the only plastic element on the keyboard, and I couldn’t find exact information on the tilt angle. By default, the keyboard has a tilt of about 2-3 degrees, and the feet add roughly the same amount.

HyperX Alloy Rise 75 Wireless

By the way, when I said the feet are the only plastic element, I wasn’t kidding. Even the media control wheel, located at the top right, is made of metal. I should also mention the light sensor, which is slightly below the wheel.

Specifications

In terms of specifications, the HyperX Alloy Rise 75 Wireless measures 330.8×142.2×48.9 mm. It features a 1000 Hz polling rate, 100% anti-ghosting, and N-Key rollover support. The keyboard also supports 5 levels of RGB lighting and offers 10 customizable profiles, which can be saved directly on the device. It can operate in wired, Bluetooth, or 2.4 GHz wireless mode.

HyperX Alloy Rise 75 Wireless

However, for the first time that I can recall, I couldn’t find the Bluetooth version supported by the keyboard. This is important because the newer the version, the fewer interference issues it tends to have. On the positive side, there are three Bluetooth profiles, and switching between them is quite fast.

HyperX Alloy Rise 75 Wireless

The HyperX Alloy Rise 75 Wireless features a 6000 mAh lithium-polymer battery, with the manufacturer claiming up to 80 hours of use at 50% backlight brightness or up to 1500 hours with the backlight off. Additionally, the keyboard can operate while charging, and it can be charged from any power source, including high-wattage ones.

HyperX Alloy Rise 75 Wireless

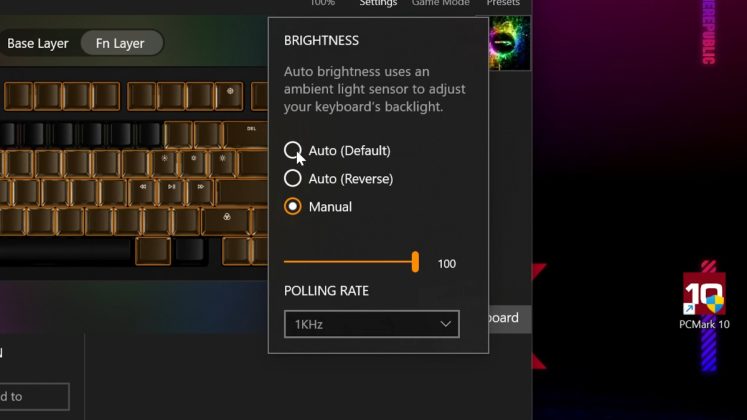
You might wonder how it’s possible to test battery life at 50% brightness when there are only five brightness levels. The answer is simple: we start counting from 0. So, the levels are 0%, 25%, 50%, 75%, and 100%. The backlight can also automatically adjust its brightness based on the surrounding environment, but this feature is configurable through the proprietary NGENUITY software.

Software

The worst thing I can say about this software is that the page on the official website, which should lead to a list of compatible components, is empty.

HyperX Alloy Rise 75 Wireless

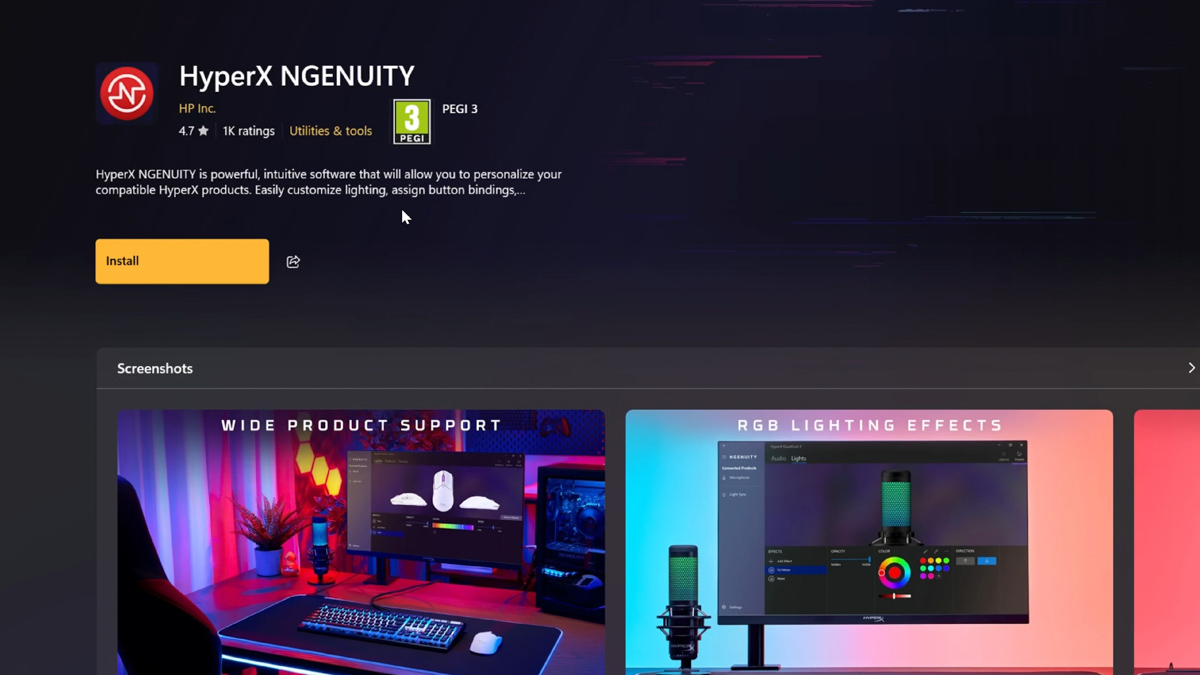
Aside from that, the software is great. It can be downloaded either from the official website via an EXE file or from the Microsoft Store, and it’s also available for smartphones (Android / iOS).

HyperX NGENUITY
HyperX NGENUITY
Developer: HP Inc.
Price: Free
‎HyperX NGENUITY
‎HyperX NGENUITY
Developer: HP Inc.
Price: Free

Typically, the software requires updating the firmware for components, which means you need to connect the keyboard via USB. However, once that’s done, it unlocks a very broad range of customization options.

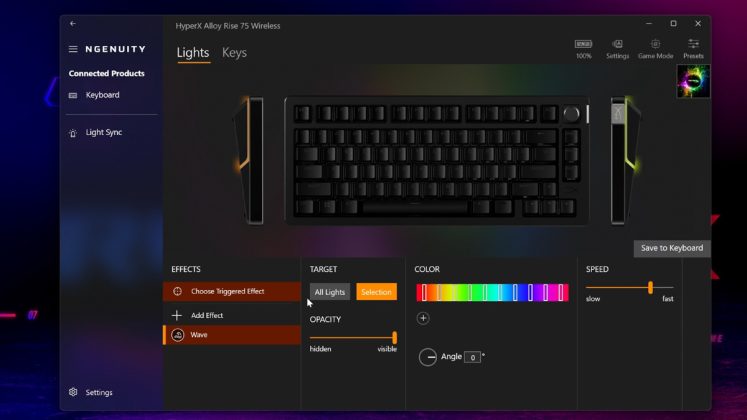
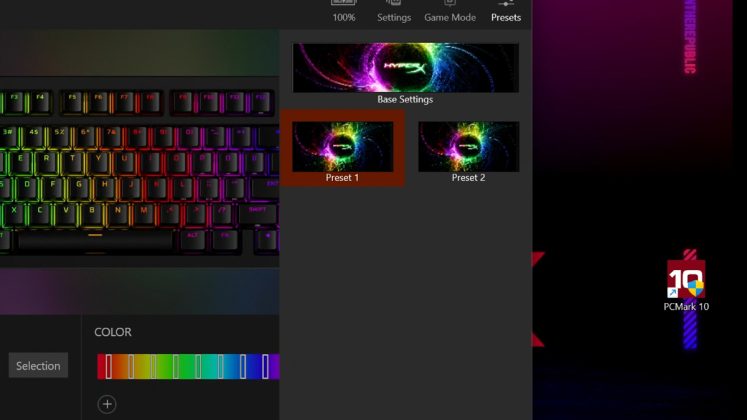
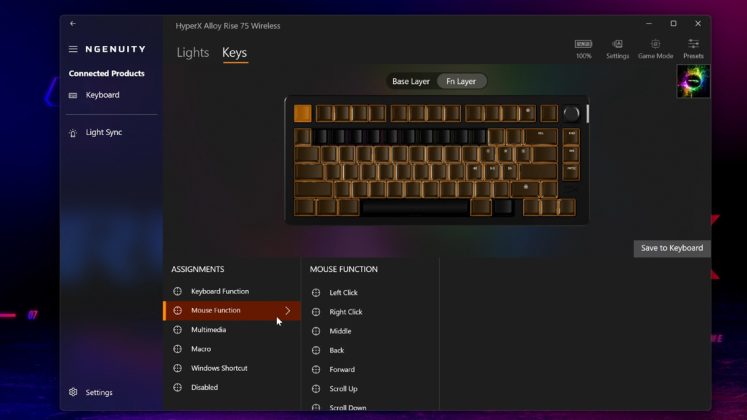
The backlight is highly customizable, with a wide range of options, including presets for key presses. Don’t forget that there’s also backlighting on the sides, which can be adjusted or turned off. You can change the auto-brightness settings, and even reverse it if needed. Macros and key combinations for the Fn key can be customized in great detail, and all of this can be saved to three standard profiles, with the option to add up to ten profiles in total.

Keyboard shortcuts

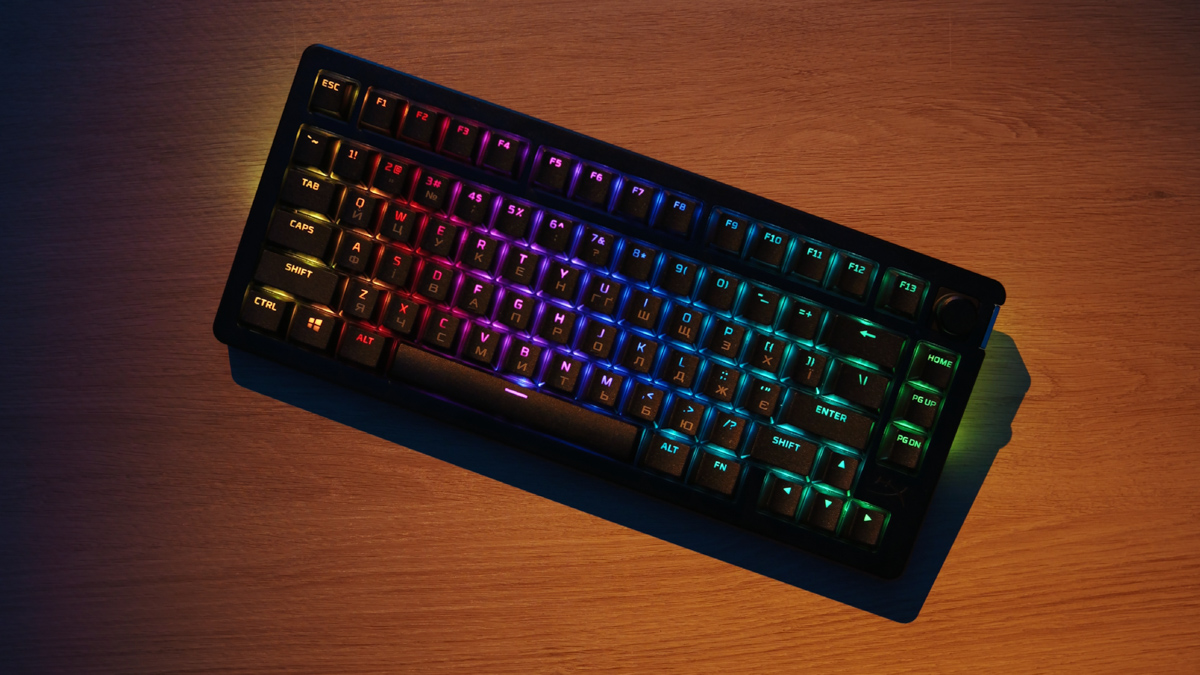
I’ll say a couple of words about the key combinations for control—there are essentially only 9 by default. However, to use them, you need to look for additional markings on some of the keycaps. Since the HyperX Alloy Rise 75 Wireless is a 75% keyboard, it needs to compensate for a lot of functions, and the markings on the side of the keycaps are a good solution for this.

HyperX Alloy Rise 75 Wireless

The functions themselves are great, sometimes even ingenious. By holding down Fn + Shift and pressing any key from 1 to 0 on the number row, you can switch between different settings profiles. A quick press of Fn + Shift switches between the first three profiles. Holding down Fn + “?/.”, which is the key just above Fn, shows the battery status.

HyperX Alloy Rise 75 Wireless

Similarly, you can control the brightness and gaming mode with button lock features. You can even switch between Bluetooth profiles. Holding down the spacebar and Fn for 5 seconds resets the settings.

Operating experience

In terms of user experience, I’ll start with the good news. The internal structure is immediately noticeable, even in the promotional photos, and it definitely justifies the price of the HyperX Alloy Rise 75 Wireless. Specifically, it features a Gasket mount, or “gasket mounting system.” Both the switches and stabilizers are factory-lubed. This has a significant impact on the sound of key presses, which will be demonstrated in the video review above.

HyperX Alloy Rise 75 Wireless

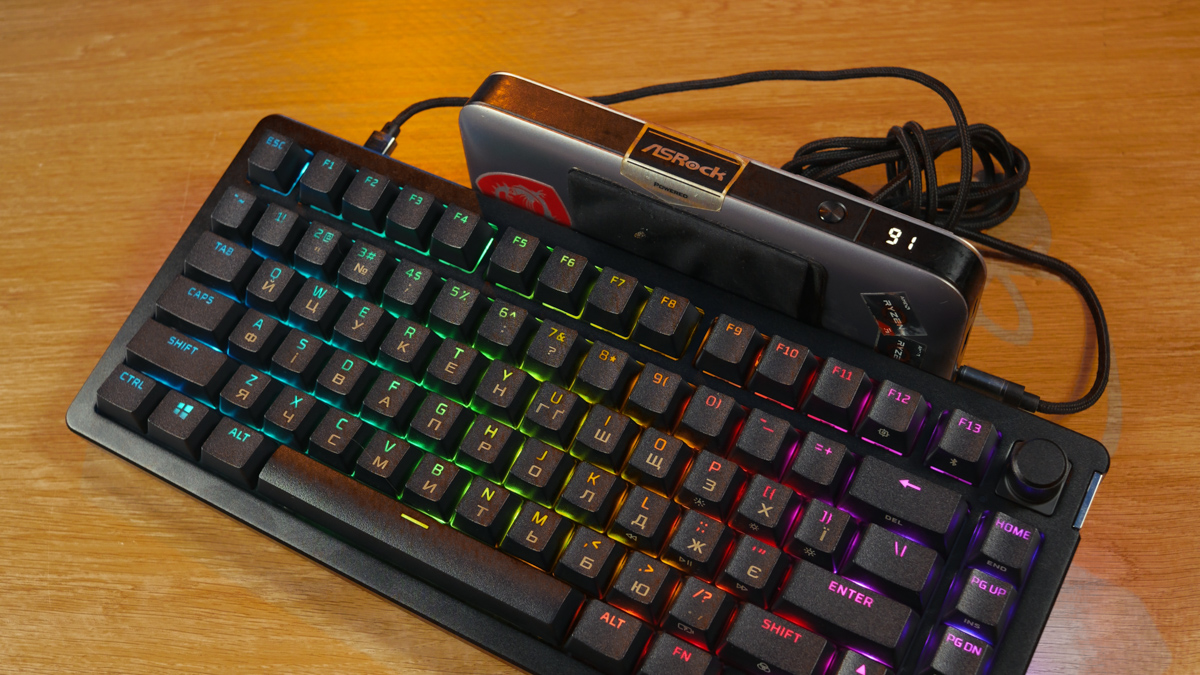
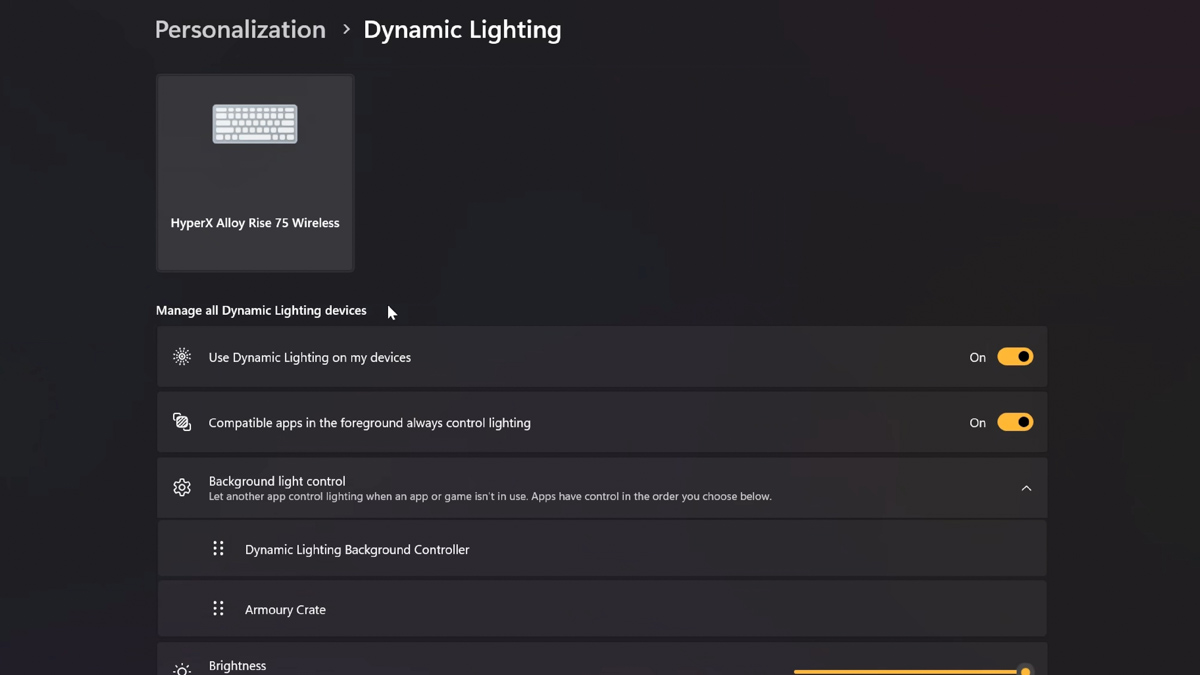
The backlighting is impressive, especially since the keyboard supports Windows Dynamic Lighting. This feature allows you to control the backlight at the operating system level without needing to install any additional software. I’d heard about it before, but only saw it in action now. The system recognized the keyboard immediately after connecting it via the 2.4 GHz adapter.

HyperX Alloy Rise 75 Wireless

Visually, the backlighting is almost the best I’ve seen from HyperX. I personally prefer the version with semi-transparent keycaps at the bottom, like the “pudding” style. However, the key difference here is that these keycaps are made of PBT, not ABS, meaning you won’t see any oily marks after two years of use.

HyperX Alloy Rise 75 Wireless

The keycaps aren’t just PBT; they also have a coated surface that adds extra friction for your fingertips, meaning your fingers will glide less. This isn’t a cheap feature—it’s not like it’s worth two cents or 500,000 Russian rubles, or whatever the current exchange rate is. It’s costly to produce, but it’s reliable. Additionally, the switches are HyperX Linear Red, which are hot-swappable.

HyperX Alloy Rise 75 Wireless

Any keyboard with quality “reds” automatically earns a spot in the “could use for years” category for me. However, getting used to a 75% layout is a silly idea for someone who spends 99% of their time typing and only 1% gaming. For gamers? It’s a whole different story. Plus, as I understand it, the keyboard uses the standard MX profile, which means it’s compatible with Cherry switches.

Conclusions

This model feels like a very solid foundation for gradually customizing it to your preferences. Yes, the proprietary add-ons are expensive, and the magnetic design isn’t always fully thought out, but this keyboard is no longer one that you just use and that’s it. You’ll likely want to take care of it, and customization will almost certainly be something you’ll enjoy. Plus, the customization process will be very pleasant and convenient.

HyperX Alloy Rise 75 Wireless

Add to that versatility, battery life, and a 2-year warranty, and you get the simple fact that the HyperX Alloy Rise 75 Wireless is one of the best, if not the best, 75% keyboards on the market. So, if it’s within your budget… I definitely recommend it.

Approved

Acer Chromebook 314 CB314-3HT Review

0

Chromebooks are gradually carving out their niche in the laptop market, and a great example of this is today’s review subject—the Acer Chromebook 314 CB314-3HT.

Having some prior experience with Chromebooks, I remain pleasantly surprised by their capabilities. That said, these devices are full of surprises. At first glance, they look like classic laptops with simple designs. But soon, a key difference becomes clear—where’s Windows? It’s not here. Instead, you get Chrome OS, which makes these devices feel more like smartphones, especially in terms of available features and apps.

So, what exactly is a Chromebook, and who should consider buying one? Let’s break it down—get comfortable, as there’s a lot to cover.

Також цікаво: Огляд Acer Chromebook Plus 515: Чи є життя на ChromeOS?

Positioning and price

If something looks like a laptop, has a lid that opens, a display, a working panel with components, along with a keyboard and side ports, it must be a laptop, right?

Well, not quite. The Acer Chromebook 314 CB314-3HT demonstrates that devices like Chromebooks require a different perspective. They also come at a lower price point—something worth noting when discussing these devices, as their affordability is undeniably appealing.
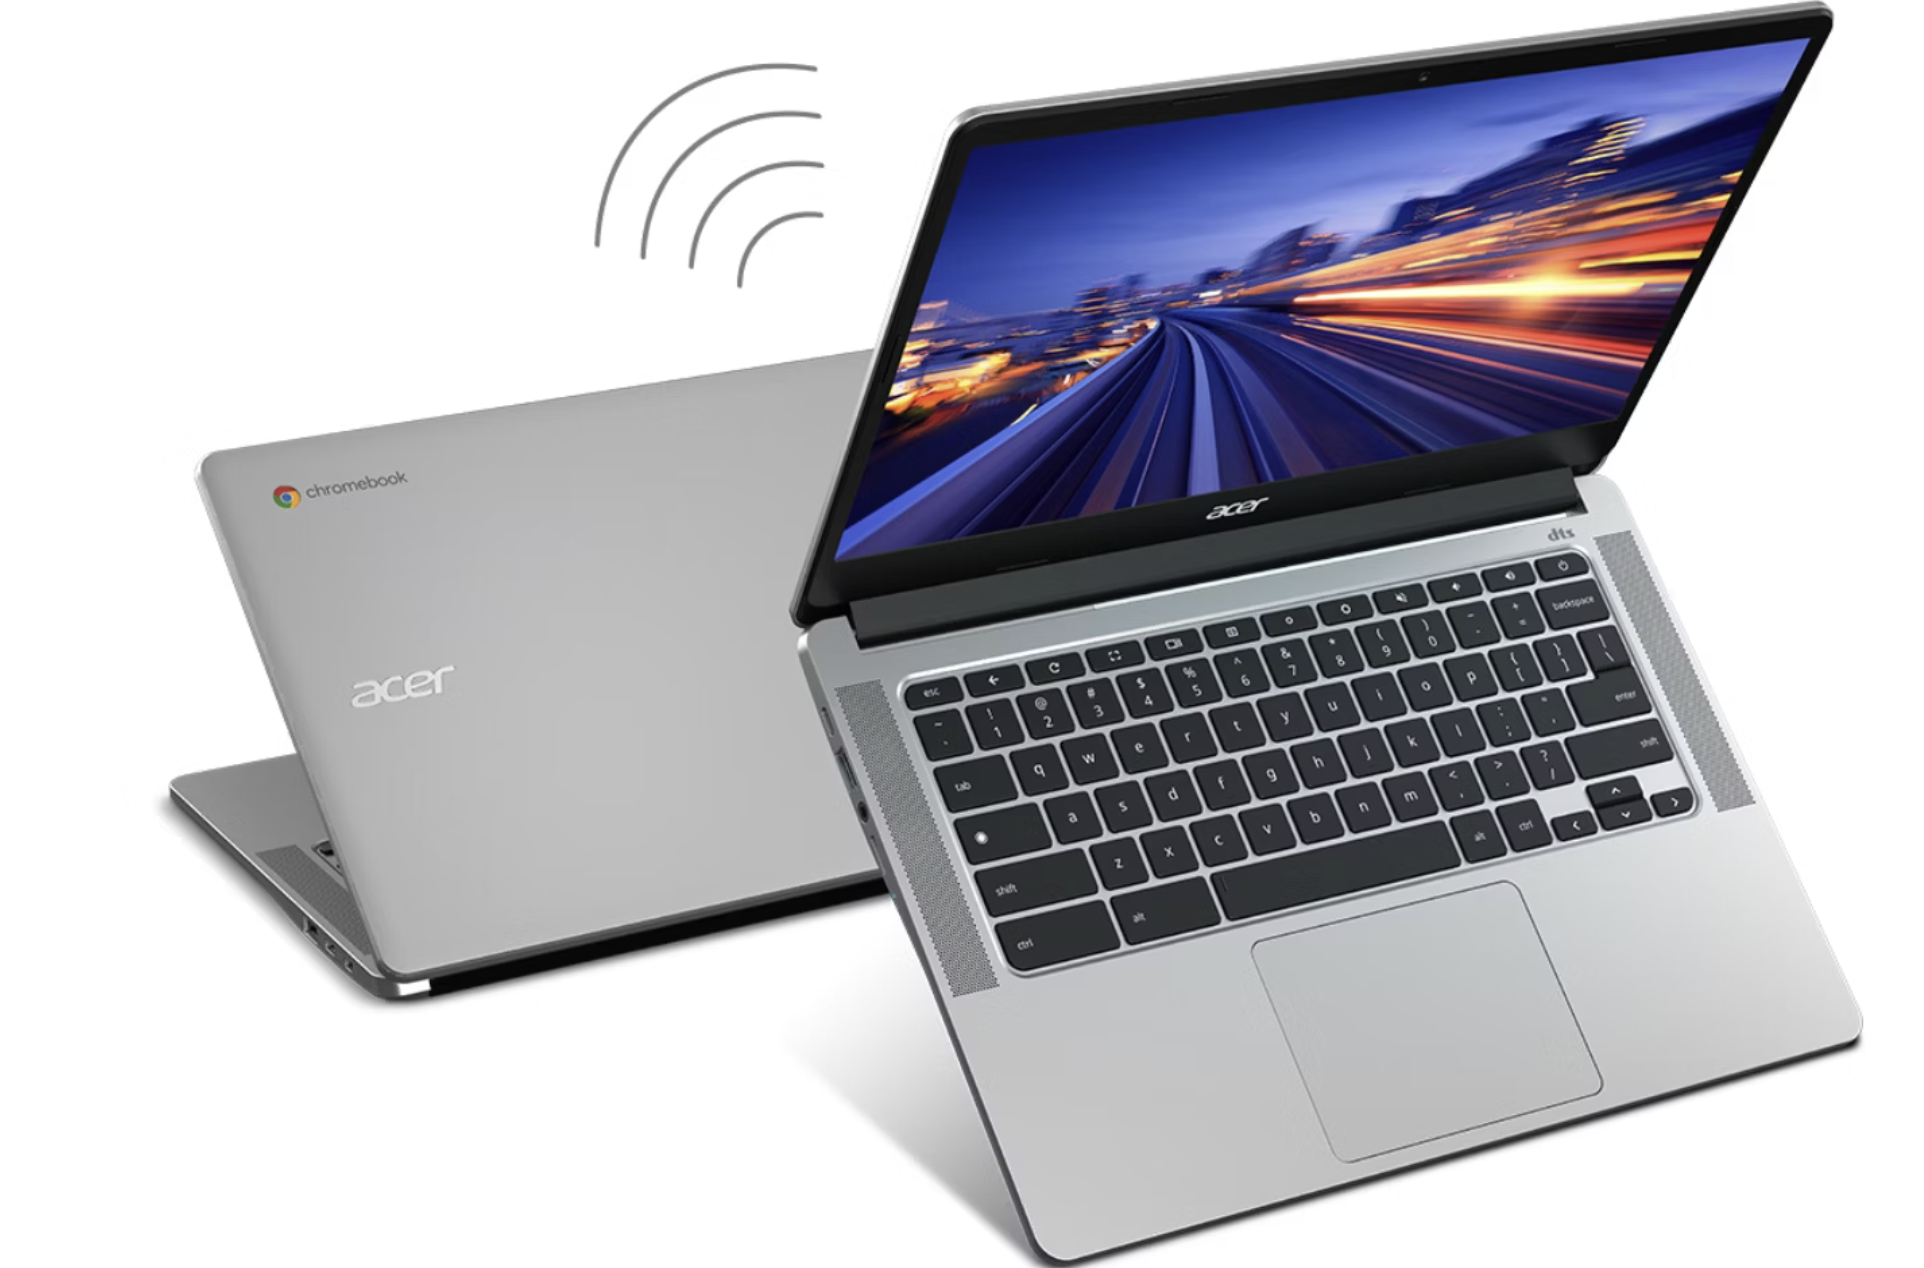
Acer Chromebook 314

For around $400, you get a 14-inch device powered by an Intel Pentium N6000 processor. This is a perfectly capable machine, designed not to handle the full load of Windows and desktop applications, but instead to focus on running a browser and mobile apps efficiently.

This is where the Acer Chromebook 314 CB314-3HT truly shines. It’s ideal for comfortable web browsing, video conferencing, managing emails, and working with Google Docs while enabling seamless file sharing and collaboration.

At first glance, it might seem limited, but that’s not entirely accurate. The Acer Chromebook 314 CB314-3HT offers plenty of modern features and, for many users, serves as a device that perfectly meets their professional needs. It’s affordable, lightweight, and operates smoothly. What more could a modern user want?

It’s like a well-planned meal: you get the right portion of calories, you feel satisfied, and there’s nothing wasted. But, much like a tailored dish, it’s designed specifically for certain users—and it might not appeal to everyone.

Acer Chromebook 314 CB314-3HT Specifications

First, let’s take a look at the technical specifications of this Acer chromebook.

  • Screen: 14″, 1920×1080, IPS 60 Hz, touchscreen with ComfyView matte finish, 16:9 aspect ratio, NTSC color space coverage 45%.
  • Processor: Intel Pentium Silver N6000, 4 cores, 1.1 GHz processor frequency
  • RAM: 8 GB LPDDR4X 2933 MHz
  • Storage: 128 GB eMMC
  • Video card: Intel UHD Graphics
  • Wireless interfaces: Wi-Fi 6.0 IEEE 802.11a/b/g/n/ac/ax, Bluetooth 5.1
  • Card reader: micro SD
  • Ports and connectors: 2×USB Type-C 3.2 Gen 1, 2×USB 3.2 Gen 1 Type-A, 3.5 mm combo jack
  • Camera: HD 720p
  • Audio: DTS, 2 speakers
  • Power supply: 65 W Type C
  • Battery: 50 Wh, Lithium-ion, AP18C8K (11.25V 50.29Wh 4471mAh), claimed autonomy up to 11.5 hours
  • Case material: matte plastic
  • Weight: 1.45 kg
  • Dimensions: 326×225×20 mm
  • Operating system: Chrome OS.

The technical specifications and functionality are quite interesting for the money. But how does everything work in practice?

What’s in the package

The packaging here is standard for Acer devices: eco-friendly, with minimal branding. However, this time, the cardboard box features colorful printing, which might surprise those familiar with Acer’s typically understated laptop packaging.

The box contains plenty of information about the Chromebook and its features. Even the back is adorned with icons for Google’s cloud apps—just in case you weren’t already familiar with them.
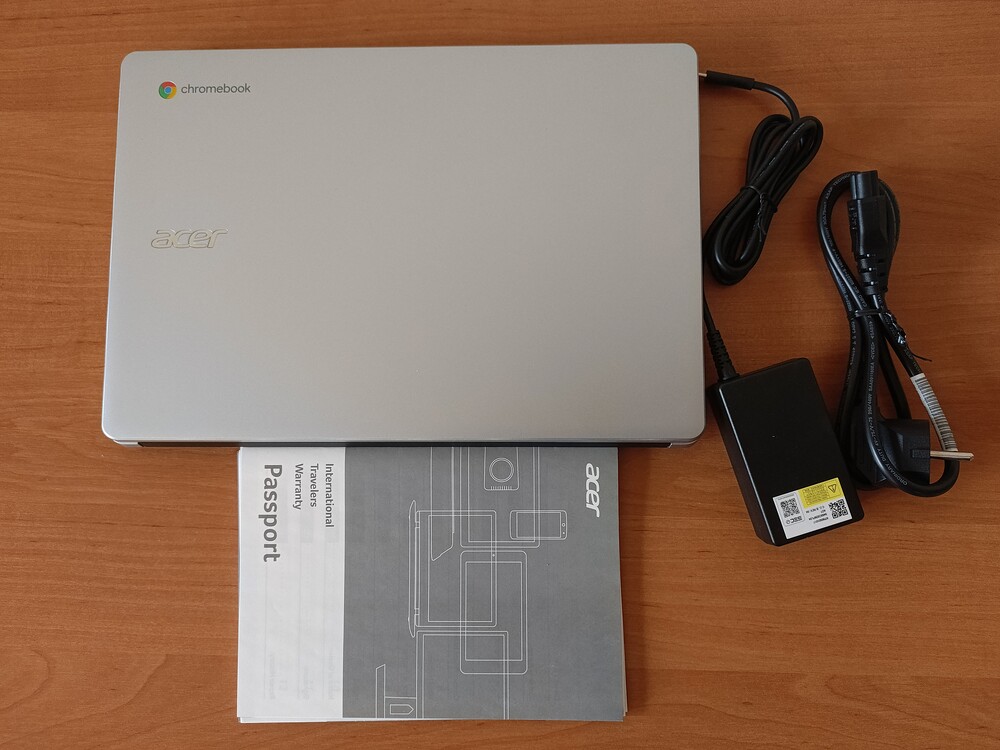
Acer Chromebook 314

Inside the box, you’ll find just the essentials: the Chromebook itself, a power adapter with a USB Type-C output, a power cable for European outlets, and a set of paper documentation. Nothing superfluous, but everything you need is included.

Read also:

The case is plastic, but of good quality

It’s important to remember that Chromebooks are designed to be budget-friendly, and this expectation is evident throughout. However, Acer’s Chromebook doesn’t constantly remind you of its affordability. The chassis is made of attractive silver-colored plastic, with some black accents around the hinge and on the four rubberized feet for stability.
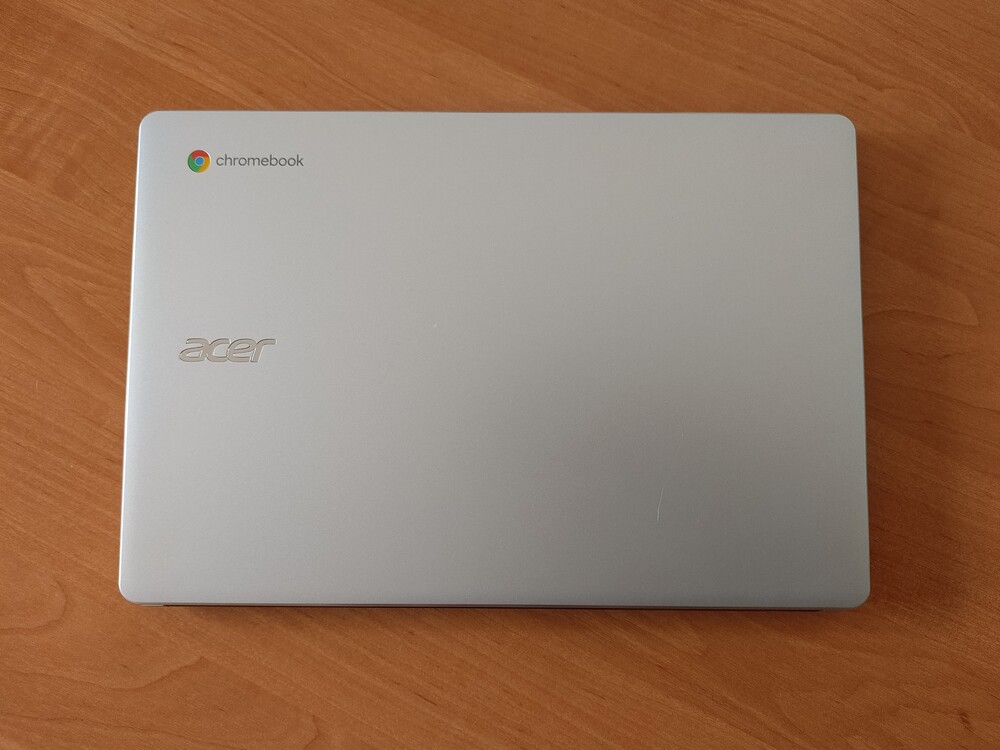
Acer Chromebook 314

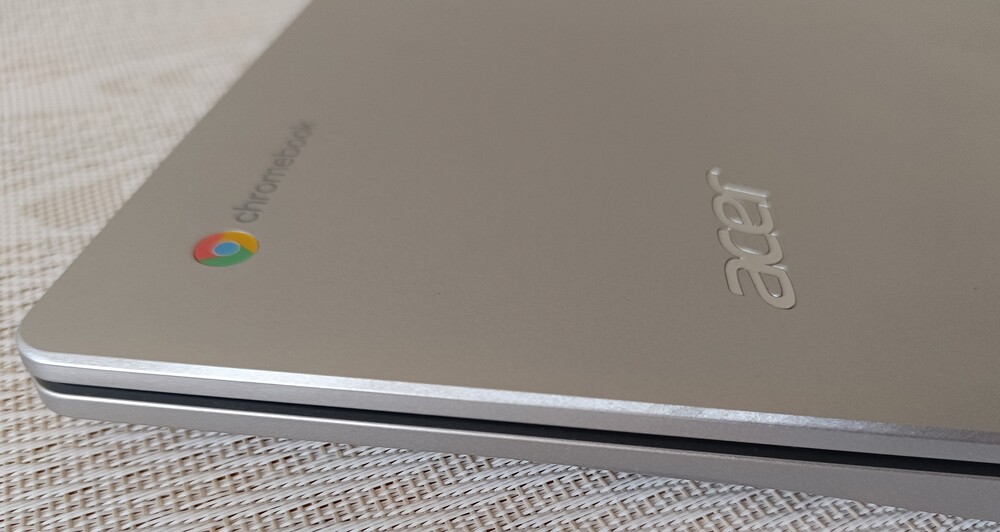
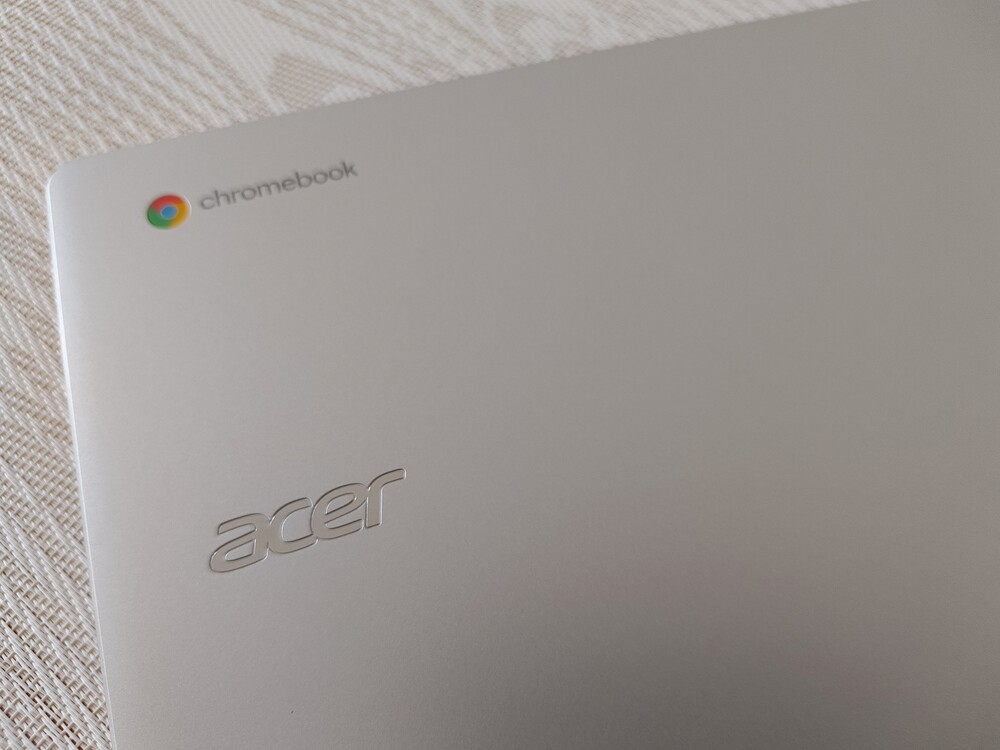
The Acer logo still shines prominently on the lid, accompanied by the round, four-color Chrome browser logo just above it. While the material is matte plastic, the components fit together seamlessly, giving the device a cohesive and polished appearance. Additionally, the finish helps keep the laptop looking clean over extended use. If you’re not expecting metal or glass, you’ll likely be satisfied with the design. The overall construction feels well-thought-out, as you’ll soon discover.

Acer Chromebook 314

Calling it a particularly slim device would be a stretch—20 mm in thickness doesn’t exactly scream sleekness. However, its lightweight nature is undeniable. At 1.45 kg, it’s easy to lift with one hand, and the weight feels negligible during use. The finish is pleasant to the touch, and the precision of the assembly is commendable. The Chromebook 314 has a clean, appealing design that might just win you over.
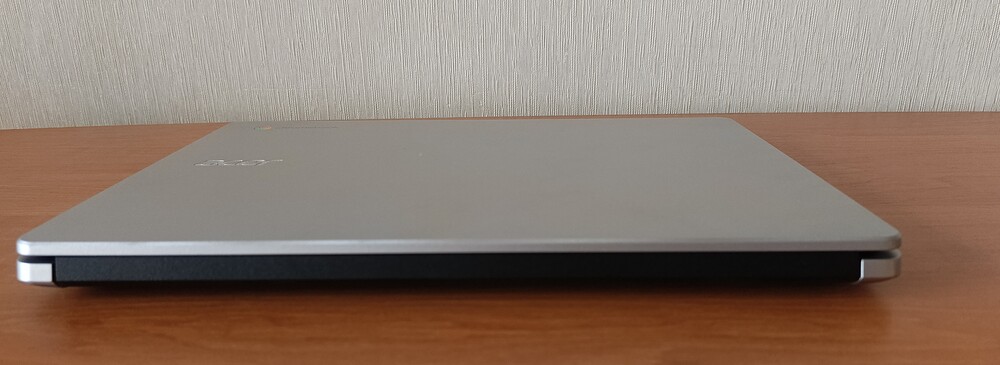
Acer Chromebook 314

The lid and display exhibit slight flex when pressed, a reminder that this is a plastic build, albeit a sturdy one. For most users and typical scenarios, this won’t be a critical issue.
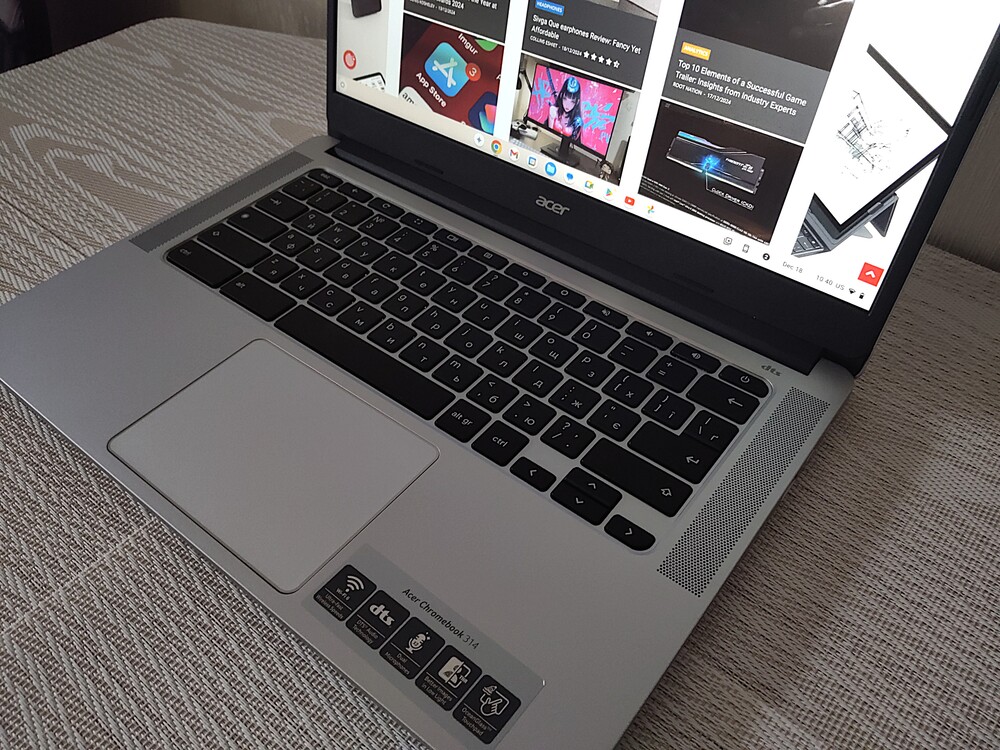
Acer Chromebook 314

The material around the touchpad and keyboard is more rigid and doesn’t flex, ensuring a comfortable typing experience and smooth touchpad usage.
Acer Chromebook 314

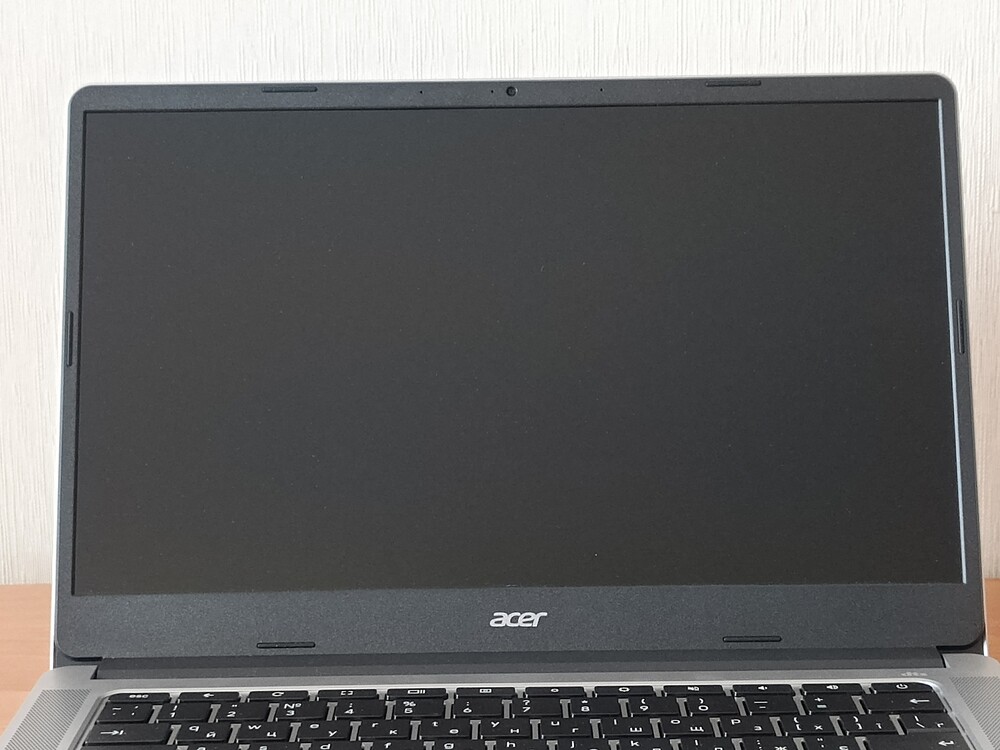
The relatively thick bezels around the display might not appeal to everyone. However, it’s important to remember that this is a budget device, and such design choices are to be expected at this price point.

Acer Chromebook 314

Two speakers are located along the edges of the keyboard. They blend seamlessly into the overall design of the Chromebook. We’ll discuss their sound quality later.

Acer Chromebook 314

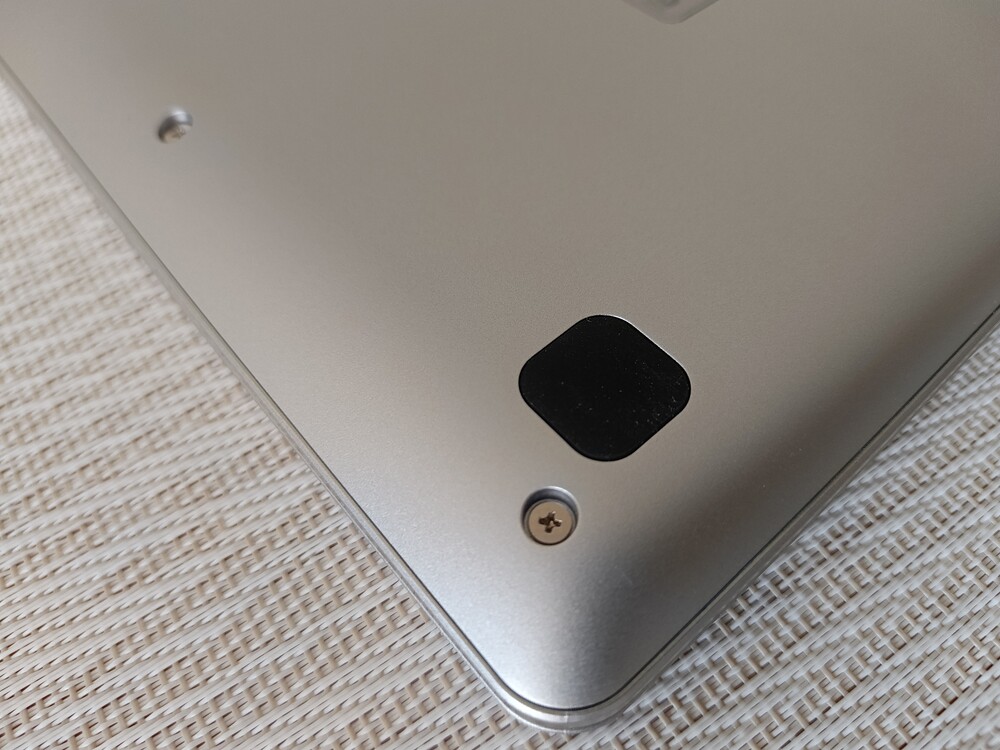
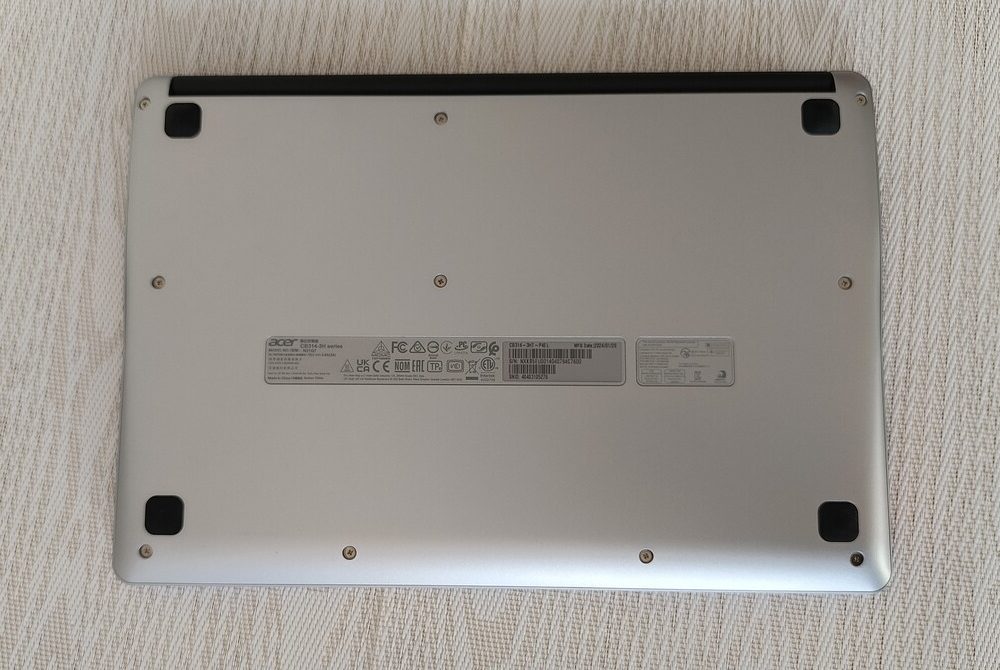
The bottom of the chassis is also made of silver-colored plastic, with the exception of the hinge and four rubberized feet, which are made of black matte plastic. It might not appeal to everyone, but that’s the design choice here.
Acer Chromebook 314

The rubberized feet do their job effectively, providing the Acer Chromebook 314 CB314-3HT with excellent grip on smooth surfaces.
Acer Chromebook 314

Interestingly, there are no cooling vents here. In fact, the Chromebook doesn’t have an active cooling system at all. Instead, it uses passive cooling, which makes it very quiet under load.
Acer Chromebook 314

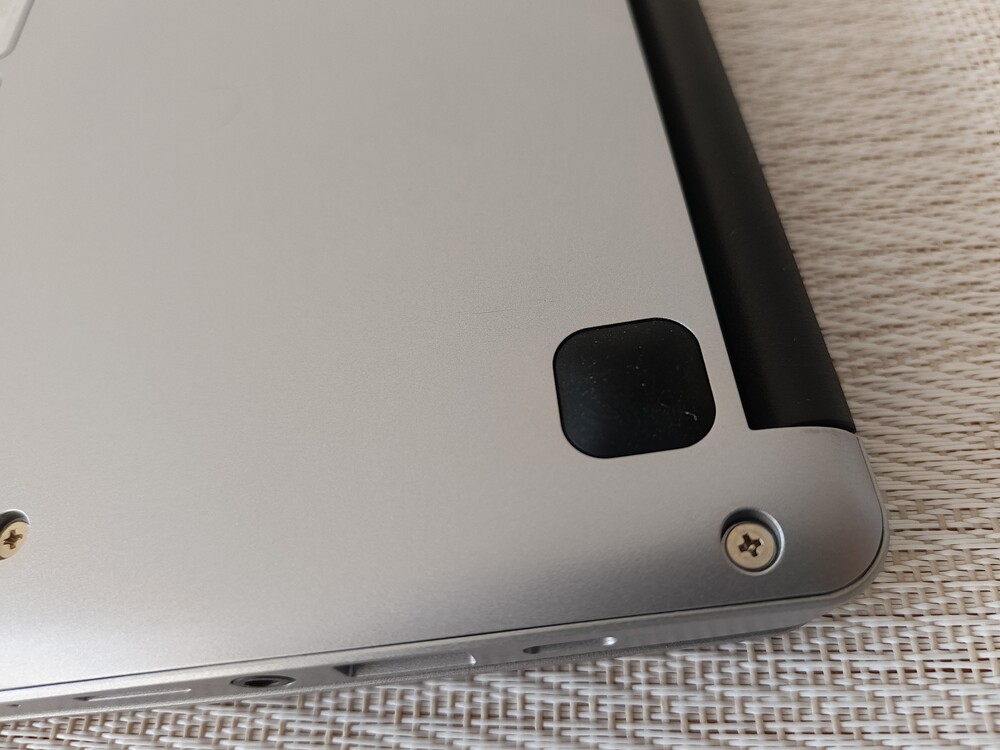
The entire bottom edge of the top lid and the Chromebook itself features a large black hinge, allowing the display to rotate 178° relative to the body.
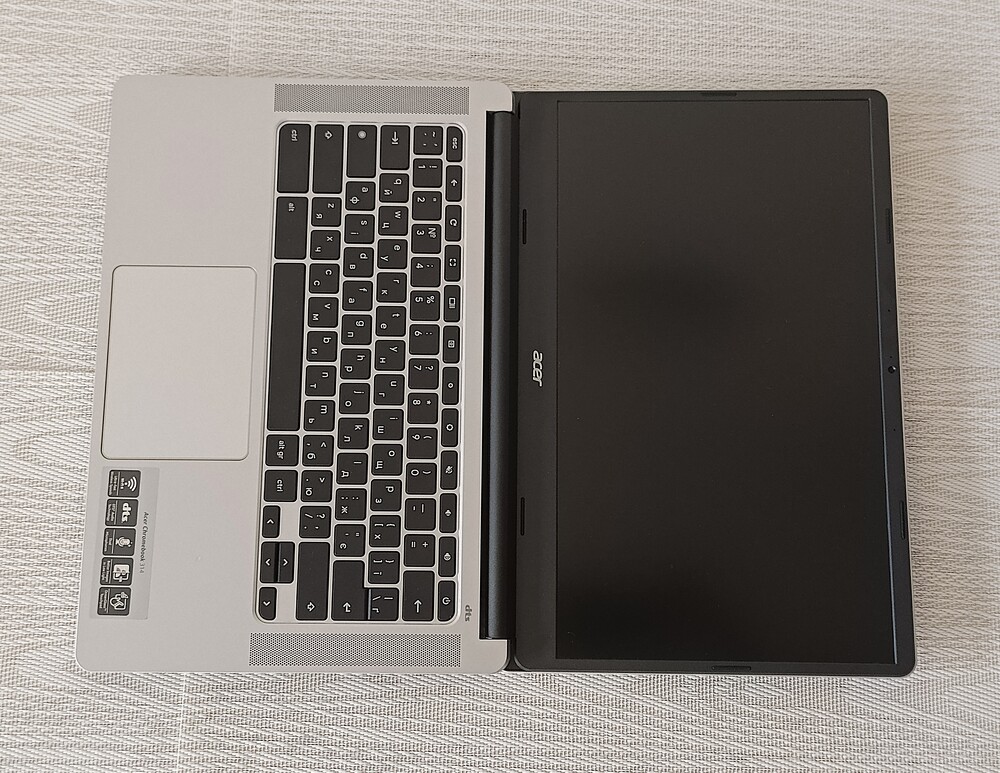
Acer Chromebook 314

The hinge itself is quite stiff and sturdy, allowing the Chromebook to hold the desired opening angle securely. This is worth praising Acer for, as budget devices in this price range often have issues with hinges.

In essence, we have a classic Chromebook that, while belonging to the budget laptop category and having certain compromises, remains solid and durable. It features a restrained and neat design that will appeal to many users.

Read also: Express Review of Apple iPad (2021): Is It Still Worth Buying in 2024?

Ports and connectors

All the ports and connectors of the Acer Chromebook 314 CB314-3HT are located on the sides. On the right side, there is one USB Type-A 3.2 Gen 1 port, and above it, another USB Type-C 3.2 Gen 1 port that supports Power Delivery and video output. They also remembered about security: there’s a slot for a Kensington lock as well.
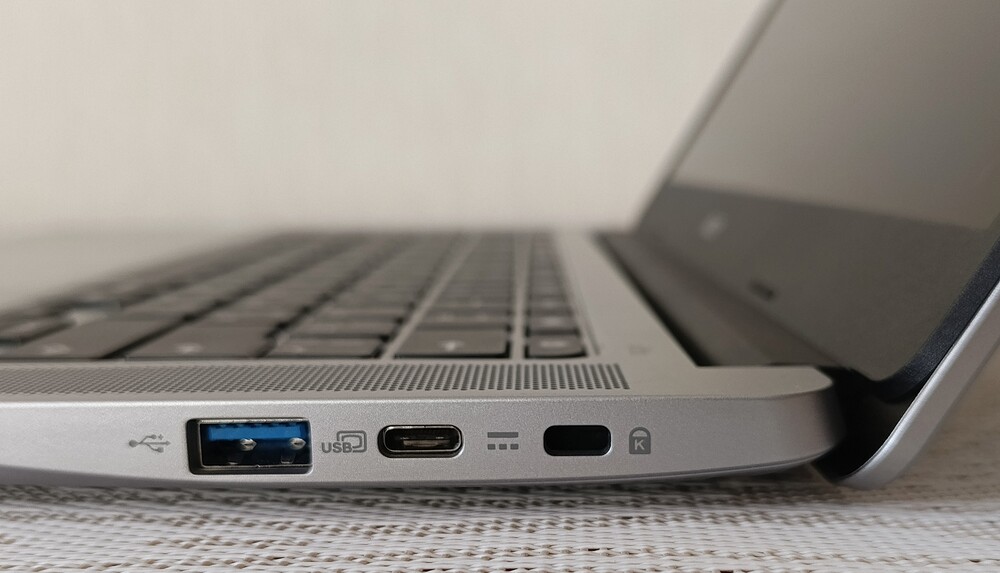
Acer Chromebook 314

The left side is more interesting. Here, you’ll find a USB Type-C 3.2 Gen 1 port with Power Delivery and video output support, followed by another USB Type-A 3.2 Gen 1 port. Additionally, there’s a standard 3.5mm audio jack and a microSD card reader slot.

Acer Chromebook 314

This is quite unexpected, considering the current trends in laptops, where such luxuries are becoming a rarity. The charging mode LED indicator completes the package.

The port selection is standard for this price range. Of course, you can’t expect cutting-edge USB4 ports, but it’s still surprising that there’s no full-sized HDMI port. It would certainly have been useful here. However, this is Acer’s decision, and we should respect it.

It’s also worth mentioning that the Acer Chromebook 314 CB314-3HT supports Bluetooth 5.1 and Wi-Fi 6, making it a relatively modern laptop, despite being in the budget segment.

Read also: realme GT 7 Pro Review: Flagship That Outperforms Competitors

The keyboard is unusual but comfortable

If you’ve never used a Chromebook before, the keyboard may surprise you a bit. It seems pretty standard, just like any other laptop keyboard, but not quite. It features a nearly standard QWERTY layout with a small twist. However, there are some differences compared to what you might be used to from Windows devices.
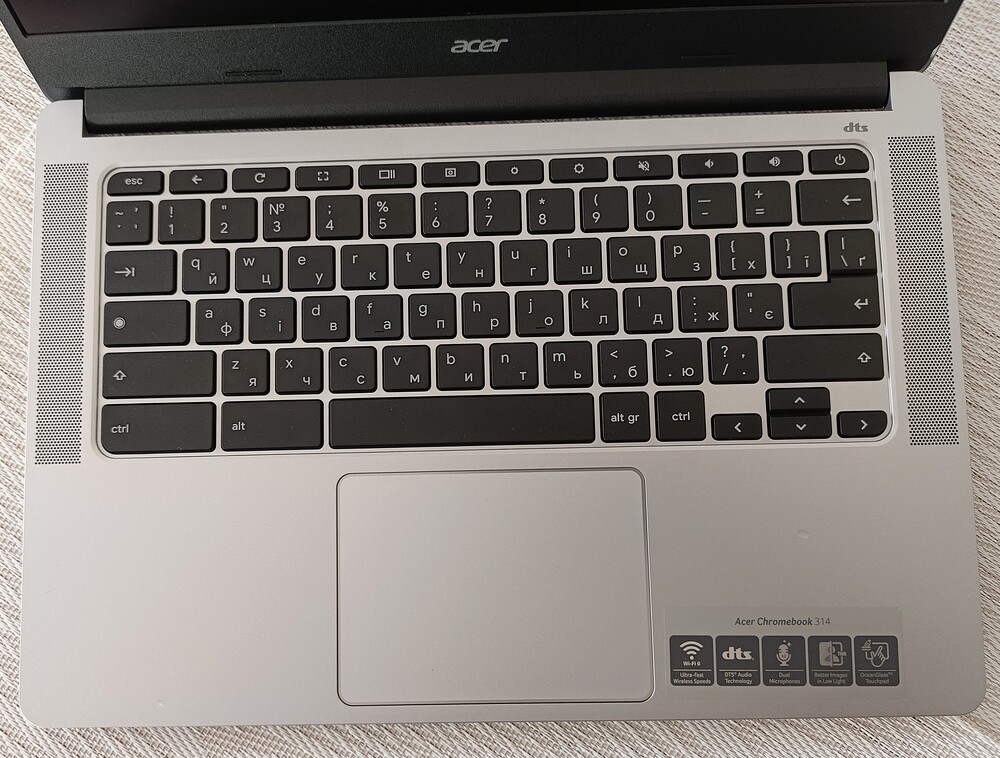
Acer Chromebook 314

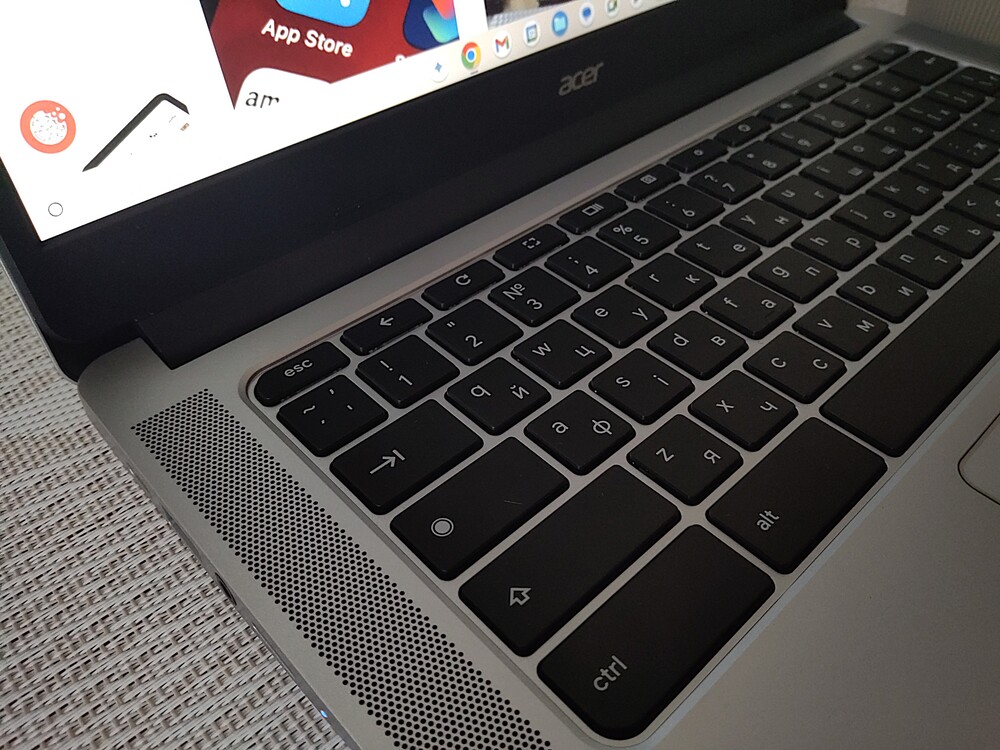
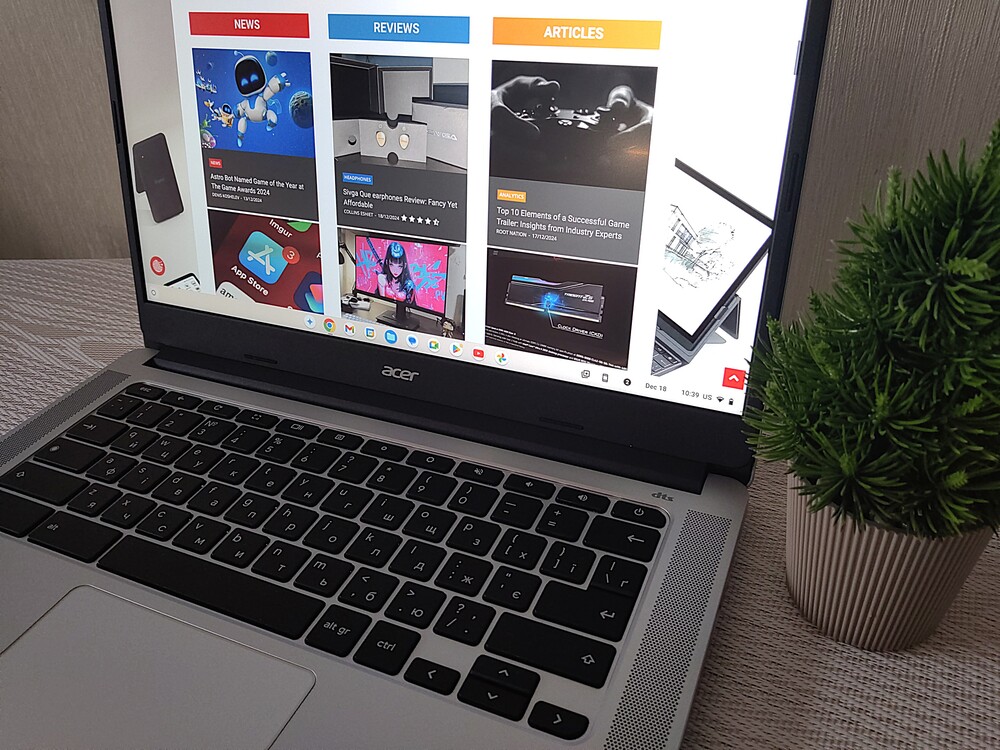
The keyboard doesn’t have traditional function keys (from F1 to F12) at the top, nor does it have a Caps Lock key in the usual sense. Instead, it’s replaced with a button that features a magnifying glass icon. This button serves as a convenient search tool. When pressed, a window pops up with the characteristic “G” symbol, allowing you to enter the desired search query. The system then searches through the device, apps, and the internet.

The keyboard also lacks two familiar keys — one for Windows and one for the context menu, which makes sense since there is no Windows on the Chromebook. As a result, the Ctrl and Alt keys are positioned next to each other on either side of the space bar. Additionally, this model does not have a numeric keypad.

The keyboard lacks backlighting. While I know that this convenience is available in more expensive devices, I have to admit I miss it since I’m used to having it. Also, there is no fingerprint scanner in this model. However, you do have the option to connect the computer to a smartphone.

Acer Chromebook 314

However, don’t worry about ergonomics, because in this regard, the keyboard works wonderfully. Typing on the Acer Chromebook 314 is no problem at all. The excellent key travel and proper key placement make the overall experience very pleasant. The keys work smoothly, and when pressed, they give a distinct tactile click. After a few days, you’ll get used to the key sizes. Personally, I prefer slightly larger keys, but here I give it a good rating.
Acer Chromebook 314

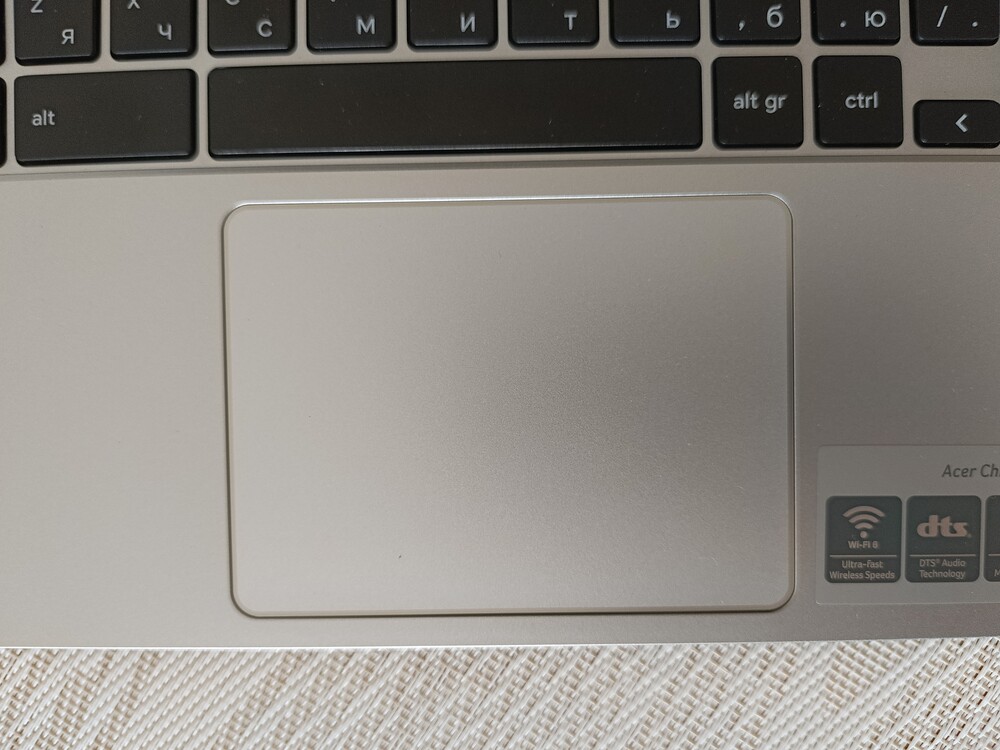
I’ll briefly mention the touchpad. It’s of medium size, positioned roughly in the center, and its color blends with the rest of the lower panel. According to the manufacturer, the touchpad is made from 100% recycled plastic collected from oceans. The touchpad correctly recognizes gestures and provides the right resistance, though the clicks could be a bit quieter, but it didn’t hinder my work.

Read also: ASUS ZenScreen MB229CF Portable Monitor Review

Acer Chromebook 314 CB314-3HT Display

The Chromebook 314 is equipped with a 14-inch display. The tested model features an IPS panel with a touchscreen, offering a Full HD resolution of 1920×1080 and a 60Hz refresh rate. The display boasts a pixel density of 157 PPI and a 16:9 aspect ratio. It’s also worth mentioning the proprietary matte anti-glare coating, ComfyView.
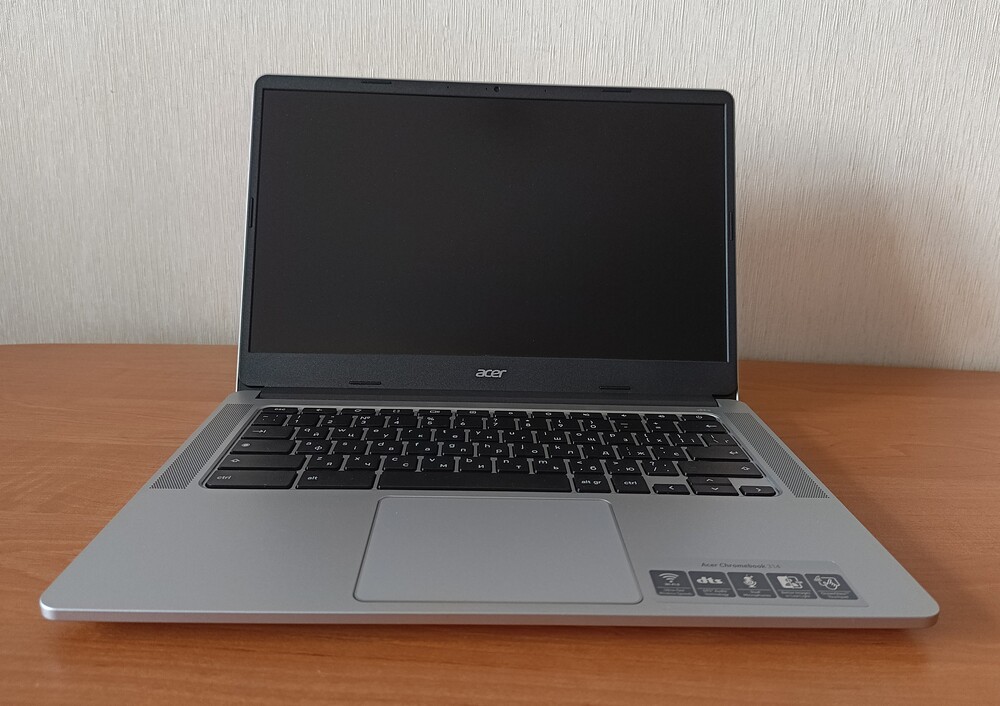
Acer Chromebook 314

The display features the typical static contrast ratio of 860:1, which is standard for IPS panels. It’s worth noting the maximum brightness of over 233 cd/m² and a 45% NTSC color gamut. These are quite respectable figures for laptops in this price range.

The screen is readable, with clear and detailed images and fairly accurate color reproduction. Of course, it’s well-suited for office tasks and everyday use.
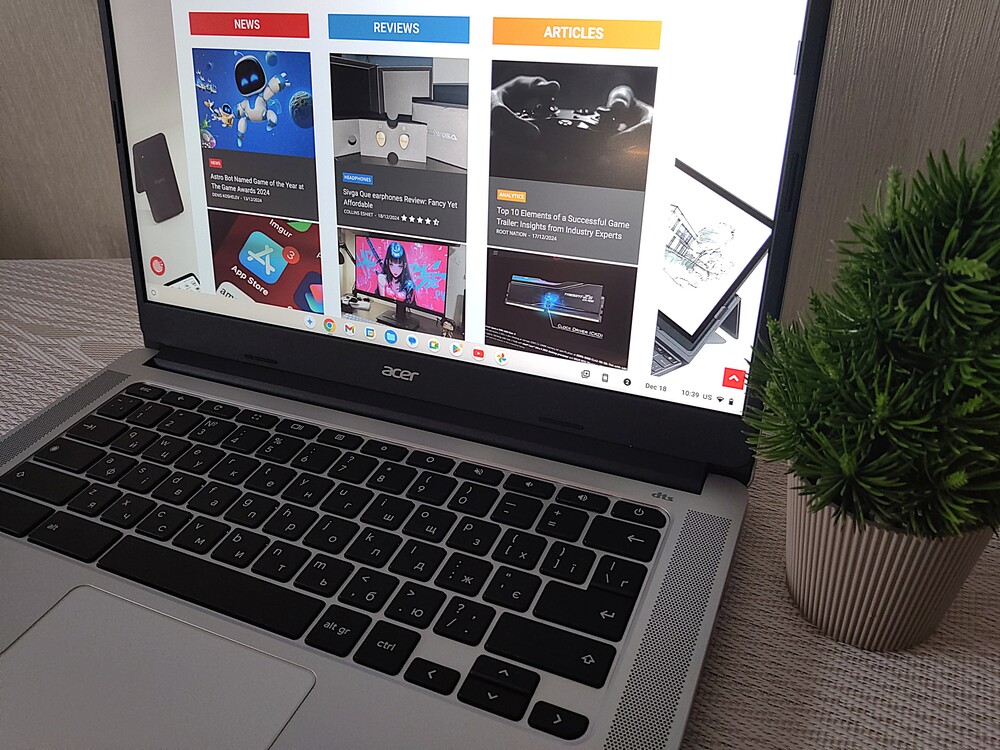
Acer Chromebook 314

Graphic processing isn’t really an option here. Moreover, this computer is not intended for creators, but rather for everyday tasks such as browsing websites, working with documents, social media, or casual gaming. Thanks to the matte finish on the screen, using this device outdoors is not a big issue.
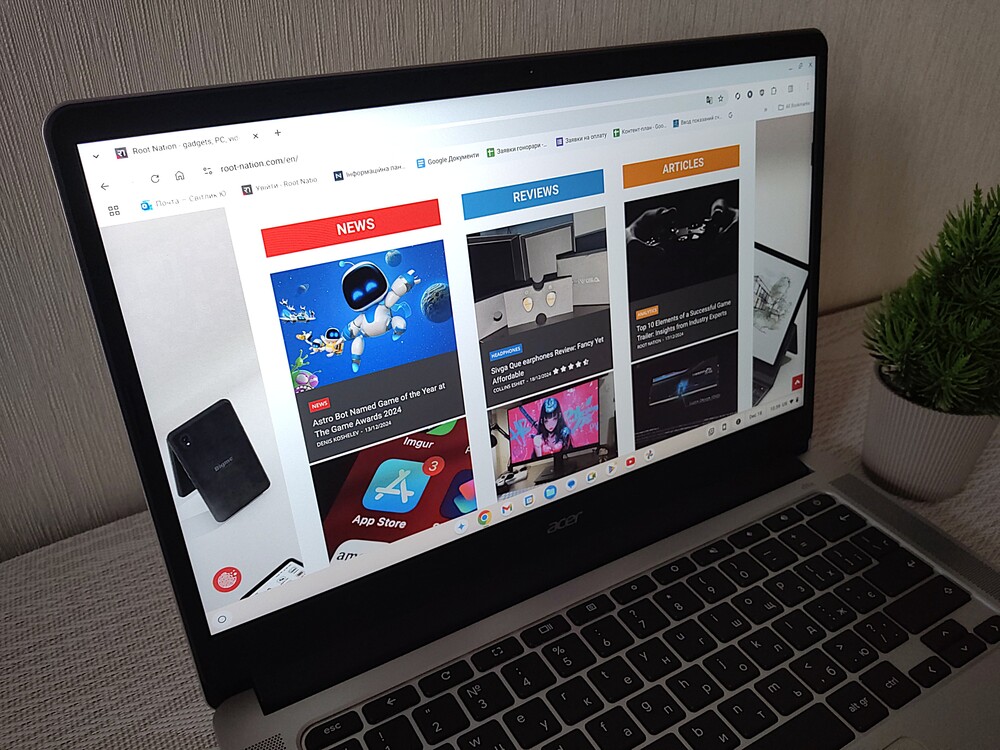
Acer Chromebook 314

Of course, the display of the Acer Chromebook 314 CB314-3HT can’t be compared to the screens of more expensive laptop models. I compared it to the display of the ASUS Vivobook S14 and found that the colors are a bit blurry, and the contrast isn’t as satisfying. But I just want to remind you that we’re talking about a device priced just under $400, so it’s not worth complaining. The display’s backlighting is even, and even a subjective view of individual colors doesn’t make the picture look bad. The screen is simply good for its price.

Read also: Škoda Kamiq 2024 Review: Is This Compact SUV Crossover Worth Your Attention?

Webcam and audio

It’s also worth noting that above the screen is a 0.9 MP (1280×720) camera. The image quality isn’t the best. I would even say it’s quite mediocre, but it should be sufficient for video calls, for example, through Teams or Zoom. Therefore, the Acer Chromebook 314 CB314-3HT will also work well for remote work or learning.
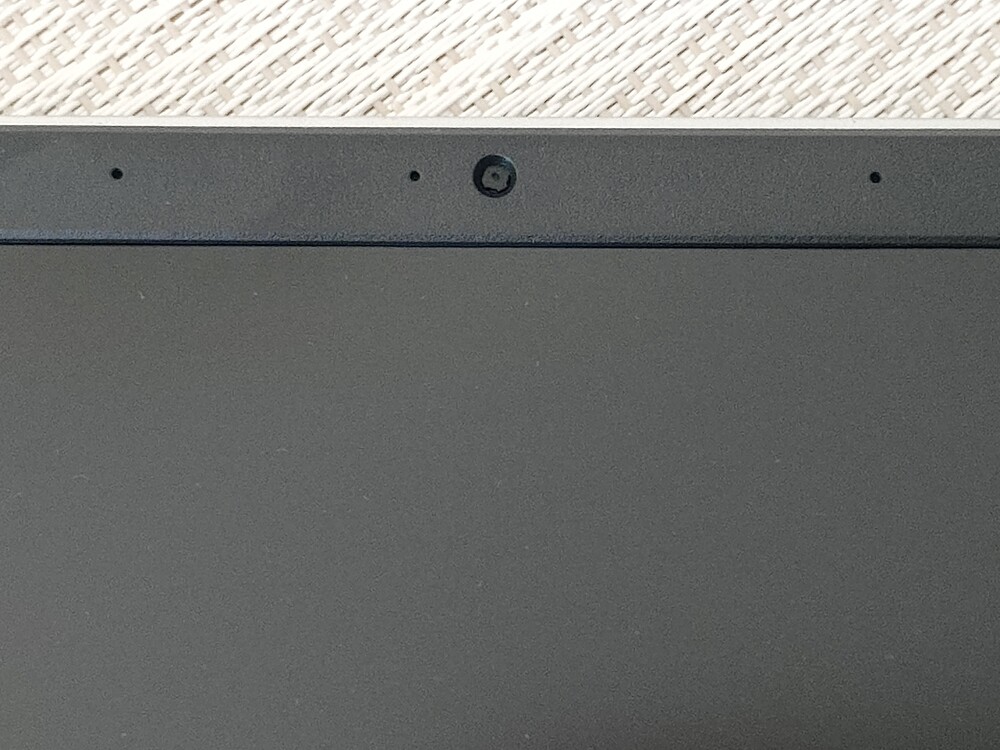
Acer Chromebook 314

As for the audio, there are two small speakers located at the bottom of the chassis. They don’t have much power, and even at maximum volume, they don’t provide great listening in terms of low, mid, and high frequencies, but the sound is quite balanced.
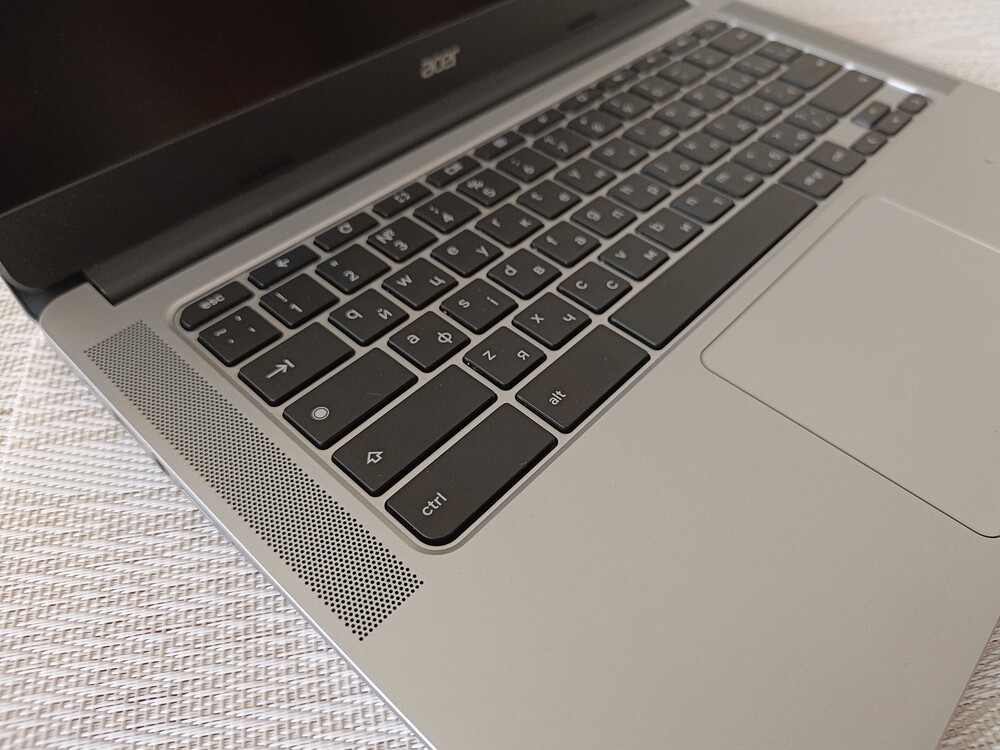
Acer Chromebook 314

The manufacturer claims support for virtual surround sound DTS Audio and enhanced bass playback.

Acer Chromebook 314

The speakers were sufficient for watching YouTube videos or movies, but I wouldn’t recommend them for listening to music. Fortunately, there’s the standard 3.5mm audio jack, which came in handy when I was listening to music on Spotify.

Read also: ASUS ROG Rapture GT-BE19000 Review: Tri-Band Gaming Router

Performance

Chrome OS is still relatively unknown in Ukraine, but it deserves our attention. It’s essentially a platform that revolves around running the Chrome browser and everything related to it. Of course, Android games and apps are also available through the pre-installed Play Store. Integration with Android smartphones is also quite good. So, no matter how you look at it, the Acer Chromebook 314 is perfect for anything you can do in a browser.
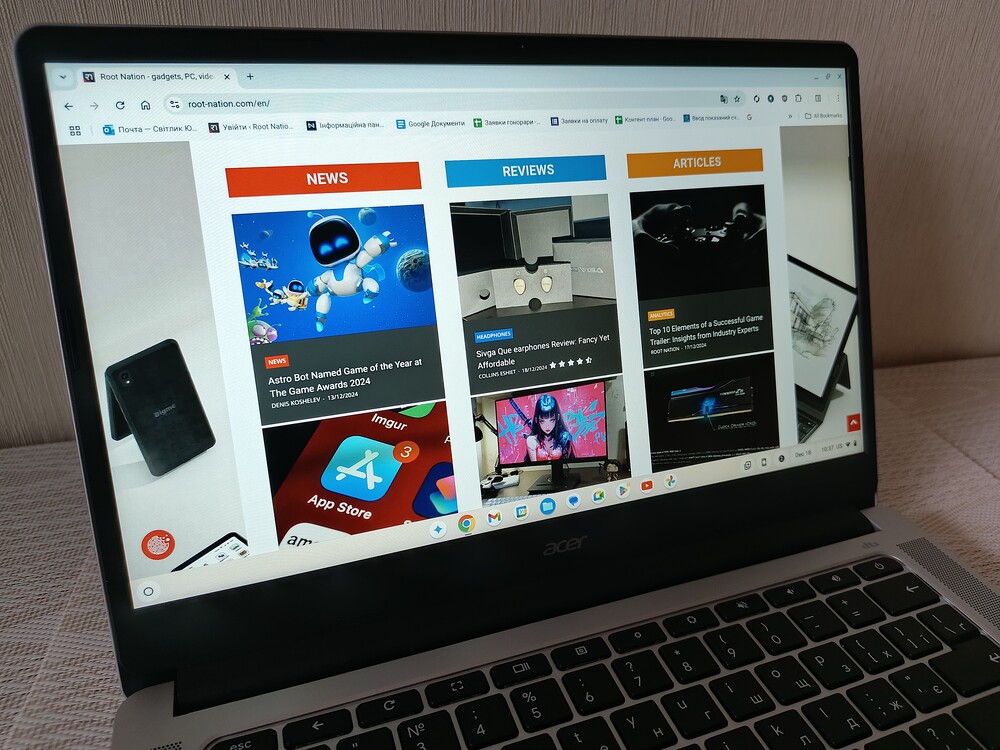
Acer Chromebook 314

It’s no surprise that the Acer Chromebook 314 CB314-3HT is equipped with an energy-efficient Intel 11th generation Jasper Lake processor. This quad-core Pentium Silver N6000 runs at a base frequency of 1.1 GHz and can boost up to 3.3 GHz under Turbo Boost for short periods. The chipset is manufactured using a 10nm process and has a thermal design power (TDP) of 6W, which is why it relies on passive cooling, which I will elaborate on later.

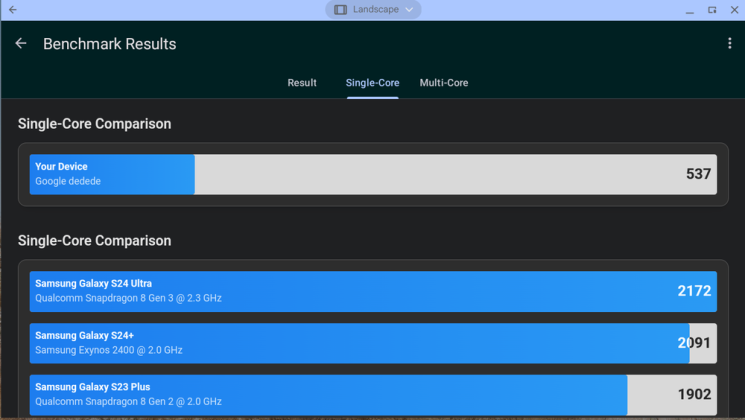
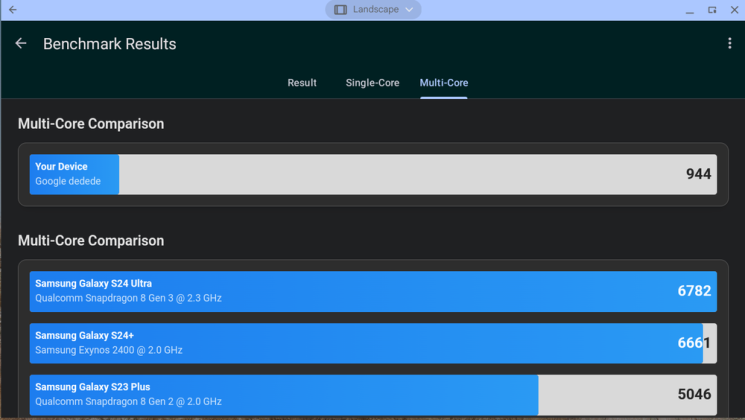
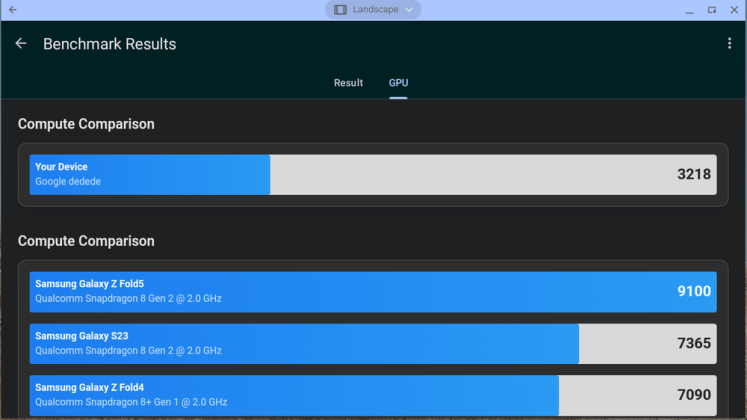
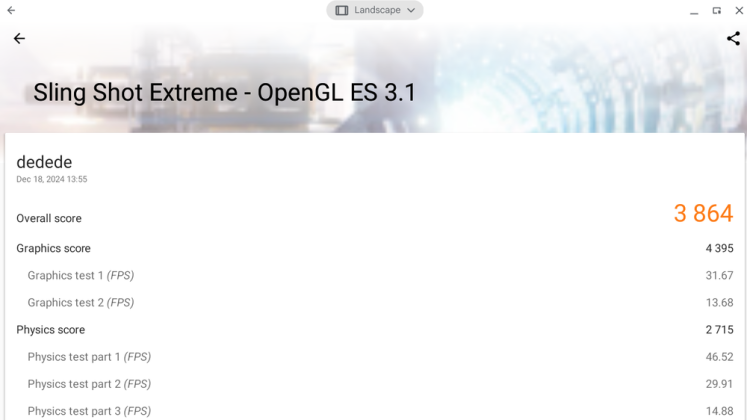
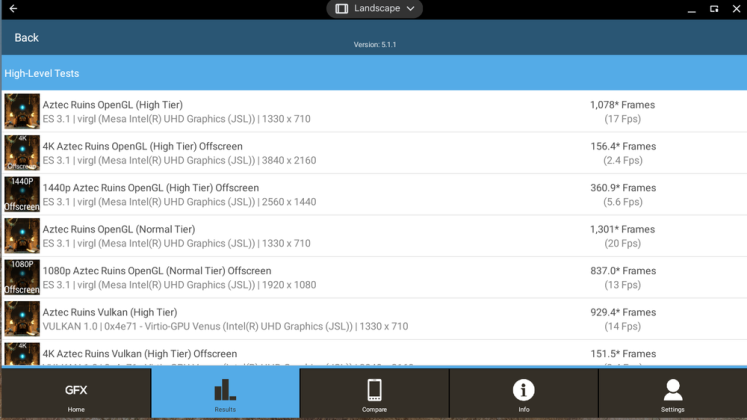
For graphics, it uses an integrated Intel UHD Graphics subsystem with 32 execution units and a frequency range of 350-850 MHz. So, you shouldn’t expect stellar performance in tests or practical use. The processor isn’t very powerful, and the graphics are fairly modest. However, I was able to edit photos, though with some delays.

The Acer Chromebook 314 CB314-3HT comes with 8 GB of energy-efficient LPDDR4X RAM running at 2993 MHz and a 128 GB eMMC storage drive. Both the RAM and storage are soldered to the motherboard, meaning neither can be upgraded or replaced. While these are not the fastest memory standards, they are far from the slowest. This does not negatively affect the Chromebook’s performance. The 8 GB of RAM is more than enough for browsing websites and watching videos, and even opening many tabs in Chrome simultaneously does not slow down the Chromebook. The only effect was a slight delay in image loading, but overall, the slowdown was minimal.

I also appreciated that the Acer Chromebook is equipped with relatively modern Wi-Fi modules supporting IEEE 802.11 a/b/g/n/ac/ax standards for internet connectivity. Additionally, Bluetooth 5.1 is included for connecting peripherals.

Read also: ASUS ROG NUC 970 Mini-PC Review: Power in Compact Form

Temperature and noise

The Acer Chromebook 314 CB314-3HT features passive cooling, meaning it does not have any fans that could generate noise. No capacitors or other components produce unpleasant sounds, making the laptop completely silent during use.
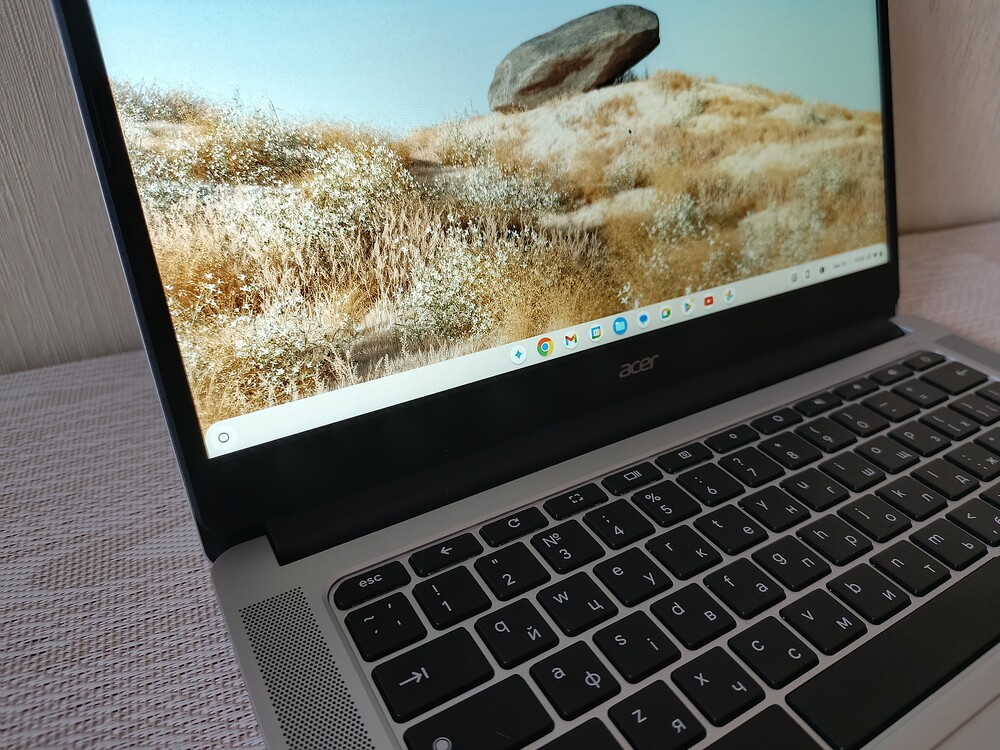
Acer Chromebook 314

The Acer Chromebook 314 CB314-3HT does not generate excessively high temperatures. Any increase in temperature can only be felt on the bottom of the device. The additional degrees do not transfer to the keyboard, so you won’t notice the laptop heating up from the top.

Read also: Acer Nitro V 14 ANV14-61 Review: Pristine White Gift for Gamer

First startup and setup

Since everything operates within the Google ecosystem, setting up the Chromebook is similar to the first setup of an Android phone. You need to sign in to your Google account (or create one), accept a few terms, and that’s it. The computer is ready for use.

Acer Chromebook 314

However, the operating system itself presents a bit of a challenge. I’m sure many will find it difficult to get used to this system, regardless of whether you’re coming from Windows or macOS. You’ll have to learn it pretty much from scratch. Fortunately, upon first boot, you get a helpful window with a lot of useful information.

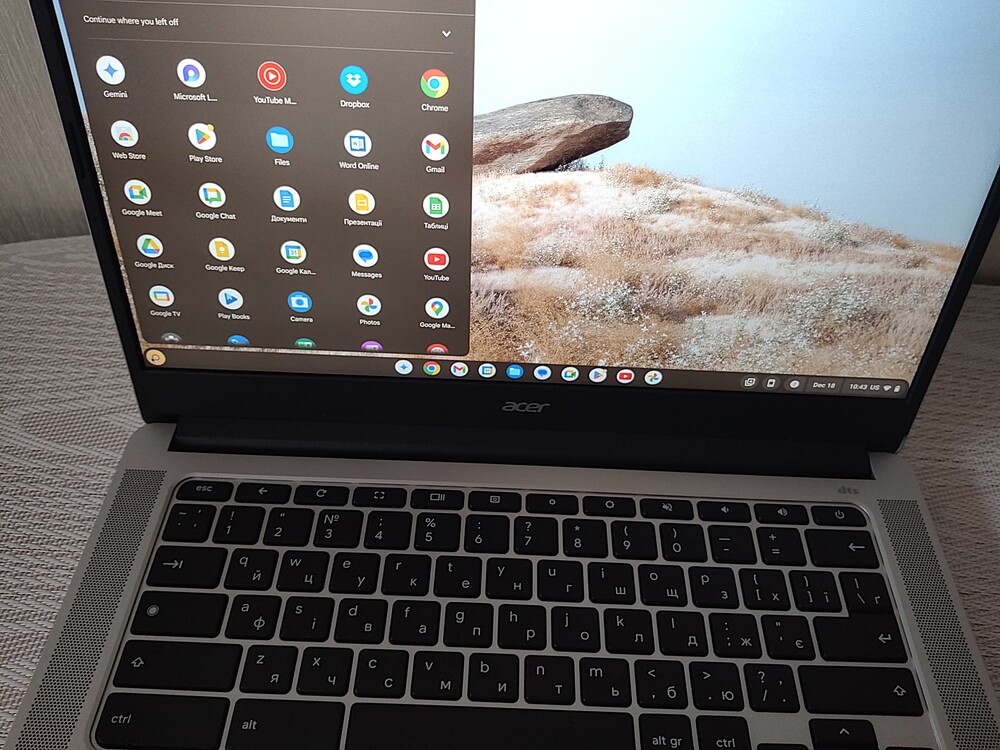
Later on, you can explore and familiarize yourself with the system. The advantage of a Chromebook is that its interface integrates seamlessly with the entire Google ecosystem. Moreover, someone who already has an Android phone will likely find it easier and quicker to adapt. The program icons on your phone further simplify navigation.
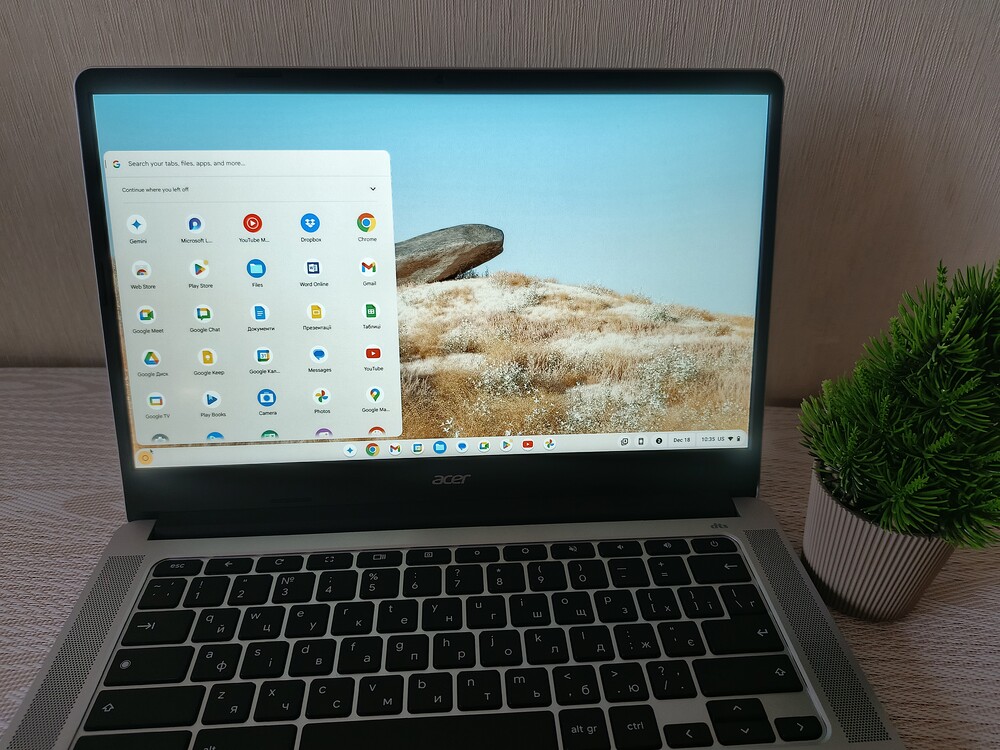
Acer Chromebook 314

It’s also important to remember that ChromeOS isn’t as flexible as Windows, so app installations are limited to what’s available in the Google Play Store. While all the most popular apps, like Spotify and Netflix, are available, you might be out of luck if you’re searching for something more specific or niche.

Read also: Mitsubishi Eclipse Cross Review: True Japanese Car – Modern on Outside, Conservative on Inside

Acer Chromebook 314 CB314-3HT in practice

Chrome OS is a lightweight system that handles simple tasks effortlessly. The core of Chrome OS is based on a GNU/Linux distribution and is available for both ARM and x86 processors. While the components you’ve seen earlier might not be the most powerful, when combined with this operating system, it’s hard to notice any significant limitations in computational power.
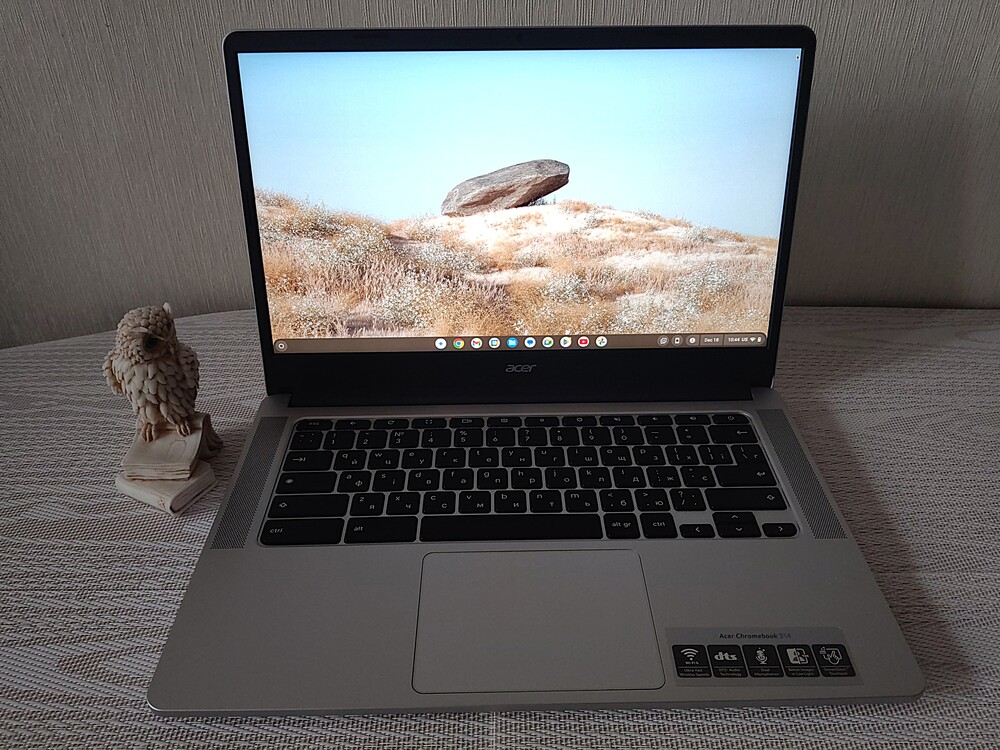
Acer Chromebook 314

The key to Chromebooks is that everything works within the browser and the cloud. What I appreciate the most about them is the seamless integration with cloud storage. Having worked with similar laptops before, the transition wasn’t as painful for me. Although, there are a few things that feel strange and unfamiliar at first.

Acer Chromebook 314

However, working on the Acer Chromebook 314 CB314-3HT is quite enjoyable. It’s like working on a large Android smartphone or tablet. Yes, I’m not mistaken—the Chrome OS interface uses Material Design 3, similar to Android 13. There’s a bit of a Windows resemblance with the quick-launch panel and a desktop that has its own quirks. In short, it’s Android as we know it from phones and tablets, but in a more windowed form. So, we have to keep in mind that we won’t be able to install every app we can imagine, but only those available in the Google Play Store. Interestingly, some apps I downloaded ran in phone or tablet mode. Those I installed for mouse clicks or keyboard control (like games), but it wasn’t always the most convenient experience.
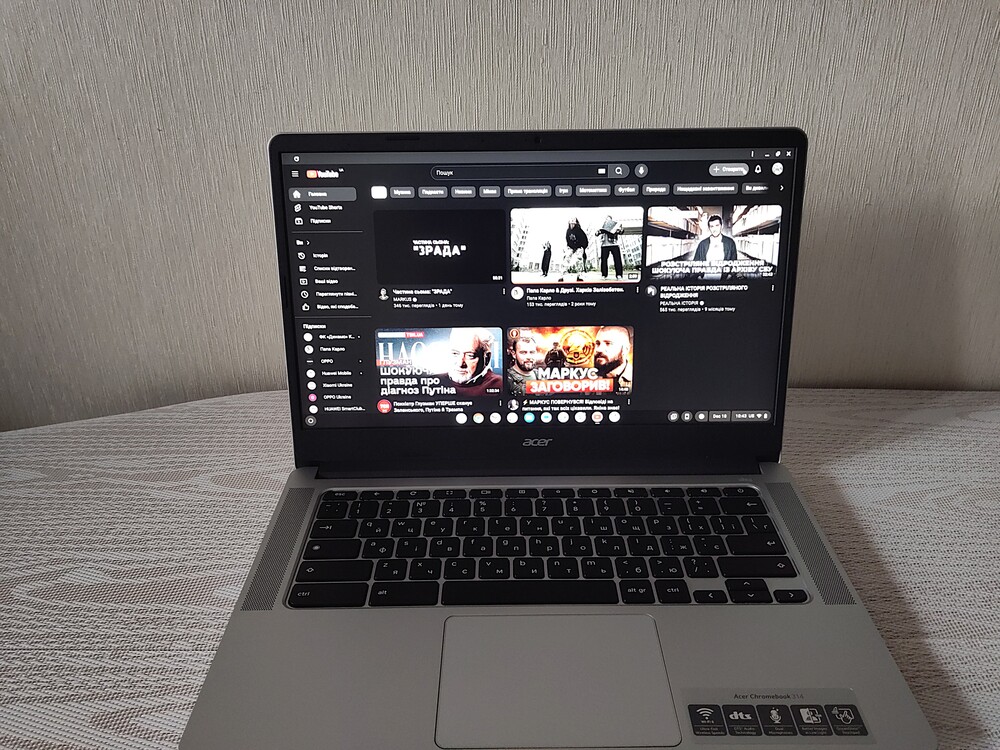
Acer Chromebook 314

The music player running in the background and working with multiple tabs (including YouTube) performs just as well as on regular, much more expensive laptops. When more complex tasks run in the background, there are slight slowdowns, but they don’t make the experience unbearable, and I never felt the need to switch to something more powerful during my work. Of course, the eMMC memory isn’t particularly fast when it comes to transferring large files, but the Chromebook is primarily designed for online work.

Can you play games on the Chromebook? The answer is both yes and no. With access to Google Play, it’s possible to download Android apps and games. Once installed and launched, the game runs in fullscreen mode. I tested two games: a simple one, Geometrix Lite (which my grandson enjoys), and a more advanced one, Diablo Immortal.
Acer Chromebook 314

Playing Geometrix Lite was actually quite enjoyable, as the gameplay is simple – you just need to tap at the right moment to make the square jump over obstacles.

With Diablo Immortal, it was much more challenging. The truth is that most Google Play games are designed for touchscreen controls. Playing Diablo on the Chromebook requires both hands, but it’s difficult to change direction and attack at the same time. This made the game hard to play.

To answer the question – yes, you can play games, but you’ll need to spend some time finding one where the controls aren’t frustrating.

Read also: 10 Examples of the Strangest Uses of AI

Battery life

The Acer Chromebook 314 CB314-3HT comes with a non-removable lithium-ion battery, the AP18C8K, which has a nominal capacity of 4471 mAh (11.25 V and 50.29 Wh). The manufacturer claims that this capacity should provide up to 11.5 hours of battery life. Of course, in practice, this isn’t exactly the case. Although…

Acer Chromebook 314

Despite this, the Acer Chromebook offers impressive battery life. Its efficient components and streamlined system mean that several hours of use without needing to plug in the charger is not a problem. To be precise, the Acer Chromebook 314 CB314-3HT can easily play video for over 11 hours. Working online is a bit more demanding, so you’ll likely need to connect it to an external power source after around 10 hours. These results are more than adequate for most use cases.
Acer Chromebook 314

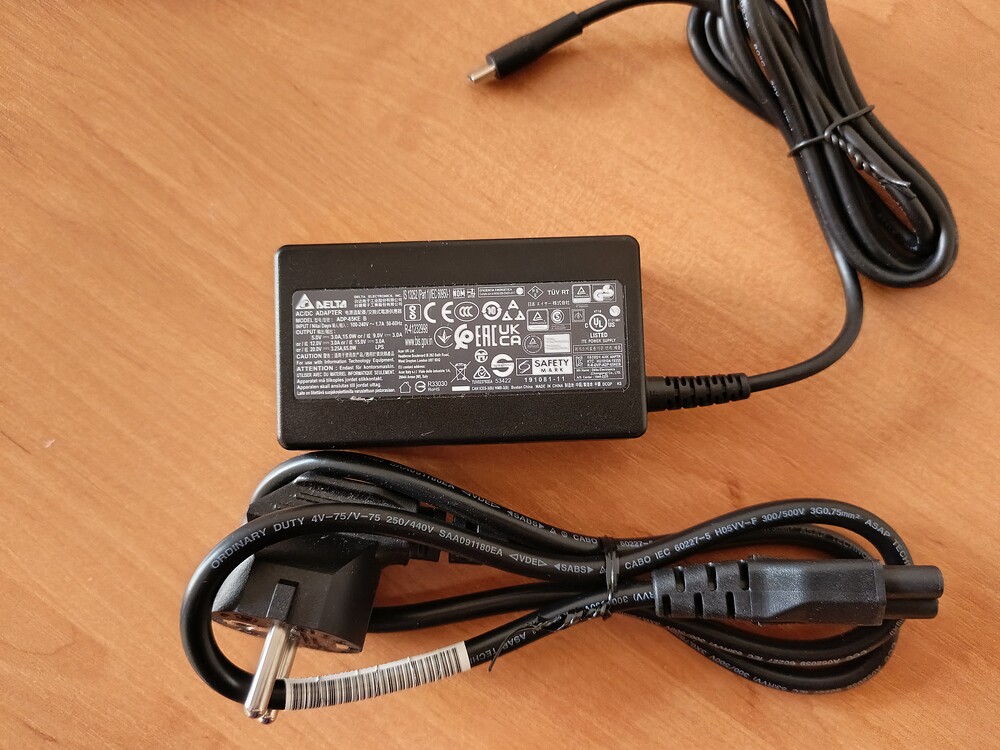
At the same time, a full battery charge takes less than 2 hours when connected to the charger. The Chromebook comes with a 65W Delta Electronics ADP-65KE B power adapter. The input signal specifications are 100-240V with a current of 1.7A and a frequency of 50-60Hz. The output provides a maximum of 20V and 3.25A.

Read also: ASUS ROG Azoth Extreme Wireless Gaming Keyboard Review

Who Acer Chromebook 314 CB314-3HT is recognized for

After spending nearly a month with this device, I can say it’s definitely for minimalists — but for very conscious minimalists. If you’re choosing it purely based on price, you might be disappointed. You won’t even find a classic desktop here!

Everything is different, but not necessarily worse. One of the more interesting aspects is the integration with your Google account, which you probably already use on your smartphone. You log into your Google account on the Chromebook, visit the Play Store, and it shows you which mobile apps can be installed on this unique laptop. However, it’s also a bit unconventional because you’ll need to learn how to use it. Your Windows habits won’t quite work here.
Acer Chromebook 314

Moreover, you can have multiple accounts on the Chromebook, with each one having its own set of apps downloaded from different accounts. One for me, another for my kids or spouse. The device doesn’t specifically collect data about this. Word online encourages you to store files in the cloud, and you simply need to get used to this way of working.

Naturally, not everything here is perfect and flawless. So, let’s take a closer look at the hero of my review.

Read alsо: Infinix HOT 50 Smartphone Review

Why buy Acer Chromebook 314 CB314-3HT?

So, we’ve reached the end of the review for the Acer Chromebook 314 CB314-3HT. My impressions are mixed. It’s a decent laptop, but I think I’m more of a Windows device user. I wouldn’t recommend buying a Chromebook if you plan to install programs written for Windows or use tools created for Microsoft. In this regard, the Chromebook has significant limitations, which will likely frustrate and turn you away.
Acer Chromebook 314

I should note, however, that this device has shown me once again that ChromeOS is definitely worth considering if you don’t use computers for specialized, complex tasks.
Acer Chromebook 314

Are you browsing the web? Doing office work? Remote learning? All of this is possible with this device, as the key here is not raw computational power, but a well-optimized operating system. So, for just under $400, you can be confident that nothing will freeze, and everything will run smoothly for a long time – both in terms of battery life and Google’s support. It’s larger and more functional than a tablet, yet cheaper than a traditional laptop, and works faster since it’s not burdened by resource-heavy Windows.
Acer Chromebook 314

The Acer Chromebook 314 CB314-3HT is a laptop that generally offers a good balance between price and performance. It makes a great choice for students, schoolchildren, and those who mainly need a browser or simple applications. It’s also suitable for programming and development. However, be prepared for some compromises.

Advantages

  • stylish and at the same time ascetic design
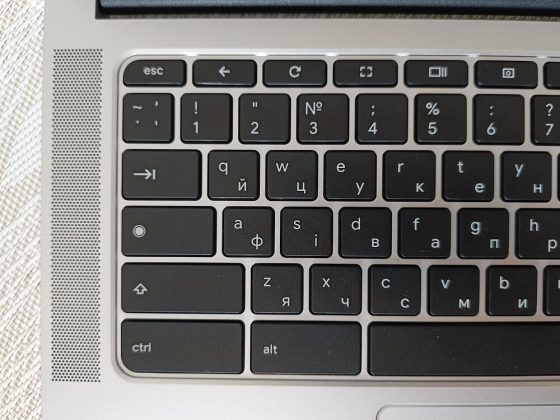
  • comfortable keyboard with full Ukrainian localization
  • high-quality materials, compact size and light weight
  • 14-inch Full HD IPS touchscreen display with ComfyView matte finish and thin bezels
  • simple, secure cloud-based and easy-to-use Chrome OS
  • sufficient performance
  • passive cooling system
  • excellent battery life
  • great price

Drawbacks

  • not quite comfortable keyboard
  • the screen could be better

Read also:

Tronsmart Mirtune C2 Wireless Speaker Review

Technically, the Tronsmart Mirtune C2 is just a Bluetooth speaker with stereo sound and water resistance, but it’s far more interesting than it first appears. This is a credit to Tronsmart, as it’s not their first impressive product, and hopefully, it won’t be their last.

Tronsmart Mirtune C2

Technical characteristics

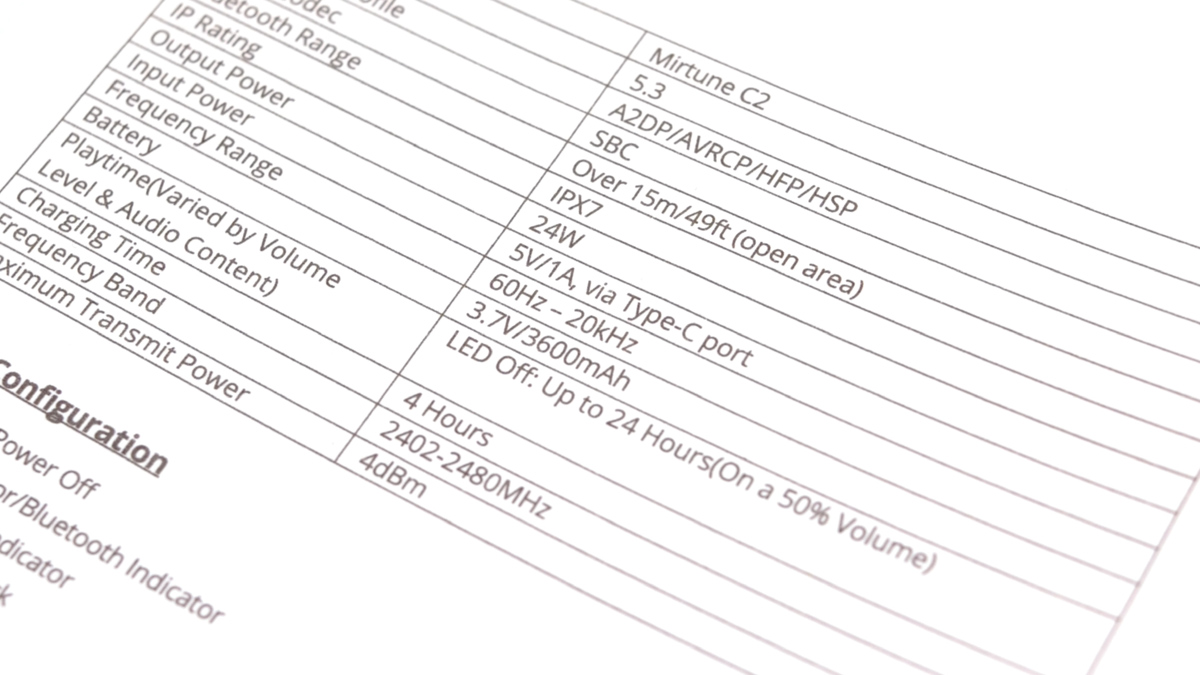
  • Power: 24 W
  • Working time: up to 24 hours (50% volume)
  • Charging time: 4 hours
  • Weight: 610 g
  • Bluetooth version: 5.3
  • Frequency range: 60 Hz – 20 kHz
  • Moisture protection: IPX7
  • Charging: 5 V / 1 A, via Type-C port

Video review of Tronsmart Mirtune C2

Package contents and price

The official price of the Tronsmart Mirtune C2 on the manufacturer’s website is around $60, but it can currently be found at nearly half the price with discounts.

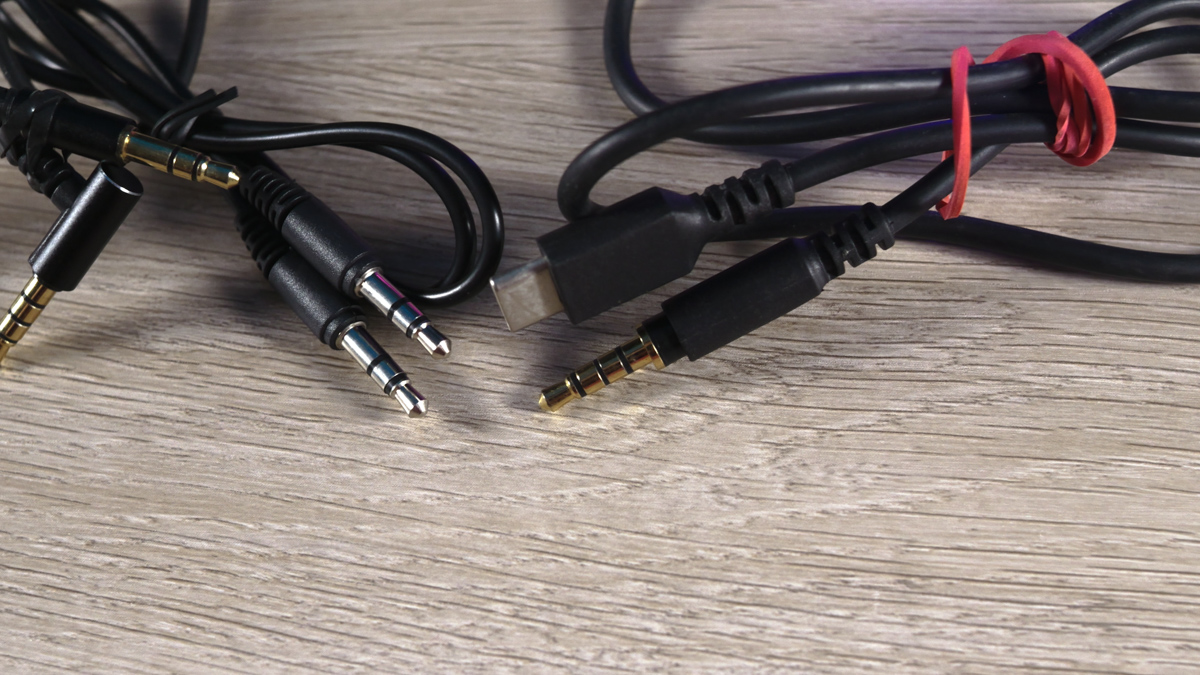
The packaging is quite generous for the speaker, including a Type-C charging cable, an AUX cable, and even a detailed user manual. I strongly recommend reading the manual, especially if this is your first time purchasing Tronsmart products.

Tronsmart Mirtune C2

Appearance and ergonomics

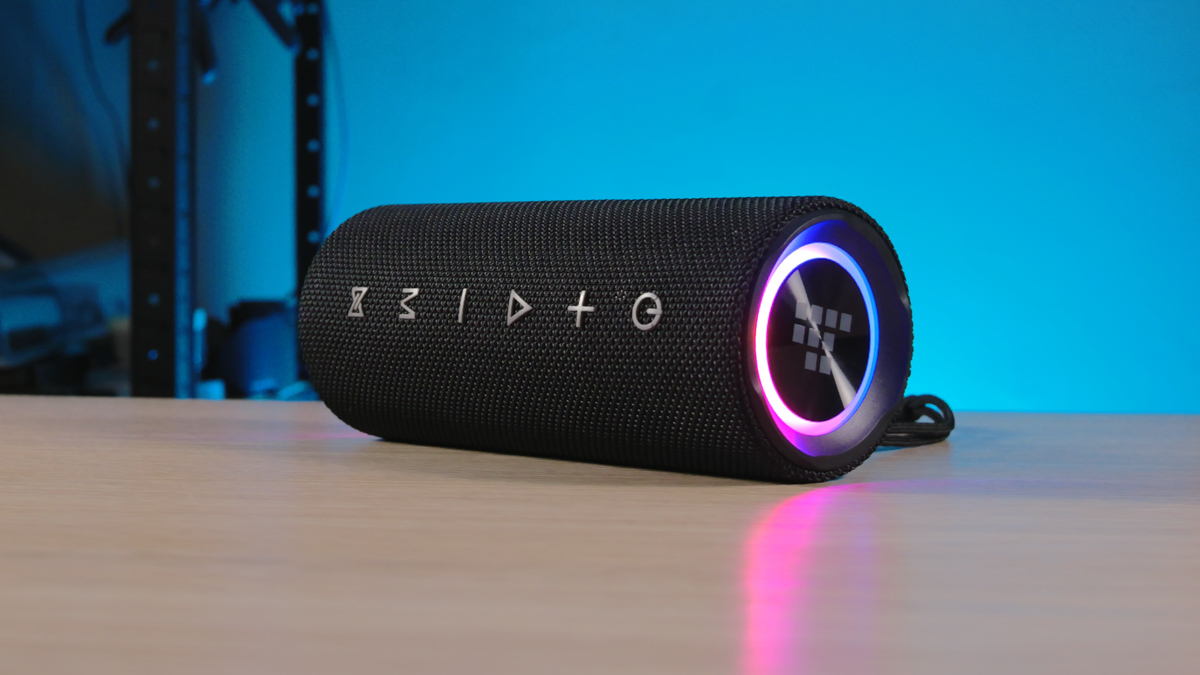
The design of the speaker is well-thought-out. It has a cylindrical shape, wrapped in a rough grey fabric – currently, no other color options are available. The speaker also features slightly protruding feet, which allow the sound to pass through when the speaker is standing vertically.

Tronsmart Mirtune C2

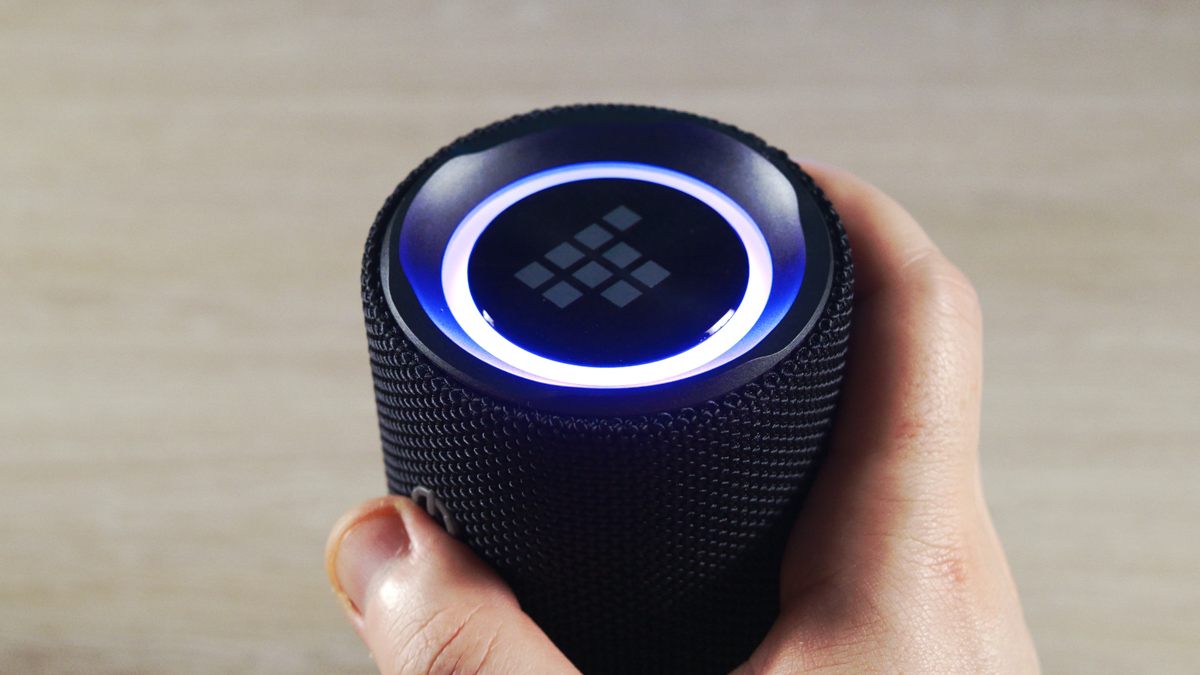
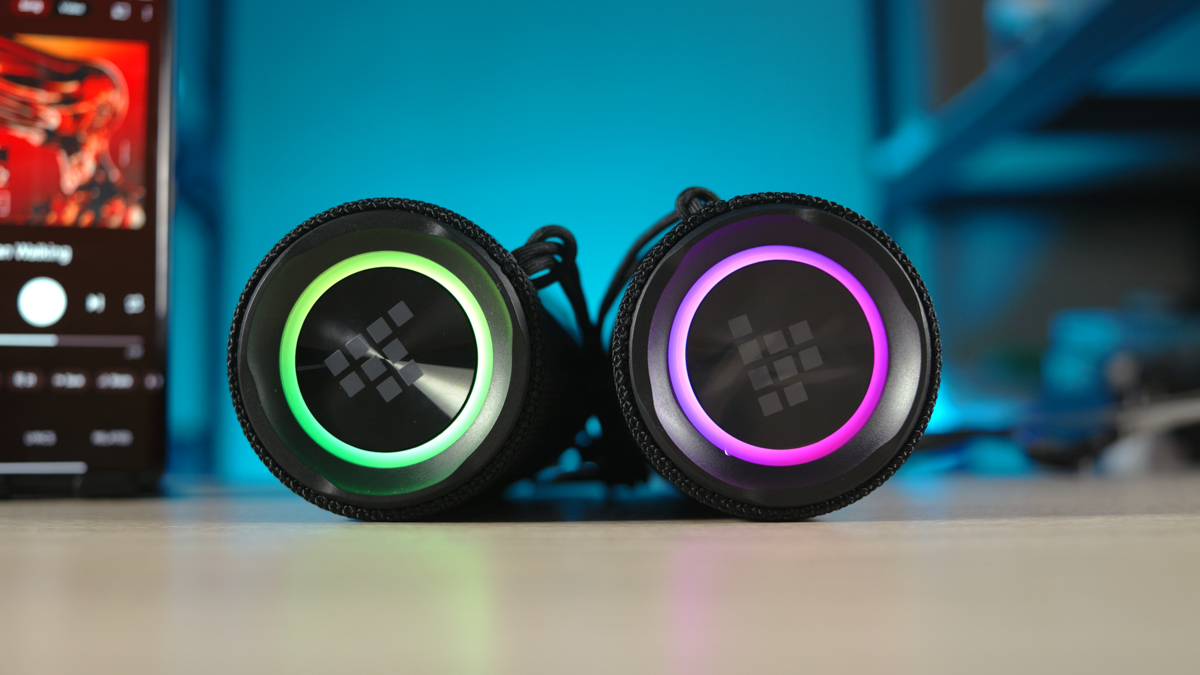
The feet also protect the low-frequency subwoofer driver and the RGB lighting – because, of course, there’s RGB lighting here!

Tronsmart Mirtune C2

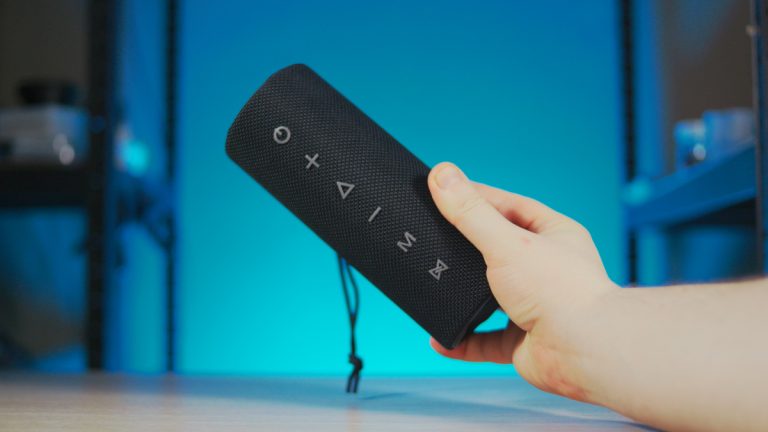
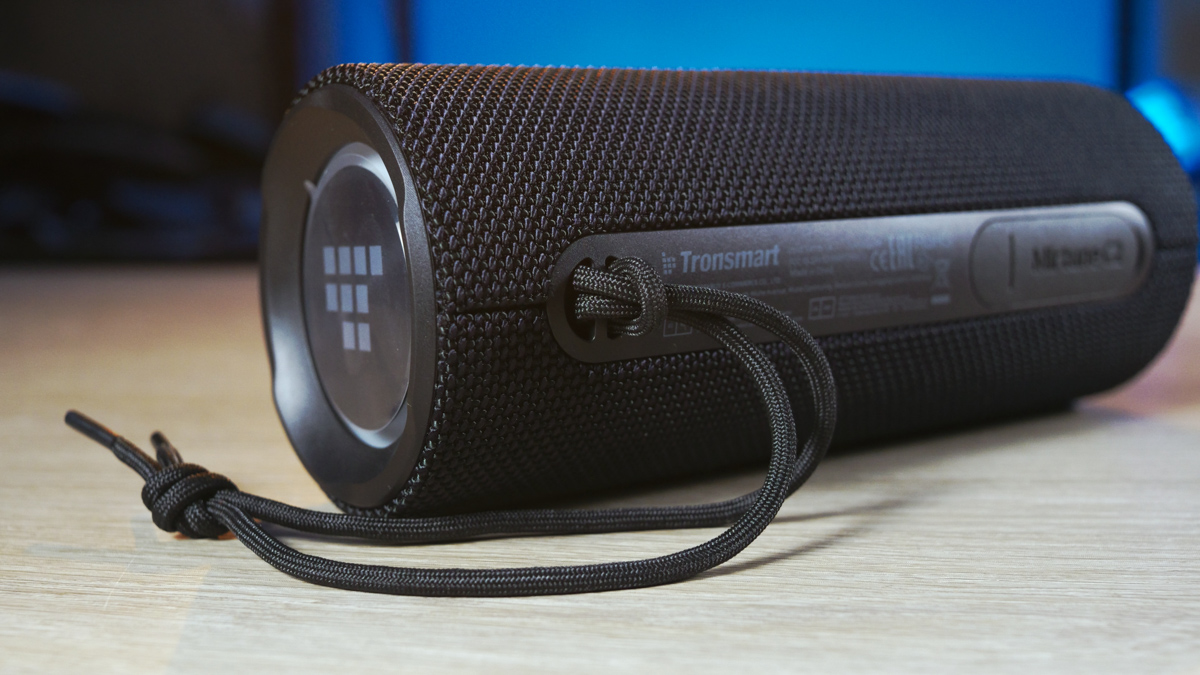
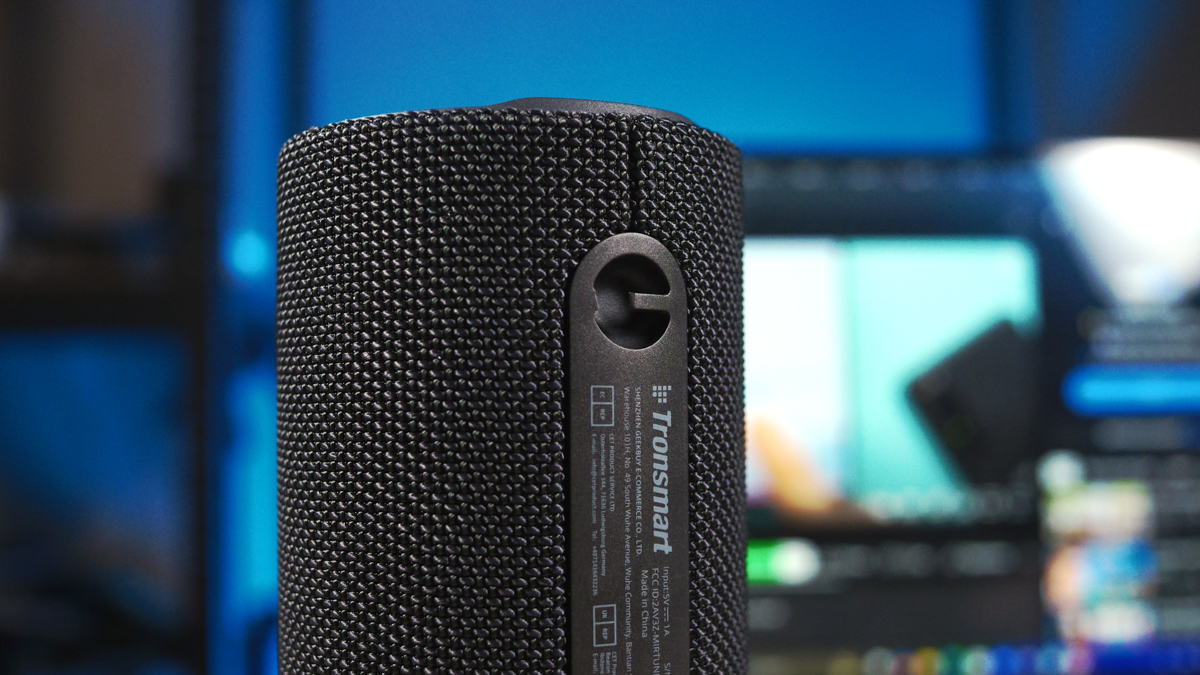
Other interesting features include the Tronsmart logo on the driver, a set of tactile control buttons running the full length, a status indicator between two of the buttons, a rubber plug with the model name, and a genuine lanyard threaded through a hole in the body.

Tronsmart Mirtune C2

Keep in mind that the hole, like the rest of the speaker’s body, is not reinforced with metal. Therefore, the lanyard may break, but the hole itself is more likely to tear if pulled too hard. Of course, no one promised durability in this regard, but it’s something to be aware of.

Tronsmart Mirtune C2

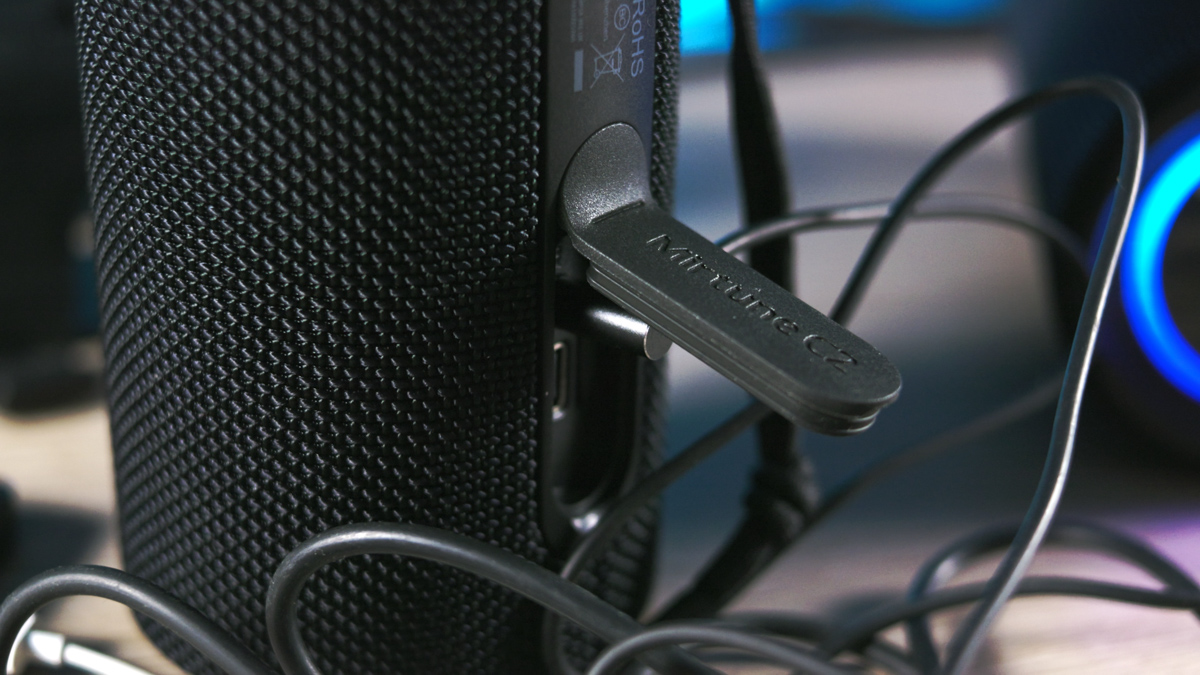
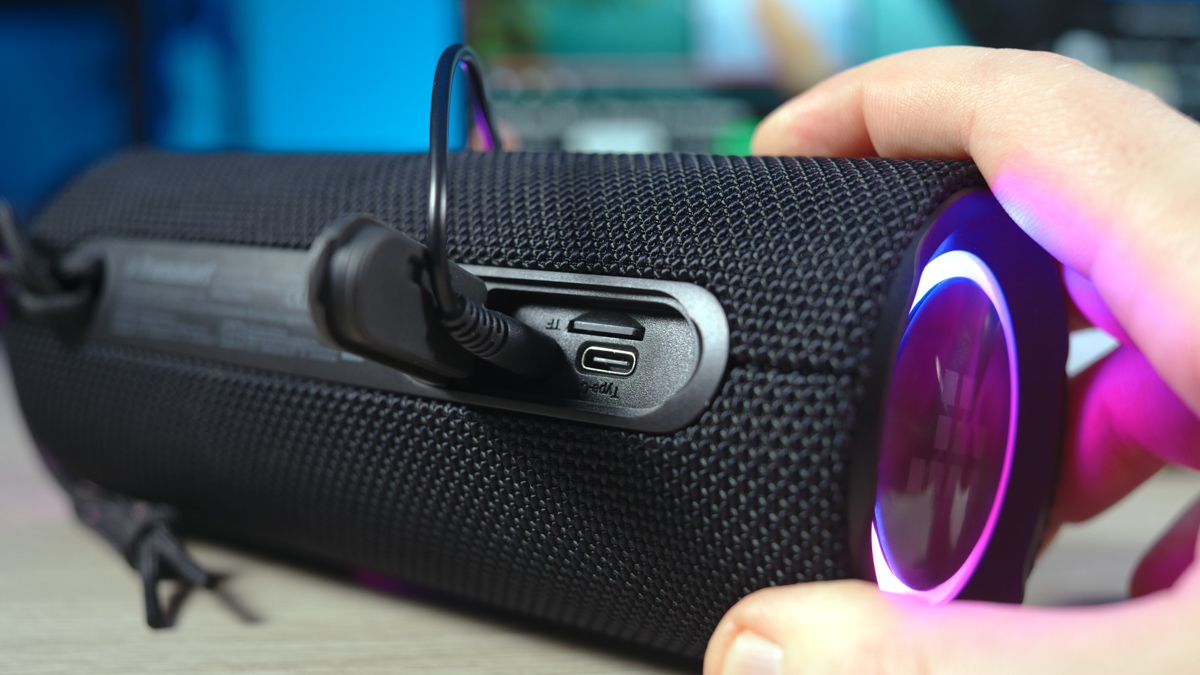
This is offset by the fact that the Tronsmart Mirtune C2 comes with an IPX7 rating, meaning it can even briefly go underwater up to a depth of 1 meter. This is also why the port cover is difficult to open with a fingernail and requires a flat, thin tool.

By the way, under the cover, you’ll find a Type-C port, an AUX input, and yes, a slot for a microSD card, or TF, or TransFlash. For those who aren’t familiar, these are not the same — TransFlash cards are much more basic in functionality compared to microSD cards, and they aren’t even produced anymore. The point is, the speaker can work autonomously in the absence of wireless connectivity — either via cable using the AUX port. This is why I refer to it as “universal.”

The Tronsmart Mirtune C2 can replace both your smartphone’s audio system and your PC’s speaker, and it can also operate independently. It can even work in pairs. Yes, Mirtune supports quick synchronization for full stereo sound. Just take two speakers, press the sync button once, and they start working in unison. The latency is minimal, and the lighting syncs up as well.

What’s neat is that after successfully connecting to the signal source, the speaker dims a bit and then gradually increases its brightness again.

Specifications

In terms of specifications, the Tronsmart Mirtune C2 features Bluetooth 5.3, with support for the SBC codec, which is more than sufficient since these aren’t audiophile-grade headphones. The operating range is up to 15 meters, and the power output is up to 24W. For context, 10W is plenty to fill a small room with sound, while 24W is more suitable for larger spaces or a party setting. In my video review, I also provide a comparison with my Redmi Note 13 Pro+ 5G.

Tronsmart Mirtune C2

The Tronsmart Mirtune C2’s lighting works in three modes: pulsation, rainbow, and flashing spots, and it can be turned off. When the lighting is off, the 3700mAh battery lasts for 24 hours of music at 50% volume. Even at 12W, it’s quite powerful, so expect louder sound in a larger space. The charging speed is relatively slow, with a 5V 1A Type-C input, taking up to 4 hours for a full charge. HOWEVER, the speaker can still function while charging, although it doesn’t accept a signal via Type-C.

Control

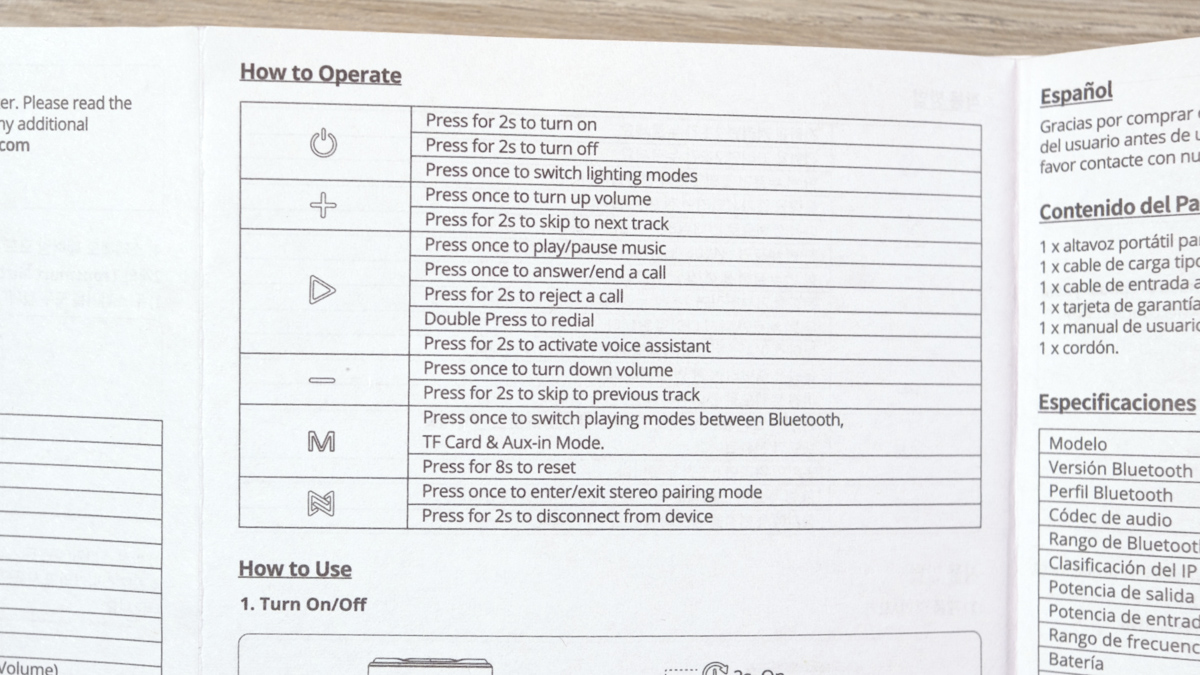
Tronsmart Mirtune C2 control buttons: power, forward-back-pause, mode and Bluetooth button. All functions are more or less obvious – the power button is held down for 2 seconds and switches the power on. Forward and back buttons – for two seconds, they switch tracks. Pause button – pauses and unpauses a track. The mode button switches the mode between Bluetooth, cable and memory card operation.

Tronsmart Mirtune C2

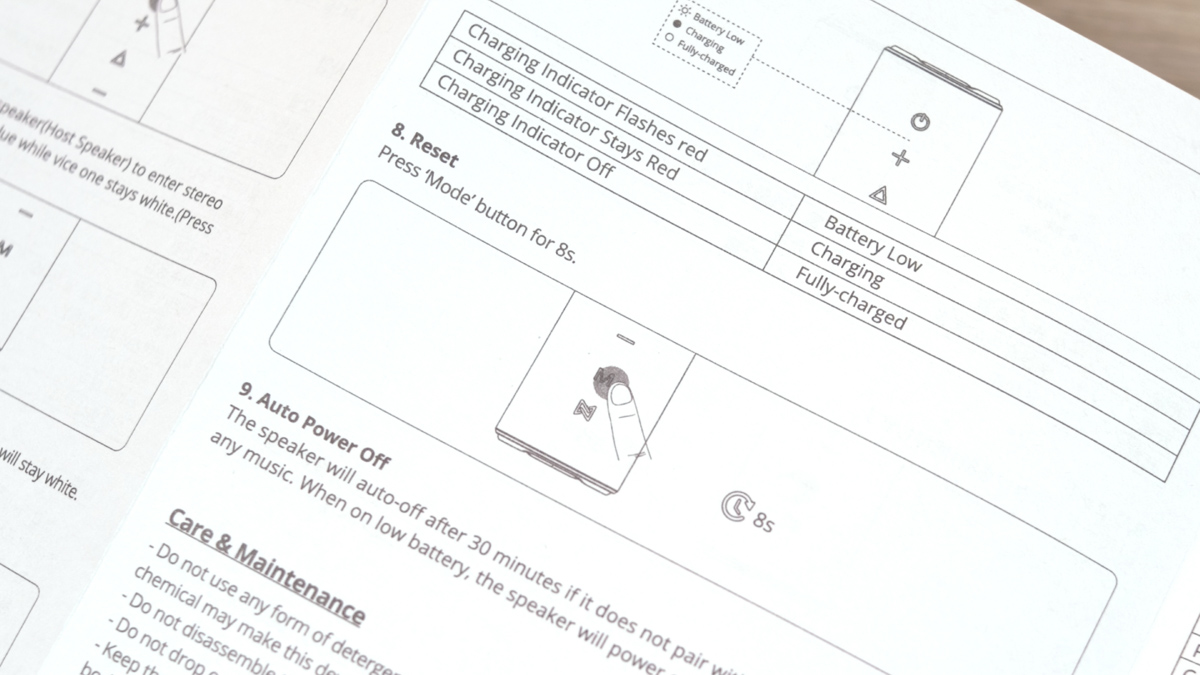
Each button on the device offers additional functions. A single press of the power button toggles the backlight. The pause button manages call functions and can activate the voice assistant. Pressing the forward/backward button adjusts the volume, while holding the mode switch button for 8 seconds resets the Tronsmart Mirtune C2 to its factory settings.

Operating experience

The first thing I did was try out the Type-C to mini-jack cable, a mother-to-mother connection. When I connected the speaker to my smartphone using this cable, it didn’t work. However, a simple Type-C to 3.5mm adapter worked, and it even functioned with a third-party cable.

Tronsmart Mirtune C2

Stereo synchronization works even with a wired connection. Once you pair the speakers and connect one of them to the smartphone via cable, you’ll get stereo sound. It’s possible to connect this pair to two wired audio sources, but only the first one will output sound. There is some confusion, however, since the speaker doesn’t announce which mode it’s in when switching, and the audio signal is the same across all modes.

Tronsmart Mirtune C2

When there is no memory card inside the speaker, it won’t switch to that slot. So, it will either be Bluetooth or a wired connection. The speaker can be connected to up to three audio sources at once, and you can switch between them sequentially, which happens almost seamlessly. Almost. When a memory card is inserted, the music starts playing automatically, so keep that in mind.

Tronsmart Mirtune C2

I noticed that when using a microSD card, the speaker’s volume adjusts in 10% increments. So, you won’t get volume levels below 10%, just something to keep in mind. Finally, when using the AUX connection, the pause button doesn’t actually pause playback. Instead, it mutes the speaker, while the player on the laptop, for example, continues to run.

Drawbacks

Now, what I didn’t like. Aside from the lack of a reinforced loop for a strap, there’s only the volume of the welcome sound when turning on the speaker. For outdoor use, it’s loud enough—won’t miss it in a noisy environment. However, for use indoors with a PC, I would have preferred it to be quieter.

Tronsmart Mirtune C2

Fortunately, if the backlight is turned off, it doesn’t activate when the speaker is powered on.

Conclusions

In conclusion, the Tronsmart Mirtune C2 is much more impressive and versatile than I expected. The fact that I spent about an hour exploring the combinations and modes speaks for itself—this speaker is as versatile as it gets for a $50 budget. Yes, there are a few points worth noting, but overall, I recommend it.

Read also:
Sivga Que earphones Review: Fancy Yet Affordable

In this article, we’re going to take a close look at the Sivga Que earphones, dissecting their ups and downs. This product is one that I seemingly have a love-hate relationship with as a result of its form factor. Considering the pricing of this pair of earphones, its quality is mind-blowing.

From its packaging to the earphones themselves the Sivga Que is a complete package. Throughout my period of using this product, most people found it difficult to believe that it doesn’t retail above $100. Despite the fact that the Sivga Que got a lot of attention from onlookers there are a few things I wish were done differently.

Read also: realme GT 7 Pro Review: Flagship That Outperforms Competitors
Basis specifications of the Sivga Que

  • Headset Type: In-ear wired earphones
  • Number of Drivers: 2
  • Driver Type: 10 mm beryllium diaphragm dynamic driver unit
  • Frequency: 20 kHz
  • Impedance: 32+/-15% Ohms
  • Magnetic Circuit System: Single-magnetic dual-cavity
  • Build Material: Zinc Alloy, Maple Wood

Read also: OUKITEL P2001 Plus Portable Power Station Review
Positioning and Pricing

While you might have not heard of Sigva, they are a headphone manufacturing company founded in 2016. This firm has managed to make a name for itself by using high-quality materials like wood and metal in the various products that they offer. The Sivga Que is no exception as it lives up to the name that Sigva has built for itself over the past years.

How much do you think a pair of earphones that have real maple wood and zinc alloy as their build materials cost? Maybe well over $100? If you guessed this, you’ll be wrong as this pair of wired earphones retails for $69.90.

Read also: SteelSeries Arctis GameBuds: Best Gaming Earbuds of 2024?
What’s in the package

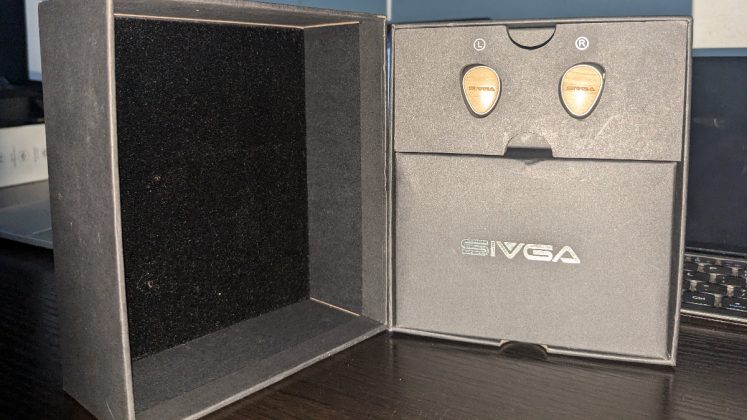
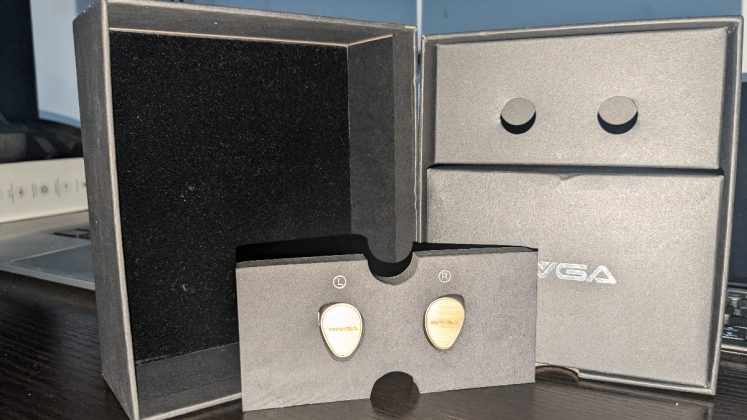
Sivga Que

After receiving this product in the mail and unboxing it, I couldn’t seem to understand how something this premium retails for less. The retail box comes with an interesting design with the name of the product, a bird, and some Chinese write-ups. At the back of the retail box, we find some more details on this product like its specifications.

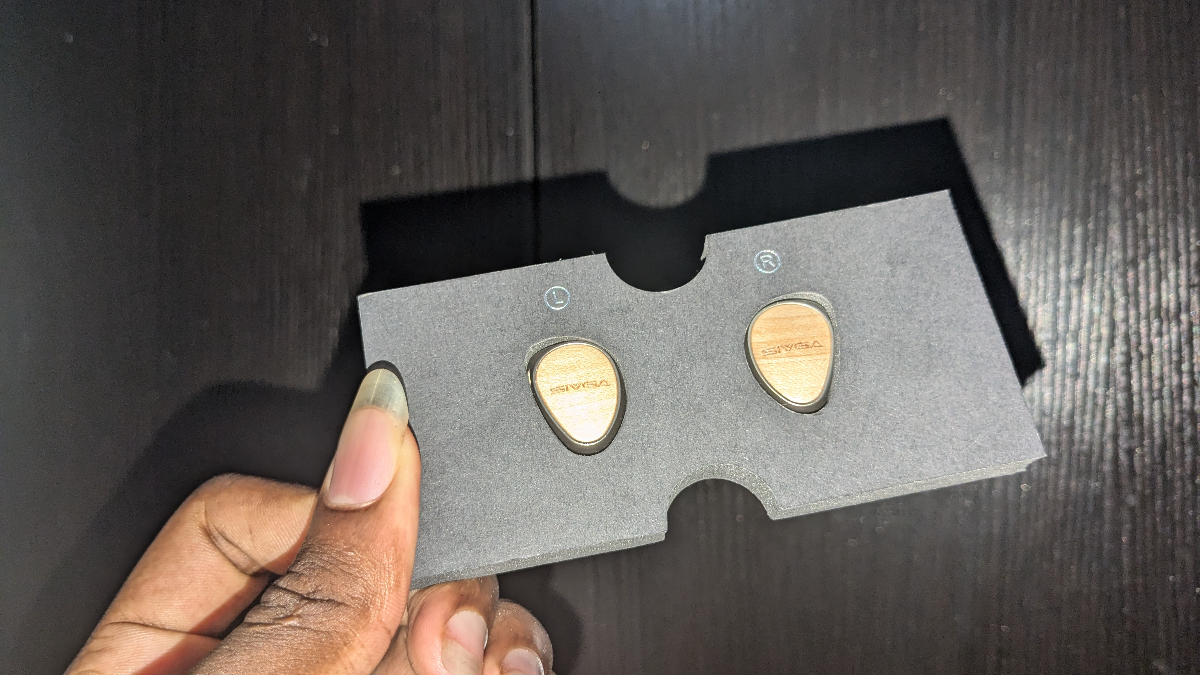
The retail box itself doesn’t feel flimsy, as it is thick and felt lined on the inside (to protect the earphones from scratches). Opening up the box, you’re greeted with the earphone buds in a thick padding that labels both left and right buds. There are two more boxes inside the Sivga Que retail box, one of which holds the leather carrying case, 2 pairs of large, small, and medium ear tips, and instruction manuals.

Just like the Sivga Que earphones, the leather carrying case wasn’t an afterthought, as a lot of attention was put into perfecting it. This is a high-quality case that houses the earphones and extra tips for easy transportation. The earphone’s changeable connecting cable is also of high quality as it’s made of oxygen-free copper with silver plating cable.

Construction, design, material, and build quality

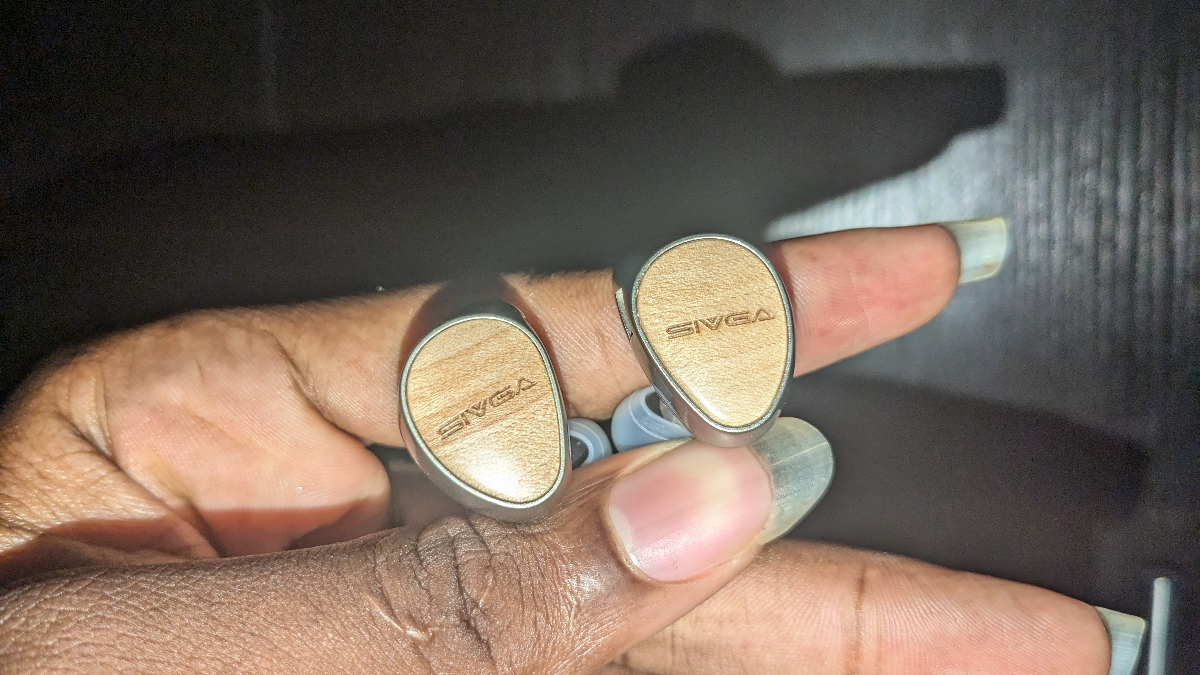
Sivga Que

It would have been easy to give this earphone a 10 out of 10 rating for its design. However, there is a little problem for me as an end user of this product. I have simply got too used to rocking wireless earphones on a daily basis, so carrying a wired earphone around became an issue for me.

Most flagship smartphone manufacturers don’t add a 3.5mm headphone jack to their devices so I couldn’t use this earphone on my primary device. But after using the Sivga Que for a few days on my laptop and budget secondary smartphone I started to get the hang of it. It fits perfectly into the ear and won’t fall out occasionally like over-wired earphones would.

The use of materials like maple wood, and zinc alloy makes the Sigva Que look amazing. For its build quality, material, and construction, I will give the Sivga Que a 10 out of 10 score. However, when it comes to its design, I just wish that this could be a wireless product as the world has somehow forgotten that the 3.5mm jack on smartphones exists.

Read also: Jabra Evolve2 65 Flex Premium Headset Review

Experience using the Sivga Que

Sivga Que

Despite wishing that the Sivga Que was a pair of wireless earphones, it’s still an awesome wired earphone. Initially, I felt that I would find it difficult to rock a wired earphone in public, but I adjusted just fine. The Sivga Que was designed to be comfortable for long hours of usage thanks to how the earbuds are shaped.

Sivga Que

An advantage of using the Sivga Que as against my wireless earphone is that the Sivga Que doesn’t run out of battery. So I technically get weeks of usage without having to plug it in to charge up. Editing documents outdoors with the Sivga Que plugged into my laptop gained me a lot of attention.

People loved not just the design of the Sivga Que but also its overall quality. However, just like every other wired earphone, I found myself tugging on the Sivga Que’s connecting wire now and then. Overall, the good sides of the Sivga Que far outweigh its sides that I really wish were different.

Audio Quality And Controls

Sivga Que

Considering the fact that the Sivga Que is a wired earphone, it is easy to expect that it doesn’t come with some audio specifications. One of these specifications includes active noise cancellation (ANC) and the Sivga Que doesn’t come with this. However, the build of the Sivga Que offers a good level of noise cancellation and harmonic resonance.

Sivga Que

According to Sivga, the materials used to make this wired earphone play various roles in its audio delivery. The maple wood used on this earphone ensures “excellent harmonic resonance. Sivga also ensured the addition of a wide soundstage of natural and powerful bass production.

This ensures that the music you’re listening to on the Sivga Que maintains its bass and audio quality. During my period of using this pair of wired earphones, I really came to love its overall audio quality. Regardless of what type of song I was listening to, it felt as though I had some noise-cancelling headphones on.

Conclusion and Final Verdict

Sivga Que

The Sivga Que ticked a lot of boxes during my use experience, in areas like design, audio quality, and packaging, and this pair of earphones proved impressive. However, I had to get familiar once again with using a wired headphone, which might be a dealbreaker for some potential buyers. Putting the design, audio, and sound quality of the Sivga Que into a wired headphone will be purely amazing.

If you’re in love with wired headsets and want a premium experience for your next wired earphone, I highly recommend the Sivga Que. We look forward to testing more audio products with different form factors from Sivga. Just like with the Sivga Que, we expect these products to come with top-notch design and impressive sound quality.

Read also:
Where to buy

Top 10 Elements of a Successful Game Trailer: Insights from Industry Experts

Creating a game trailer that captivates players is both an art and a science. In an industry where first impressions are crucial, a well-crafted trailer can make the difference between a game’s success and obscurity. But what exactly makes a game trailer effective? Here, we delve into the top 10 elements that industry experts believe are essential for crafting a compelling game trailer.

Top 10 Elements of a Successful Game Trailer:
From Pigeon Studio Portfolio

The Importance of a Strong Opening

When considering how to make a game trailer, it’s important to start with a strong opening. The first few seconds of a trailer are critical. They need to grab the viewer’s attention immediately. A powerful opening, whether it’s a dramatic scene or an intriguing question, sets the tone and encourages viewers to keep watching. This initial hook is vital in ensuring that the audience remains engaged throughout the trailer.

Top 10 Elements of a Successful Game Trailer:
From Pigeon Studio Portfolio

Key Elements of a Successful Game Trailer

  • Clear Narrative: A successful game trailer tells a story. It doesn’t just showcase gameplay; it weaves a narrative that gives viewers a sense of the game’s world and its stakes. This narrative should be concise yet engaging, providing enough context to intrigue without overwhelming it.
  • Highlight Key Features: Players want to know what makes a game unique. Highlighting key features, such as innovative gameplay mechanics or stunning graphics, can pique interest. This is where the expertise of a studio like Studio Pigeon can be invaluable, as they know how to showcase these elements effectively.
  • Emotional Connection: Great trailers evoke emotions. Whether it’s excitement, curiosity, or nostalgia, tapping into the viewer’s emotions can create a lasting impression. Music, voiceovers, and visuals all play a role in building this emotional connection.
  • Pacing and Rhythm: The pacing of a trailer is crucial. It should build momentum, keeping viewers engaged from start to finish. A well-paced trailer balances action with quieter moments, creating a rhythm that mirrors the game’s experience.
  • High-Quality Visuals: In the gaming industry, visuals are everything. A trailer should showcase the game’s best graphics, using high-quality footage that reflects the final product. This not only attracts players but also builds trust in the game’s quality.
  • Memorable Soundtrack: Music can elevate a trailer, making it more memorable. A well-chosen soundtrack complements the visuals and enhances the emotional impact. It’s worth investing in original music or carefully selecting tracks that align with the game’s theme.
  • Call to Action: A trailer should end with a clear call to action. Whether it’s a release date, a pre-order link, or an invitation to visit the game’s website, viewers should know what to do next. This step is crucial for converting interest into action.
  • Authentic Representation: It’s important that a trailer accurately represents the game. Misleading trailers can lead to disappointment and damage a game’s reputation. Transparency builds trust and ensures that players’ expectations align with the actual gameplay experience.
  • Expert Craftsmanship: Finally, the craftsmanship behind a trailer can make all the difference. From editing to sound design, every element should be polished and professional. This is where industry experts, like those at Studio Pigeon, excel. Their experience in creating captivating trailers ensures that every detail is meticulously crafted to engage and excite.

Final Thoughts

Incorporating these elements into a game trailer can significantly enhance its effectiveness. As the gaming industry continues to grow, the importance of a well-executed trailer cannot be overstated. By understanding what makes a trailer successful, developers can better connect with their audience and drive interest in their games.

Top 10 Elements of a Successful Game Trailer:
From Pigeon Studio Portfolio

For those looking to delve deeper into the intricacies of creating a game trailer, resources like Studio Pigeon’s blog on how to make a game trailer offer valuable insights and guidance. By learning from industry experts, developers can refine their approach and create trailers that not only capture attention but also leave a lasting impact.

Additional Insights

To further enhance your game trailer, consider the following:

  • Audience Analysis: Understand your target audience and tailor the trailer to their preferences and expectations.
  • Competitive Analysis: Study successful trailers in your genre to identify trends and effective strategies.
  • Feedback Loop: Use feedback from test audiences to refine and improve the trailer before its official release.

By integrating these additional strategies, developers can ensure their game trailers are not only engaging but also strategically aligned with their marketing goals.

What are CU-DIMM and CSO-DIMM, and Why Does It Matter?

In my personal opinion, the emergence of CUDIMM and CSODIMM memory (as seen in models like the G.SKILL Trident Z5 CK Series, for example) represents a breakthrough on par with the introduction of NVIDIA DLSS or AMD’s 3D Cache. Why? First, because RAM, as a technology, doesn’t often see rapid or visually obvious advancements, so any significant leap forward is worth celebrating.

G.SKILL Trident Z5 CK Series

Secondly, CUDIMM isn’t just vertical progress driven by manufacturing optimizations—it’s a fundamental change in the technological process that will significantly accelerate industry development. To explain why this is such a game-changer, I’ll use the example of the G.Skill Trident Z5 RGB Black DDR5-7800 32 GB memory.

G.SKILL Trident Z5 CK Series

While this isn’t a CUDIMM-based kit, it’s still significant. This module stands out because it’s one of the fastest in the world today. Running at 7800 MT/s with timings of 36-46-46-125, it delivers truly impressive performance.

G.SKILL Trident Z5 CK Series

And all of this will soon be completely overshadowed by models like the G.SKILL Trident Z5 CK Series, which are capable of hitting 9600 MT/s. The product page for the CK Series is already live on ArtLine’s store, and by the time this article is published, they should already be available in stock. Meanwhile, the page for the G.Skill Trident Z5 RGB Black DDR5-7800 32 GB has been up for quite some time.

G.SKILL Trident Z5 CK Series

Video about CUDIMM and G.SKILL Trident Z5 CK Series

Terminology

Let’s start by explaining what CUDIMM and CSODIMM actually are. These terms stand for Clock Unbuffered Dual In-line Memory Module and Clock Small Outline Dual In-line Memory Module, respectively. The more observant among you might have noticed the word “Clock” in the name — and you’re absolutely right to pay attention to it.

G.SKILL Trident Z5 CK Series

The presence of the CKD chip — which stands for Client Clock Driver, or simply Clock Driver — is the key difference between the new CUDIMM/ CSODIMM modules and traditional UDIMM or SODIMM. Why is this chip important? The main obstacle to increasing RAM speed right now is the interference caused by data transfers — not just within the memory itself, but from everything surrounding it.

G.SKILL Trident Z5 CK Series

RAM isn’t the only component on a motherboard that processes information, right? This is precisely why the recommendation to use the 2nd and 4th slots exists. It helps prevent cross-interference, where one RAM stick disrupts the performance of another. This same issue can also cause XMP to fail if you use the wrong slots. Keep this in mind.

G.SKILL Trident Z5 CK Series

Here’s the point: in modern systems, the RAM controller is located in the processor. If the RAM frequency is too high, the data can turn into a garbled mess because it essentially interferes with itself. This happens partly because the data has to travel from the RAM to the controller, which is a relatively long path when you’re transmitting gigabytes of data with timings measured in tens of nanoseconds.

G.SKILL Trident Z5 CK Series

To address this issue, RAM modules are equipped with chips that include a Client Clock Driver (CKD). This chip takes on some of the responsibilities of the controller in the processor, and since it is directly on the RAM, the path to it is minimized.

G.SKILL Trident Z5 CK Series

In other words, rather than waiting for data from the processor, which may not arrive on time or intact due to interference, what happens? The clock driver chip receives the information from the processor once and then provides it continuously to the memory chips. Why wasn’t this done earlier? Because the issue wasn’t as apparent, and also, clock driver chips come at an additional cost.

Format advantages

So, what does CUDIMM offer? Stability, higher frequencies, and better timings. If your system fully supports CUDIMM, you can expect a performance boost in your RAM, potentially doubling or even tripling the increase in speed compared to what it could achieve without CUDIMM, albeit at a higher cost.

G.SKILL Trident Z5 CK Series

And, it’s also worth mentioning the difference between CUDIMM and CSODIMM. It’s quite simple: CUDIMM is for desktops, while CSODIMM is essentially the same thing but in a laptop-friendly form factor, just like UDIMM and SO-DIMM. Interestingly, CSODIMM will now compete with the new CAMM2 format, which is a bit unfortunate, as SO-DIMM has been around for 20 years and is now facing two competitors in its 21st year.

G.SKILL Trident Z5 CK Series

Next, if you’re expecting a review of the G.Skill Trident Z5 RGB, along with tests and benchmarks, don’t expect that, and I’ll explain why. Similarly, there won’t be any tests for the CUDIMM modules from the G.SKILL Trident Z5 CK Series either. The reason is that, as of the time of writing this review, the only platform that supports CUDIMM is Intel Arrow Lake, which includes the Core Ultra series, the LGA 1851 socket, and the Z890 chipset.

G.SKILL Trident Z5 CK Series

If you try to install the Trident Z5 CK on motherboards with DDR5-supported processors but do not support CUDIMM, two things might happen. First, the motherboard may fail to recognize the RAM, which is guaranteed to happen with Ryzen 7000 series CPUs. Alternatively, after a BIOS update, the RAM may run in “bypass mode,” meaning the clock chip will be disabled, and the memory will run at reduced frequencies.

G.SKILL Trident Z5 CK Series

In other words, you won’t gain any advantages from these memory modules, but the system will still function normally with them. This is already a positive, as it can reduce potential future headaches. Speaking from personal experience as an owner of a test bench with an AM5 motherboard and an AMD Ryzen 5 7600, this RAM won’t even boot for me. That’s why there won’t be any tests.

Why is it important now?

So why am I even making this material? Because CUDIMM ensures that the RAM will be interesting. Right now, when I review RAM with a frequency of 6400 MT/s, I realize that the difference between such a kit and a 7800 MT/s kit (like the G.Skill Trident Z5 RGB) with XMP or EXPO enabled…

G.SKILL Trident Z5 CK Series

…will depend on the specific game, settings, processor, motherboard, and BIOS version being used. In the best case scenario, the performance boost will be minimal. In the worst case, it won’t be worth considering at all.

G.SKILL Trident Z5 CK Series

With CUDIMM, things will change. Memory frequency will increase significantly faster. As a result, hardware manufacturers will start focusing on this, processor manufacturers will pay more attention to it, and even game developers will begin optimizing for higher frequencies. Undoubtedly, most current platforms, except for LGA 1851, won’t directly benefit from CUDIMM modules. However, over time, even within a year or two, the advantages of kits like the G.SKILL Trident Z5 CK Series at 9600 MT/s will become more noticeable. And this improvement will be significant. I am genuinely excited about this development.

G.SKILL Trident Z5 CK Series

I am 100% confident that CUDIMM won’t fade out like the FBDIMM format did. For context, FBDIMM also had an additional chip called the Advanced Memory Buffer, but it was solely promoted by Intel and was much more expensive than DDR2, which made it unappealing to competitors. CUDIMM, however, is a JEDEC standard, and AM5 motherboards already plan to support CUDIMM in their BIOS. Additionally, the cost should not be more than 5% higher.

G.SKILL Trident Z5 CK Series

The reason I’m excited about CUDIMM right now is because, according to tests by JayzTwoCents, on the Intel Core Ultra 7 285K, FPS in some games increases by as much as 20% simply due to the use of CUDIMM. And 20% is a significant difference—it’s comparable to the performance gap between different tiers of graphics cards, like between the RTX 4070 and the RTX 4070 Ti.

G.SKILL Trident Z5 CK Series

And all of this is achieved thanks to a single chip on the RAM, which won’t be that expensive. What’s even more impressive is that this result is seen on relatively unpolished hardware, which didn’t even have a QVL (Qualified Vendor List) at the time of this review. The QVL is a list of guaranteed compatible accessories, meaning no motherboard is guaranteed to be compatible with any CUDIMM RAM. And still, we’re seeing a +20% increase in FPS.

G.SKILL Trident Z5 CK Series

Conclusions

The best conclusion I can make is that CUDIMM has truly made the Arrow Lake platform interesting and competitive for me. And in the future, this format will only improve. So, if you’ve decided to buy an Intel Arrow Lake platform, a Core Ultra processor, and a Z890 motherboard, there’s no reason not to go for RAM like the G.SKILL Trident Z5 CK Series.

The QVL will appear over time, optimization in games and applications is inevitable, and BIOS updates will definitely come. But even now, you will see a performance boost. And it could even spark some enthusiasm for the future of the PC industry, as it personally did for me.

G.SKILL Trident Z5 CK Series

So, the final question: Should you then give up on the G.Skill Trident Z5 RGB 7800? If you’re not planning to switch to Intel for CUDIMM support and you’re happy with the future AMD Ryzen 9 9800X3D, then the 7800 MHz kit will be more than enough for you.

Read also:
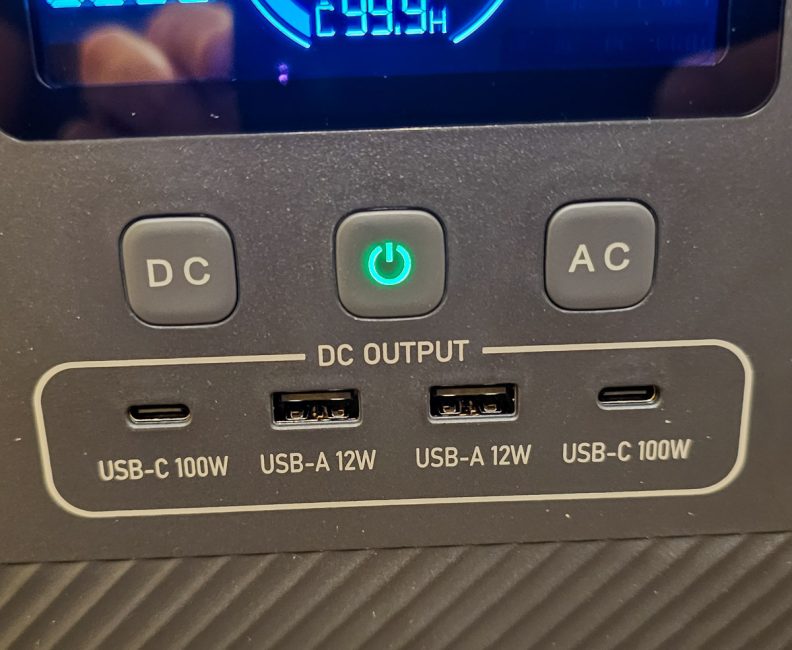
ASUS ROG STRIX XG259CMS Gaming Monitor Review

Today, I’m reviewing the ROG STRIX XG259CMS, a new gaming monitor from ASUS that expands their lineup this year. After spending some time using it, I can confidently say it’s a solid choice for 1080p gaming within the $359 / €343 price range. Here’s why: it features a 10-bit Fast IPS panel with a 310Hz refresh rate, excellent image clarity, and vibrant color reproduction. The monitor supports HDR, G-SYNC, and AMD FreeSync, and offers a fast 1ms GTG response time. With a brightness of 400 nits and a versatile stand that allows for extensive adjustments, it’s designed to fit a variety of setups. Additionally, the monitor showcases the distinctive ROG STRIX aesthetic, which some may find appealing.

While the initial impression is positive, I’ll break down the details of its performance and features in this review.

Specifications

  • Model: ROG Strix XG259CMS
  • Diagonal: 24,5″
  • Resolution: Full HD (1920×1080)
  • Aspect ratio: 16:9
  • Matrix type: Fast IPS
  • Display surface: matte
  • Color space: sRGB 110%.
  • Display colors: 16.7 million colors
  • Support for HDR: HDR10
  • Brightness (typical): 400 cd/m2
  • Contrast ratio (standard): 1000:1
  • Response time: 1 ms (GTG)
  • Refresh rate: 310 Hz
  • Pixel pitch: 0.2830 mm
  • I/O ports: 1×DisplayPort 1.4; 1×HDMI 2.0; 1×USB-C (DP Alt Mode / Power Delivery 7.5W); 1×3.5 mm audio jack
  • Built-in speakers: no
  • Tilt adjustment: yes (+20° ~ -5°)
  • Horizontal swivel: yes (+45° ~ -45°)
  • Vertical rotation: yes (+90° ~ -90°)
  • Height adjustment: yes (0~120 mm)
  • VESA wall mount: 100×100 mm
  • Socket for a tripod: 1/4″
  • Kensington lock: yes
  • Dimensions with stand (W×H×D): 55.8×49.2×21.8 cm
  • Dimensions without stand (W×H×D): 55.8×33.2×5.7 cm
  • Package dimensions (W×H×D): 79.5×48.2×17.2 cm
  • Weight with stand: 5.58 kg
  • Weight without stand: 2.78 kg
  • Technologies: Flicker-Free, Trace Free, Low Blue Light, HDCP 2.2, Extreme Low Motion Blur (ELMB), ELMB Sync, GamePlus, GameVisual, Shadow Boost, HDR, Adaptive-Sync
  • Certificates and standards: TÜV Flicker-Free, TÜV Low Blue Light, VESA AdaptiveSync Display 310 Hz, VESA DisplayHDR 400, AMD FreeSync Premium, G-SYNC Compatible
  • Proprietary software: ASUS DisplayWidget Center
  • Package contents: monitor, DisplayPort cable, 65W power supply, adjustable leg with stand, ROG pouch, user manual, warranty documentation, ROG stickers

Positioning and price

The XG259CMS positions itself as one of the most affordable monitors in the ROG STRIX lineup with a refresh rate exceeding 240Hz. Its current average price sits at approximately $353 / €336.

When considering its market placement overall, it stands out as a balanced option. While there are competing models offering a 360Hz refresh rate, they typically come at a higher price point. In my view, the additional 50Hz doesn’t justify the extra cost for most users. This makes the XG259CMS a well-rounded choice when evaluating it through the lens of performance, quality, and price.

Package contents

The monitor comes packaged in a large branded box measuring 79.5×48.2×17.2 cm and weighing around 7.5 kg. The sides of the box feature carrying handles, making it easier to transport the monitor from a store or delivery point despite its size. Inside, the monitor and accessories are securely packed in protective foam, ensuring safe transit and minimizing concerns about potential damage.

In addition to the monitor itself, the package includes:

  • DisplayPort cable
  • 65 W power supply unit
  • adjustable leg with stand
  • branded ROG bag
  • user manual
  • warranty documentation
  • ROG branded stickers

ASUS ROG STRIX XG259CMS

The box includes a branded pouch that holds the DisplayPort cable, power adapter, and documentation with stickers. Interestingly, the pouch itself is quite practical—it can be repurposed for organizing items at home or used as a travel case for small accessories.

The monitor stand is 38 cm long with a sturdy metal base covered in high-quality plastic, featuring ASUS ROG branding. At the top of the stand, there’s a 1/4″ tripod mount, while the lower section includes a simple cable management opening. The stand’s standard mounting system allows for tilt adjustments between +20° and -5°, swivel rotation of +90° to -90° in the vertical plane, and height adjustment up to 120 mm.

Instead of the typical V-shaped support, the ROG STRIX XG259CMS features a stylish base. The stand attachment is rotatable, allowing horizontal adjustments of +45° to -45°. The base also includes the iconic REPUBLIC OF GAMERS logo, which shimmers depending on the angle and lighting. Additionally, ASUS has incorporated a practical groove in the base, designed to hold a smartphone.

Assembling the monitor is straightforward and can literally be done with one hand. I always recommend assembling it directly within the protective foam packaging to minimize the risk of leaving fingerprints on the screen, which can be difficult to clean later.

To assemble, simply insert the stand into the slots on the back of the monitor and press gently—the clips will automatically lock into place. Then, attach the base to the stand using the included screws, which can be tightened by hand without the need for tools. That’s it—the monitor is ready to go. You can place it on your desk and remove the foam, or lift the entire assembled unit by the stand. The complete setup weighs just 5.58 kg. Below, I’ve included a short clip demonstrating the assembly process.

If you ever need to detach the monitor from the stand, simply press the release mechanism on the back, and the clips will unlock the stand effortlessly.

ASUS ROG STRIX XG259CMS

Read also:
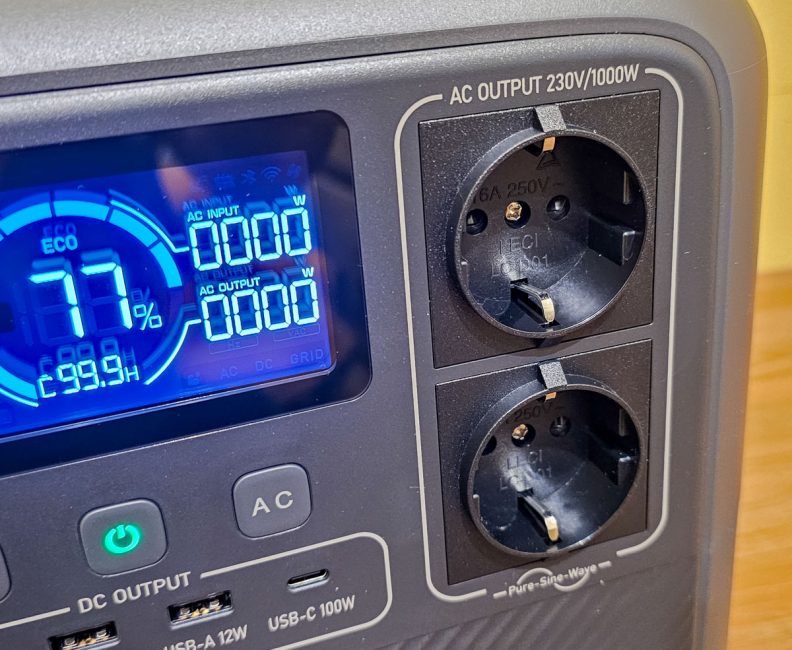
Design, ergonomics, build quality

The monitor features the distinctive and recognizable ROG STRIX design, evident in every detail: the hexagonal shape of the stand, the red line on the base, ROG logos everywhere, intricate patterns, a textured back panel, and the brand’s signature slogan “FOR THOSE WHO DARE.” It’s stylish, unique, and instantly recognizable. In terms of design, it certainly earns a solid 10.

The monitor is relatively compact. While not as small as the TUF Gaming VG259Q3A that I recently reviewed, it still doesn’t take up much space and should fit into any workspace without issue. The screen size is 24.5 inches. With the stand, the overall dimensions are 55.8×49.2×21.8 cm. Without the stand, the dimensions are 55.8×33.2×5.7 cm. The total weight of the monitor with the stand is 5.58 kg, while the monitor alone weighs just 2.78 kg.

I’ve already covered the adjustment options in the previous section. The monitor can be tilted, rotated, raised, and lowered in various ways. If needed, it can also be mounted on a bracket, as it has a standard VESA 100×100 mm mounting pattern on the back. In fact, any VESA-compatible mount will work, even the more affordable ones, since the monitor isn’t particularly heavy.

The front of the monitor is mostly occupied by the 24.5-inch display. The screen has a matte finish to reduce reflections and glare from sunlight or other light sources. At the bottom, you’ll find the ROG logo. The bezels are standard, with a 2 mm frame and a 4 mm matrix bezel.

The back of the monitor, as mentioned earlier, follows the typical gaming ROG style. On the right side, there is a large ROG logo. In the lower-right corner, you’ll find a Kensington lock. On the left, there are decorative lines, branding, a five-position joystick, and the menu control buttons.

All the connectivity ports are located at the bottom center of the monitor: the DCIN power input, HDMI 2.0, DisplayPort 1.4, TYPE-C (DP Alt Mode / Power Delivery 7.5W), and a standard 3.5mm audio jack for headphones. It’s worth noting that the monitor does not have built-in speakers.

The build quality is solid: the matte plastic feels durable, there are no creaks, and all components are neatly aligned. The stand holds the monitor securely, and all adjustments are easy to make. In terms of ergonomics, it’s excellent as well: the monitor doesn’t take up much space, it’s easy to adjust to your preferred position, and there’s basic cable management. Overall, it’s top-notch; there’s really not much more to add.

ASUS ROG STRIX XG259CMS

Read also:
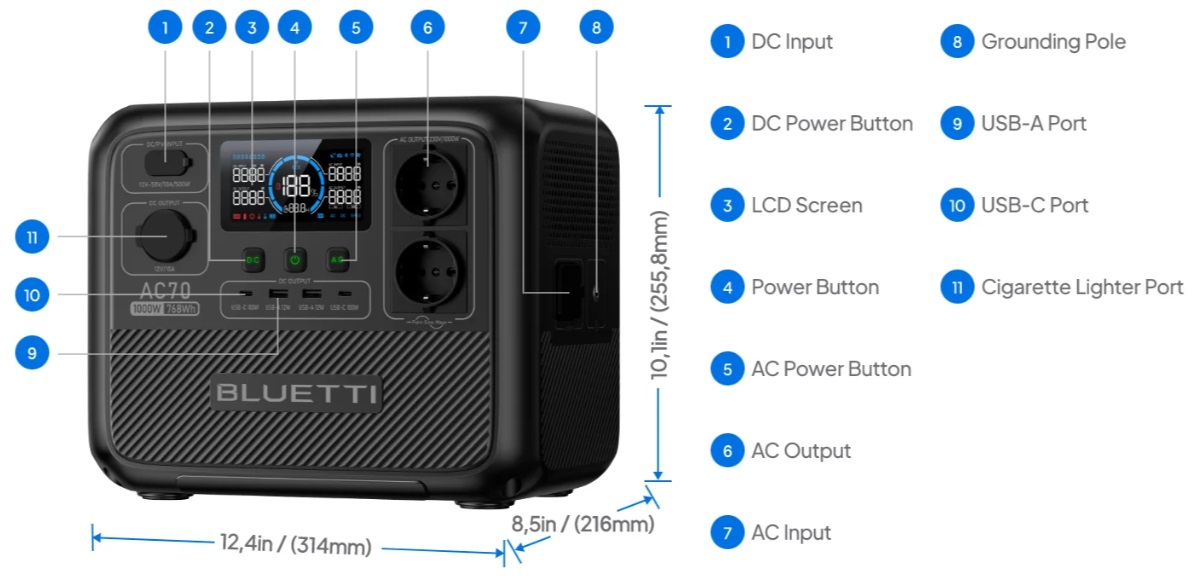
Display, features and technology

The ASUS ROG STRIX XG259CMS features a 10-bit Fast IPS panel with a Full HD (1920×1080) resolution and a maximum refresh rate of 310Hz. It’s important to note that the 310Hz refresh rate is available only when overclocking the monitor. Without overclocking, connected via DisplayPort, the monitor runs at 300Hz, which is still quite good. As for other specifications, the monitor offers a solid set of features for gaming: a 1ms (GTG) response time, a brightness of 400 nits, a 1000:1 contrast ratio, 110% sRGB color gamut, and a pixel pitch of 0.2830mm. It also supports HDR and G-SYNC / AMD FreeSync.

ASUS ROG STRIX XG259CMS

In addition to the main features, the monitor offers a variety of functions designed to enhance the image quality, gaming experience, and reduce eye strain: Flicker-Free, Trace Free, ELMB, GamePlus, GameVisual, Shadow Boost, and Blue Light Filter.

Flicker-Free minimizes screen flicker, reducing eye strain. Trace Free lowers the response time of the display. ELMB (Extreme Low Motion Blur) reduces motion blur in fast-moving scenes. GamePlus provides various built-in features like on-screen crosshairs, timers, and counters. GameVisual offers a selection of 8 preset display modes that can be switched on the fly and further customized through the DisplayWidget Center app. Shadow Boost improves visibility in dark areas without affecting bright sections. The Blue Light Filter reduces blue light exposure to lessen eye strain. Additionally, ASUS notes that all ROG STRIX XG259CMS monitors undergo factory calibration for more accurate color reproduction.

ASUS ROG STRIX XG259CMS

The image quality of the ROG STRIX XG259CMS honestly impressed me. The monitor delivers a sharp picture with vibrant and rich colors. The blacks are deep, and the contrast and brightness are good. While it doesn’t quite reach the level of top-tier VA or OLED panels, it’s also significantly more affordable. For a mid-range IPS panel, however, the display offers a very solid image, and I was genuinely impressed by its performance.

The viewing angles are wide. The image on the display remains clear from any angle, with minimal changes in brightness, contrast, or colors.

The response time of the monitor is excellent, which is particularly noticeable during fast-paced games. Playing shooters on this monitor is a real pleasure, with no blurring, smearing, or ghosting. Additionally, built-in tests from TFT Monitor Test showed an average response time of 3ms at a 310Hz refresh rate.

Regarding backlight bleed, the monitor I tested does exhibit some. The most noticeable spot is in the lower-left corner. However, it’s important to note that under typical usage, this is not visible at all, only appearing in very dark scenes and even then, only at certain angles.

ASUS ROG STRIX XG259CMS

In summary, I can only briefly reiterate: the picture quality of the monitor is truly impressive, and this becomes very noticeable when switching to the ROG STRIX XG259CMS from a more budget-friendly display. For example, when S.T.A.L.K.E.R. 2 was released, after a brief test, I realized that my 4060 Ti couldn’t handle the game at 5120×1440 resolution on my primary monitor. Of course, I could have lowered the settings and locked the FPS, but that solution didn’t appeal to me. On another 2K monitor, things were a bit better, but it was still nearly impossible to play due to frequent stuttering, with FPS dropping from 90-70 to 3-5 frames. It’s great that after the review, I still had (or rather, I didn’t manage to send it back) the ASUS TUF Gaming VG259Q3A monitor with a 1080p resolution. Without much thought, I switched to this monitor. Yes, it was to properly play S.T.A.L.K.E.R. 2. The stuttering didn’t completely disappear, but it was significantly reduced, making the gameplay much more enjoyable. Plus, I could now comfortably raise the graphics settings to high. I spent around 100+ hours on this monitor and nearly finished the game. Then, when the ASUS ROG STRIX XG259CMS arrived for review, I happily continued playing the game on it. So, all of this to say, the difference in image quality between the budget TUF Gaming VG259Q3A and the ROG STRIX XG259CMS is honestly huge. Faster matrix, sharper overall picture, more vivid colors, better brightness and contrast. It’s a shame the monitor didn’t arrive sooner.

As for other games, the ROG STRIX XG259CMS also impresses. Playing Battlefield 2042 on this fast monitor is a real pleasure. For CS games, I think the XG259CMS is an excellent choice as well. By the way, while checking the prices of this monitor in stores, I decided to also read reviews to see what people are saying about it. Based on the reviews, it seems many people buy this monitor specifically for CS.

Read also:
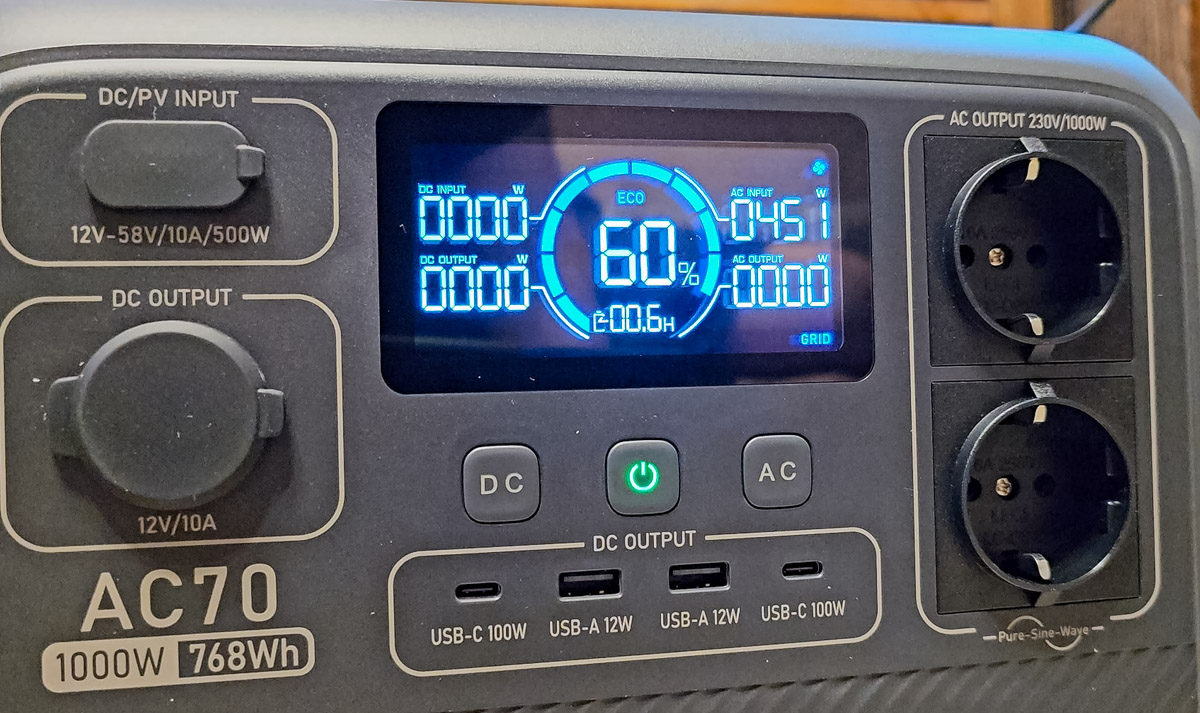
Control menu

Navigation through the built-in menu is done using the 5-way joystick located at the back of the monitor (on the right side when the screen is facing you). Some menu options can also be accessed using quick buttons. The menu itself is quite standard for ASUS monitors, similar to what we’ve seen in models like the VG259Q3A and VG34VQL3A. All monitor settings are divided into six main categories: Games, Image, Color, Input Source, MyFavorite (Favorites), and System Settings.

In the “Games” menu, you can activate the matrix overclocking, adjust the level of Variable Overdrive, enable VRR (which includes G-Sync / FreeSync), turn on ELMB (Extreme Low Motion Blur), display various counters/timers/crosshairs in GamePlus, select a display mode in GameVisual, and activate Shadow Boost. Additionally, you’ll find a QR code linking to the official ASUS website, where you can download Display Widget Center for further monitor customization.

In the “Image” menu, you can adjust the brightness, contrast, sharpness, enable ASCR (dynamic contrast), and activate the blue light filter, as well as adjust the screen format. HDR settings are also found here, but to make them active, you need to enable HDR in Windows itself.

In the “Color” menu, you can choose the color gamut and mode, adjust the color saturation, and fine-tune the gamma settings.

In the “Source Selection” menu, you can manually choose the input signal source for the display, or leave it set to auto-detection mode.

In the “MyFavorite” menu, you can assign specific menus to the quick-access buttons. By default, GamePlus and GameVisual are selected here. Additionally, you can save your custom settings and easily load them when needed.

In the “System Settings” menu, you can change the language of the menu, adjust the volume of headphones or speakers connected to the monitor, enable the Kensington lock function, block certain buttons, modify the menu appearance, choose the DisplayPort version, view system information about the monitor, and perform a full factory reset.

Read also:

Proprietary software

The monitor can also be adjusted using the proprietary ASUS DisplayWidget Center application. This app provides access to some features that are not available in the monitor’s built-in menu, so let’s take a closer look at it.

In the “GameVisual” menu, you can further customize each display mode. Additionally, there’s an AI Visual function, which automatically recognizes what the monitor is displaying at the time and selects the appropriate mode for it.

In the “GamePlus” menu, you can find various counters, metrics, timers, and virtual crosshairs. Essentially, this is the same as what is available in the monitor’s built-in menu.

In the “MultiScreen” menu, you can split the monitor into several independent work areas. This feature is not available in the monitor’s built-in menu.

In the “HotKey” menu, you can assign hotkeys to specific monitor settings. For example, you can adjust brightness, sharpness, and contrast directly from the keyboard. You can also enable the feature to call up and navigate through the built-in monitor menu using the keyboard.

In the “App Tweaker” menu, you can select specific applications and assign them individual display modes. When the chosen application is launched, the monitor will automatically switch to the selected mode.

In the “System Settings” menu, you can enable HDR, hide the taskbar, switch between Windows themes, and change power modes.

In the “Device Info” menu, you can view the serial number, firmware version, and current settings of the monitor.

In the “Application Settings” menu, you can change the application’s language, set the update mode, enable automatic startup of the application, and download the service information log. Additionally, by clicking on “FAQ / User Manual,” the application will redirect you to the official ASUS website with the user manual.

Conclusions

In conclusion, I can only repeat what I said at the very beginning of the review: the ASUS ROG STRIX XG259CMS is an excellent monitor for 1080p gaming in the price range of $359 / €343. It offers fast response time, clear picture quality, excellent color reproduction, 310 Hz refresh rate, great contrast and brightness, HDR support, G-SYNC / AMD FreeSync, and the ability to adjust the monitor (tilt, height, rotation). As a bonus, it also features the stylish ROG design and various image-enhancing features, such as Shadow Boost and ELMB. For these reasons, this monitor can be confidently recommended to everyone: for gaming, work, studying, casual gamers, beginners, experienced eSports players, and especially for CS enthusiasts.

ASUS ROG STRIX XG259CMS

Read also:

Approved

Bigme B751C review: Finally, Affordable E-Reader With Color E Ink And Android

E-readers are a passion of mine. I love reading, and in 2024, reading is more affordable than ever due to the advent of platforms like Libby. Modern e-readers are also a lot more capable than ever, with hardware that’s more than capable of working with huge PDFs and demanding websites. And on paper, the Bigme B751C sounds like it’s a perfect device for pretty much every kind of reading. Well, is it? Let’s take a closer look.

Price

First of all, what is Bigme? It’s definitely not as big a name as Kindle or even Onyx Boox, but it’s getting there by being aggressive. The company has a lot (and I mean a lot) of models, all of them very competitive price-wise. The Bigme B751C is a good example: at $289.99 USD, it offers more than almost anyone else, adding not only the colour screen to the mix but also a case and a stylus. Compare it with BOOX Tablet Tab Mini C which costs $399.99. That alone is a reason enough to give it a closer look.

Design

This is a small-ish e-reader with a 7-inch screen. Its dimensions are quite standard — I’d say, this is probably the most popular size. The tablet itself has two buttons for changing the pages (or whatever it is you want to use them for), as well as a power button. On the left side housing the buttons there’s also a USB-C port, and on the bottom edge, there’s a SD card slot.

The device is 100% plastic, the colour is dark grey, but the edges are made to look like matte metal. I am not a fan of imitating other materials, which always cheapens the look for me, but overall, it’s a neat-looking reader. The bezels are not too big, and it’s light and sturdy-feeling — well, as sturdy as plastic can feel.

In the box there’s also a case — always a welcome bonus. The case is also plastic, but it looks and feels pretty nice, making the device feel slightly more premium.

Read also: Onyx Boox Darwin 8 e-reader review: Practical and recognisable

The screen

The main part, the screen, is interesting. The Bigme B751C features a Kaleido 3 display featuring 300 PPI (black-and-white) and 150 PPI (colour) resolutions. What’s Kaleido 3, you ask? Basically, a technology specifically designed to enhance the colour display capabilities.

My first impression was: this is good. Good, but once again I have to ask if there really is a need for a colour 7-inch display. I get it, colour e-ink is cool and still kind of a novelty, and only recently has it started going down in price. But even the best colour e-screens that are available to the public are a bit underwhelming. And for an e-ink reader, the Bigme B751C is very good. Its capable, fast screen does the job beautifully. And yet, I have to wonder what are the applications for colour here.

I like reading magazines and comic books as much as the next guy, but not on a 7-inch tablet. This size is good for manga, but the irony is, that manga is black-and-white anyways! And for magazines or comic books, no matter how I tried, the screen is just not big enough.

The Bigme B751C is great for web surfing — well, as good as an e-ink device can be. The screen is one of the fastest I’ve tried yet, and the pre-installed browser is surprisingly decent (nothing stops you from installing your browser of choice, of course). If you enjoy reading internet articles on a paperlike screen, the Bigme B751C will suit it just fine. Just remember that even the best colour e-ink technology can be underwhelming to someone used to LCD screens. The colours are very subdued and never “pop.”

But back to traditional reading: I don’t know about you, but I mostly read standard, black-and-white and mostly imageless books. I know, boring. Is the Bigme B751C a good device for that? 100%. 300 PPI is the sweet spot for a screen of this size, meaning each letter is smooth without any noticeable pixels. Changing the pages is fast, too. There is a pre-installed reading app that’s more than capable, but if you want, you can install anything from Google Play. One more positive that comes from a colour screen is that controlling Android apps that are not optimized for a monochrome screen is much easier.

Unfortunately, for me, there’s a big downside that spoils my reading enjoyment somewhat — performance without backlight. One of the best things about e-ink for me is that you don’t need a backlight at all if you have enough ambient light. There’s an issue with the Bigme B751C: its screen is a bit dark. Even in a room with enough light, it remains too dark for my comfort, forcing me to turn on the backlight. There’s nothing wrong with the two-tone backlight here (and in fact, it has German Rheinland certification with an index score of 86), but that’s not the point: the point is, the screen is dark, making it a lot less paperlike that I would have liked.

Read also: reMarkable 2 review — Proudly Limited

Bigme B751C and ONYX BOOX Edison

And to drive the point home, here’s a comparison with the ONYX BOOX Edison, my reader of choice that I’ve been using for the past two years. You can see how much lighter its screen is. Now, maybe that’s due to the Bigme B751C having a colour screen, I don’t know. But this is how it compares both with the Edison and a real book.

Most of the time I read in the dark which makes it a non-issue for me, and when I am reading outside, it also stops being a problem. But reading inside without a bright light source right beside you is not possible.

It it the best screen I’ve ever tested? Not quite. In some ways, it’s spectacular, and in some, not as paperlike as I would have liked. There’s a noticeable texture to it, and the dimness is a bit of a worry, but overall, the technology here is impressive.

Software and Hardware

This part here is the second most important one. I’ve dealt with a ton of similar devices from China, and software is where they usually score the least. And when you first turn on the Bigme B751C, it looks like what you might expect: overly busy UI, some garbage apps no one would use, as well as less than stellar English. But after 20 minutes, all my fears were largely gone. Seems like in the past year, Bigme has done its homework, massively improving its OS and English specifically. Gone are mysterious terms that made no sense; now 98% of the time you will have no issues understanding what everything does. Now, I can’t say how good it is with other languages: I also tried Ukrainian and it’s much worse, with chunks of settings not translated at all.

And the busy UI can be easily fixed, because there’s a simplified “tablet” version of it. There’s always a freedom of choice: Bigme prides itself on creating a shell that’s about as free as you want it to be. There’s nothing you can’t rebind, change or modify. The amount of screen settings frightened me, who never had encountered anything like this on an Onyx device.

The settings are vast, and this being an Android 11 device means the possibilities are endless. Install the reading app that you like, or any platform like Libby (my favourite). There are no issues with Google Play whatsoever: you don’t have to “activate” anything like some of the Onyx devices I’ve tested.

And if you have local files, those are fairly easy to transfer too, even without logging in to Bigme’s platform (no thank you, I have enough). I used the Wi-Fi transfer that works exactly like Onyx Boox: it gives you a QR code that can be opened on any device. Drop the files you want, and they will be teleported to the Bigme B751C. Using USB-C to transfer files from my computer turned out to be a challenge though: for some reason, I could not make it work with my MacBook Pro. Android is not the problem — I already have all the necessary drivers.

The device has a few pre-installed apps, some of which are surprising. This is the first e-reader I’ve tried with AI onboard. Seems like it’s a ChatGPT-connected app, but since it asks me for a login, I decided not to try as I don’t really see the point in it here.

There are a lot of apps for note-taking, including a special app for recording meetings. Honestly, it’s easier to say what the Bigme B751C doesn’t do, which isn’t a lot.

The stylus works as intended, but it needs power (one AAAA battery is included — yes, that’s quadruple A). Wacom styluses are not supported, which can be a bummer. You can take handwritten notes just fine, but this is no reMarkable 2.

Read also: Journey Loc8 Passport Finder Wallet Review: Finally, A Wallet I Can Charge

Powering the device is a 2.3GHz octa-core processor, supported by 4GB of RAM and 64GB of internal storage. If needed, users can expand the storage capacity by up to 1TB via external means. The device is equipped with dual-band Wi-Fi and Bluetooth 5.0 for connectivity options. The reader has a 2300 mAh battery, which is more than enough for a reader of that size.

Verdict

The Bigme B751C has a lot going for it. An impressive colour screen for this price is a steal, but reading without a backlight might be a bit of an issue. Software and hardware are impressive: this is an e-ink tablet that works great with websites and has no problems with performance. Overall, it’s a big success for Bigme, which seems to be taking prior criticisms to heart. If you’re looking for an affordable colour e-ink table, the Bigme B751C might be a good bet.