
© ROOT-NATION.com - Use of content is permitted with a backlink.
I continue sharing my experience of building a balcony solar power system in a city apartment. This article focuses on solar panels, which are the main component of a PV system. I will discuss how to choose panel models, which types are more suitable and why, and describe installation considerations specific to balcony setups. I will also include practical tips and observations from using different panel types in real conditions.

Here’s a reminder of the schedule for the weekly articles (links to all published posts will gradually appear here):
- Part 1. Equipment selection: rationale for choosing the EcoFlow Stream platform and an overview of its operating principles
- Part 2: EcoFlow Stream Setup, Basic Configuration, Backup Power, and Scalability
- Part 3: Choosing and Installing Solar Panels. Flexible vs Rigid Panels – Which Are More Efficient? – THIS ARTICLE
- Part 4: Setting Up Efficient Operation of EcoFlow Stream, Automation, and Tips
TABLE OF CONTENTS:
Selection of Solar Panels for a Balcony
In this section, I focus specifically on selecting solar panels for the conditions of a city apartment. In the case of a private house, the situation is significantly simpler: you typically install an inverter with 1–3 MPPT trackers (depending on the number of PV strings you plan to use) and then build series strings using identical panel models.
Panel size and power are chosen based on the specific installation constraints, ideally aiming for the maximum feasible output. The key requirement is to stay within the voltage, current, and power limits of each controller, and to ensure compliance with the overall specifications of the inverter.
In the case of an apartment, the situation is considerably more complex. A number of factors need to be considered from the outset, along with various practical constraints and details. Before going further, it is useful to review the basic theory of solar panels, at least at a high level.
Series or Parallel Connection of Panels
Solar panels in groups (strings) can be connected in two main ways:
- Series connection – used with panels of the same rating, preferably the same model. Partial shading should be avoided, since the weakest panel reduces the output of the entire string. In this configuration, the MPPT input characteristics are as follows: total power equals the sum of all panels, voltage equals the sum of panel voltages, and current remains the same as that of a single panel.
- Parallel connection – allows mixing panels of different ratings and is more tolerant of partial shading, as a weaker panel has less impact on the rest of the system. In this configuration, the MPPT input characteristics are: total power equals the sum of all panels, voltage remains the same as that of a single panel, and current equals the sum of the panel currents.
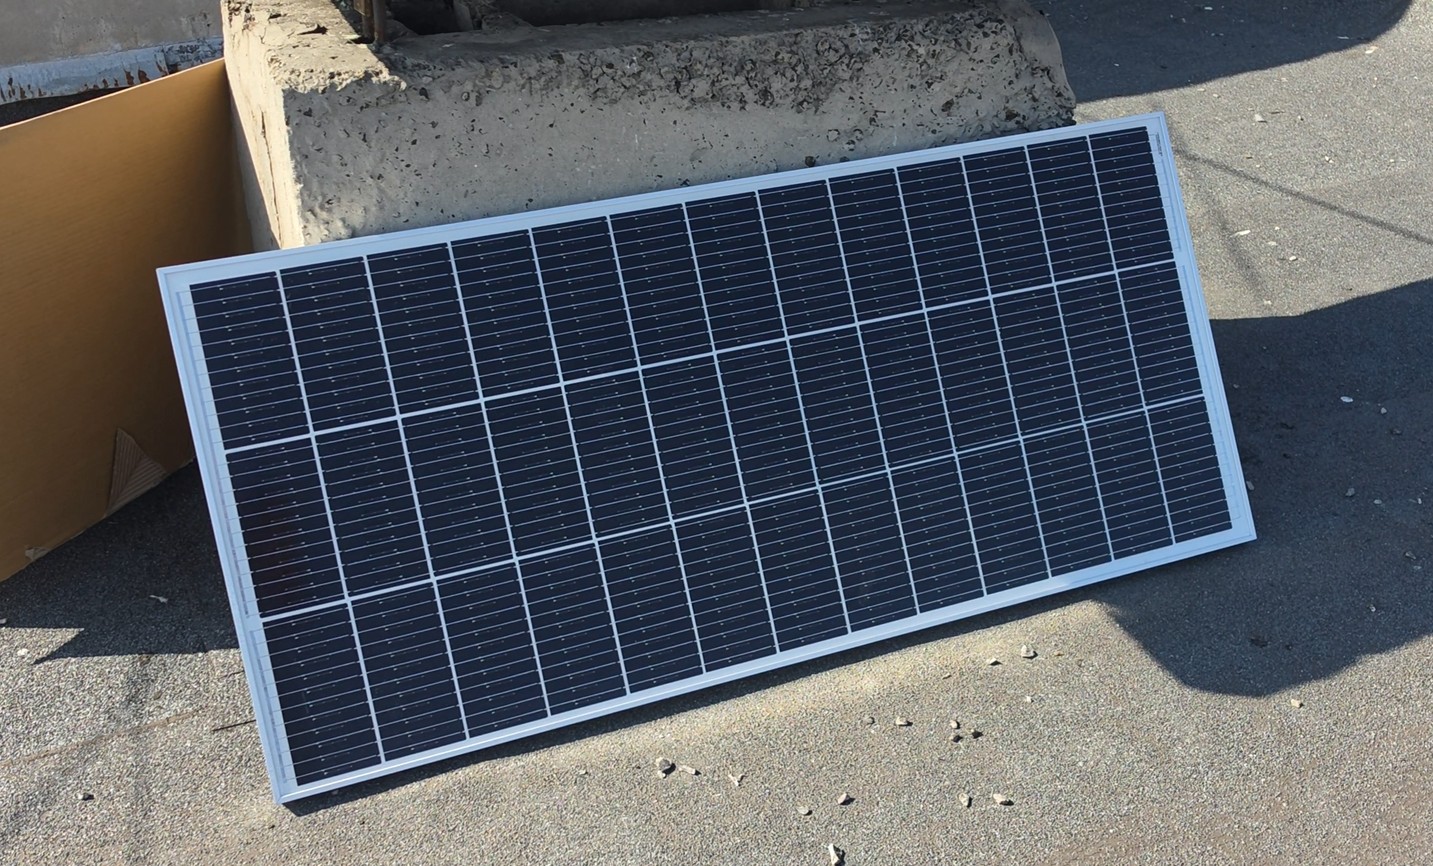
Monocrystalline vs Polycrystalline Solar Panels
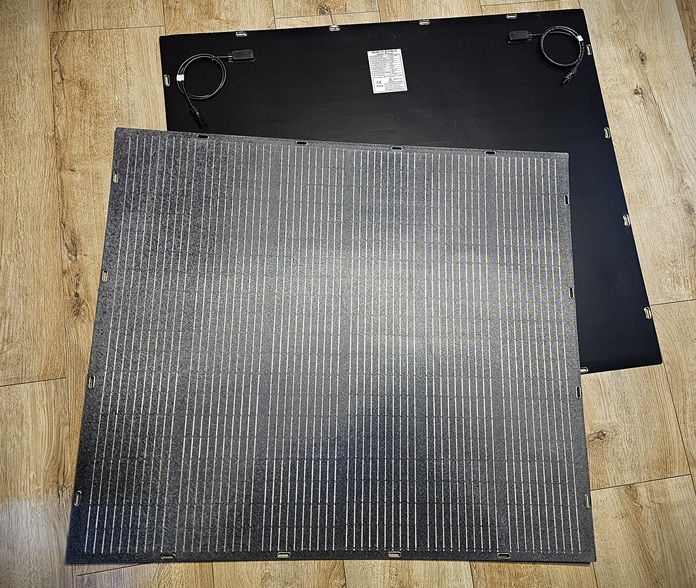
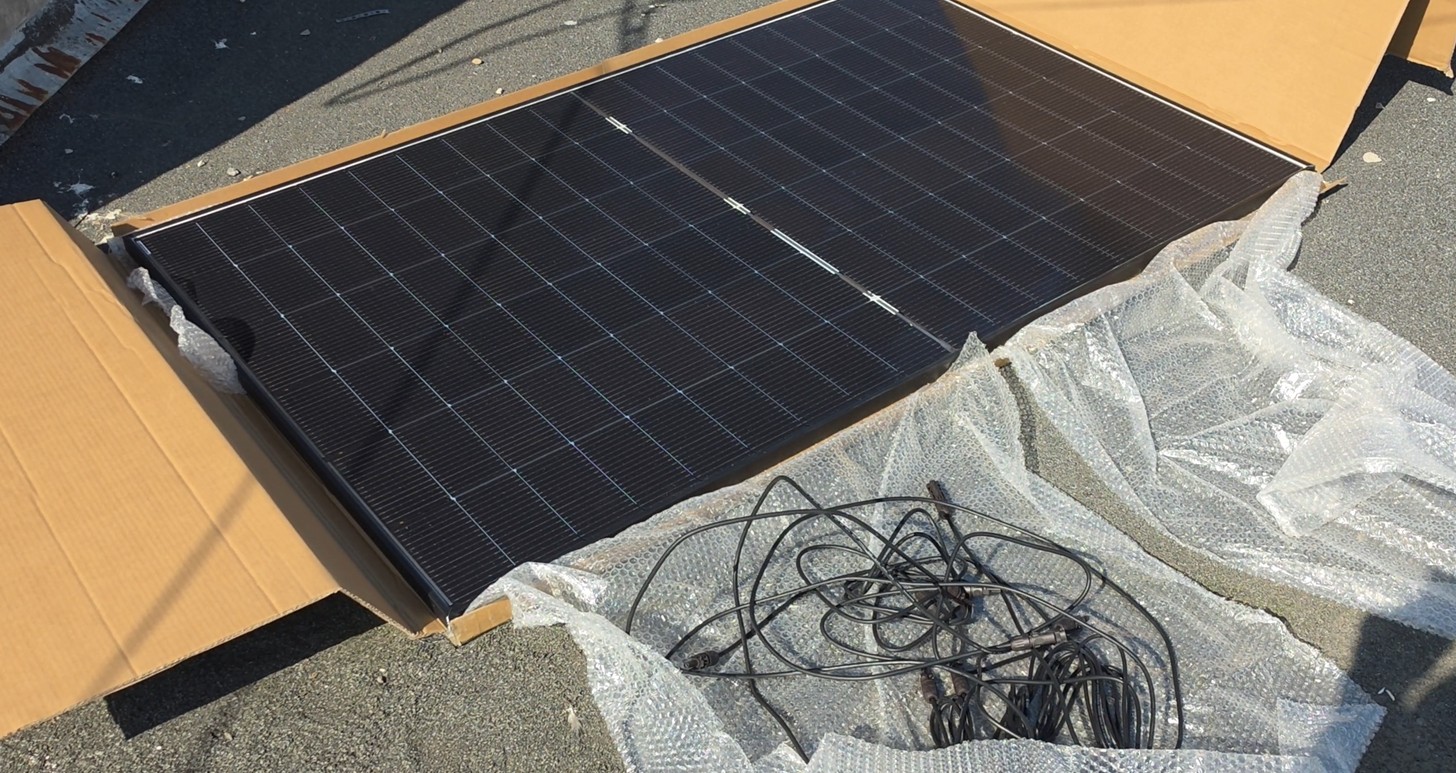
There are two main types of photovoltaic panels on the market in terms of manufacturing technology: monocrystalline and polycrystalline. The first type is generally more efficient and offers higher conversion efficiency, while the second is typically less expensive. However, the final pricing does not always follow this pattern. For example, large monocrystalline panels in the 400–600 W range can cost as much as flexible or foldable polycrystalline panels rated at 150–200 W. In addition, specialized portable or “touring” panels are usually significantly more expensive regardless of the cell technology used.
It is also common for sellers – either intentionally or due to lack of expertise – to label polycrystalline panels as monocrystalline in product descriptions. A quick way to distinguish between the two is by appearance: monocrystalline panels are typically black, while polycrystalline panels have a bluish tint.
In general, if budget and installation conditions allow, monocrystalline panels are usually the preferable choice. However, in cases where budget is limited or installation constraints do not allow for large monocrystalline modules, polycrystalline panels may represent a more practical and justified option. The decision should ultimately be based on the specific use case and constraints.
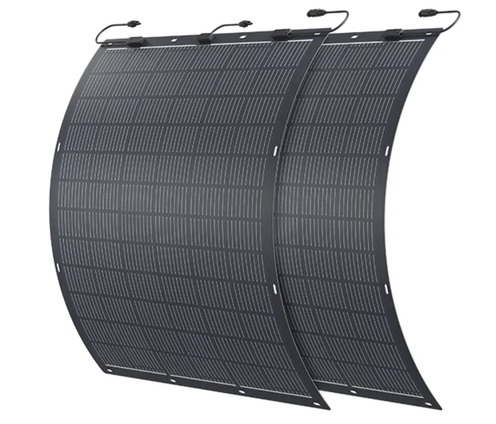
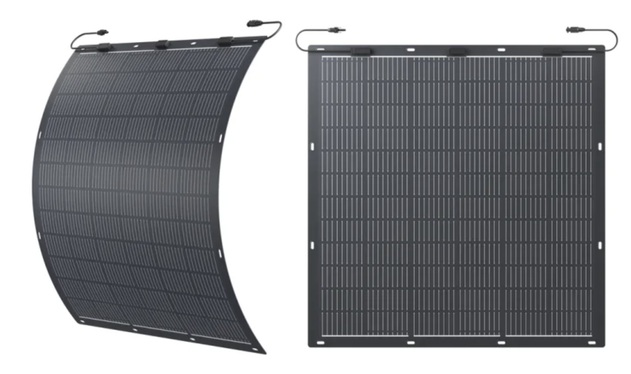
Flexible vs. Rigid Fixed Solar Panels
I will state my main conclusion upfront, based on practical testing, since I operate both flexible and rigid panels in real conditions. From the perspective of energy yield per unit area, when using the same cell technology and under identical conditions (solar irradiance, tilt angle relative to the sun, and ambient temperature), the performance of flexible and rigid panels is approximately the same. The difference is generally within measurement error.
Of course, there are certain nuances that stem from structural differences. For example, rigid bifacial panels can, in some cases, generate output that exceeds their nominal rating due to additional light capture from the rear side. Flexible panels cannot achieve this. However, in general terms, both types perform at a broadly comparable level under similar operating conditions.
There are, however, more significant parameters that influence panel selection, with cost being the primary one. The average price of a rigid framed solar panel in the 450–500 W range is around 100 USD. If circumstances allow, it is generally preferable to choose such panels, as they provide the highest power output per unit cost. At present, flexible panels are typically around 2–3 times more expensive per watt compared to rigid modules.
Installation methodology is another important factor. Rigid panels are easy to mount on roofs using standardized systems – mounting rails, end clamps, and mid clamps. This represents a well-established installation process that can be carried out without specialized requirements. For large-scale PV systems with extensive solar arrays, rigid panels are effectively the only practical option; flexible panels are not a reasonable choice for such installations. In other words, for a private house setup, the decision is generally straightforward. However, apartment conditions introduce a completely different set of challenges.
If you have the option to install large rigid panels on a façade or roof, that is generally the best technical solution, and it is reasonable to follow that path. At the same time, it is important to understand that mounting 20–30 kg panels on a building façade typically requires professional high-altitude installation services. In many cases, the cost of such work may exceed the price of the panels and additional materials.
This is where the main advantage of flexible panels becomes relevant: they are lightweight and much easier to handle. They do not require heavy-duty mounting structures like rigid modules. In practice, it is often possible to install flexible panels on a balcony façade or beneath windows without specialized equipment. However, it is still preferable to perform installation with two people. In my case, the installation was done together with my partner.
Another important consideration is space utilization. If you need to maximize the available surface area on a balcony façade, it will often accommodate only one large rigid panel in the 400–600 W range. If you then try to add smaller panels to fill the remaining space, these would likely need to be connected to separate MPPT inputs.
For a typical low-cost hybrid inverter (which is likely to be relatively compact in a balcony setup), there is often only one MPPT controller for PV input. In such a case, system expansion becomes limited at that point. There are, of course, alternative approaches – such as using several smaller panels (typically at a higher cost per watt), or configuring parallel connections. However, both options may introduce constraints, particularly related to maximum charging current limits.
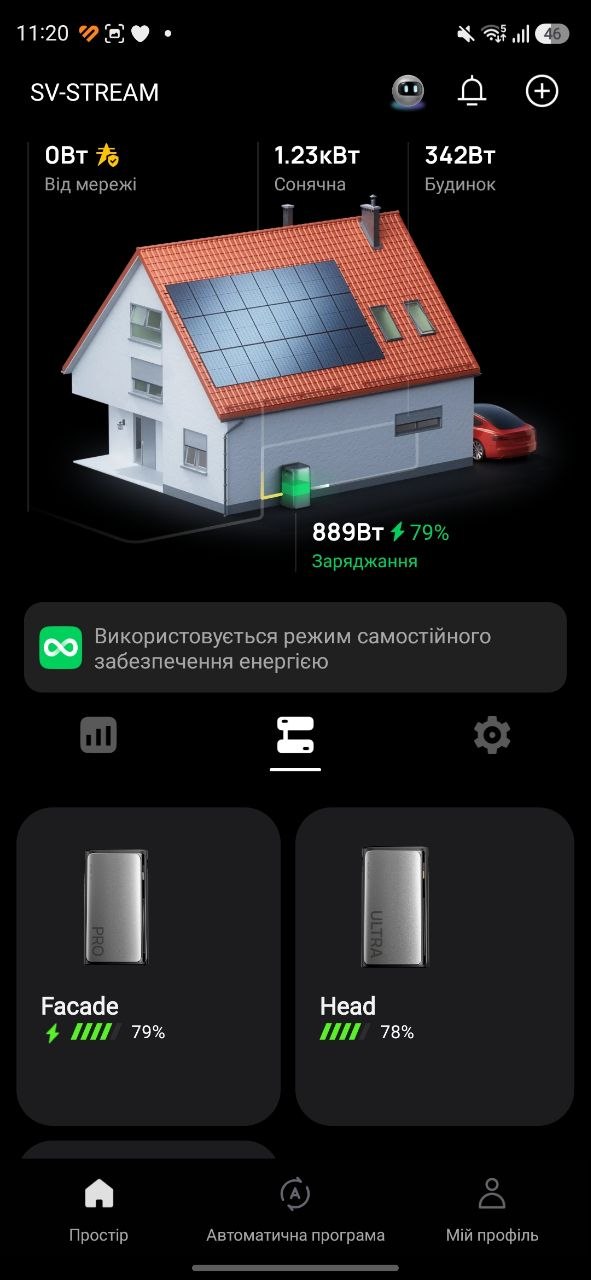
Accordingly, this was also one of the key reasons I chose the EcoFlow Stream platform, as it provides 3–4 MPPT inputs (depending on the model – Pro or Ultra), which makes it suitable for working with a heterogeneous mix of different panel types. The main requirement is to stay within the limits of a single controller: 500 W, 60 V, and 14 A.

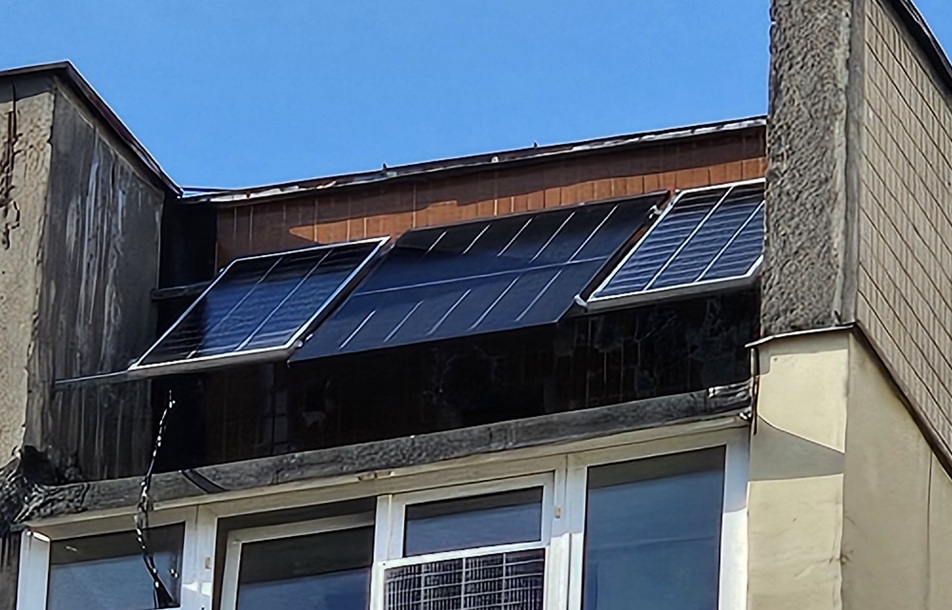
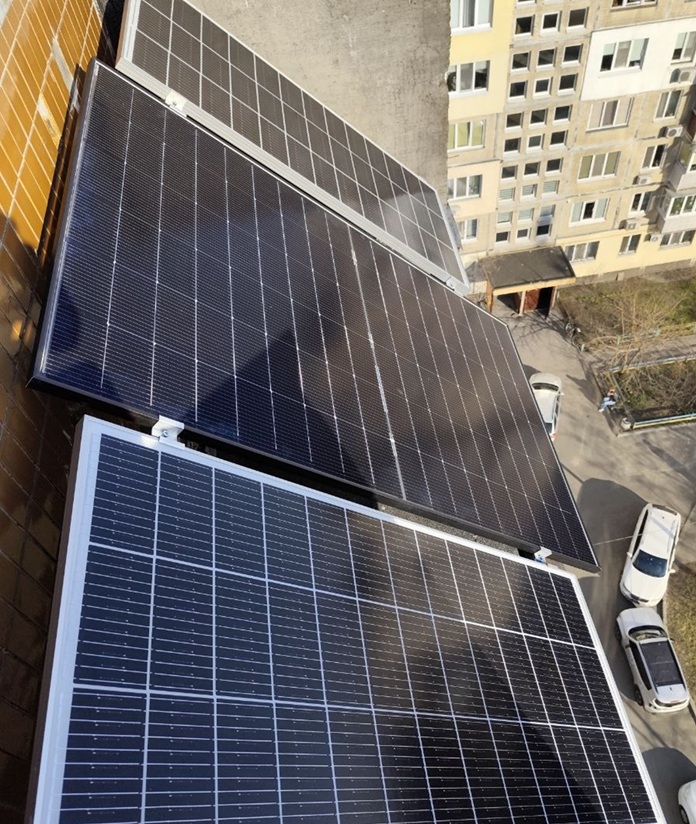
Let’s move on to the practical part. As you can see in the example of my balcony, I have filled the available façade space almost to its maximum, and the entire installation was completed independently. In terms of overall system cost, although I paid more for the panels themselves, I simultaneously reduced expenses on additional mounting materials and professional installation services.

At the bottom, I installed two 210 W flexible Growatt panels connected in series. They are connected to a single MPPT input. EcoFlow generally does not recommend series connections in order to avoid exceeding the input voltage limits. However, this is primarily a protective guideline intended to prevent user errors. Series connection can be used safely as long as the voltage, current, and power limits are not exceeded. In this configuration, the combined output is: 210 + 210 = 420 W total power, 22 + 22 = 44 V total voltage, while the current remains 9.54 A, the same as for a single panel. These values remain within the specified limits.
A similar situation applies to the panels installed on the window sections. These are two flexible Volt Polska MONO FLEX 140 W panels. The combined configuration results in: 140 + 140 = 280 W total power, 18.72 + 18.72 = 37.44 V total voltage, while the current remains 7.48 A. This setup also stays within the allowable limits, so the two panels are connected in series to a single controller input.

The third smaller panel visible on the façade is a flexible 100 W EcoFlow panel. I did not purchase it; I borrowed it from a friend for temporary use. It was installed to fill the remaining available space on the façade.

Accordingly, all of these panels have a combined nominal capacity of 800 W and are connected to a single EcoFlow Stream Pro unit, occupying all three available MPPT inputs.

If we compare my setup with a hypothetical installation of rigid panels on the balcony façade, it is unlikely that I would have been able to achieve a higher total PV capacity at this location. In addition, I would have needed to purchase or order a heavy supporting structure and hire installers for high-altitude façade work.
From practical experience, this is currently a significant challenge. Finding contractors for such small-scale installation work is difficult, since the volume of work is limited. For installing just one or two panels on a multi-storey building façade, contractors often either refuse the job or charge a price comparable to installing a full array of panels. These costs largely eliminate the price advantage of rigid panels over flexible ones. Based on my calculations, using rigid panels would have resulted in higher overall expenses than the current flexible-panel setup that I installed myself.
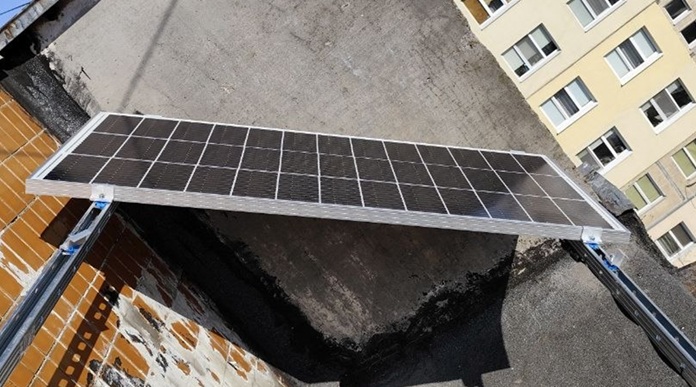
However, for the next installation area – above the balcony roof – I was able to use rigid panels without issues. In this section, I installed one JA Solar JAM54D40-460/LB 460 W panel and two no-name 150 W panels. At this stage, I followed a more conventional approach, using two mounting rails with the panels installed at a 45° angle using standard clamps. The installation was carried out by two professional installers equipped with safety gear for working at height. The cost of the installation service at that time was roughly equivalent to the price of the panels themselves.
Read also: EcoFlow Trail 200 DC and Trail 300 DC Mini Power Stations Review: Worth Every Penny
Mounting Flexible Solar Panels on a Façade – Methodology and Practical Tips
If, after my previous explanation, you decide to install flexible panels on your balcony façade yourself, I will share my personal experience. In this case, several simple but effective engineering solutions were applied, which may be useful in similar setups.
The first challenge is how to secure the panels without drilling into the balcony structure. This is especially relevant if you are renting the property. The idea was suggested by a Threads user – andrii.nazarenko:

The idea of top mounting through the drainage holes in plastic window frames seemed genuinely practical, so I implemented it with a few minor modifications:

All materials were purchased at a local hardware store: L-shaped bolts, mounting profiles, washers, and nuts. I also used an aluminum tube to extend the profile slightly forward beyond the window sill. The installation process is relatively fast, and the resulting structure is lightweight and reliable. In practice, this is a very effective solution that can be implemented independently, especially if your balcony is enclosed with PVC (plastic) windows.


In principle, once such a profile is installed outside the window, it becomes possible to temporarily hang lightweight foldable portable panels or flexible panels – simply using carabiners. For seasonal PV setups or rented apartments, this can be a workable solution. If needed, the mounting profile can also be easily disassembled and moved to another location.

However, I went a bit further, since my installation is not a temporary one. To secure the lower part of the installed panels, I prepared two 210 W flexible panels and connected them together using plastic cable ties. I then threaded a steel cable with a polypropylene sheath through the lower mounting holes. The cable length should be calculated so that, once the panels are fixed at the top to the mounting profile, the cable ends remain accessible inside the balcony. I will explain later why this is necessary and how these ends are used.

Next, I attached metal brackets to the mounting profile and fixed the upper part of the panels to these brackets using bolts and wing nuts. Wing nuts were chosen because they can be tightened manually without tools. As a result, the upper part of the structure became fairly rigid and mechanically stable.


Moving on to securing the lower part of the panels. For this purpose, I drilled two holes in the lower part of the balcony wall, directly below the panel attachment points where the ends of the steel cable exit. It is preferable to drill these holes with a slight downward angle to create a natural drainage path for moisture. Next, I extended a wire loop outside the balcony through the opening. A washer was pre-installed on the cable, then the cable end was threaded through the loop and pulled back inside the balcony from both sides. The cable was tensioned through the aluminum tube and fixed using rigging hardware. If necessary, the openings can later be sealed and filled with foam to improve thermal insulation.


Overall, the structure remains fairly flexible, but it has proven to be very stable even under strong gusts of wind, including during storm warnings. This has been confirmed through repeated real-world testing. The lower fixation prevents the bottom edge of the panel from lifting. The panel does not behave like a sail in the wind; instead, it is pressed against the balcony wall. By adjusting the length of the aluminum tube, I can change the projection of the lower edge of the flexible panel, which helps optimize the tilt angle relative to the sun. In cases of very strong wind, the lower edge can simply be pulled fully against the balcony wall.
In general, I consider this mounting approach viable, although it can certainly be improved. If you experiment with similar solutions, it would be useful to share results or improvements. One adjustment I would likely make in hindsight is adding more fixation points for each panel. For example, additional fasteners at the junction between two panels or at intermediate lower mounting holes would reduce flexing in the middle section. That said, in practice, even two-point fixation at the panel edges has been sufficient.
Users can adapt the concept as needed – additional mounting points can be added at every lower hole if required. It is also possible to reinforce the lower edge of the panels with a bar or profile to increase structural rigidity. Another important note: if you want to avoid drilling holes for cable routing, consider using flat cables designed to pass under window frames. These allow windows to open and close normally without interference.


Read also: BLUETTI AC200L vs OUKITEL P2001 Plus: comparison of portable power stations
Conclusions and Initial Performance Results
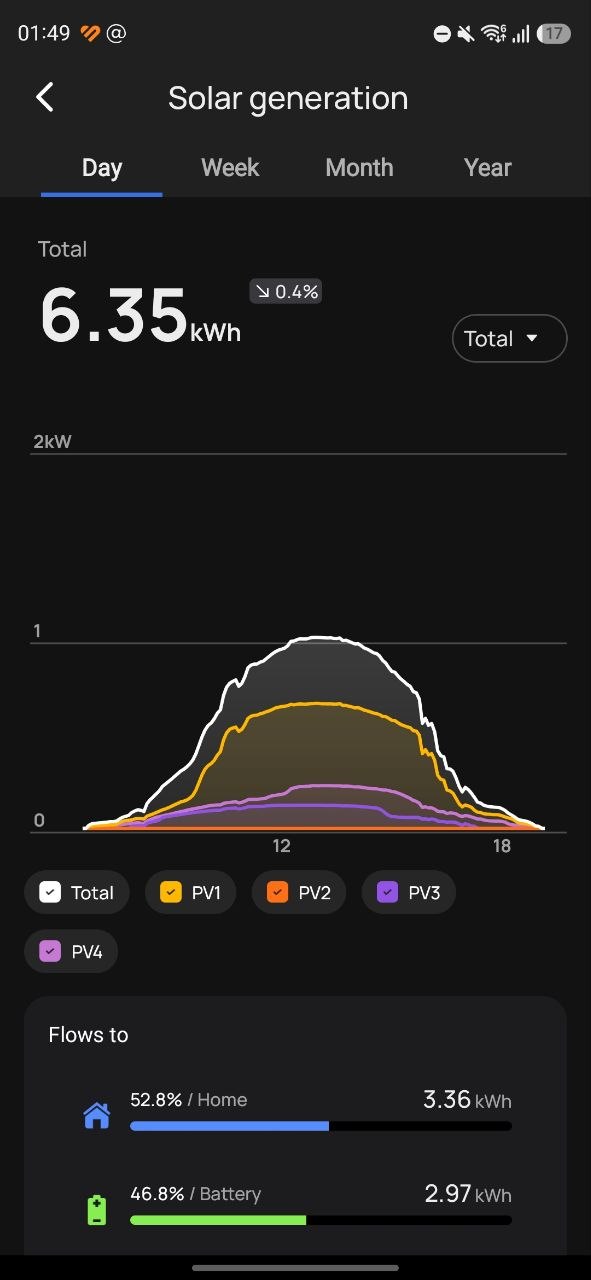
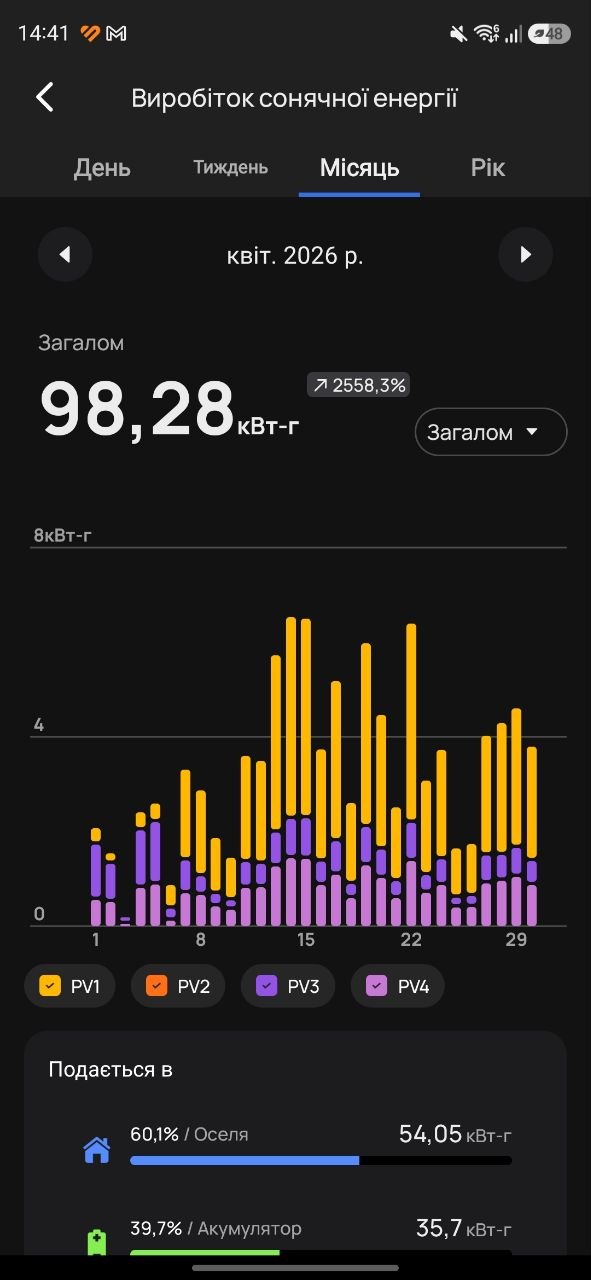
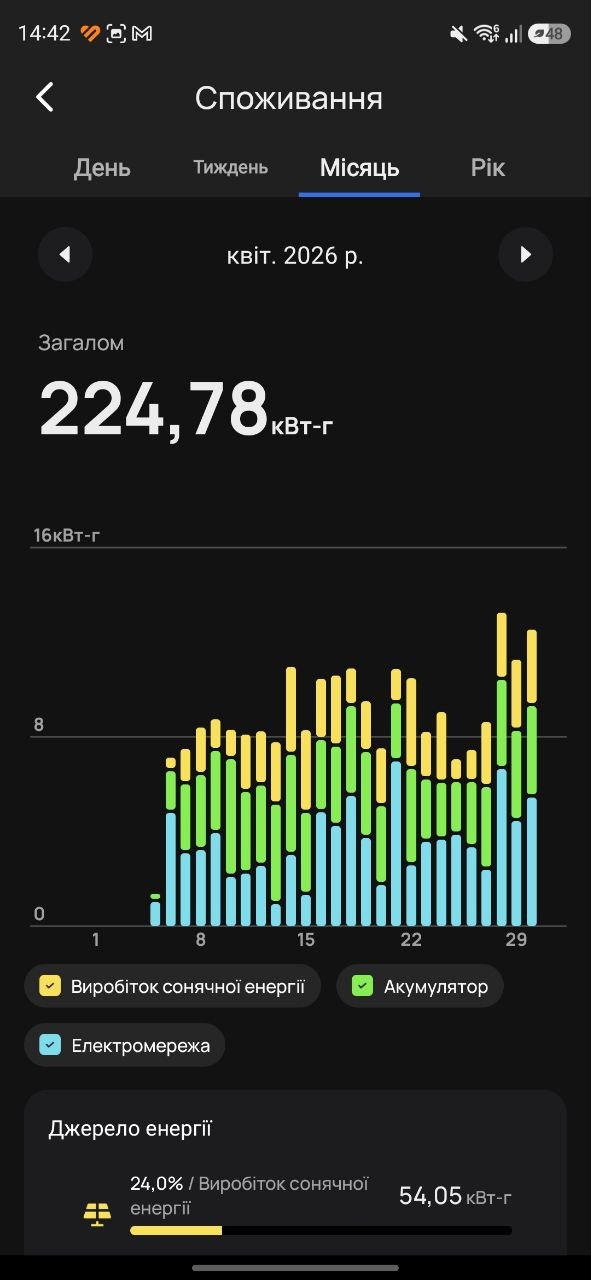
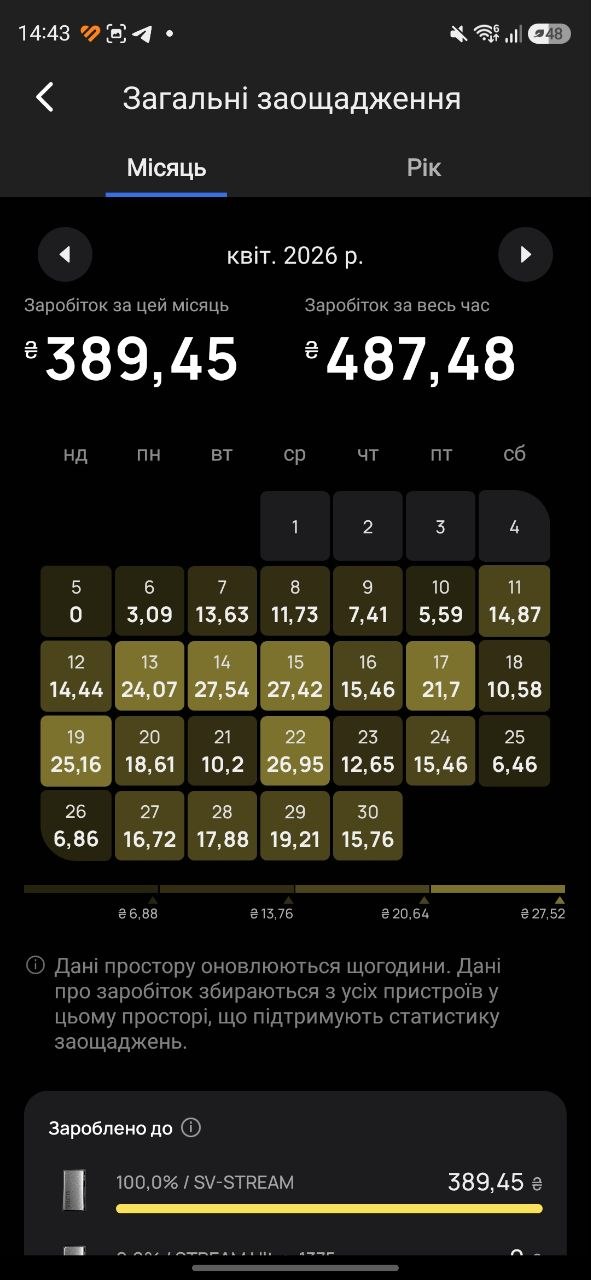
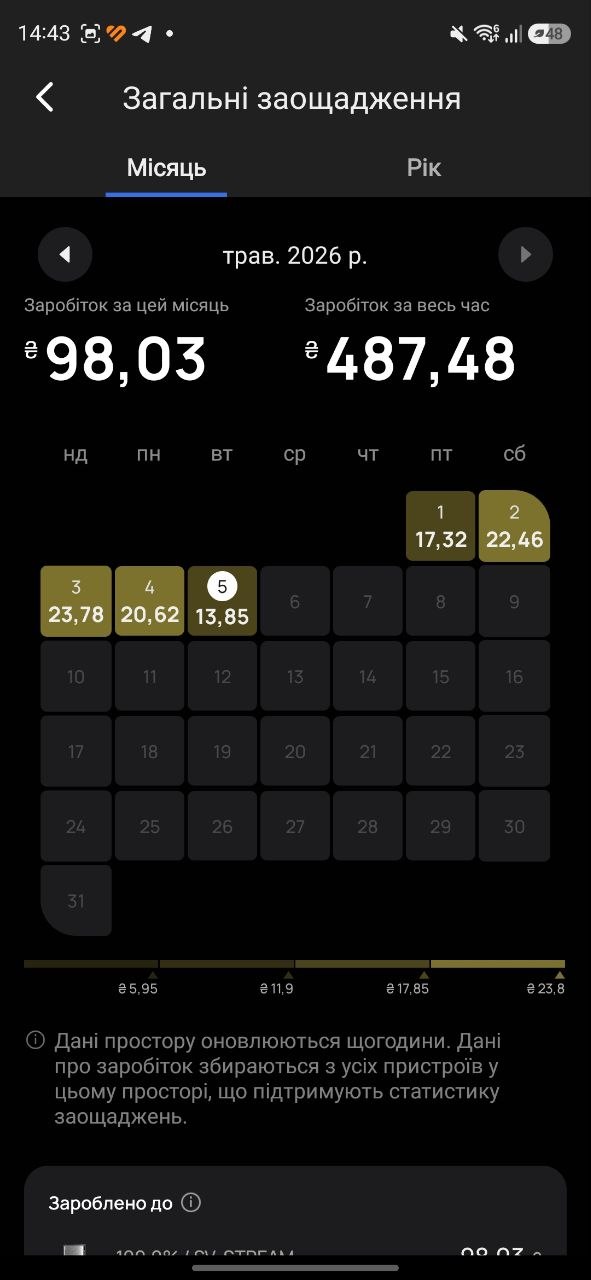
Regarding the performance of my setup, the average energy output of the PV system with this panel configuration is slightly above 6 kWh on a sunny day. Under cloudy conditions with occasional sunlight, the output is around 3–4 kWh per day. Even in poor weather and during rain, it is still possible to generate approximately 1–2 kWh of electricity. Overall, the results are reasonably good. Given an average daily household consumption of 10–12 kWh, this setup provides a noticeable reduction in electricity costs and a meaningful level of partial energy independence. In the event of a complete grid outage, it is still sufficient to cover basic loads for critical household devices.
By the way, if you have your own ideas, solutions, or real-world cases for quickly and simply mounting flexible panels on a balcony wall, feel free to share your designs. I’m confident this would be useful for other readers.

Stay tuned. If you have any questions about the Stream system, or about selecting and installing solar panels on an apartment balcony, you can leave them in the comments under this post or reach out via the social networks where I actively share updates on this project: X (Twitter), Theads.
See you next week.
All reviews of portable power stations and home backup powersystems on our website: read here
Thank you, a really useful article for me!