
© ROOT-NATION.com - Use of content is permitted with a backlink.

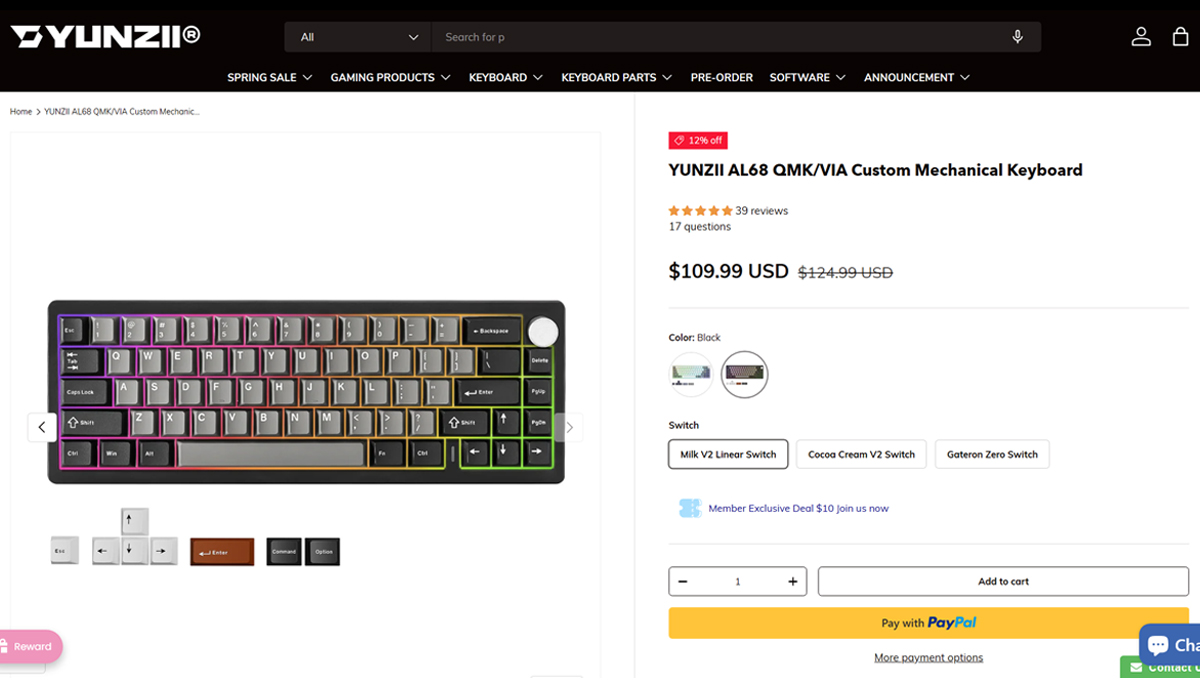
Recently, I explored YUNZII’s line of mechanical keyboards housed in full aluminum cases, having reviewed the AL65 and AL80 models. Today, I’m continuing with another device from this series – the new YUNZII AL68. This is an ultra-compact 65% keyboard featuring an aluminum frame and a multifunctional rotary knob. Essentially, the AL68 can be seen as a variation of the AL65 but without the hollow cutouts, side RGB lighting on the case, and with the addition of the multifunctional knob. In other words, it’s the same keyboard with a more classic, minimalist design.
As for the rest of the features, there aren’t many changes: it offers three connection modes, supports QMK/VIA firmware, uses a gasket mount design, has hot-swappable switches, comes with pre-lubricated switches and stabilizers, includes quality double-shot PBT keycaps, delivers a solid typing experience, and comes at an affordable price. Looking ahead, I can say that I liked the keyboard, especially for its minimalist design. Because of this, I’d expect it to appeal primarily to users who want a classic 65% keyboard without extra features like side lighting or built-in displays.
TABLE OF CONTENTS:
Models and specifications
To start, a few words about the YUNZII AL series itself. This is a dedicated line of wireless mechanical keyboards housed in aluminum cases. The build quality is excellent, the materials feel premium, the design stands out, the typing experience is impressive – and all that comes at a relatively affordable price. That’s a fair summary of what the entire lineup offers.
As I mentioned in a previous review, once you try a keyboard with an aluminum case, it becomes harder to look at plastic models the same way. As of now, the YUNZII AL series includes seven models: AL65, AL66, AL68, AL71, AL75, AL75 PRO, and AL80.
You can find detailed reviews of the AL65 and AL80 models via the links above. Now, let’s take a closer look at the AL68. As for the AL66 – it’s already on my desk, waiting its turn for testing. Below, I’ll outline the key technical specifications of the YUNZII AL68 to give you a clearer picture of the device.
- Model: YUNZII AL68
- Format: 65%
- Number of keys: 66 keys
- Connection: wireless (RF 2.4 GHz / Bluetooth); wired (USB-C)
- Switches: YUNZII Milk V2 Linear Switch, YUNZII Cocoa Cream V2 Switch, Gateron Zero Switch
- Hotspot: yes (3-way and 5-way switches are suitable)
- Design: Gasket Mount
- Anti-Ghosting: yes
- #KRO: N-KRO
- Keycaps: Double-Shot PBT Keycaps (Cherry Profile)
- Backlighting: RGB keys, RGB indicator on the case, southern LEDs
- Multifunctional wheel: yes (sound and backlight control)
- Firmware: QMK/VIA support
- Platform support: Windows, MAC, Linux, Android, iOS, Nintendo Switch, XBOX
- Battery: 6000 mAh
- Battery life: 36 hours with backlight on, 96 hours with backlight off
- Cable: detachable USB-A to USB-C 1.8 m long
- Body material: CNC aluminium
- Dimensions: 319.0 × 114.0 × 40.25 mm
- Weight: 1.2 kg
- Model features: Gasket Mount, hotspot, built-in memory, QMK/VIA setup, pre-lubricated switches/stabilisers, RGB backlighting, aluminium body, multifunction wheel
- Package contents: keyboard, detachable USB-A to USB-C cable, 2-in-1 remote control (for keycaps and switches), two spare switches (as in the keyboard), 2.4 GHz RF wireless adapter, set of alternative keycaps (including keys for MAC), blister dust cover, user manual (book and cardboard spread)
Positioning and price
The YUNZII AL68 stands out as the only truly classic keyboard in the YUNZII AL lineup. It features a standard metal case without the cutouts seen on the AL65 or the side lighting found on models like the AL66 and AL71. That straightforward, clean design is exactly what drew me to this model in the first place.
The keyboard is available for purchase both on YUNZII’s official website and on AliExpress. On the official site, it’s priced at $109.99 or €95. As usual, AliExpress offers a slightly lower price – around $98 or €85.

Additionally, YUNZII’s official website offers a barebones version of the AL66 – essentially a customizable base without switches or keycaps – for $85 or €74.
Read also:
- Review of YUNZII RT75 – Mechanical Keyboard with Magnetic Switches
- YUNZII YZ75 PRO Wireless Mechanical Keyboard Review
Package contents
The keyboard packaging follows YUNZII’s usual approach – a stylized sleeve over a black cardboard box containing the main components.
The keyboard itself is basic:
- keyboard
- detachable charging cable
- 2-in-1 pulser
- two spare switches
- 2.4 GHz wireless RF adapter
- set of additional keycaps
- blister dust cover
- user manual
The detachable cable is a standard USB-A to USB-C type, 1.8 meters in length. It comes with a branded Velcro strap to help manage and secure any excess length. The included keycap puller is a dual-purpose tool: one end features metal prongs for removing keycaps, while the other includes a switch puller for hot-swappable switches.
The spare switches included in the box are identical to those pre-installed in the keyboard. In my case, these are YUNZII’s own Milk V2 Linear Switches.
The set includes a small selection of alternative and extra keycaps: a red Enter key, white arrow keys and ESC, as well as a few Mac-specific keys (Command, Option). I especially liked the red Enter key and how well it complements the rest of the keycap set, so I swapped out the standard black Enter right away.
There are two manuals included: a fold-out cardboard guide with key shortcut combinations, and a standard multi-language booklet. Both include English, which is a plus.
The included blister-style dust cover is a very useful accessory that helps keep the keyboard clean when it’s not in use – especially handy if you have pets at home.
Design, ergonomics, build quality
In terms of design, the YUNZII AL68 closely resembles the AL65. However, unlike the AL65, the AL68 features a solid metal case without any cutouts or lighting effects. It also includes a multifunctional rotary knob for adjusting volume and controlling the key backlighting. Additionally, there’s a small indicator strip near the arrow keys on the case, but it’s quite subtle and doesn’t significantly affect the overall design concept.
The available color options for this model, like the AL65, are limited to classic black and silver. The unit I received for review is the black version, so the photos will feature that color.


The first thing you notice when picking up this keyboard is its metal case and substantial weight. Like all keyboards in the YUNZII AL series, the AL68 features a fully aluminum chassis with precisely crafted shapes and well-fitted components. The keyboard itself weighs 1.2 kg.
Inside, the keyboard uses a gasket mount design with comprehensive sound dampening and multiple cushioning layers to provide a quieter and more comfortable typing experience. You can see a detailed view of the keyboard’s internal construction in the screenshot below.
In terms of form factor, the AL68, like the AL65, is an ultra-compact 65% keyboard. Its dimensions are nearly identical to the AL65, measuring 319.0 × 114.0 × 40.25 mm.
The layout follows the standard ANSI format, featuring long Shift keys, a single-row Enter, and an extended backslash key. As with all 65% keyboards, the YUNZII AL68 lacks a numeric keypad (NumPad) and the function key row (F1–F12). However, these functions can be accessed via FN key combinations or by switching keyboard layers. I’ll cover this in more detail in the relevant section later on.
As you’ve probably noticed in the photos, the keyboard lacks a right Alt key, and the right-side FN and Ctrl keys are the same size as their left-side counterparts. It might seem like a minor change, but I found it surprisingly convenient – especially on a 65% keyboard, where FN key combinations are frequently used during work.
The keyboard comes with double-shot PBT keycaps in Cherry profile. These keycaps are well-made: thick plastic, pleasant to the touch, with large, clearly printed legends applied neatly. As is common with many PBT keycaps, the legends do not shine through the backlighting. There are no versions available with additional language layouts or extra symbols. For me, this isn’t an issue, and anyone who needs different keycaps or custom legends can always replace them or add engraving.


Unlike the AL65, the AL68 features a multifunctional rotary knob. You can use it to adjust volume and control the RGB backlighting of the keys. The adjustment modes switch by pressing and holding the knob for about five seconds. Notably, when the mode changes, the indicator strip on the case briefly lights up white, which is a handy visual cue confirming the switch.
The rotary knob itself is also made of aluminum. It feels smooth to the touch and operates silently when turned.
Similar to the AL80 model, the AL68 features a small illuminated strip on the keyboard’s case between the right Ctrl key and the arrow keys. In normal use, it cycles through RGB colors. When connecting the keyboard or switching between Bluetooth devices, the strip flashes corresponding colors to indicate status. In short, it serves as both a functional indicator and a decorative element.
The keyboard’s bottom is also made entirely of aluminum. It features a decorative metal plate similar to the one on the AL80 model, but slightly smaller and in a different color. While this design element looks nice, it serves little practical purpose since it’s mostly hidden while you’re using the keyboard.
The keyboard doesn’t have adjustable feet for changing its tilt – just like the AL80 and AL65 models. Personally, I find its default height and angle comfortable for typing, though some users might feel the AL68 sits a bit high.
The sides of the keyboard are clean and perfectly smooth, with no extra features. At the front, you’ll find the standard USB-C port for the cable and the connection mode switch. Notably, both the switch and the port are located on the underside, which isn’t very convenient. It’s difficult to quickly plug in the charging cable or toggle the connection mode with one hand without lifting the keyboard off the desk. That said, since you probably won’t need to use the switch frequently, this isn’t a major issue.
The build quality matches that of the AL80 and AL65 models – that is, it’s excellent. The keyboard feels heavy and solid, with a monolithic construction that won’t flex or slide easily. The shapes and case elements are precisely executed, and ergonomically it’s well thought out. In short, the keyboard is comfortable to use and generally quite enjoyable overall.
Read also:
- YUNZII B75 PRO Review: Wireless Mechanical Keyboard
- SteelSeries Apex Pro Mini – So Good It’s Almost Cheating
Backlighting
Like the AL80, this keyboard features two separate lighting zones: the keys themselves and a small indicator strip on the case. These zones operate independently, allowing you to turn them on or off and adjust their settings separately. The backlighting itself is vibrant and bright, with smooth animations and a variety of effects available for the keys.
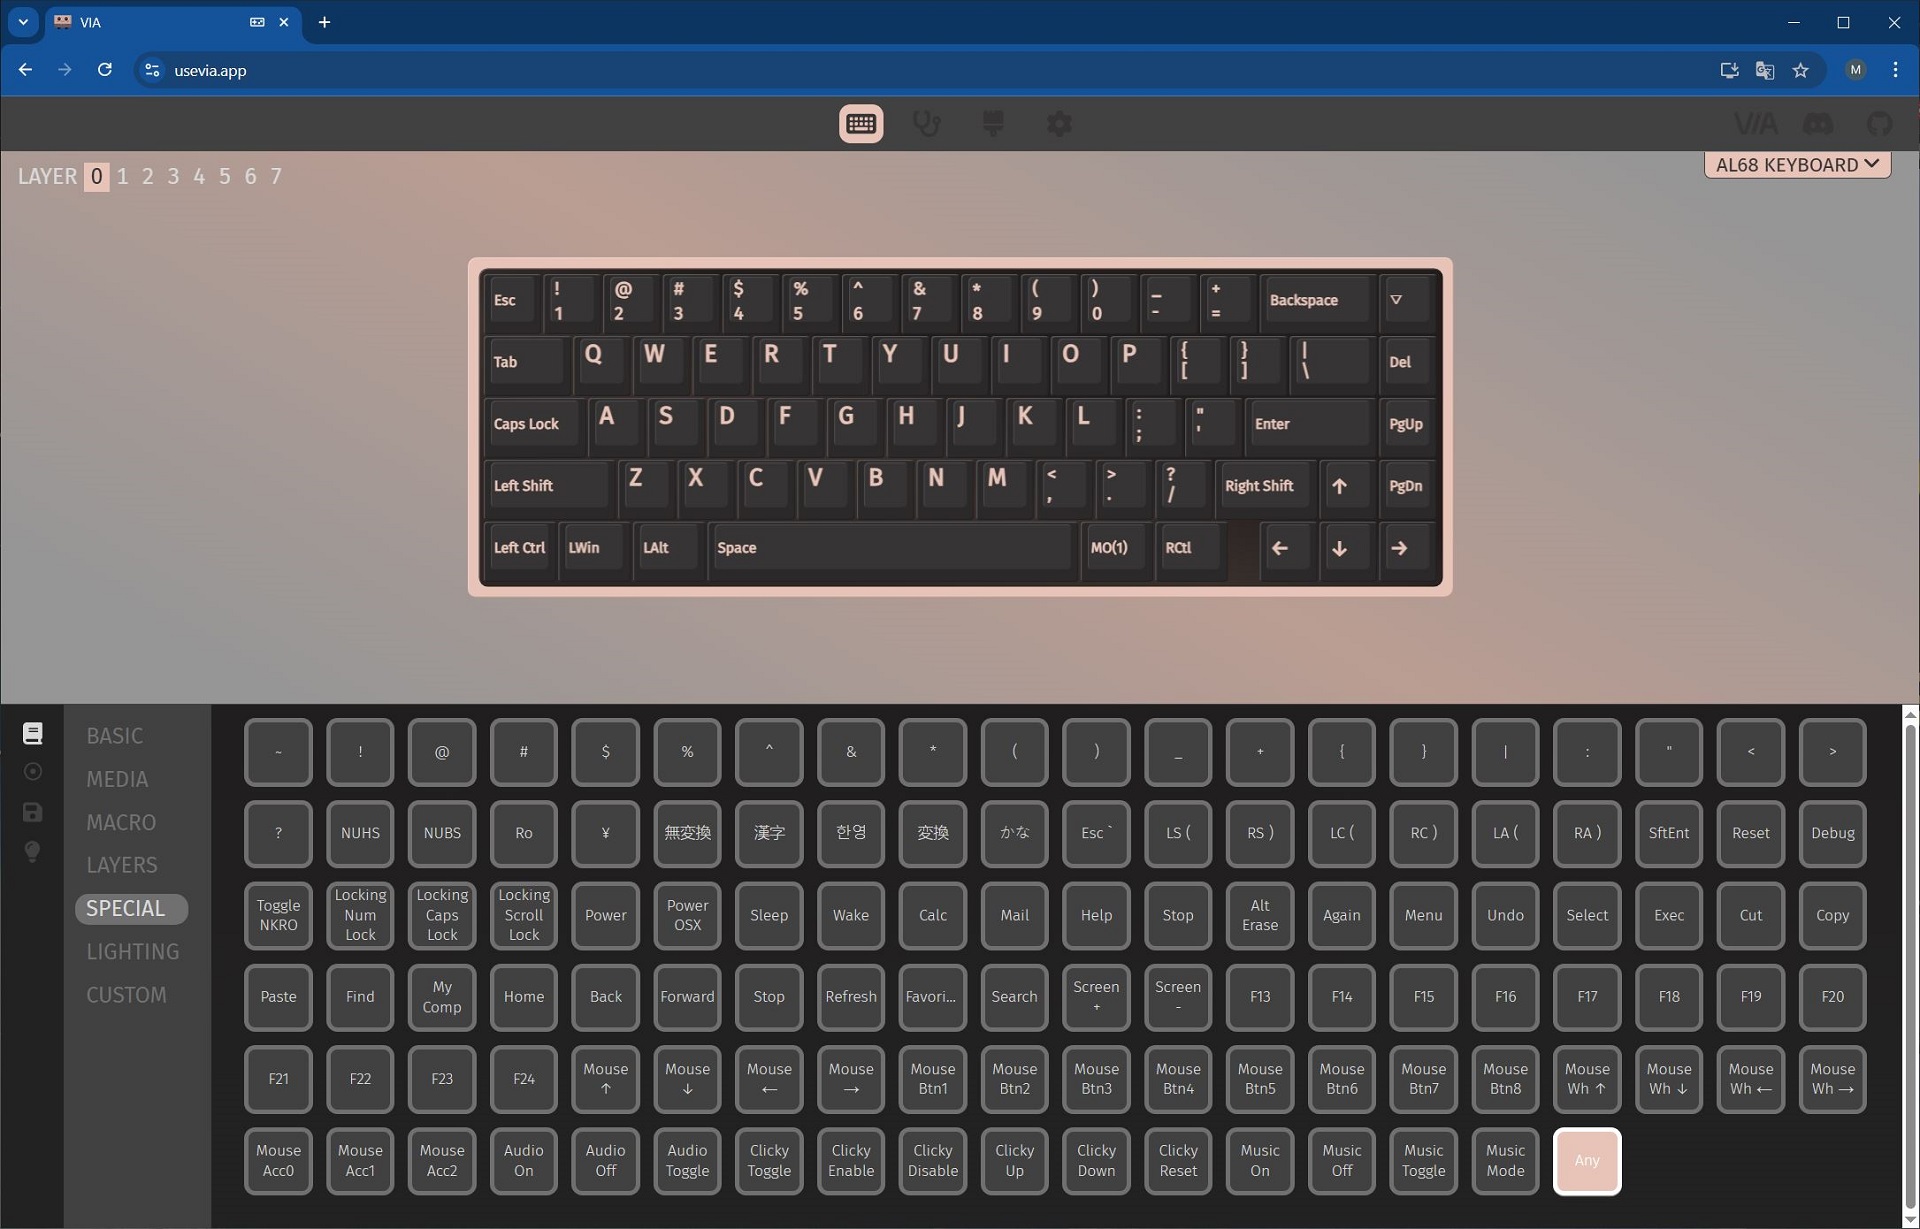
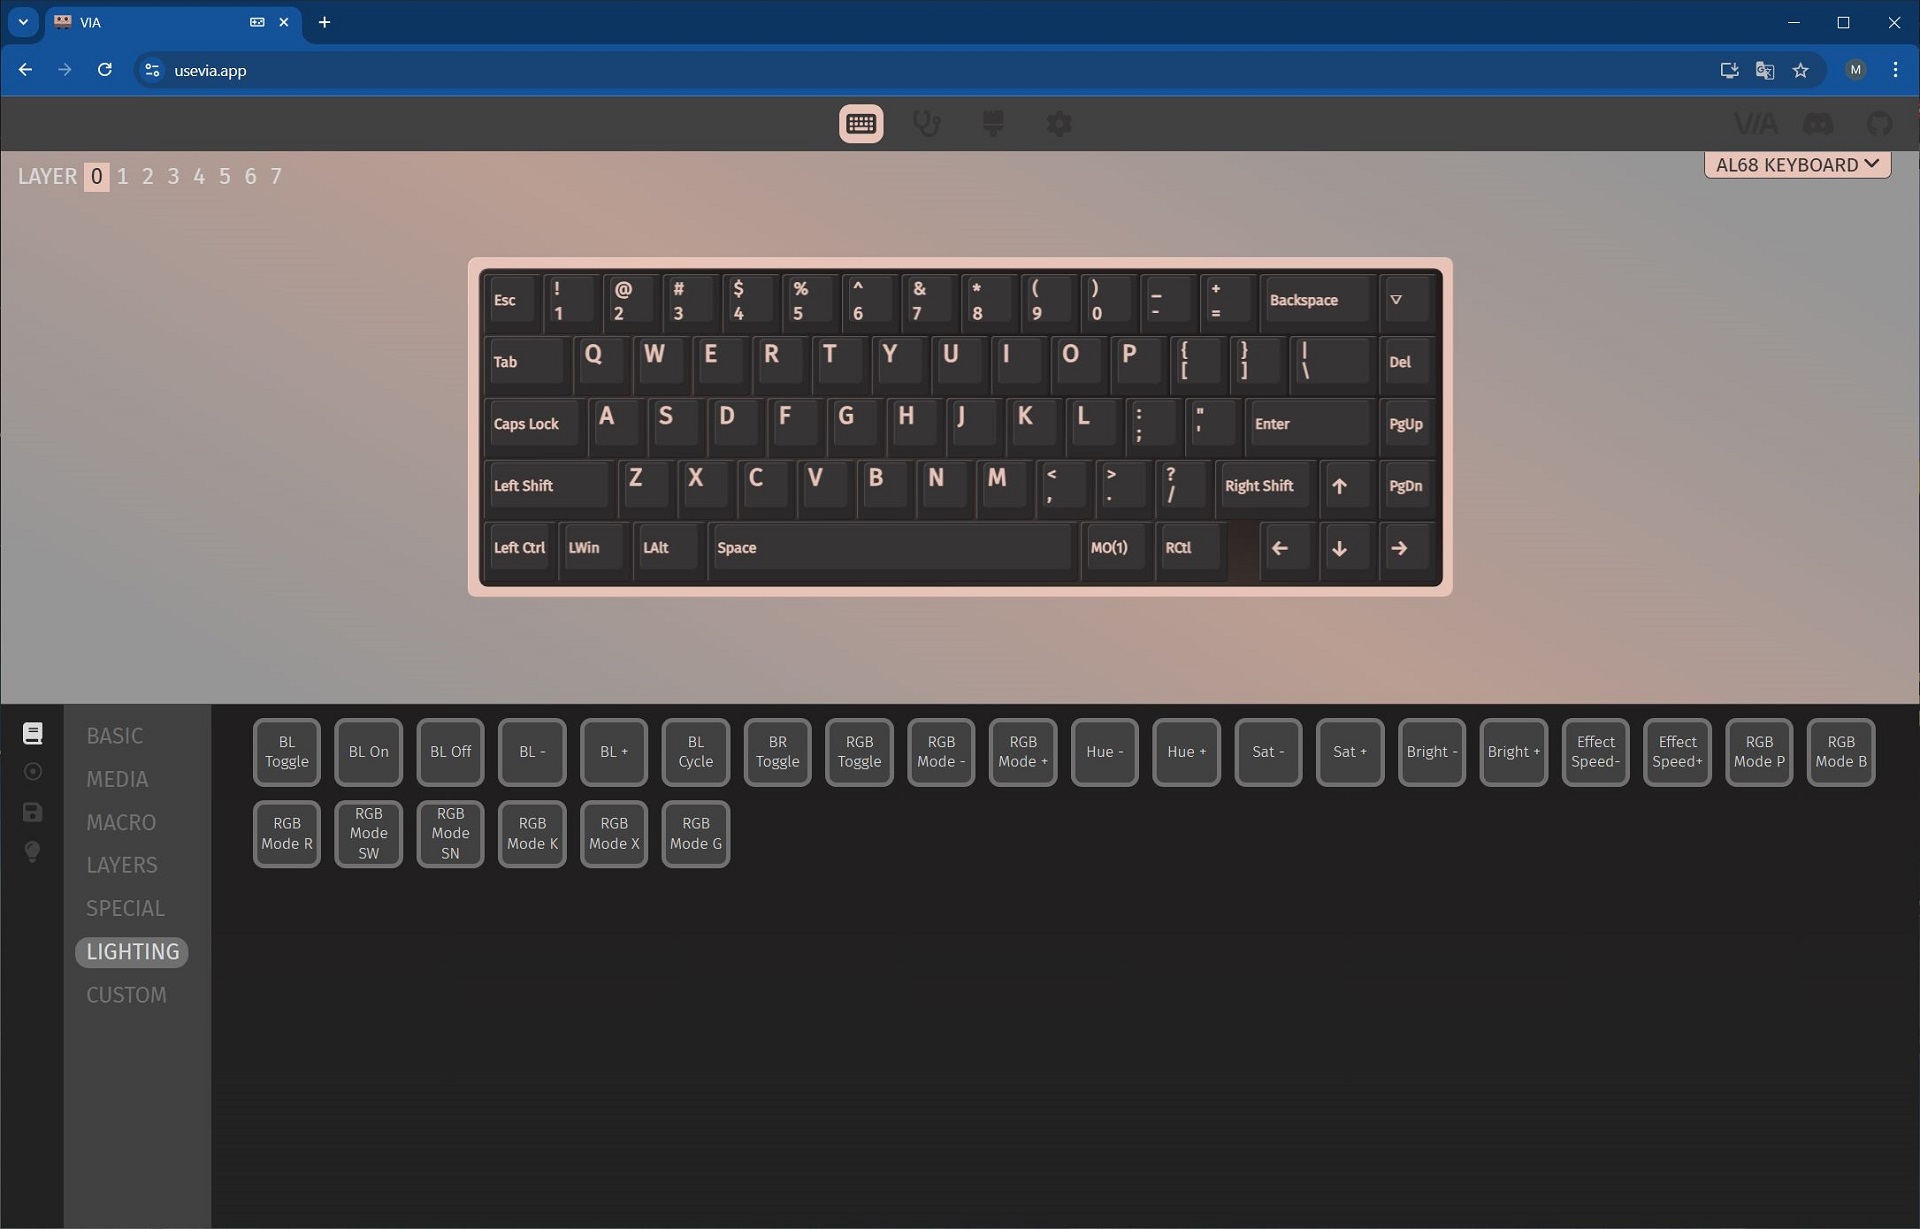
You can adjust the backlighting directly from the keyboard using FN key combinations or through the VIA software in your browser. We’ll cover VIA settings in a separate section as usual. For now, I’ve attached a screenshot below showing all the keyboard shortcuts for controlling the RGB lighting. By the way, the default RGB key combinations can be customized and reassigned to your preference. When we get to the software section, I’ll explain how to do that.
Regarding the lighting effects, the AL68 offers the same selection as the AL80 and AL65 models. There are just over 20 preset effects, all of which can be further customized – for example, adjusting speed, direction, and colors. I’ll include a video below to give you a clear demonstration of the lighting in action.
The indicator strip on the case doesn’t have any lighting effects. As mentioned earlier, it simply cycles through colors in a loop during normal use. The only available setting for it is brightness adjustment, which can be controlled using the FN + PgUp/PgDn key combinations.
Finally, a few words about the LEDs. The YUNZII AL68 uses southern-style LEDs, which offer better compatibility with various switches and keycaps compared to northern-style LEDs.
Read also:
Connections and supported platforms
The YUNZII AL68 supports three connection modes: wired, 2.4 GHz RF, and Bluetooth. Via Bluetooth, you can connect up to three devices simultaneously and switch between them on the fly using the FN + Q/W/E key combinations. Additionally, the keyboard can connect to one more device through the 2.4 GHz RF module, which you can switch to using FN + R. This means the AL68 can manage up to five devices at once: three via Bluetooth, one via 2.4 GHz RF, and one wired connection. Supported platforms include all major current systems: Windows, macOS, Linux, Android, iOS, Nintendo Switch, and Xbox.
By the way, switching between Windows and macOS modes is done with simple key combinations: FN + S for Windows mode and FN + A for macOS mode.
Multi-layer layouts and customisation with VIA
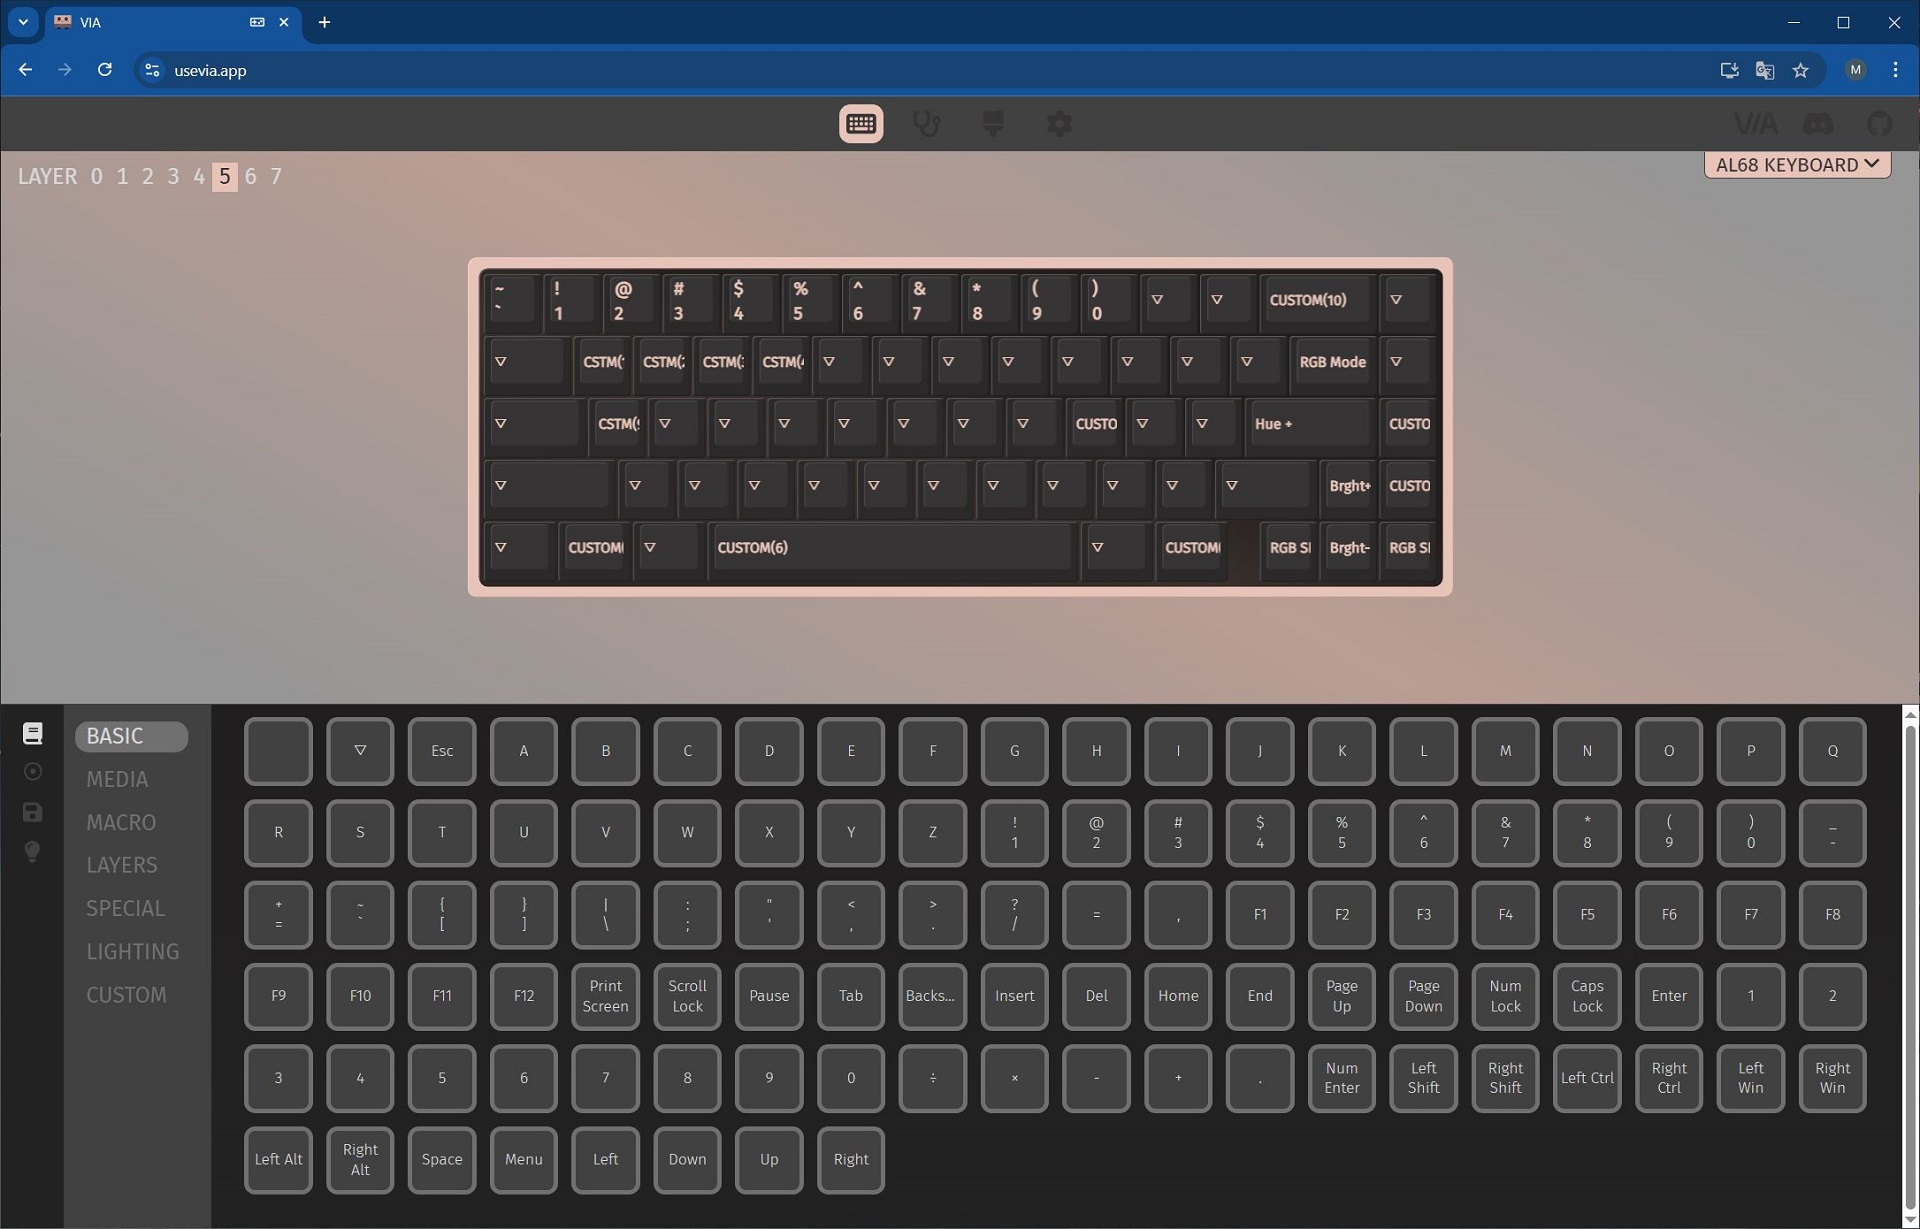
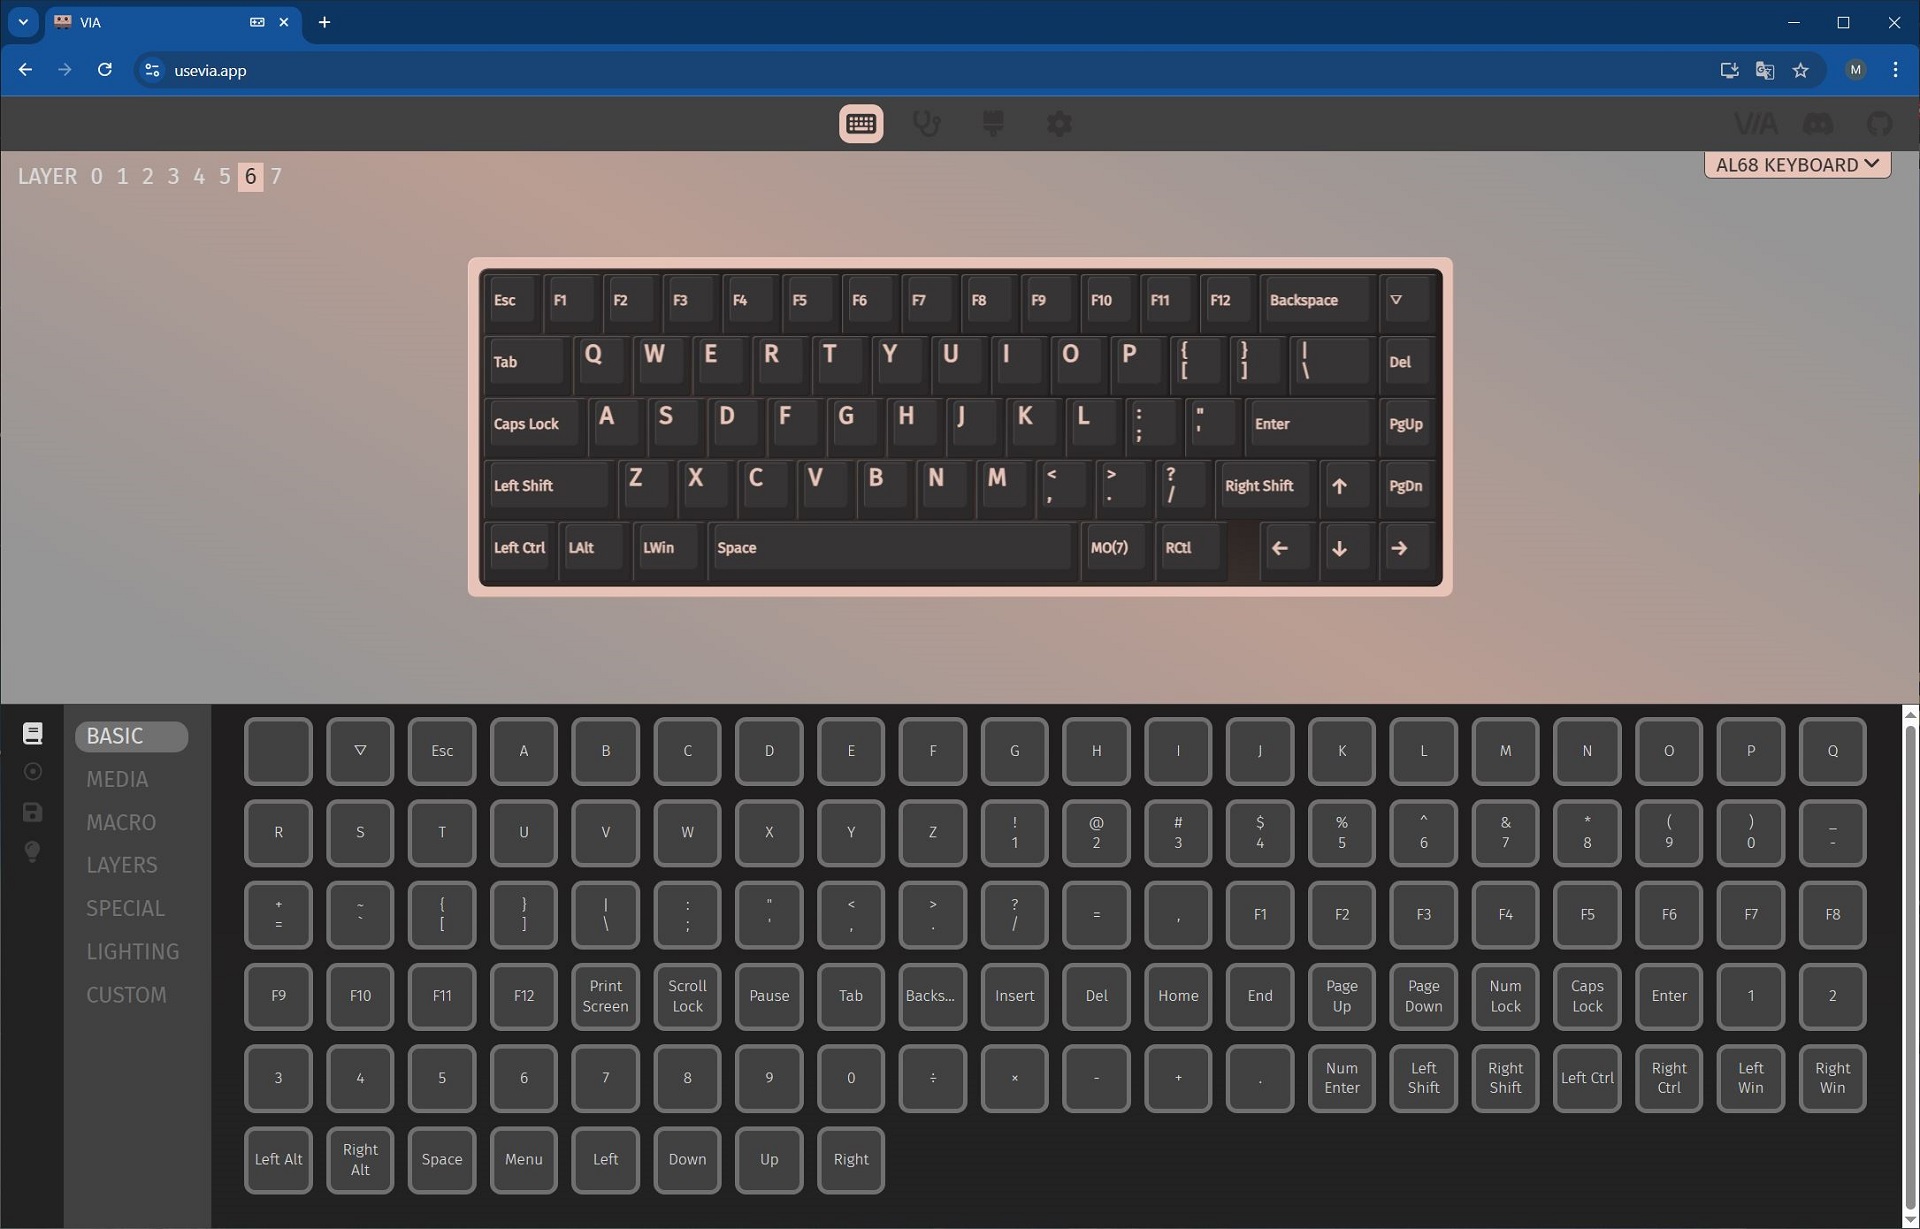
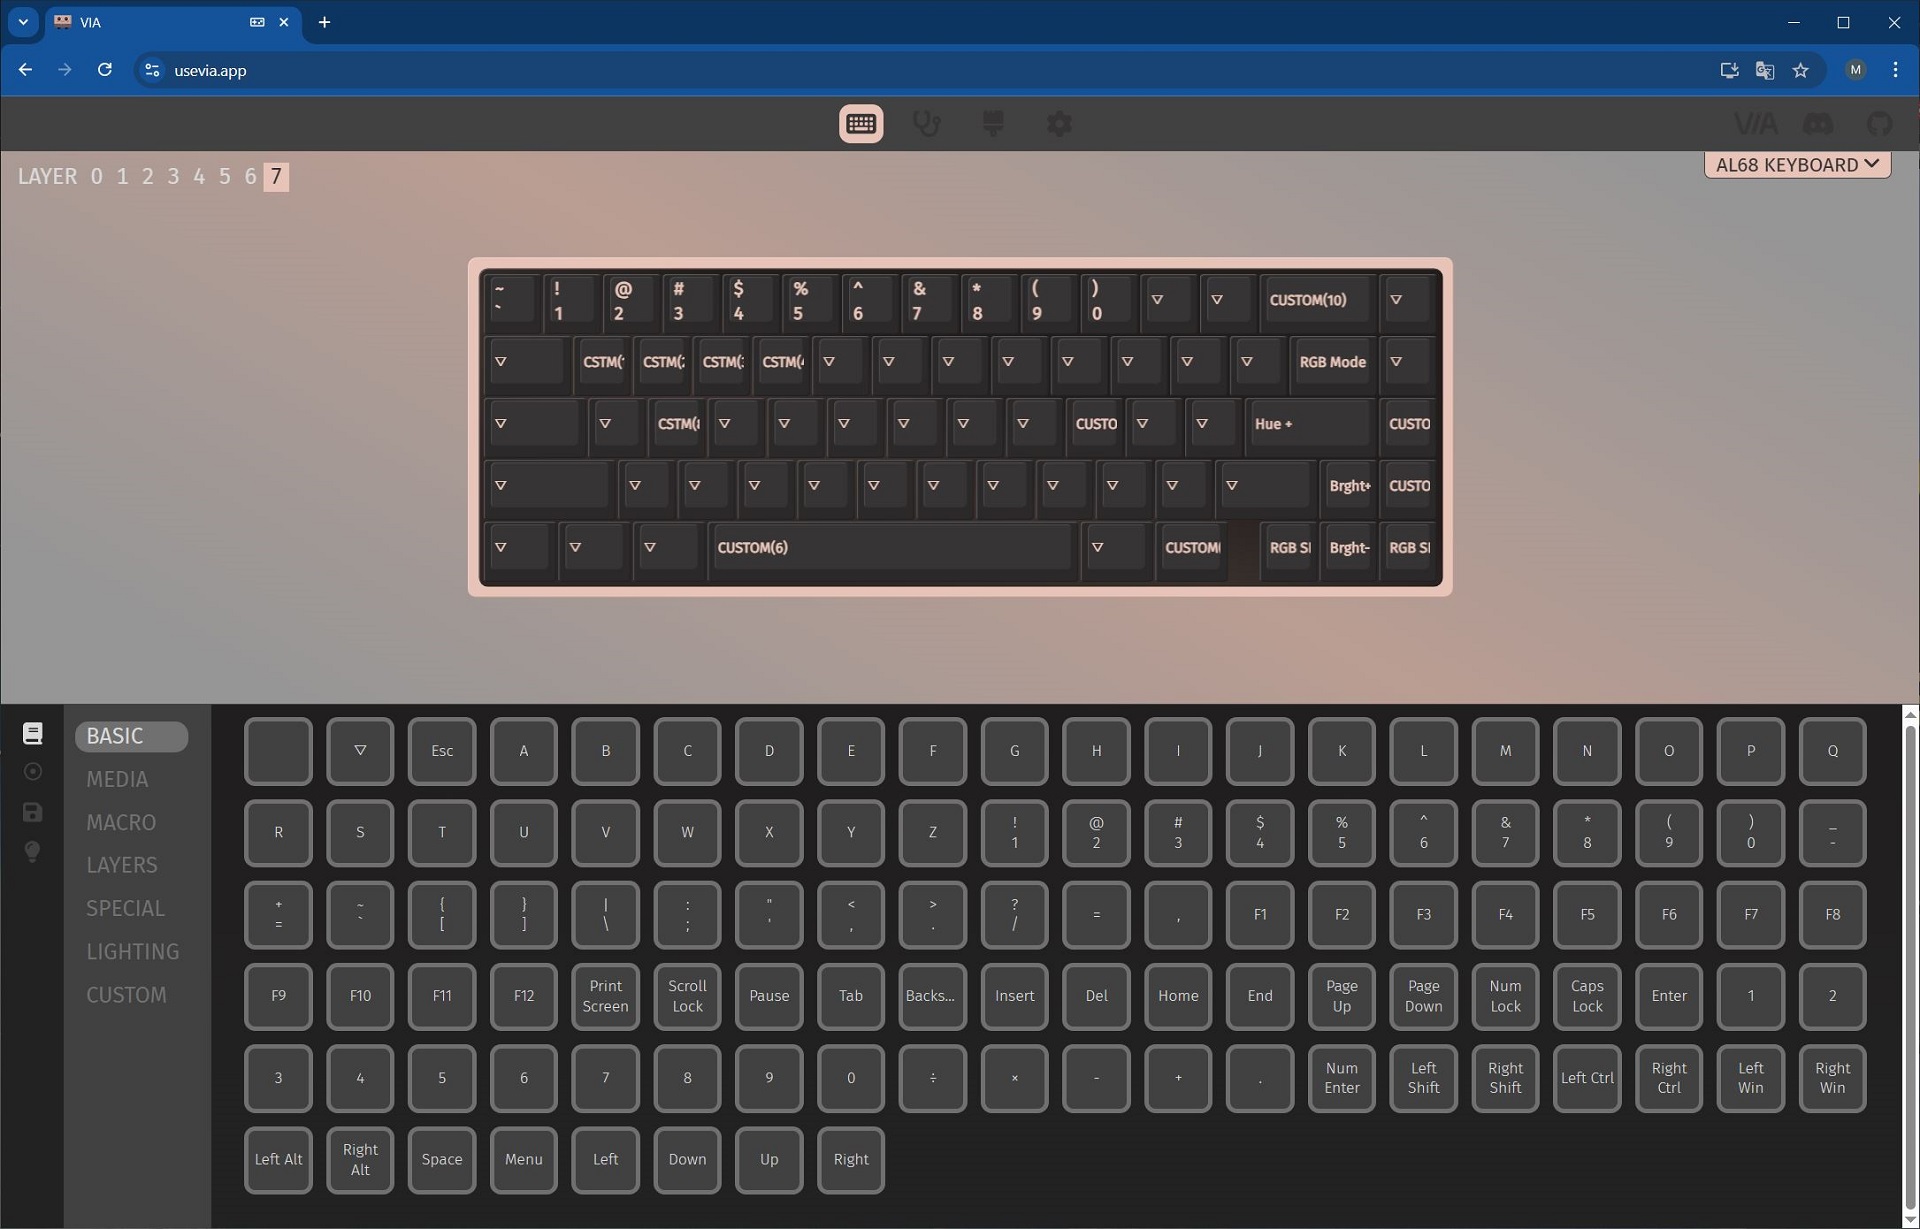
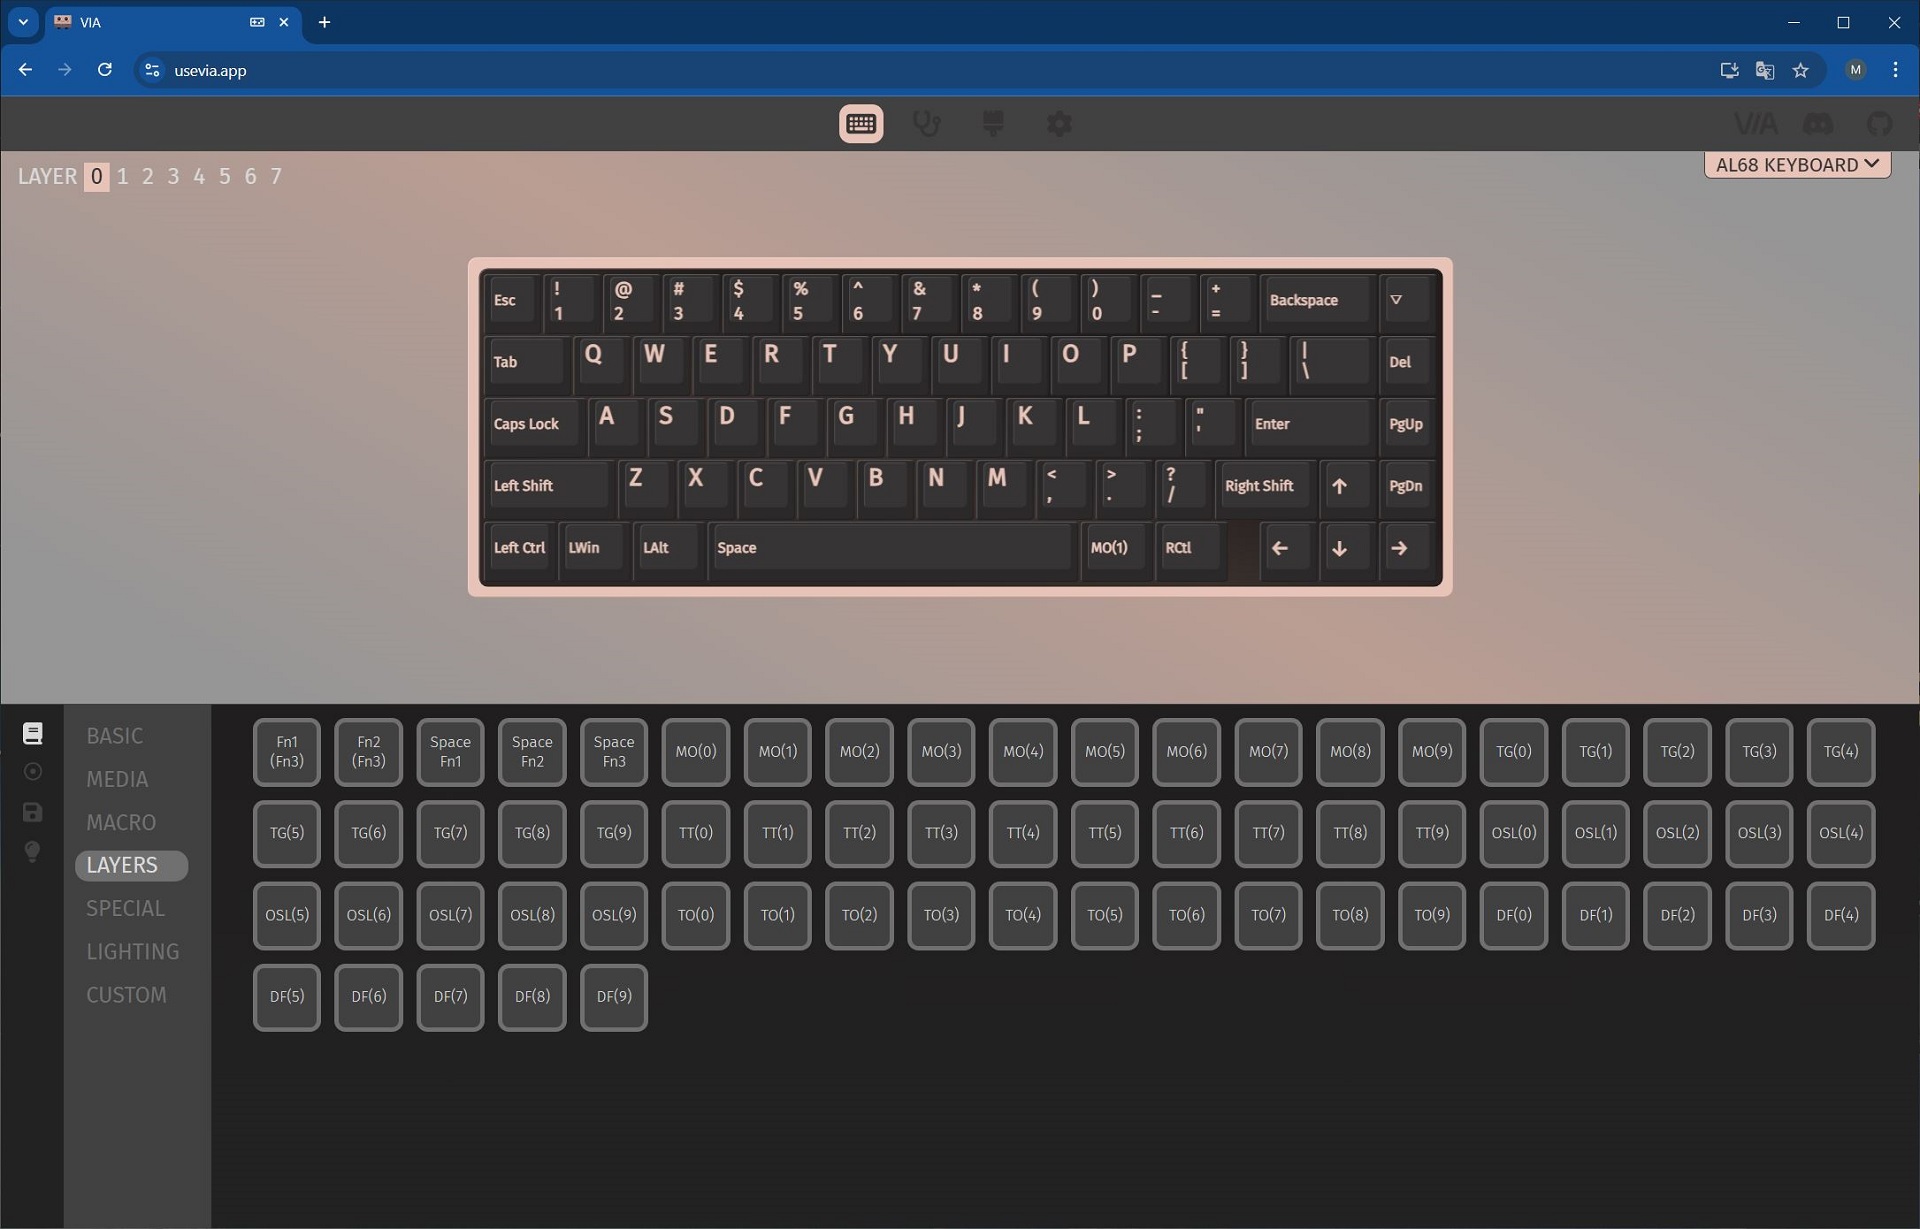
The keyboard supports multi-layer layouts that can be customized flexibly. Like the AL65, the AL68 offers eight layers that you can switch between on the fly using FN key combinations or by double-tapping the FN key.
Unlike the AL65, the layers on the AL68 seem to have been rearranged. Honestly, it took me a little time to figure out which layer is which. So, instead of listing them in numerical order, I’ll describe them in a more logical sequence.
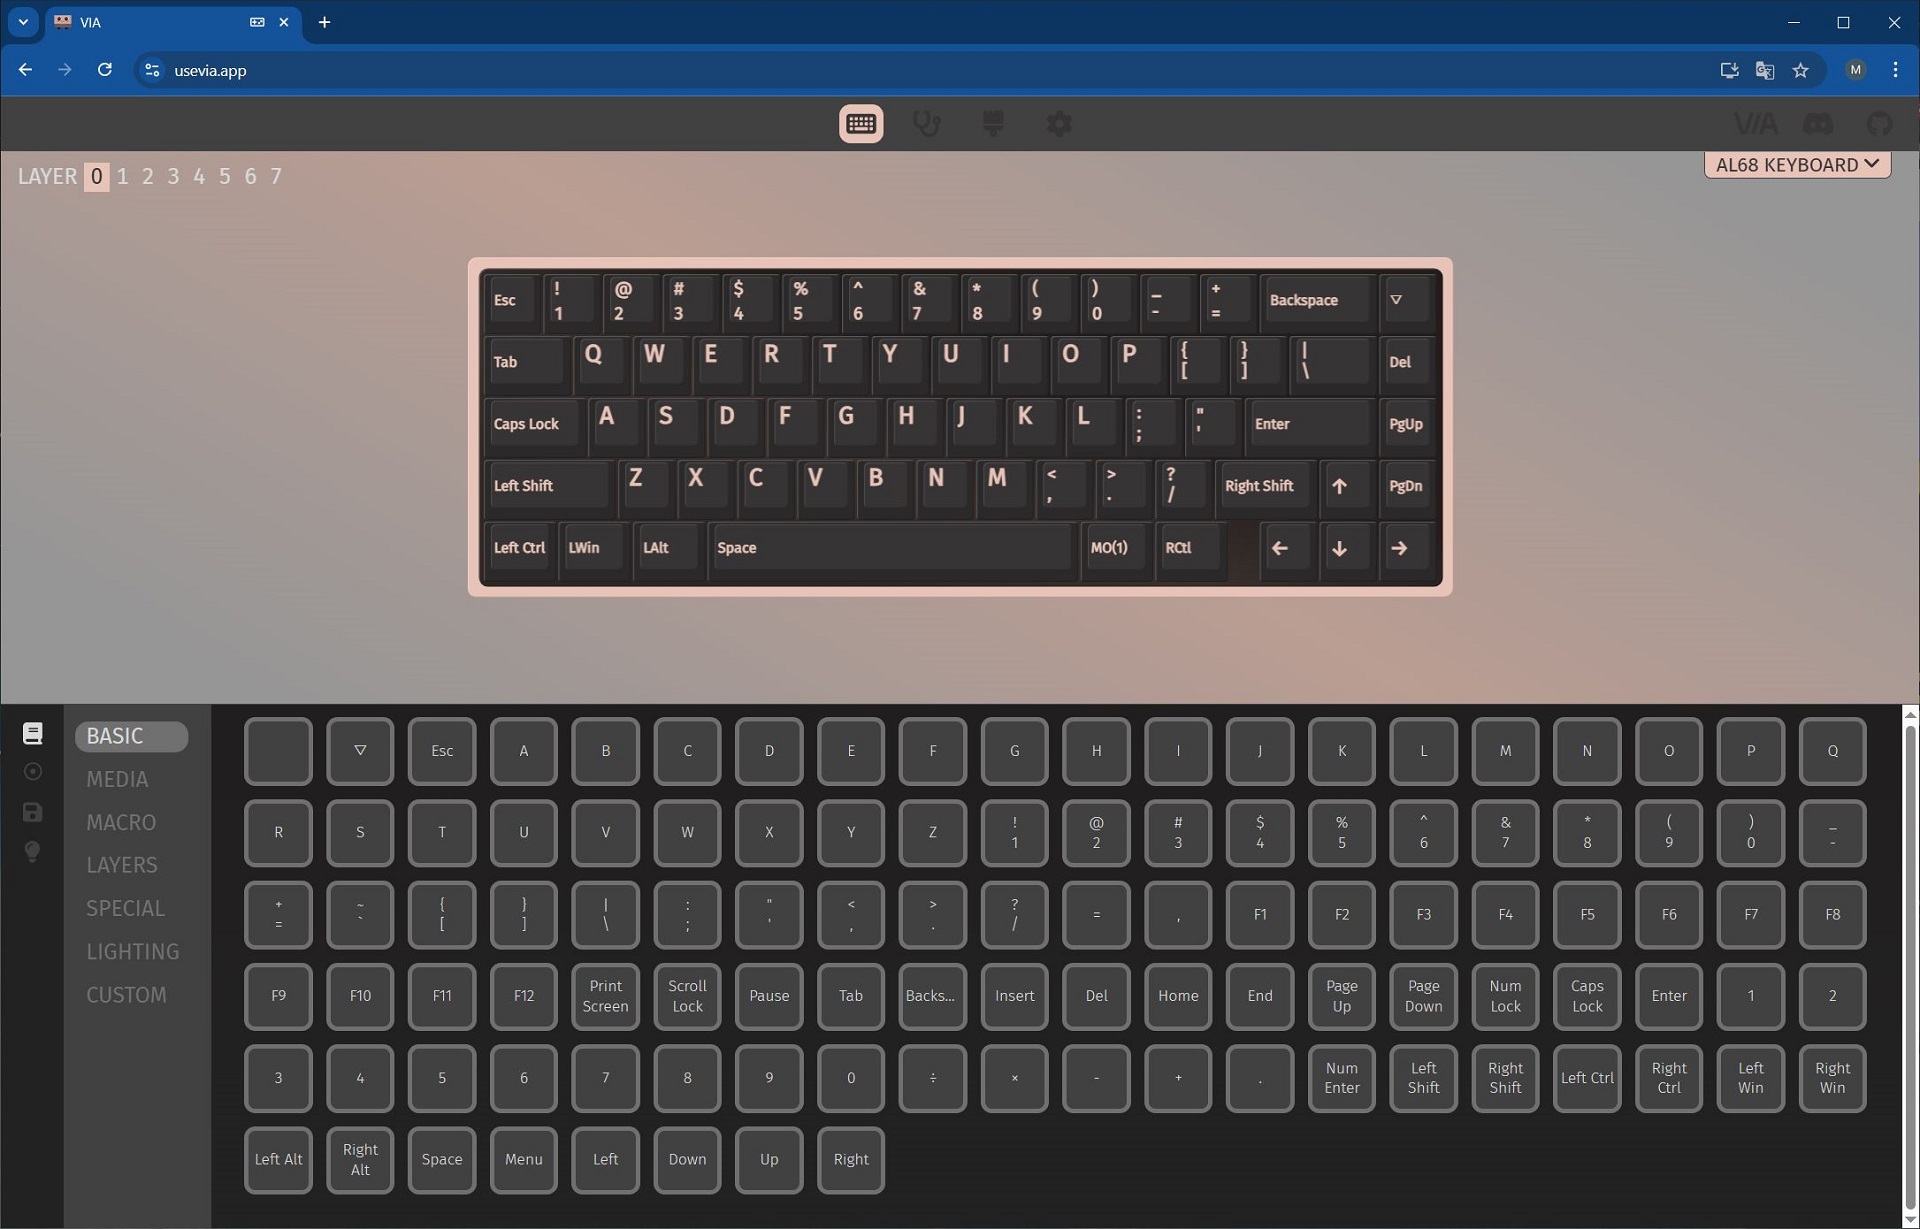
The default layer (LAYER 0) is the one the keyboard uses out of the box. It includes all the basic keys except for the F1 to F12 function row.
The first layer (LAYER 1) is the default layer combined with the FN key pressed. For example, pressing FN + 5 opens the email client right out of the box. FN + 1 and 2 adjust the screen brightness, FN + 8, 9, and 0 control track skipping, and FN + minus/plus adjusts the volume. I’ll be honest – this layout feels a bit awkward, so I plan to customize it later to better suit my needs.
The fourth layer (LAYER 4) is activated by double-tapping the FN key. In this layer, the number row functions as the F1 to F12 keys.
The second layer (LAYER 2) is a combination of the fourth layer (LAYER 4) with the FN key held down. In this layer, the number row functions as regular digits when used with the FN key pressed.
Layers 3, 5, 6, and 7 appear to be designed for macOS mode. They switch and function similarly to the Windows layers, so I won’t go into detail here. Instead, I’ll just show them in the screenshots below.

All layers – that is, keys and their combinations – can be fully customized and reassigned as you wish. You have complete freedom to change anything in any way. To give a clearer idea of how this works, I’ll share my personal keyboard customization that I use in my daily workflow.
In 65% keyboards, I usually miss quick access to the F1–F12 keys. The default layer (LAYER 0) works well for me, but it doesn’t provide fast access to those function keys. Constantly switching to the fourth layer (LAYER 4) by double-tapping the FN key feels inconvenient. So, I decided to modify the first layer (LAYER 1). Specifically, I replaced less useful functions – like brightness control, track skipping, and opening the email client – with the standard F1–F12 key row. Reassigning keys and their combinations is straightforward. On the layout map, you select the key or combination you want to change, then choose the desired key or function from the options below. Below, you can see an example of the original first layer (LAYER 1) and the modifications I made to it.


Now I mostly use the default layer (LAYER 0), which includes all the standard keys and the number row. To access F1–F12, I press FN plus the numbers 1 through 0. I don’t really need the other layers, so I leave them as they are.
For someone unfamiliar, customizing the keyboard through VIA might seem complicated or awkward at first. But after some exploration and experimentation, it quickly becomes clear. The keyboard applies changes instantly, without needing to save anything. And if you get confused or misconfigure something, you can always reset the keyboard to factory settings by holding FN + Space for a few seconds.
Read also:
Setting up VIA
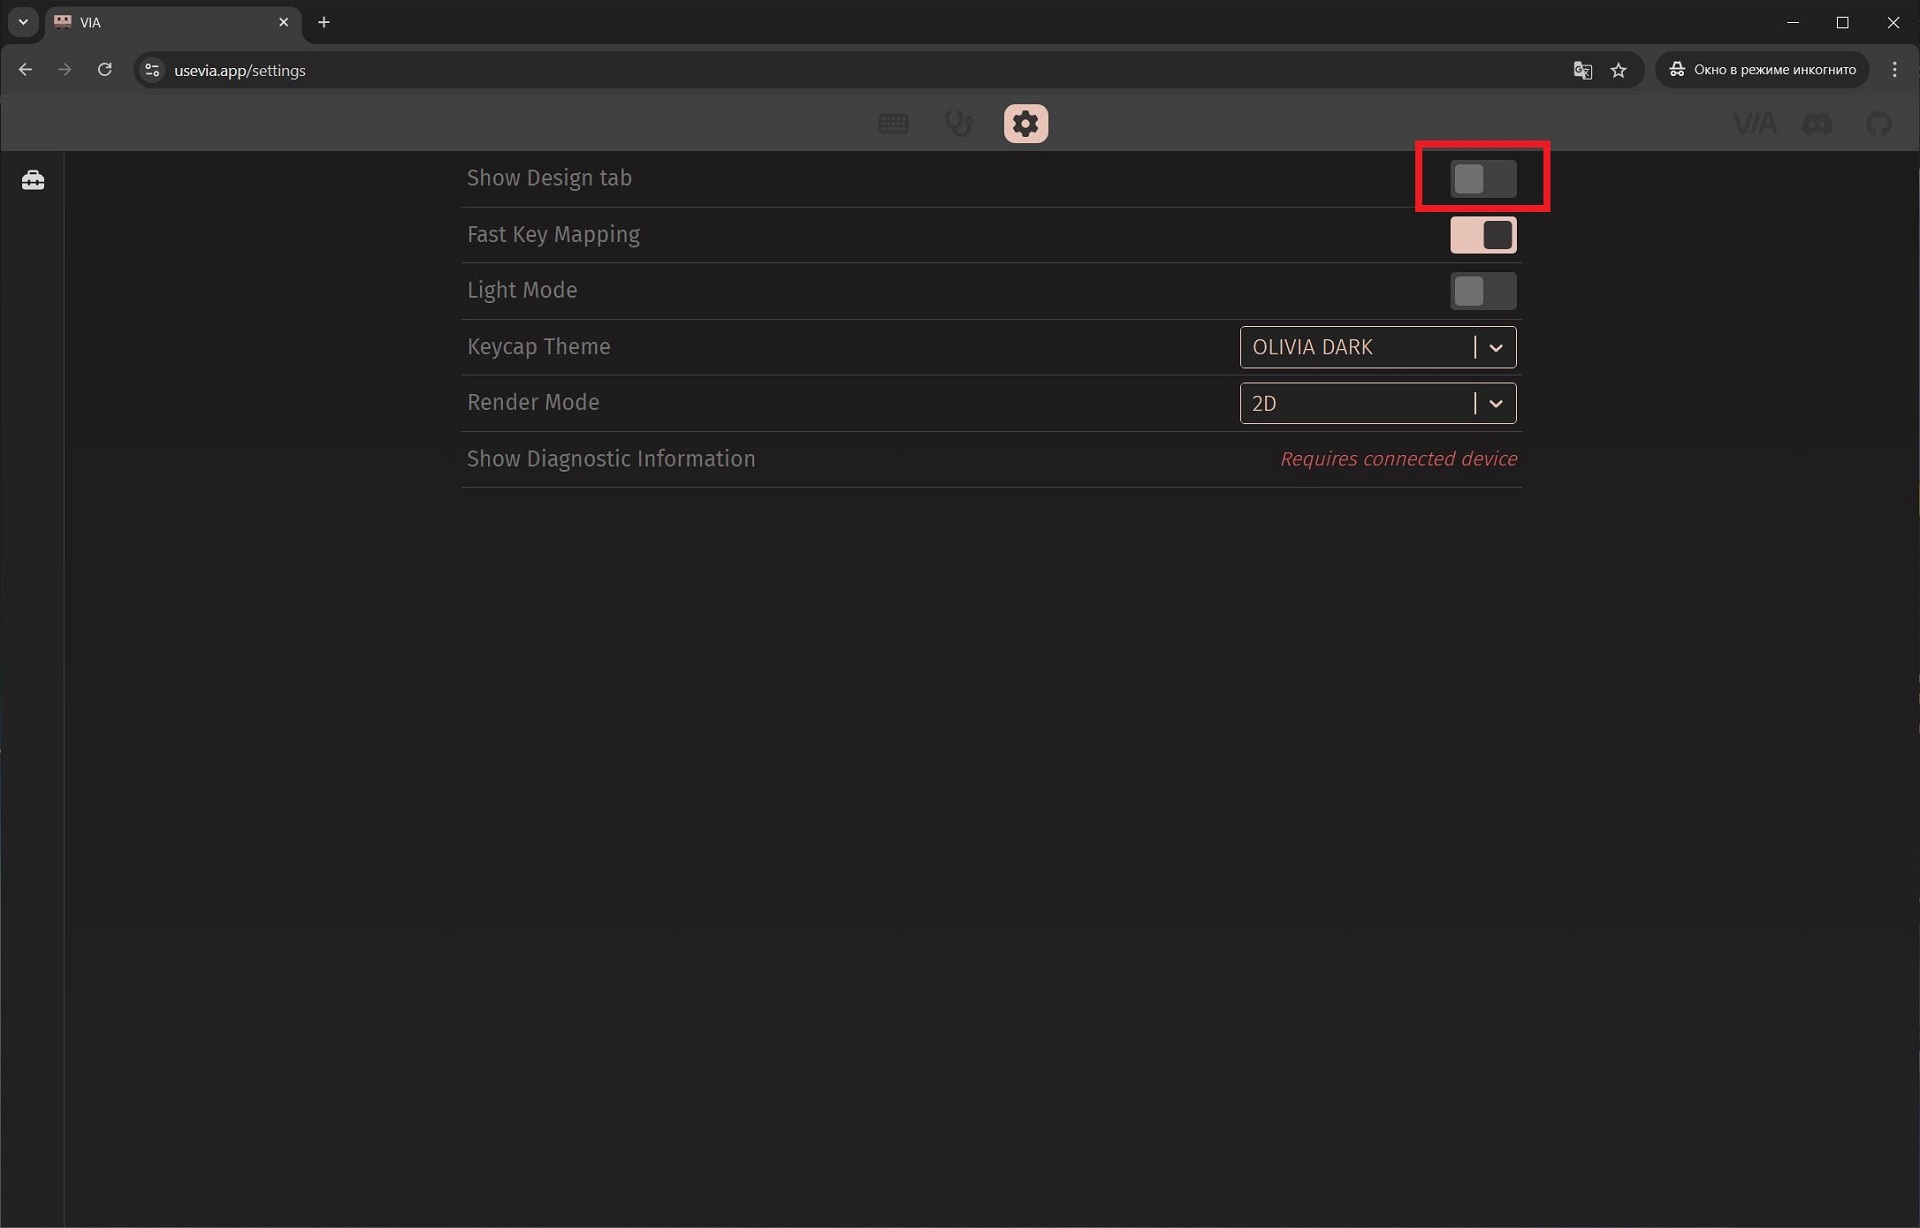
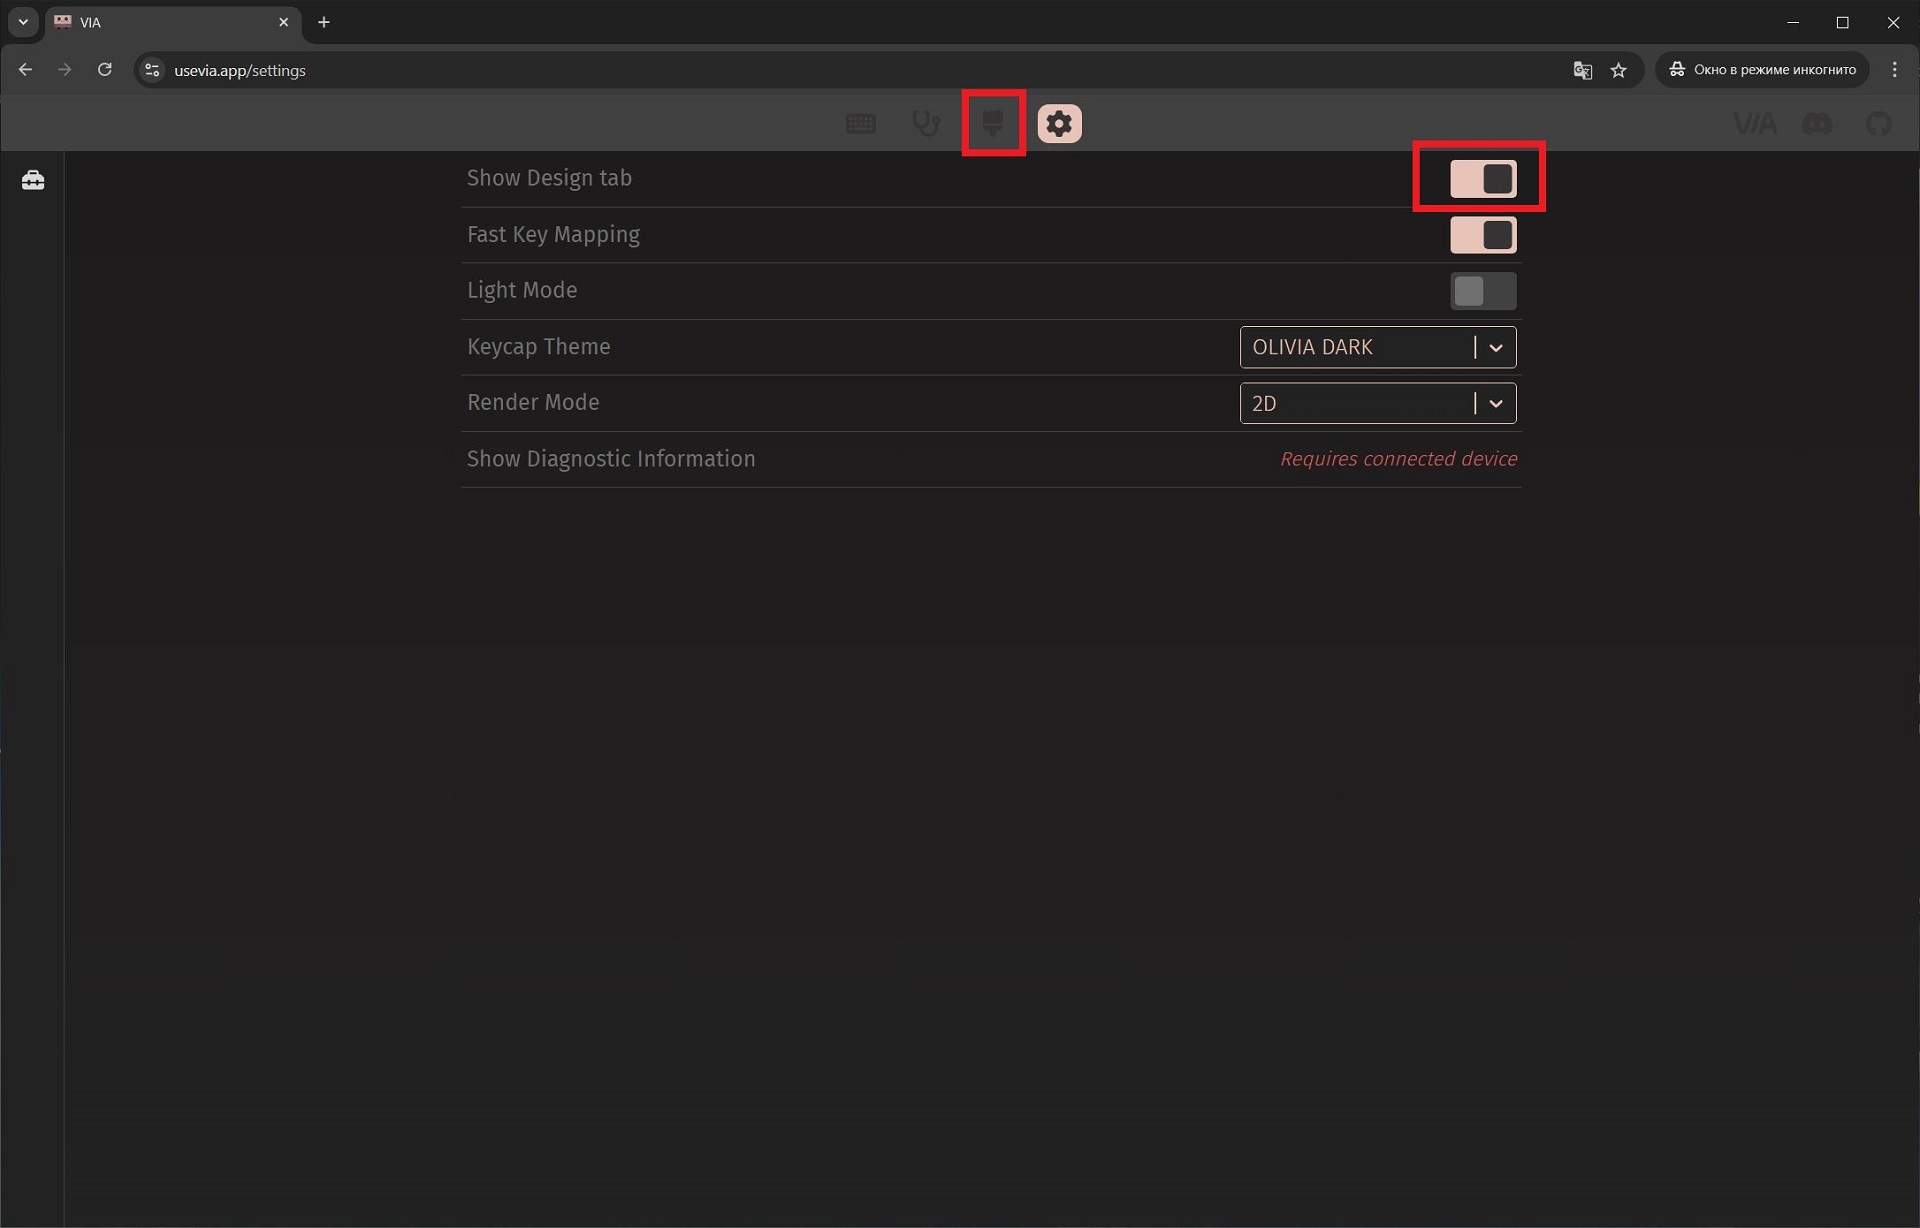
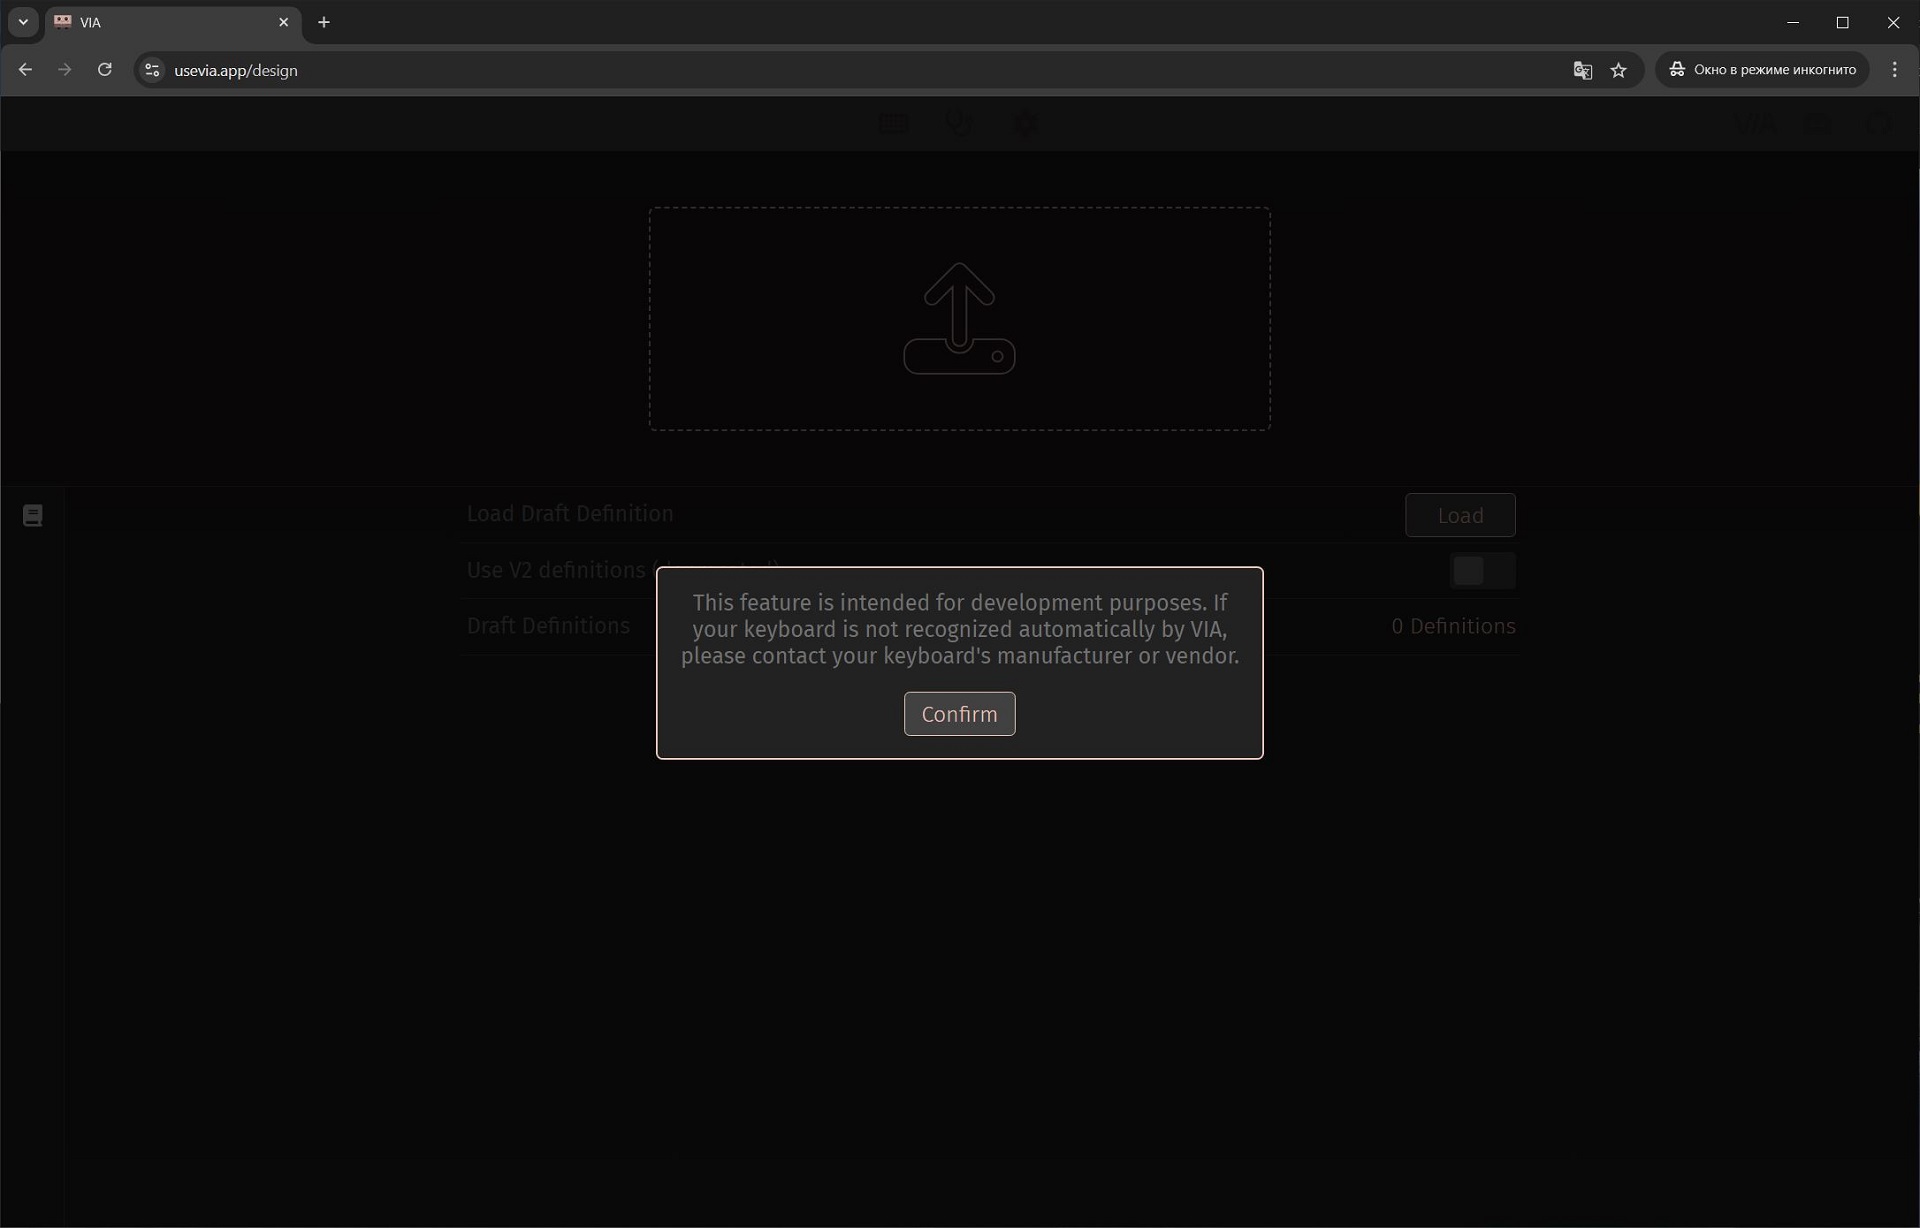
Here’s how to access the VIA settings, along with an overview of its features. To open the keyboard settings, you need to:
- Connect the keyboard to the PC with a cable and switch it to wired connection mode
- Download the JSON file for the keyboard from the official YUNZII website
- Go to the usevia.app settings site
- Go to the Settings tab and activate the Show Design Tab
- Go to the Design tab and download our JSON file to the browser
- Allow connection to the keyboard


The connection procedure only needs to be done once. After that, all subsequent settings can be adjusted directly in the same browser without additional steps or loading a JSON file.
VIA settings for the AL68 are essentially the same as for the AL65 and AL80 models. On the main CONFIGURE tab, you’ll find four menus: KEYMAP, MACROS, SAVE + LOAD, and LIGHTING. The KEYMAP menu is where you customize layouts and key assignments.

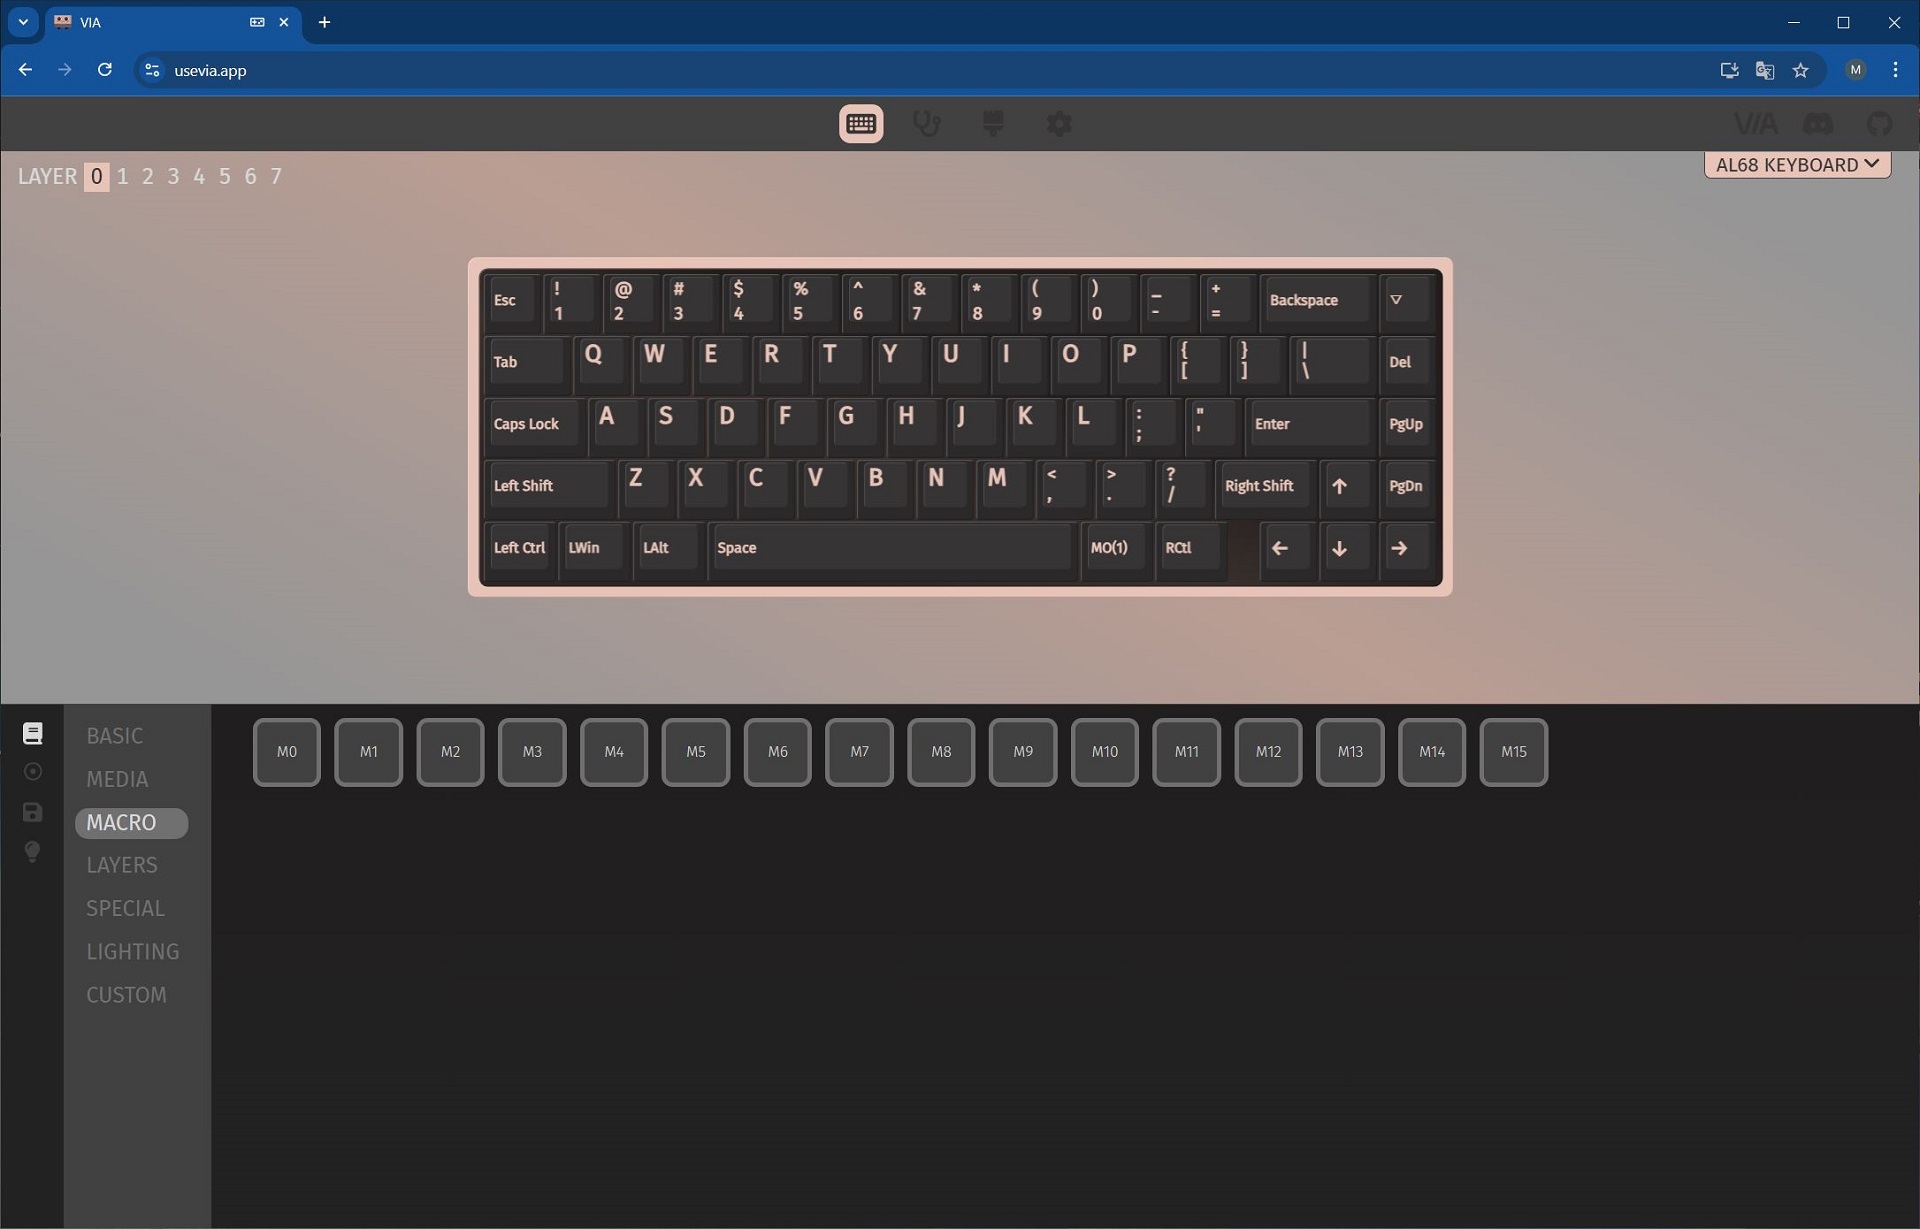
The MACROS menu is where you record macros that can then be assigned to keys or key combinations in the previous KEYMAP menu.
The SAVE + LOAD menu allows you to save and load your settings and layouts in JSON file format.
The LIGHTING menu is where you can adjust the keyboard’s backlighting: effects, brightness, speed, direction, and colors.
The KEY TESTER tab allows you to check the keyboard’s functionality. Right after making changes, you can test individual keys as well as key combinations with the FN key.
The DESIGN tab is where you upload the JSON file for connecting the keyboard. Here, you can also view the keyboard matrix.
The SETTINGS tab contains options for customizing the visual appearance of the website interface.
In the top right corner of the site, you can find several useful links: the official VIA website with detailed firmware documentation, the official VIA Discord channel, and the VIA source code on GitHub.
Read also:
- Epomaker Galaxy 100 Review: The Full-Size Keyboard That Will Survive a Nuclear Blast
- SteelSeries Apex Pro TKL Gen 3 White review: Gorgeous Update
Switches, stabilisers, typing
The keyboard can come equipped with three types of switches: YUNZII Milk V2 Linear Switch, YUNZII Cocoa Cream V2 Switch, and Gateron Zero Switch. All the switches are linear and come pre-lubricated.
Like all YUNZII keyboards, the AL68 features hot-swappable switches, allowing you to replace switches without soldering. The switch sockets are standard 5-pin, compatible with both 3-pin and 5-pin switches.
The stabilizers are also pre-lubricated, which noticeably improves the feel during key presses. The longer keys have a very smooth travel and produce a pleasant sound – no spring rattling or clacking like you’d find on cheaper keyboards. Overall, the stabilizers here are top-notch.
Typing on the YUNZII AL68 is excellent. The keys have a smooth, soft travel with a very pleasant sound when pressed. The review unit I tested came equipped with YUNZII’s own Milk V2 Linear switches, and it sounds like this (see video below).
In terms of sound and feel, typing on the AL68 is very similar to the AL65, which I also tested with the same switches. However, to me, the AL68 feels a bit more solid – there’s less hollowness in the key presses, as if the keyboard feels more filled out. Although, technically, the construction of both models is the same. Overall, it’s a subtle difference that’s hard to describe in words – you really need to try both keyboards yourself to understand what I mean. For reference, I’ve also included a typing video of the AL65 below, but honestly, a video doesn’t fully capture the experience. In short, I liked the typing feel of the AL68 slightly more.
If we compare the YUNZII Milk V2 and Cocoa Cream V2 switches, I personally preferred the Milk V2. They feel softer to press and seem quieter, at least to me. Overall, both are pretty solid switches on their own and could easily be used for custom builds on other keyboards.
Battery life
The AL68 model comes with a 6000 mAh battery. With the backlighting turned on, the keyboard can last about 36 hours on a single charge. Without backlighting, the battery life extends up to 96 hours.
You can check the battery status using the key combination FN + right Ctrl. When pressed, the number row lights up in a corresponding color: green, yellow, or red. The lit numbers indicate the approximate remaining battery percentage. For example, in my photo below, the keyboard is fully charged – numbers 1 to 0 light up green. If the battery were at 50%, numbers 1 to 5 would light up yellow. When the battery is low (around 20%), numbers 1 and 2 light up red.
To save battery in wireless mode, the keyboard enters sleep mode after 3 minutes of inactivity. The AL68 shares the same behavior as the AL65 and AL80 when it comes to waking up: if it’s been idle for a long time (around an hour), there’s a slight delay – about 1–2 seconds – before it becomes fully responsive after pressing a key. In other words, if it’s been asleep for a while, you’ll notice a short pause before you can start typing again.
If the keyboard was asleep for a shorter period (10–20 minutes), it wakes instantly with no delay. This isn’t a bug or flaw – it’s just how the device is designed to conserve power. You’ll quickly get used to it. Naturally, this behavior doesn’t occur in wired mode.
If 3 minutes before entering sleep mode feels too short, the next section will walk you through how to update the keyboard’s firmware and extend that timeout. Besides increasing the active time, the firmware update also addresses a critical bug that some AL68 owners may have encountered.
We update the firmware, increase the activity time, fix bugs in wireless mode
So, some users of the YUNZII AL68 might encounter a critical bug in wireless mode. If the keyboard remains untouched for around 2–3 minutes, keystrokes may stop registering – meaning the first key press after a short idle period doesn’t respond. Only the second press wakes the keyboard up and returns it to normal operation. And if you again leave the keyboard idle for another 2–3 minutes, the issue repeats. I personally noticed this happening specifically within the 2:30 to 3-minute window of inactivity – which is before the keyboard officially enters sleep mode. The interesting part is that if you actually let the device go into full sleep, the keypresses afterward register just fine. To make this behavior easier to understand, I recorded a short video demonstrating the bug and showing the timing at which it occurs.
How can this issue be fixed? The most logical solution is to update the keyboard’s firmware. YUNZII’s website already offers several firmware versions for the AL68, some of which also extend the time before the keyboard enters sleep mode.
However, there’s an important detail – all the firmware versions available on the official website at the time of writing this review still contained the bug. It’s possible that by the time you read this, newer, fixed versions will have been uploaded. But just in case, here’s a clarification: do not install these specific versions, as the issue remains unresolved in them.
- YUNZII_AL68_Refreshing_IT32CTB0_V0111-2_20240813.bin (Resetting Firmware)
- YUNZII_AL68_Sleep_Time_Adjust_5min_20241127.bin (Sleep Time Adjustment Firmware)
- YUNZII_AL68_Sleep_Time_Adjust_5min_20241127.bin (Sleep Time Adjustment Firmware)
After I reported the issue to YUNZII, they sent me updated firmware versions where the bug had been fixed and the sleep timeout extended. So now, here’s how to update the firmware and fix the keyboard.
First, download the archive containing the corrected firmware and extract it. Inside, you’ll find three .bin firmware files and a JSON file with key layouts, which is used for configuring the keyboard through VIA. Based on the filenames, the only difference between the firmware versions appears to be the preset sleep timeout duration.
- V0119_CSE60C2FE1_20250402_sleep_5min – 5 minutes
- V0119_0xE60C2FE1_20250402_sleep_10min – 10 minutes
- V0119_CS4704C57F_20250331 – 3 minutes
For testing, I tried all three firmware versions and can confirm that the issue is resolved in each of them. So it’s safe to install any of the three.
To update the keyboard, you’ll need to use QMK Toolbox. It’s available from the official QMK website or directly from YUNZII under the Updating / Refreshing Toolbox section. In my case, I used the version provided by YUNZII.
The update process itself is straightforward and quick:
- Switch the keyboard to wired mode and connect it to your PC using the included cable.
- Launch QMK Toolbox and install the necessary driver.
3. Put the keyboard into bootloader mode (DFU mode). To do this, unplug the keyboard from the PC by disconnecting the USB cable, then press and hold the ESC key. While holding ESC, reconnect the keyboard to the PC and wait a few seconds. After this, the keyboard’s backlight will turn off, and QMK Toolbox will display a line like this (highlighted in yellow in the screenshot).
4. Use the OPEN button to select the desired firmware file. Leave the MCU setting (AVR only) as is – ATmega32U4. Then click the FLASH button and wait for the update process to complete.
5. The keyboard update process takes only a few seconds. Once the flashing is complete, the keyboard’s backlight will turn back on, and the program will display a log like this.
6. After that, you can close the program, disconnect the keyboard from the PC, switch it back to wireless mode, and use the device as usual.
As mentioned earlier, I tested all three firmware versions and can confirm that the bug is fixed in each update. I also checked the sleep timeout in all versions, and it works as expected.
The only change I noticed after updating is that the lighting adjustment mode via the scroll wheel no longer works. Holding the scroll wheel no longer switches the lighting mode. However, volume control via the scroll wheel still functions, which I find more important personally. It’s possible that by the time you update your keyboard, YUNZII will release new firmware versions addressing this issue as well. The key point is that the main critical bug affecting non-functioning keys has been resolved.
One more thing to note – any changes you’ve made to key layouts or mappings through the VIA software will be reset after the firmware update. Therefore, I recommend saving your settings as a JSON file (using SAVE – LOAD) just before updating. Otherwise, you’ll need to reconfigure everything from scratch after the update.
If you have any questions about firmware or YUNZII keyboards in general, you can always chat with company representatives and other users on the official YUNZII Keyboard Discord channel. There you can find various news, guides, discussions, tutorials, solutions to device problems, and more.
Conclusions
To sum up, I found the YUNZII AL68 to be a solid keyboard. Honestly, I liked it even more than the AL65 and AL80 models. Mainly, this comes down to its simplicity and classic design, without side lighting, a display, or other extras. For those looking for a quality 65% keyboard with a traditional design, the AL68 is a strong option.
The keyboard offers a compact size, solid build quality, a sturdy metal case, a scroll wheel for adjustments, customization via VIA, a satisfying typing experience, and a reasonable price. Battery life could be better, but it’s acceptable for this keyboard segment. The main downside was some software bugs in wireless mode, but those have been fixed, so they’re no longer a concern. Overall, my conclusion is that this is one of the best options in its price range – something I’m happy to keep in my collection.
Read also:
- Cubot KingKong Power 5 Review: Rugged, Durable, and Budget-Friendly
- Three Unconventional Ways to Use a Tablet, Featuring the Lenovo K11 Plus
- Motorola Edge 60 Fusion Review: Moto AI, MIL-STD 810H and Elegant Design
Thank you for the sleep fix! it worked