
© ROOT-NATION.com - Use of content is permitted with a backlink.
This article was originally planned for release at the end of last year, since the panels were installed back in November 2024. However, I decided to take the time to thoroughly test the system first – identify any hidden issues, understand the ins and outs of home energy generation and storage, and only then share my thoughts and experience with you.
So, how did I end up with a mostly complete solar setup? What were the prerequisites, what kind of hardware is involved, what’s actually needed for installation, what’s the rough budget, and is it worth spending the full amount upfront if you’re working with limited resources? I’ll cover all of that in plain language. So if you’re already deep into the topic, this probably won’t offer anything groundbreaking. But if you’re just starting out – and maybe all you’ve heard is a friend of a friend saying “it’s not worth it” – then stick around. Let’s get into it.

Read also:
- HATOR Hypergang 3 Wireless Review: Gaming Hi-Res Headphone with ANC
- ASUS VA259HGA Review: An Affordable Full HD Gaming Monitor with 120Hz and Eye Care+
Background
About two years ago, I discovered energy storage systems built around a standalone inverter and a high-capacity battery – not out of curiosity, but out of necessity, thanks to our lovely neighbors to the northeast. It wasn’t an immediate discovery either. During the winter blackouts, I needed a way to keep the heating boiler running in a private house. That’s when I bought a small-capacity power station. It provided around four hours of backup, which, at the time, was just enough to get us through the average outage. It was the minimum I could afford back then to make sure the kids didn’t freeze.
But then came the moment that changed everything: we were without power for five straight days. My wife, kids, and even the cat had to stay with her parents, while the temperature inside our home dropped to just 4°C. That was the breaking point. I decided right then that I’d do whatever it took to provide my family with a reliable backup power system. Not long after that, I was approached by a company asking me to review a setup based on an off-grid inverter paired with a battery. I did the review – and ended up buying the system. I realized I was fully prepared to pay for something like this, even if it meant racking up a sizable chunk on my credit card. And I haven’t regretted that decision for a second.
And for a while, that system gave me peace of mind. Well – “a while” turned out to be about a year. What pushed me to the next phase of upgrades were my neighbors, who started installing solar panels on the roof of their large house. I looked at their setup and, to be honest, felt a bit discouraged. I don’t have that kind of roof space, and my main house roof is quite old, covered in asbestos slate – I’m not financially ready to replace it, and I definitely wouldn’t install panels on it in its current state. But I do have a small extension – basically a combined entryway and kitchen – with a nearly flat roof (somewhere between 12° and 16° tilt), covered in metal sheeting. It’s just big enough to fit four large panels. That ended up being the deciding factor.
TABLE OF CONTENTS:
As for the hardware
I’ll walk you through the specs of my own setup and offer some basic recommendations for matching solar panels to an inverter. But first, a disclaimer: if you don’t plan to take a gradual, step-by-step approach to making your home more energy-independent or if you can’t clearly distinguish between current and voltage (and yes, if you’re still mixing up amperage and voltage, someone really should smack your hand with a solar cable), then it’s best to leave this to the professionals. There are plenty of experienced installers who’ve seen it all and know what they’re doing. As for me, things ended up this way mostly because I hadn’t originally planned to deal with solar panels at all.
So, my inverter model comes with a single MPPT controller and one input. This means I can only connect one string of solar panels to it. Now, it’s important to note that having one MPPT doesn’t always limit you to just one string – some inverters can support two or even three strings on a single MPPT input. That depends on the specific inverter’s design and electrical parameters. In my case, though, I’m sticking to a single-string setup – that is, several solar panels connected in series. I’m not going to dive into dual-string configurations here. If you’re planning a much larger array and want to maximize panel count, then honestly, your best bet is to consult a qualified installer. They’ll help ensure everything is safely and properly configured.
Next, I will describe how to choose the number of panels.
1. The first thing you need to understand: you choose your solar panels based on your available roof space (or any other surface where you plan to install them). You won’t be able to install more panels in a single string than your physical space allows – no matter what your inverter can handle. So, the starting point is figuring out roughly how many panels will physically fit on the intended surface. Just measure the dimensions of the area where you plan to install the panels – this will be useful after the second step. Now let’s move on to the next – and arguably most important – factor.
2. On the side of your inverter, look for a specifications label. What you’re interested in are the parameters for the MPPT controller. These are usually listed under terms like PV Input, PV Input Voltage, or sometimes Solar Charger Mode.
First and foremost, the MPPT voltage is what matters here. This is the maximum voltage the inverter can handle from the solar panels. You need to strictly stay within this limit. Typically, for many Chinese inverters, this value ranges between 450 and 500 volts. Exceeding this voltage under any circumstances is not allowed. There are also low-voltage inverters, sometimes called apartment inverters, where the maximum voltage might be around 140 volts, designed for balcony panels, but that’s not the focus here. The same specification table also shows the minimum voltage at which the inverter operates.
Read also:
- Bigme B7 Review: When an E-Reader Tries to Be a Tablet – and Actually Pulls It Off
- Motorola Edge 50 Ultra: What the Qualcomm Snapdragon 8s Gen 3 Is Really Capable Of
- Once the operating voltage range of the inverter is determined, the next step is to check the panel specifications. The key parameter here is OCV (Open Circuit Voltage), also known as the open-circuit voltage. Manufacturers may use different terms for this, but to avoid confusion, it refers to the highest voltage listed in the panel’s specifications. For example, in my Longi Solar LR7-72HGD 600M panels, this number is clearly indicated, making it easy to identify.
Another important point is that in cold, sunny weather – such as during winter – the open-circuit voltage of the panel will inevitably be slightly higher due to physical factors. This means the voltage can exceed the maximum MPPT voltage limit of your inverter. There’s a straightforward way to account for this increase. If you live north of a city like Cherkasy, add about 18% to the panel’s open-circuit voltage rating. For locations south of Cherkasy but roughly up to Nikopol, add 16%. And if you’re south of Nikopol, add 14%.
Next is a simple calculation: divide the inverter’s maximum MPPT voltage by the adjusted open-circuit voltage of the panel (after adding the percentage for temperature compensation). This gives you the number of panels you can safely connect. For example, if the inverter’s maximum MPPT voltage is 500 V and the Longi Solar LR7-72HGD 600M panel’s voltage is 52.34 V multiplied by 1.18 (to account for cold conditions), the result is about 61.76 V. Dividing 500 V by 61.76 V gives approximately 8.1, meaning you should not connect more than 8 panels to the inverter’s controller.
At the same time, it’s important to consider the inverter’s minimum voltage limit. By dividing this minimum voltage by the panel’s adjusted open-circuit voltage, you can find the minimum number of panels needed to get any meaningful output. In my case, that’s 120 V divided by 61.76 V, which equals about 1.94 panels. Practically, this means you should have at least two, preferably three panels. My kitchen roof can physically fit four Longi Solar LR7-72HGD 600M panels. This number is below the calculated maximum of eight panels and above the minimum of two to three, so four panels is a suitable choice.
3. MPPT current is another important parameter to keep in mind. Try not to exceed the inverter’s maximum MPPT current. If the total current from the panels is higher than what the inverter can handle, the inverter will simply limit the excess. This means you won’t get the full power output you expected. In practical terms, one or more panels may be underutilized, which isn’t critical but can be frustrating, especially since you’ve already invested in those panels.
What you need to install
Here comes the least interesting part: ordering the panels along with all the accessories and mounting hardware. Of course, if you really want to and know how to work with welding equipment, you could build the entire frame yourself. But since I don’t have the skill or the tools for welding, I decided to order ready-made mounting brackets.
My mounting system doesn’t have any tilt adjustment, meaning the panels are fixed without the option to change their angle.
You’ll also need solar cable with a conductor cross-section of 6 mm². I didn’t order the cable myself because I decided to do things properly (only just now) and hired a professional with a lot of experience to install all four of my panels. So, the cost of the cable was included in the installation price.
One important piece of advice: either order a complete, pre-assembled solar power system from the start – which is actually the best option since the components will already be tested together and installed turnkey – or plan for a larger number of panels. Installing just four panels is a very small job, and it can be quite difficult to find a qualified installer who has availability and is willing to take on such a small project. I’m serious about this. I spent about a month and a half looking because installers would cancel after agreements, charge exorbitant prices for installing a single panel, or be delayed by weather and other factors.
Read also:
- Huawei FreeBuds Pro 4 Review: Possibly the Best All-Around TWS Earbuds for Everyday Use
- YUNZII AL68 Review: Solid, Affordable Keyboard with Aluminum Сase
What this set is enough for
A common question is about the inverter’s mode. I set mine to SUB mode, which prioritizes solar energy to power all loads as long as it’s available. If solar power isn’t sufficient or completely unavailable (like at night), the system draws power from the external grid. And if the grid goes down as well, it switches to battery power.
There is also an SBU mode, where the roles of the battery and the grid are reversed. This mode is more suitable if you’re not concerned about preserving battery capacity and your solar generation consistently exceeds your consumption, or if your home doesn’t have access to the external grid at all.
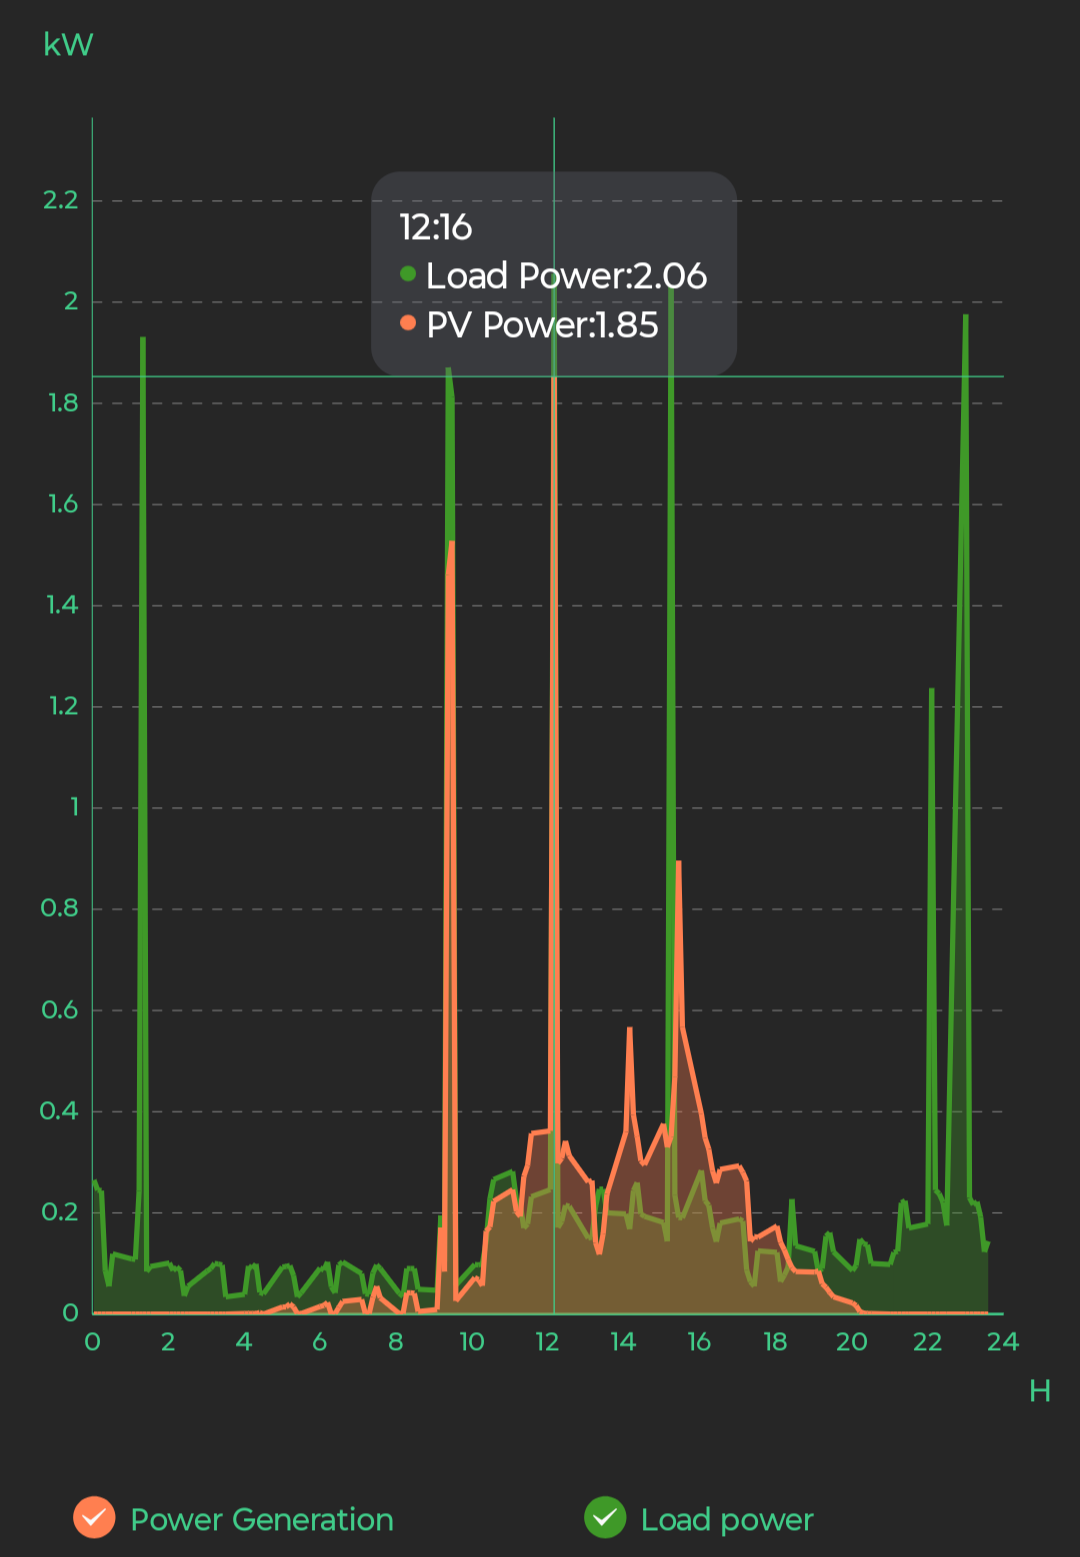
So, what can this setup handle? A 5.12 kWh battery paired with four 600 W panels is more than enough to charge something like an EcoFlow flexible panel. On a sunny summer day, this panel array – without relying on battery reserves – can easily power appliances like an electric kettle, washing machine, or induction cooktop.
If you turn on all those appliances at once, the battery will simply kick in to cover the shortfall. Once the heavy loads are turned off, the battery quickly recharges to 100% using the solar panels. So, on sunny days, I can already disconnect from the external grid and rely entirely on solar power and the battery. In fact, I sometimes do this intentionally to give the battery a full discharge and recharge cycle, since it often just sits fully charged without much use.
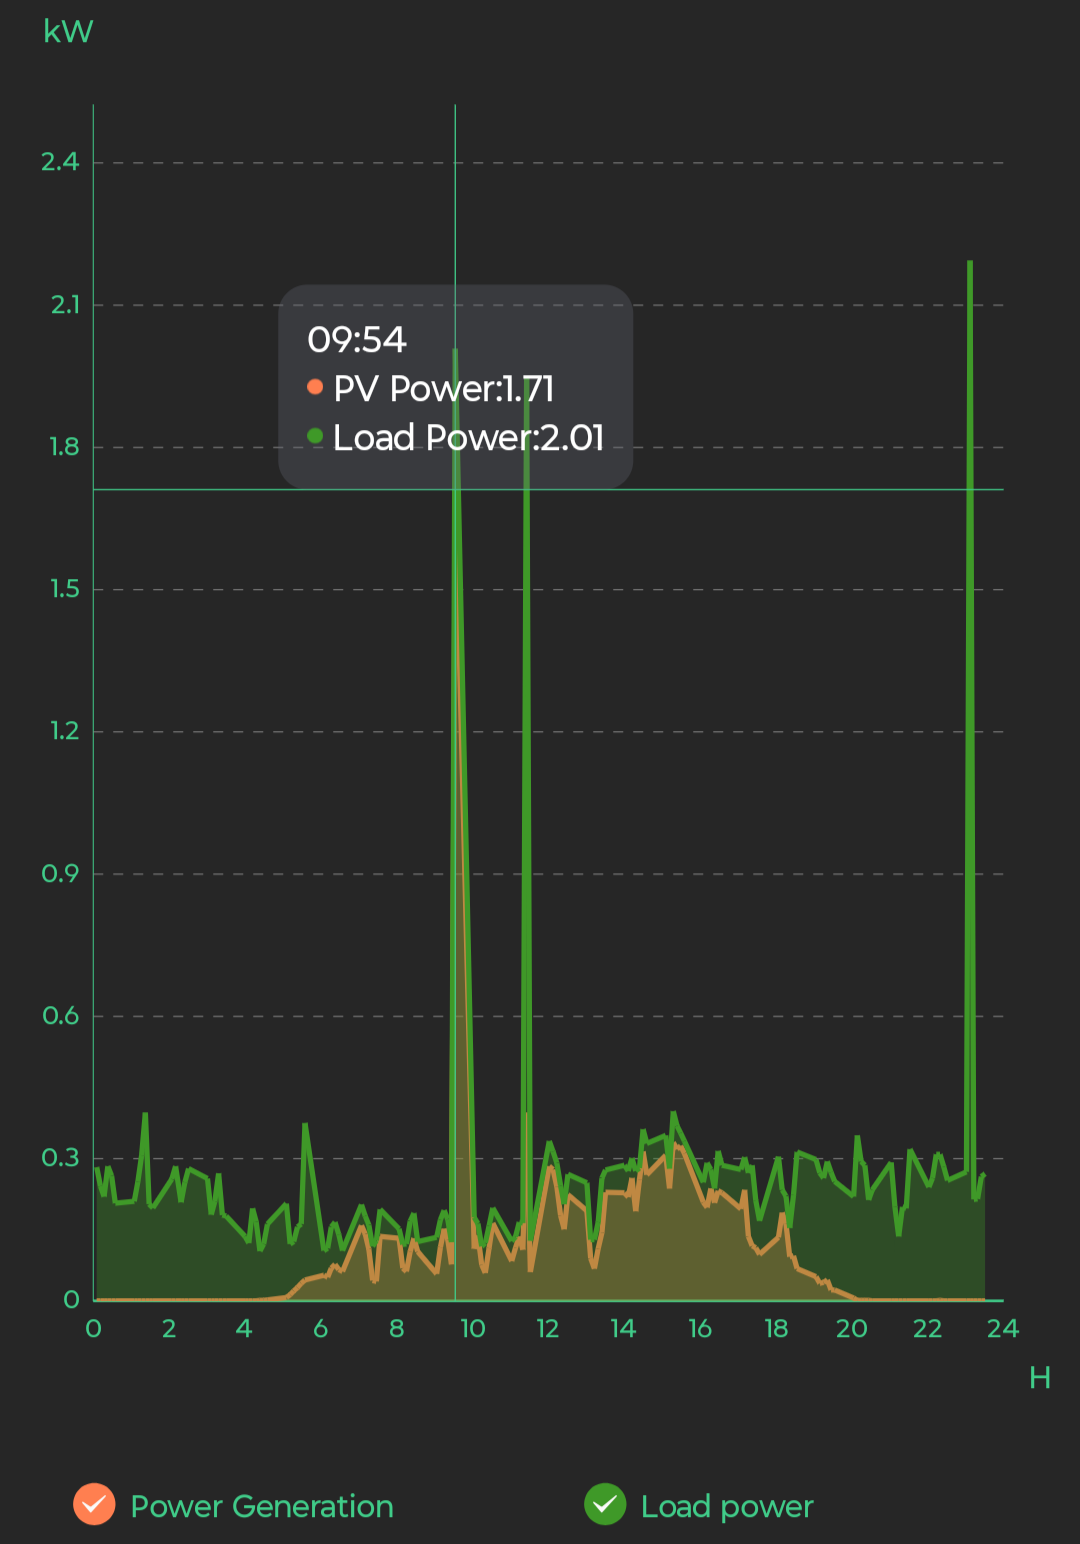
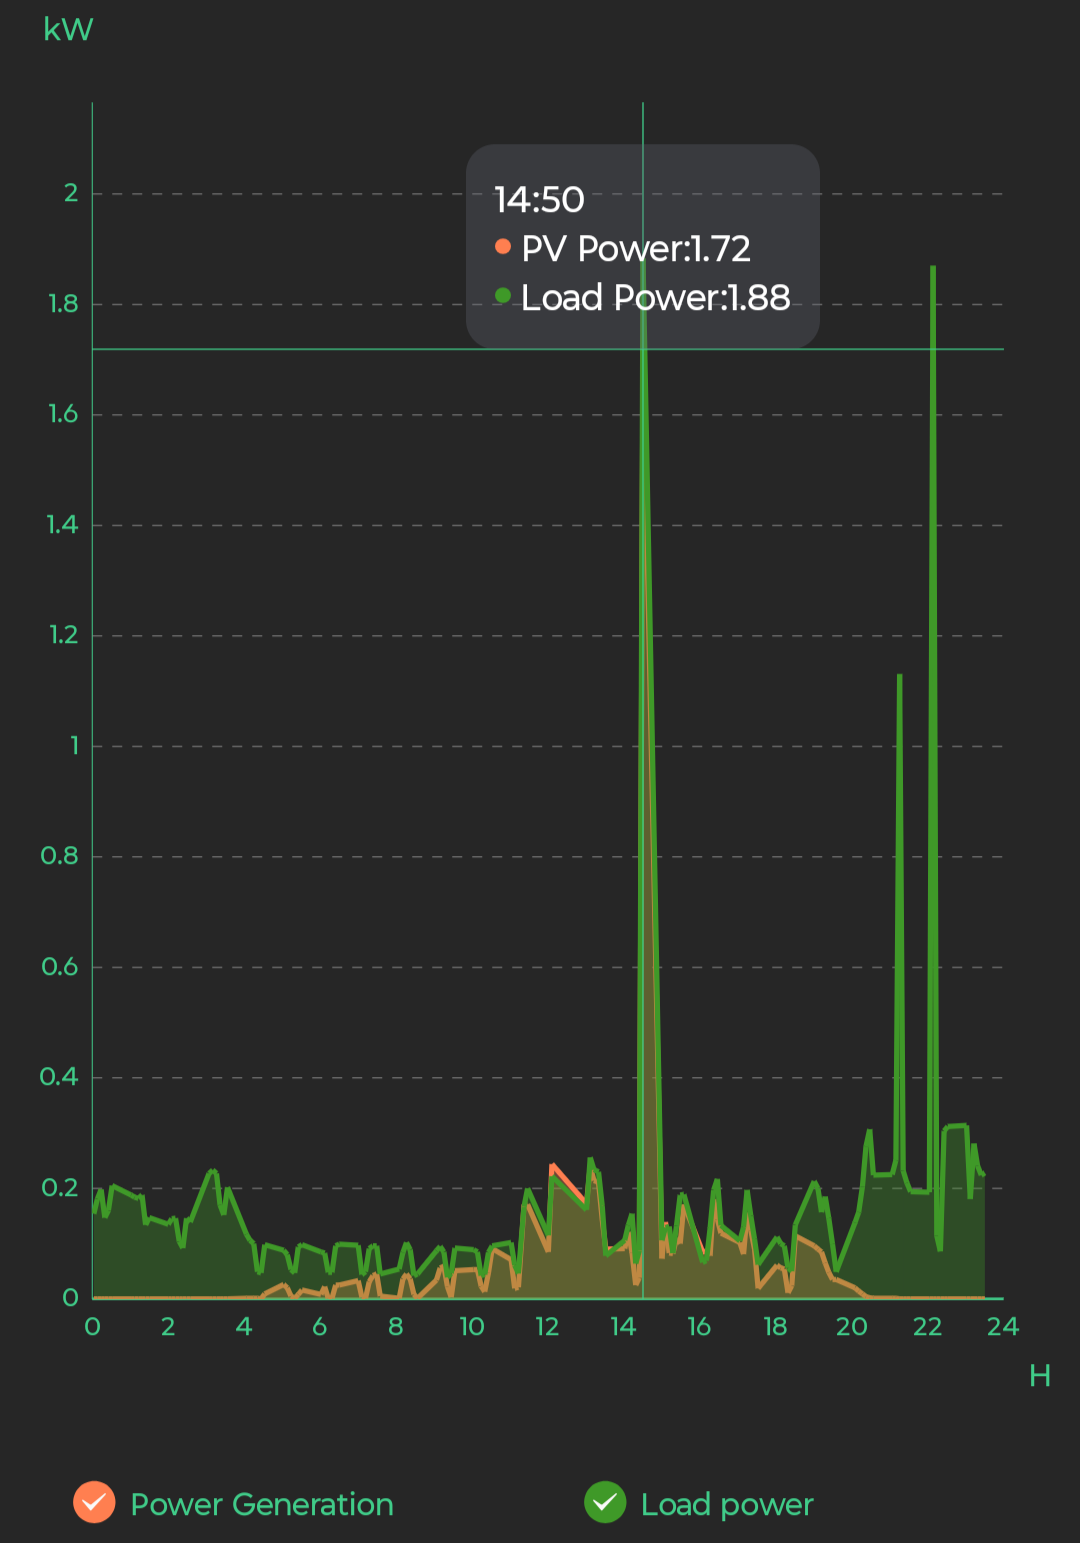
When there’s little sunlight, the system won’t be able to cover the load of heavy appliances fully. Even so, it provides enough power for average consumption around 200–300 Wh. This gives me confidence that during winter, at least, my children will have heat and lighting.
It’s important to understand that solar generation is highly variable – it starts in the morning and ends in the evening. Because of this, an additional energy source is essential, whether it’s the external grid or a battery. If your budget allows, it’s best to choose the largest battery you can afford.
Service
I was asked about this, so I’ll honestly include it here. Specifically, questions about how to clean and maintain the system, what to do with snow, and whether connections, batteries, and the inverter need regular checks.
In my opinion, the idea of “installing new equipment and then forgetting about it” doesn’t apply to solar power systems – at least not when it comes to the panels. They require regular maintenance.
Yes, the photovoltaic surface of the panels requires maintenance – specifically, cleaning with a water spray. Cleaning agents are unnecessary. This should be done regularly, at least once a month or after events like dust storms. In winter, if your panels are installed at a low angle (like mine), after snowfall – and if no warming is expected the same or next day – you’ll need to clear the snow manually. It’s a good idea to prepare a long-handled brush in advance, especially if roof access is difficult. Planning access to the panels should be done before installation – not after – because you will have to get up there at some point, and it’s best to ensure there’s space to move safely.
Regarding panel connections – if quality connectors and proper 6 mm² cable were used, you generally don’t need to touch them. Occasional visual inspections to confirm everything is intact and connected as it should be are sufficient. These connections won’t just come loose on their own. However, if you’ve used poor-quality wiring or mixed different metals in the connections, that’s a serious mistake. In that case, I’d advise you to stop and reconsider, because that kind of setup isn’t maintenance – it’s a recipe for ongoing problems and potentially severe damage to your equipment down the line.
Read also:
- SteelSeries Apex Pro Mini – So Good It’s Almost Cheating
- Cubot KingKong Power 5 Review: Rugged, Durable, and Budget-Friendly
When it comes to the battery and inverter, it’s pretty straightforward. If these were installed as part of a complete solar power system, the same company or team that set it up should handle maintenance and troubleshooting. Often, they have remote access through an app to monitor the inverter’s and battery’s status. If you selected and installed the equipment yourself, then you’re responsible for its operation. Avoid opening or disassembling the inverter or battery – there’s no need to do that. Just keep them clean by wiping off dust and keep an eye on their condition. These are the kind of devices where the saying “if it’s working, don’t touch it” really applies.
What is the approximate budget and is it worth spending the entire amount at once
Let’s estimate a rough budget for the entire solar power system if you decide to buy everything yourself and then hire an installer separately:
- Inverter: approximately $450
- Battery, at least 5 kWh capacity: around $1,400 to $1,900
- Solar panel, for example, a 600 W bifacial Longi Solar LR7-72HGD 600M: about $100 each
- Solar cable: roughly $1.40 per meter
- Circuit breaker (installed between panels and inverter)
- Installation: roughly $45 to $90 per panel, depending on the region
So, if you’re planning to install a system similar to mine – a 5.5 kW inverter, a 5 kWh battery, and four 600 W panels – which is a relatively straightforward setup in terms of generation (any professional will tell you that), you can roughly estimate the total cost including installation by qualified technicians or even without it. Yes, it’s not cheap, even though component prices have dropped significantly compared to six months ago. But in a world where Russia is still committing genocide against Ukrainians, having peace of mind about your family’s energy independence is definitely worth it. If you can’t afford the entire amount upfront, consider starting with an energy storage system. Like I did, either with two separate components or an all-in-one unit – like the one I installed for my parents – which is basically “install and forget.” After that, you can start thinking about adding generation capacity.
One more thing: I’ve come to realize it’s best to leave the selection of components and materials to trained professionals to minimize the risk of mistakes. If I were to start a solar power system from scratch now, I’d probably order a ready-made solution with basic specifications. But since initially my goal was only to install an energy storage system, things turned out the way they did – which is why I decided to write this article. In my case, I only needed to buy panels, mounting hardware, and pay for installation, so that approach made sense.
Conclusions
Here’s a common question I often hear from people unfamiliar with solar power – and my answer to it:
“Why install solar panels at all? They never really pay off, or you need to install a huge number of them to make it worthwhile.”
But who said that payback is the main reason for installing a small solar system? For me, it’s about significantly increasing the home’s energy autonomy. Even without the grid and without solar panels, my 5 kWh battery was enough to keep things running for more than half a day without noticing a power outage. In fact, there were times when I missed the power cuts at night because I didn’t hear the inverter beep. In the morning, I’d prepare breakfast for my kids and wife on the induction cooktop, with the heating system, fridge, lighting, and router all running continuously. I even cooked lunch on the same stove, and only when the power returned did I realize from the inverter beep that I had been running entirely off the battery. With these four panels, which can generate up to about 1.9 kWh under load on a sunny summer day (Longi is indeed a solid manufacturer), and around 600–700 W during winter sunlight, my energy autonomy improves significantly. Since my home’s average consumption is around 200–300 Wh when high-power appliances like the electric kettle aren’t running, the battery can recharge during that time. So yes, I’m satisfied with the setup.
But be aware – once you start exploring solar generation, you’ll likely want more and more. It’s like getting a tattoo. My next step to increase energy autonomy will probably be adding another 5 kWh battery (or replacing the current one with a larger capacity), upgrading the inverter to a model with two MPPT controllers, and adding a second string of panels – maybe on the gazebo roof, though that’s not certain yet. With this setup, I could completely disconnect from the external grid and stop worrying about electricity bills altogether.
And a quick note on savings. Even though cost reduction isn’t the primary reason for installing panels, they do help save some money. I wouldn’t count on full payback unless electricity prices skyrocket, but every bit helps. Here are a few examples that might not be obvious at first:
From what the panels generated on the roof – in April, our family of two adults, two kids, and a cat (can’t forget the furry troublemaker) saved 75.12 kWh. At mid-2025 electricity prices, that’s about $8. I joke that it’s like a “solar cashback.” And that’s with the external grid still connected. For the first half of 2025, the total savings reached 315 kWh.
2. Now imagine this: you work from home and get paid for it, but when the power goes out, your work stops and so does your income. In that case, can you consider the money you “earned” thanks to your solar system as savings? Absolutely – you can count it as savings from having a reliable power source.
3. Or here’s a more straightforward example: friends or family come over to relax, it’s evening, and the power goes out. Sure, you could use string lights powered by a power bank or cook on a gas burner if your stove is electric. But having electricity and all its conveniences makes things much easier and more comfortable. So, ask yourself – how much would you be willing to pay in that moment to get the power back on? You can count that amount as money saved or earned thanks to your solar system. Of course you can. The problem is people usually only think about these situations after they happen, not before. Don’t be like that. Plan ahead.
This article is the account of someone independently exploring the world of energy storage and generation systems. If you have any specific questions, feel free to ask in the comments. Thank you.
We also recommend reading:
- DLSS vs FSR: It’s Actually Quite Simple
- Gabe Newell’s Starfish Neuroscience Сhallenges Neuralink
- What You Need to Know Before Buying a Multimedia Projector